Add Pet Adoption Agreement eSign with airSlate SignNow
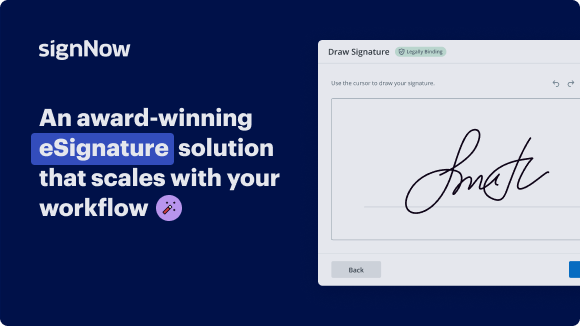
Award-winning eSignature solution


Improve your document workflow with airSlate SignNow
Versatile eSignature workflows
Instant visibility into document status
Simple and fast integration set up
Add pet adoption agreement eSign on any device
Comprehensive Audit Trail
Strict protection requirements
See airSlate SignNow eSignatures in action


airSlate SignNow solutions for better efficiency
Our user reviews speak for themselves


Why choose airSlate SignNow
-
Free 7-day trial. Choose the plan you need and try it risk-free.
-
Honest pricing for full-featured plans. airSlate SignNow offers subscription plans with no overages or hidden fees at renewal.
-
Enterprise-grade security. airSlate SignNow helps you comply with global security standards.

Your step-by-step guide — add pet adoption agreement eSign
Using airSlate SignNow’s eSignature any business can speed up signature workflows and eSign in real-time, delivering a better experience to customers and employees. add Pet Adoption Agreement eSign in a few simple steps. Our mobile-first apps make working on the go possible, even while offline! Sign documents from anywhere in the world and close deals faster.
Follow the step-by-step guide to add Pet Adoption Agreement eSign:
- Log in to your airSlate SignNow account.
- Locate your document in your folders or upload a new one.
- Open the document and make edits using the Tools menu.
- Drag & drop fillable fields, add text and sign it.
- Add multiple signers using their emails and set the signing order.
- Specify which recipients will get an executed copy.
- Use Advanced Options to limit access to the record and set an expiration date.
- Click Save and Close when completed.
In addition, there are more advanced features available to add Pet Adoption Agreement eSign. Add users to your shared workspace, view teams, and track collaboration. Millions of users across the US and Europe agree that a system that brings people together in one cohesive workspace, is the thing that enterprises need to keep workflows performing easily. The airSlate SignNow REST API enables you to integrate eSignatures into your application, internet site, CRM or cloud storage. Try out airSlate SignNow and enjoy quicker, easier and overall more effective eSignature workflows!
How it works
airSlate SignNow features that users love


Get legally-binding signatures now!
FAQs
-
How do I create a signature in airSlate SignNow?
Open your PDF with airSlate SignNow Reader DC. On the right-hand side, select Fill & Sign. Select Sign in the Fill & Sign menu. Choose Add Signature or Add Initials. -
How do I create an airSlate SignNow document?
How to create templates with airSlate SignNow Get started with the click of a button. Upload a document to your airSlate SignNow account by clicking Upload Document. Prepare your master document. Open the uploaded document in the editor by double-clicking on it. ... Create a template with the click of a button. -
How do I create my own digital signature?
The simplest and most straightforward way to create a digital signature is to simply sign your name using a pen, take a photo of it, and upload it to a digital device. -
Is airSlate SignNow legally binding?
airSlate SignNow documents are also legally binding and exceed the security and authentication requirement of ESIGN. Our eSignature solution is safe and dependable for any industry, and we promise that your documents will be kept safe and secure.
What active users are saying — add pet adoption agreement eSign


Related searches to add Pet Adoption Agreement eSign with airSlate SignNow

Test e sign order
[Music] hello and welcome to a new video of learn salesforce series in this video today we'll be looking into how we can install and configure adobe sign application into salesforce also we'll see how we can manually generate agreements and send them for the e-signature process so let's get started first go to app exchange and search for adobe sign click on the first option that says adobe sign for e-signature so once you are on the app page you have to click get it now here it will ask where do you want to install this package since i'll be using uh one of my developer arc for this demo so i'll choose install in production you can confirm the installation details and click confirm and install here it will ask to enter the account credentials so once you login you will see a screen where you have an option to install this package for admin for all users and for specific profiles so for now i'll i'll be choosing install for all users and click install so the installation process has started and it would take around 5 to 10 minutes for this com for this to get completed now the app has been successfully installed and you can verify that by going to setup in installed packages as you can see we do have adobe sign with version number 22.11 now next step is to configure and connect adobe sign account with salesforce so to do that we have to go to adobe sign for salesforce app so you can go to app launcher first click view all at the end you will see adobe sign for salesforce click on that now go to adobe sign admin tab it will automatically open a new tab uh with the salesforce setup wizard so this is basically a two-step process uh with step one is to link your adobe sign account to salesforce so for that we have to click sign into adobe [Music] here it will ask you to enter the adobe sign account credentials so let me do that click continue now it will ask you to login to salesforce again to complete the authentication process so let's just enter the salesforce account credentials again so as you can see step one is uh completed and we have successfully authorized our adobe account now uh click on next so step two is to basically enable adobe sign automatic status updates this is basically necessary to retrieve and display the latest status of adobe sign agreements in salesforce so for instance whenever an agreement is sent out for signature or whenever a recipient signs an agreement so the status of the agreements automatically update into salesforce so for that to work we have to keep this setting uh to enable and if the setting is not enabled uh the automatic status update won't work so keep that in mind so click on unable and we have to allow the access for it so click allow now step 2 is also completed now click next so now the setup is completed so we have successfully configured our adobe sign account with salesforce now you can click done uh now we will see how we can generate agreements and send them for the e-signature process so for that we have to go to adobe sign for salesforce app again so from app launcher click view all go to adobe sign for salesforce app and now you can go to agreements tab and click new so here you have a bunch of options uh to select from so first is to select the recipients so uh we can set the recipients as contacts lead user group or email so for now i'm just using the email and using my email address so i'll be receiving uh the agreement uh for signature uh in this email address so next step is for the identity verification so we'll keep all recipients at as email in the details you can enter uh the subject and the message of the agreement so for now i'll be using adobe sign test agreement and for the message i'm using test agreement you can also relate a a particular agreement with account opportunity or a contract so for now i'm just leaving these as blank and under the file section we have an option to upload our document so i have already created one simple uh document with some basic fields to fill from so basically we would want the signer to fill the details and sign that particular document so i'll choose upload that from my computer so uh at the end you will see a check box for preview and add signatures field so check that and click next so as you can see uh we do have now a preview of the a document we have uploaded and we want this document to get signed by the recipient so uh i have entered four fields a name email phone and address so basically we want these fields to get to fill uh from the signer and we want this document assigned back into salesforce so i'll add some fields of drag and drop some fields to fetch the data so uh on the data fields i'm using a basic text input [Music] and for signature go to signature fields and drag and drop the signature field tag so now it looks good uh now we have successfully entered the tags and now click on send click ok so the agreement has been uh out for signature successfully as you can see from here the status is out for signature and now let me just open my mailbox and check for an email so i have received the email from adobe sign for the signature process so let me open that and as a signer we have to click review and sign so let me just open this link in a new tab so this will be uh the view of the signer so we have four options to input the data and one signature tag so let me just input some of the test data so to complete the signature process uh we have to click to sign button so now uh the agreement has been signed successfully now let's just go back to salesforce and check for the agreement status as you can see here the agreement status has been changed from out for signature to signed also you will be able to see at the sign pdf and you can download the sign pdf from here so as you can see we have all the uh input data that the signer has added with the signature so yeah in this way you can send agreements for the e-signature process thank you for watching [Music] [Applause] [Music] [Applause] [Music]
Show more