Add Sponsorship Letter eSign with airSlate SignNow
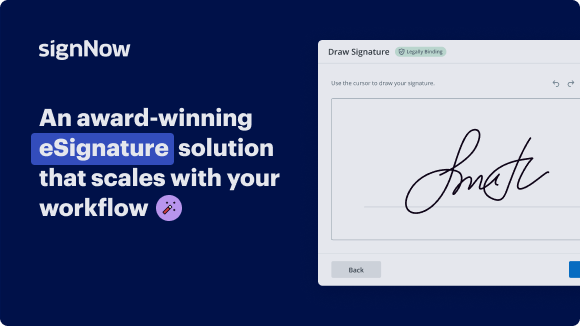
Award-winning eSignature solution


Improve your document workflow with airSlate SignNow
Versatile eSignature workflows
Instant visibility into document status
Simple and fast integration set up
Add sponsorship letter eSign on any device
Detailed Audit Trail
Strict safety standards
See airSlate SignNow eSignatures in action


airSlate SignNow solutions for better efficiency
Our user reviews speak for themselves


Why choose airSlate SignNow
-
Free 7-day trial. Choose the plan you need and try it risk-free.
-
Honest pricing for full-featured plans. airSlate SignNow offers subscription plans with no overages or hidden fees at renewal.
-
Enterprise-grade security. airSlate SignNow helps you comply with global security standards.

Your step-by-step guide — add sponsorship letter eSign
Using airSlate SignNow’s eSignature any business can speed up signature workflows and eSign in real-time, delivering a better experience to customers and employees. add Sponsorship Letter eSign in a few simple steps. Our mobile-first apps make working on the go possible, even while offline! Sign documents from anywhere in the world and close deals faster.
Follow the step-by-step guide to add Sponsorship Letter eSign:
- Log in to your airSlate SignNow account.
- Locate your document in your folders or upload a new one.
- Open the document and make edits using the Tools menu.
- Drag & drop fillable fields, add text and sign it.
- Add multiple signers using their emails and set the signing order.
- Specify which recipients will get an executed copy.
- Use Advanced Options to limit access to the record and set an expiration date.
- Click Save and Close when completed.
In addition, there are more advanced features available to add Sponsorship Letter eSign. Add users to your shared workspace, view teams, and track collaboration. Millions of users across the US and Europe agree that a system that brings people together in one cohesive work area, is what businesses need to keep workflows functioning efficiently. The airSlate SignNow REST API allows you to embed eSignatures into your application, internet site, CRM or cloud. Try out airSlate SignNow and enjoy faster, smoother and overall more effective eSignature workflows!
How it works
airSlate SignNow features that users love


Get legally-binding signatures now!
FAQs
-
How do I put my signature on eSign?
Click review and sign link in email. Click review and sign link in email. In the email you received from the sender of the document to sign, click the link labeled “Click here to review and sign...” ... Click prompt in document. ... Create electronic signature. ... Select signature option. ... Sign document. ... Finalize signature. ... Send. -
How do I add a signature on airSlate SignNow?
Open your PDF with airSlate SignNow Reader DC. On the right-hand side, select Fill & Sign. Select Sign in the Fill & Sign menu. Choose Add Signature or Add Initials. -
How do I send a document to multiple recipients in airSlate SignNow?
Turn your document into a template by clicking More >> Make Template. Once you've finished editing, close the document. Then, click More and select Bulk Invite from the menu. In the invite window, enter your recipients' emails. -
How do I add multiple signatures?
Sign using airSlate SignNow Open your document with airSlate SignNow. Select File and Request signatures. Add the email addresses of the signers and click Specify where to sign. Click the relevant area of the document to place signature fields. ... Once you have finished, click Send to email the recipients. -
How do I add documents to eSign?
How do I create an eSign document? Create a free account. Upload the document you want to sign. Drag and drop your signature onto the document. Email the document. -
How do you add multiple signers to airSlate SignNow?
How to add multiple signers to a document with airSlate SignNow. If you need more than one person to sign your document, simply add more signers to your eSignature invite and provide the necessary fields in the document for all your recipients to fill out. -
How do you add signers to airSlate SignNow?
Open your document in the airSlate SignNow editor and click Edit Signers. Add signers by clicking the blue silhouette icon. You can customize signer names and add their email addresses in the corresponding fields (or leave them blank).
What active users are saying — add sponsorship letter eSign


Related searches to add Sponsorship Letter eSign with airSlate SignNow

Add signature service Admit One Ticket
so starting September 2022 there have been some significant updates to the spousal sponsorship program for Canada number one it's now completely online number two some forms have been updated and finally the signature requirements have been updated okay so all the updated instructions for spousal sponsorship are in this guide 5289 which you can see on the screen here and I'm going to link it in the description below and as you can see right here you now need to apply online sales and Bowl all right so you'll find all the instructions here and if I scroll down here under the complete the application section scrolling down further you can locate the permanent resident online portal so you're going to click this link and you will get to the permanent resident online portal where you will now submit your application remember no more paper based applications it has to be done through this online portal so this is the pr portal where you will submit the application and if you scroll down this is where you'll create your account and you will submit the application through that account so once you sign into the online portal this is what it's going to look like so you're going to scroll down and you are going to to click on start new application and on the next page you are going to select your program so let's select family then category so you can select spouse because we are talking about spouses sponsorship and then under class there are two classes to choose from if you the principal applicant and the sponsor are inside Canada and you're applying for spousal sponsorship from inside Canada meaning an inland application then you should select this class if the principal applicant is outside of Canada meaning you're applying from outside of Canada for spouses sponsorship then you can select the outside Canada class all right and then you can name the application how you like so I'm simply going to keep this name apoorva Mishra PR sponsorship just to make it clear all right and then once you hit continue you'll get to this page this is where you upload all your PDF forms and complete all your digital forms and then you get to the supporting documents section this is where you upload all your documents in their respective categories then you upload your payment receipt this is where you provide the consent so under consent you have to type the principal applicant's name the person being sponsored then this sub button is going to become green that means you can submit the application so before we get into the list of forms always check the guide 5289 to be sure about which forms you have to submit and which forms have been updated the latest versions of every form will be posted on the guide 5289 so if I can take you back to this page real quick under the complete...
Show more