Create Templates, Insert Fields and Sign
Award-winning eSignature solution


Get the robust eSignature capabilities you need from the solution you trust
Select the pro service designed for professionals
Configure eSignature API with ease
Work better together
Create templates insert fields and sign, in minutes
Cut the closing time
Keep important data safe
See airSlate SignNow eSignatures in action


airSlate SignNow solutions for better efficiency
Our user reviews speak for themselves


Why choose airSlate SignNow
-
Free 7-day trial. Choose the plan you need and try it risk-free.
-
Honest pricing for full-featured plans. airSlate SignNow offers subscription plans with no overages or hidden fees at renewal.
-
Enterprise-grade security. airSlate SignNow helps you comply with global security standards.

Your step-by-step guide — create templates insert fields and sign
Create templates, Insert fields and Sign. Get maximum performance from the most respected and secure eSignature solution. Improve your electronic transactions using airSlate SignNow. Optimize workflows for everything from simple personnel records to complex agreements and payment templates.
Understand how to Create templates, Insert fields and Sign:
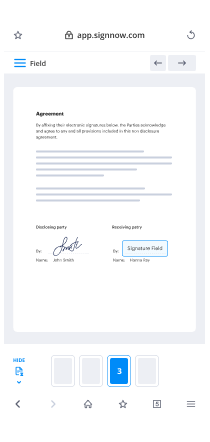
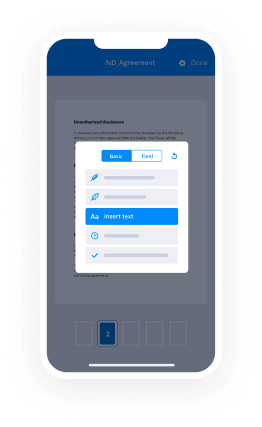
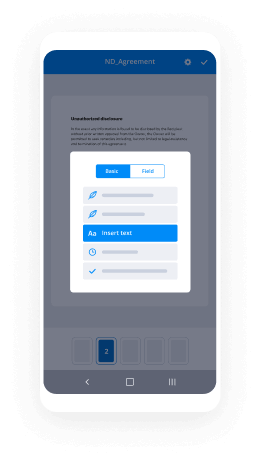
- Upload a few documents from your computer or cloud storing.
- Drag & drop custom fillable boxes (signature, text, date/time).
- Modify the fields size, by tapping it and choosing Adjust Size.
- Place dropdowns and checkboxes, and radio button groups.
- Add signers and create the request for attachments.
- Create templates, Insert fields and Sign.
- Add the formula where you need the field to generate.
- Use comments and annotations for the signers anywhere on the page.
- Save all modifications by simply clicking DONE.
Link up people from outside and inside your organization to electronically access essential documents and Create templates, Insert fields and Sign anytime and on any device utilizing airSlate SignNow. You can monitor every action completed to your templates, receive notifications an audit report. Remain focused on your business and customer partnerships while knowing that your data is accurate and secure.
How it works
airSlate SignNow features that users love


See exceptional results Create templates, Insert fields and Sign
How to submit and sign a PDF online
Check out the quickest way to create templates insert fields and sign. Stay away from paper-based workflows and handle contracts right from airSlate SignNow. Edit and share your documents from your office or effortlessly work on-the-go. No installing or more software necessary. All features can be found online, just go to signnow.com and configure your own eSignature process.
A brief guide on how to create templates insert fields and sign in minutes
- Make an airSlate SignNow account (in the event you haven't registered yet) or log in using your Google or Facebook.
- Click Upload and choose one of the PDF files.
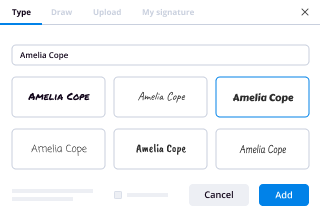
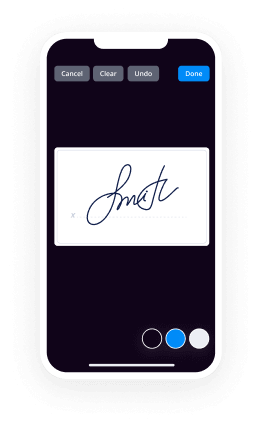
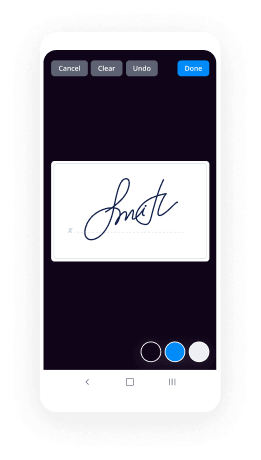
- Use the My Signature instrument to create your unique signature.
- Transform the template in a dynamic PDF with fillable fields.
- Fill in your contract and click Done.
As soon as done, share an invite to sign to multiple people. Receive an enforceable contract within a few minutes applying any device. Find a lot more features for producing professional PDFs; put fillable fields create templates insert fields and sign and collaborate in groups. The eSignature service provides a secure workflow and functions based on SOC 2 Type II Certification. Be sure that your records are guarded and that no person can change them.

How to eSign a PDF in Google Chrome
Are you looking for a service to create templates insert fields and sign directly from Chrome? The airSlate SignNow extension for Google is here now to assist. Find a document and right from your web browser quickly open it up in the editor. Add more fillable fields for text and eSignature. eSign the PDF and share it safely in accordance with GDPR, SOC 2 Type II Certification and more.
Applying this simple how-to guide listed below, broaden your eSignature process into Google and create templates insert fields and sign:
- Go to the Chrome web store and select the airSlate SignNow extension.
- Simply click Add to Chrome.
- Log in to your account or register a new one.
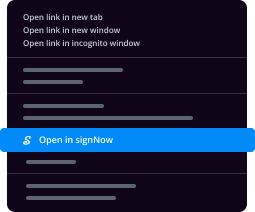
- Add a document and click Open in airSlate SignNow.
- Modify the document.
- eSign the PDF file using the My Signature feature.
- Click on Done to confirm the edits.
- Ask other participants to sign by clicking on Invite to Sign and deciding on their email addresses/names.
Create a signature that's built-in to the processes to create templates insert fields and sign and have PDFs eSigned quickly. Say goodbye to the piles of papers on your desk and start saving time and money for more important tasks. Picking out the airSlate SignNow Google extension is a great convenient decision with a lot of benefits.
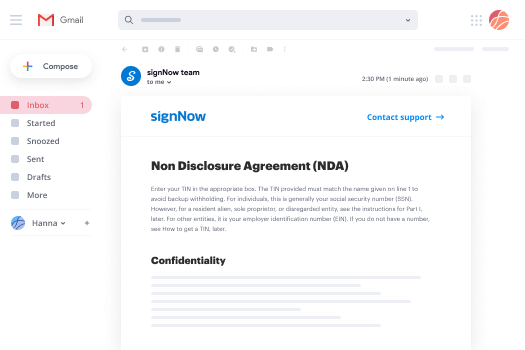
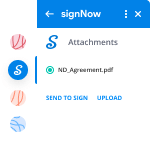

How to eSign an attachment in Gmail
If you're like most, you're used to downloading the attachments you receive, printing them out and after that putting your signature on them, correct? Okay, we have fantastic news for you. Putting your signature on PDF files inside your email just became easier. The airSlate SignNow add-on for Gmail enables you to create templates insert fields and sign without leaving your inbox. Do everything you need; add more fillable fields and share signing links in a couple of clicks.
The best way to create templates insert fields and sign in Gmail:
- Choose airSlate SignNow for Gmail within the from the G Suite Marketplace and then click Install.
- Sign in to your airSlate SignNow profile or create a new one.
- Open up your email with the PDF file you want to eSign.
- Click on Upload if you want to save the PDF file to the airSlate SignNow account.
- Click on Open document to start the editor.
- Sign the PDF file using My Signature.
- Send out a signing request for the other members using the Send to Sign option.
- Enter their email address and press OK.
As a result, the other customers will receive notifications telling them to eSign the document. No need to download the attachment repeatedly, just create templates insert fields and sign in a couple of clicks. This add-one is suitable for users who like concentrating on more essential things instead of burning time for absolutely nothing. Increase your daily monotonous tasks with the award-winning eSignature platform.
How to eSign a PDF on the go with no app
For many service, getting deals done on the go means the installation of an application on your smartphone. We're pleased to say at airSlate SignNow we've created singing on the go faster and simpler by eliminating the necessity for a mobile application. To eSign, open your browser (any mobile browser) and try out direct access to airSlate SignNow and its effective eSignature features. Modify docs, create templates insert fields and sign and a lot more. No installation or additional software needed. Manage your contracts from any place.
Check out our easy guide that teach you the best way to create templates insert fields and sign.
- Start your internet browser and visit signnow.com.
- Sign in or create a new account.
- Upload or open up the PDF file you need to edit.
- Insert fillable fields for text, eSignature and date/time.
- Draw, type or upload your signature.
- Click on Save and Close.
- Just click Invite to Sign and enter in a recipient's electronic address if you need others to sign the PDF file.
Close deals with mobile is no different than with a computer: make a reusable template, create templates insert fields and sign and manage the process as you would normally. In a couple of clicks, receive an enforceable contract that you can download to your device and share to others. Yet, if you truly want an application, download the airSlate SignNow mobile app. It's secure, fast and has an incredible interface. Take advantage of in effortless eSignature workflows from the office, in a taxi or on a plane.
How to sign a PDF file using an iPhone
iOS is an extremely popular operating system packed with native tools. It enables you to sign and change PDFs making use of Preview without the extra application. Even so, as wonderful as Apple's option is, it doesn't give any automation. Improve your iPhone's functionality by using the airSlate SignNow app. Use your iPhone or iPad to create templates insert fields and sign and a lot more. Bring in eSignature automation to your mobile processes.
Putting your signature with an iPhone has never been easier:
- Get the airSlate SignNow iPhone app from the AppStore and set it up.
- Create a new account or sign in along with your Facebook or Google.
- Simply click Plus and upload the document you wish to sign.
- Click on the PDF exactly where you want to put your signature.
- Discover other tools: put fillable fields or create templates insert fields and sign.
- Click on Save option to make the adjustments.
- Send out your PDF files via mail or using a singing link.
Create a professional-looking PDFs right from your airSlate SignNow app. Get the most from your time and work from just about anywhere; at home, in your office, on a bus or airplane, as well as at the beach. Manage a full PDf file workflow seamlessly: create reusable templates, create templates insert fields and sign and work on documents with partners. Transform your device into a highly effective enterprise instrument for executing contracts.
How to sign a PDF taking advantage of an Android
For Android users to deal with contracts from the phone, they have to find and install extra software program. The Play Market is large and plump with choices, so choosing a great software isn't a challenge when you have time to read through numerous apps. To save lots of time as well as protect against stress, we propose airSlate SignNow for Android. Store and change documents, create signing roles, and also create templates insert fields and sign.
The 9 simple actions to improving your smartphone workflow:
- Open the mobile app.
- Sign in using your Facebook or Google accounts or register if you haven't authorized yet.
- Select + to upload your record taking advantage of your camera, internal or cloud storages.
- Click anyplace on your PDF and put your eSignature.
- Just click OK to agree and sign.
- Experience a lot more enhancing features; include pictures, create templates insert fields and sign, create a reusable template, and so on.
- Click Save to apply changes when you finish.
- Download the PDf file or send out it through mail.
- Use the Invite to sign tool if you wish to set And send out a signing order to recipients.
Turn the mundane and monotonous work into simple and smooth using the airSlate SignNow mobile app for smartphone. Sign and send documents for signature from any place you're connected to the internet. Create professional-looking PDFs and create templates insert fields and sign with a few clicks. Created a flawless eSignature workflow with only your smartphone and boost your overall efficiency.
Get legally-binding signatures now!
FAQs
-
How do I create a fillable form in Word 2019?
Step 1: Show Developer tab. To do this click on File tab> Options> Customize Ribbon. ... Step 3: Add Content to the form. Go to Developer tab and then Design mode and you can then insert the controls that you want. ... Step 5: Add Instructional text to the form. Customize it by clicking on Developer tab and then Design Mode. -
How do I create a template in Word 2019?
Create a new document or open a document with styles that you can recycle. On the File tab, choose Save As. The Save As window opens. Click This PC. Click the Browse button. ... Open the Save As Type menu and choose Word Template. ... Enter a name for your template. Click the Save button. -
How can I create a template?
Click the File tab, and then click New. Under Available templates, click New from existing. Click a template or a document that is similar to the one that you want to create, and then click Create New. -
How do I make my own template in Word?
Open the document. Add, delete, or change any text, graphics, or formatting, and make any other changes that you want to appear in all new documents that you base on the template. On the File menu, click Save As. On the Format pop-up menu, click Word Template (.dotx). -
How do I create a template in Word 2016?
Open or create the document, one that has styles or formats or text that you plan to use repeatedly. Strip out any text that doesn't need to be in every document. ... Click the File tab. On the File screen, choose the Save As command. ... Click the Browse button. ... Type a name for the template. -
How do you create a fillable form in Word?
Enable Developer Tab. Open Microsoft Word, then go to the File Tab > Options > Customize Ribbon > check the Developer Tab in the right column > Click OK. ... Insert a Control. ... Edit Filler Text. ... Customize Content Controls. -
How do I make a fillable form in Word?
Enable Developer Tab. Open Microsoft Word, then go to the File Tab > Options > Customize Ribbon > check the Developer Tab in the right column > Click OK. ... Insert a Control. ... Edit Filler Text. ... Customize Content Controls. -
How do I create a fillable form in Word 2019?
Step 1: Show Developer tab. To do this click on File tab> Options> Customize Ribbon. ... Step 3: Add Content to the form. Go to Developer tab and then Design mode and you can then insert the controls that you want. ... Step 5: Add Instructional text to the form. Customize it by clicking on Developer tab and then Design Mode. -
How do I make a fillable form in word and not editable?
Add the Developer tab. Select the "File" tab, click "Options" and choose "Customize Ribbon." ... Add content controls. ... Add properties to the control. ... Add instructional text if you want to provide instructions, tips or other information for the control. ... Protect the document so it is not editable. -
How do you create forms in Word?
Click the File tab. Click New. Search for Forms in the Templates search box. Click the form that matches the type you want to create. Click Download if you're using Word 2010, or Create if you're using Word 2013 or 2016.
What active users are saying — create templates insert fields and sign


Related searches to Create templates, Insert fields and Sign
Frequently asked questions
How do you generate a document and apply an electronic signature to it?
How do I eSign in MS Word?
How do you ask people to sign PDF documents?
The ins and outs of eSignature


Find out other create templates insert fields and sign
- Empowering your workflows with Artificial intelligence ...
- Empowering your workflows with Artificial intelligence ...
- Empowering your workflows with Artificial intelligence ...
- Empowering your workflows with Artificial intelligence ...
- Empowering your workflows with Artificial intelligence ...
- Empowering your workflows with Artificial intelligence ...
- Empowering your workflows with Artificial intelligence ...
- Empowering your workflows with Artificial intelligence ...
- Empowering your workflows with Artificial intelligence ...
- Empowering your workflows with Artificial intelligence ...
- Empowering your workflows with Artificial intelligence ...
- Empowering your workflows with Artificial intelligence ...
- Empowering your workflows with Artificial intelligence ...
- Empowering your workflows with Artificial intelligence ...
- Empowering your workflows with Artificial intelligence ...
- Empowering your workflows with Artificial intelligence ...
- Empowering your workflows with Artificial intelligence ...
- Empowering your workflows with Artificial intelligence ...
- Empowering your workflows with Artificial intelligence ...
- Empowering your workflows with Artificial intelligence ...