Lots Fill Byline with airSlate SignNow
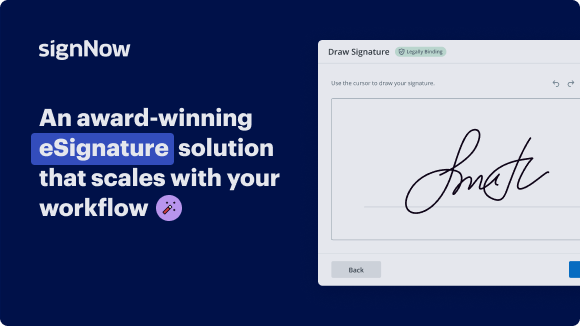
Award-winning eSignature solution


Do more on the web with a globally-trusted eSignature platform
Standout signing experience
Robust reports and analytics
Mobile eSigning in person and remotely
Industry rules and compliance
Lots fill byline, faster than ever
Useful eSignature add-ons
See airSlate SignNow eSignatures in action


airSlate SignNow solutions for better efficiency
Our user reviews speak for themselves


Why choose airSlate SignNow
-
Free 7-day trial. Choose the plan you need and try it risk-free.
-
Honest pricing for full-featured plans. airSlate SignNow offers subscription plans with no overages or hidden fees at renewal.
-
Enterprise-grade security. airSlate SignNow helps you comply with global security standards.

Your step-by-step guide — lots fill byline
Using airSlate SignNow’s eSignature any business can speed up signature workflows and eSign in real-time, delivering a better experience to customers and employees. lots fill byline in a few simple steps. Our mobile-first apps make working on the go possible, even while offline! Sign documents from anywhere in the world and close deals faster.
Follow the step-by-step guide to lots fill byline:
- Log in to your airSlate SignNow account.
- Locate your document in your folders or upload a new one.
- Open the document and make edits using the Tools menu.
- Drag & drop fillable fields, add text and sign it.
- Add multiple signers using their emails and set the signing order.
- Specify which recipients will get an executed copy.
- Use Advanced Options to limit access to the record and set an expiration date.
- Click Save and Close when completed.
In addition, there are more advanced features available to lots fill byline. Add users to your shared workspace, view teams, and track collaboration. Millions of users across the US and Europe agree that a solution that brings everything together in one unified workspace, is what enterprises need to keep workflows functioning smoothly. The airSlate SignNow REST API enables you to embed eSignatures into your application, website, CRM or cloud. Check out airSlate SignNow and get faster, smoother and overall more productive eSignature workflows!
How it works
airSlate SignNow features that users love


Get legally-binding signatures now!
What active users are saying — lots fill byline


Lots fill byline
okay we're going to give this a shot here um this is a video that i'm going to try to show you how to access the herf jones design site so that you can design a practice page now the practice page you won't be able to save so you're going to have to do something kind of unique you're going to do a print screen which is a little button on your computer it's up on the upper right hand side you'll see it says prts that's print screen computer spelling i guess anyway you click on that that'll put whatever's on the screen in a clipboard then you can open up a word document and paste that screen print into a word document it's very easy so with that said let's see if we can get you in to herf jones on this web page you'll see a blue link to herf jones your login is your first name dot last name and the password is your two thirty twenty twenty one this brings you into the herf jones site and i've already got my name and password in because i told it to remember if you see this message go ahead and say click get it here and allow takes a minute it'll come up now the book you're going to be working on is the 2021 yearbook main book click on that and say okay this is the main menu in herff jones uh some of the things i'm going to show you is the library in the library this is where we will download our images just by clicking this button it'll ask you to browse and find images we're not going to do it right now because i've got a ton of images in there for you these are the images these are the photos that you guys took kind of as practice inside the classroom excuse me you'll notice that if we click on one it shows up in the practice photos that's because i have tagged the photos to be in that folder called practice photos the other uh folders here you're gonna see this list grow quite a bit i'm to put a folder for every teacher and every event that pops up here at school so that you can easily pull out of these folders and build your practice page okay now we're going to go from library over to the book this is where you're going to do most of your work now you notice we don't have any pages really set up yet they're all undefined we're going to do that i'm going to start with a basic outline and then you're going to help me come up with pages that we want to put in our yearbook now this button up here practice page this is the one you want to be concerned with for the assignment click on that practice page this is a standard spread these are actually two pages the middle of the yearbook runs right down the center you want to keep everything within these little dotted lines don't let anything go outside of that otherwise it may get cut off now remember that library idea that i just showed you we're going to go up here into topic and we're going to say practice photos this is going to populate this area with all those practice photos now there are several ways of doing your practice book you can come over to the side here and click a rectangle and draw a rectangle you don't know what picture is going to go in there yet but you know it's going to be a big important picture so you want to have a spot reserved for it the neat thing is you can select a picture and just put it anywhere in the rectangle it will fill the rectangle now to back out you go edit undo and you can go back and say undo the rectangle as well you can also just grab a photograph and bring it across but be careful watch what happens you're going to get a little warning it says do you want this placed in the background if you click yes this is what happens it turns the whole back page that photo into a background for that page i'm going to say edit undo background image we're going to come over and try that again but this time we're going to say no i don't want it to be the background now that picture comes straight across notice there's no rectangle in the background also if you put your picture across an area or outside of an area you should get a warning message it doesn't look like it's going to happen this is older software so just remember inside those dotted lines okay now layout a good form of layout is to have a couple pictures and we're going to turn this off you want a couple pictures to stand out these are your really good pictures this is and then when i say really good these are the pictures you'll probably have a byline on or a little caption that says what's going on or it might highlight a student specific student on what they're doing you guys are going to be writing some pretty good captions now the object is not to just fill the page with pictures although having a lot of pictures is a good idea for a yearbook so we're going to bring over some more pictures and we're going to start filling our page you can resize the pictures so they'll fit scroll down we'll get a couple of others you can see this could be pretty easy to create a half decent page the object is you want to get some balance you don't want it to look like the same size picture uh just repeated 12 to 14 times in the in a in a page you want to give it some flow this has what's called an s flow we start up top go through here and then come back here it's an s flow now you notice we dealing right now with rectangles you can use some other tools the star tool i'm going to show you but i don't really like it mainly because weird things happen using the star tool let's see if i can find a good picture to show you what happens uh there we go i'm going to put this picture inside the star look what happens it it cuts heads off uh you know you can reshape it or whatever also if we move look at all the space that's wasted now i'm not saying you can't use the star feature but i would avoid it i'm gonna undo this and get rid of our star now to put text in right now i've only got one font loaded and that's going to change along with the colors so to put text in you use the text tool which is a capital t and draw a text box now notice it automatically populates the text box with what it's chosen i'm going to highlight this text in here he says there we go and we're going to change that text from body copy to headline notice it changes the text also we still have some of that other text still down there until you edit it headline is what we use for titles on pages and once again i'll put other fonts in there this is kind of a boring font but we use headlines for titles you'll use the body for stories so if you put a small story about what's going on in this picture or a byline you know for this person this is so and uh an exceptional student here in yearbook that's where you use the body i think we're going to have that throughout the book so it's easy to remember once again i'll put more fonts in i'm also going to load colors right now we don't have very many colors also one thing you can do with your pictures i'm going to show you this if you click on a picture you can go up here to object and you can do effects one of the facts that my students really used to like was this called drop shadow you can change the color haha we only have one color loaded let's see if i can force it there we go and then i'm going to say the distance is about 2.8 points everything's in points in yearbook sorry guys and i'm going to say apply notice it puts this really per shadow underneath the picture and it'll stay it'll follow the picture around it kind of gives the illusion that the picture is standing up off the page anyway i want you to play with this open up a practice page put pictures on it put type in you know put a caption on a picture put a title on it on a page create a practice layout that's all i'm asking you to do create a practice layout then go back to hit print screen that's that button down on the upper right on your keyboard it's up there with the f function keys look for it do a print screen and then open up a word document and say insert image and just or copy and paste that image in there sorry if this is a little confusing a little rushed but i want to make sure you guys at least get a chance to play with this if you have any questions you know how to get a hold of me send me an email and i'll try to walk you through it again that's it
Show more