- SignNow Partner Integration Guide
- Learn how to partner and develop with SignNow
- What the ISV partner program has to...
- Business models for ISVs
- Partner and developer resources and...
- SignNow products and concepts
- Getting started for ISVs
- Create a Developer’s account in ...
- SignNow SDKs and API examples for ISVs
- Authentication for ISVs
- Supported grant types
- Client credentials options for ISVs
- Key SignNow features
- API usage monitoring
- Go live with SignNow
- Electronic Signature
- Developers
- signNow Partner Integration Guide
SignNow Partner Integration Guide
Overview
This guide provides ISVs with step-by-step instructions and best practices for testing the SignNow API, developing integrations, and delivering solutions to customers.
Learn how to partner and develop with SignNow
What the ISV partner program has to offer
First, let’s go through the benefits of partnering with SignNow.
What do we offer ISVs?
- Improved NRR (Net Revenue Retention)
- Award-winning eSignature solution
- More value to your existing software
- Self-serve capabilities
- Recurrent fees (starting from 15%, depending on the business model)
Dedicated partner support
- Dedicated Partner Account Manager
- Pre-sales support
- Sales enablement materials
- Monthly pipeline reviews
Marketing support and growth
- Marketing co-investment (MDF)
- Marketing playbooks and kits
- Marketing consultations
- Co-marketing activities
Technical enablement
- Demo accounts (NFR)
- Guided training and certification
- Hands-on, ongoing support
- Proof of concept development
How does the SignNow API stay ahead of the competition?
- 250 free signature invites and premium features to all customers regardless of size
- Seamless eSignature experience from your website, CRM, or customer app - anytime and anywhere.
- Superior app performance (99.99% uptime) with guaranteed 24/7 API monitoring
- Up to 30% lower cost than other providers
- Fast and easy testing and deployment: developers create sandbox accounts and test in 10 min
What are the first steps for ISVs?
Join the ISV Partner Program at https://www.signnow.com/integrations/isv-partnership. Contact our ISV Embed & Migration Specialist at kurt@airslate.com for detailed information on our partnership models and find out the best solution for your business.
Business models for ISVs
We offer two primary partnership models for ISVs, depending on how you want to position SignNow within your product and customer experience.
Option 1 – Embedded / White Label Model (Master Site License)
In this model, the Partner fully embeds SignNow as a white labeled solution within their product. End customers are not aware that SignNow is used under the hood.
Billing Structure
- Partner bills end customers
- SignNow bills the Partner
Subscription Structure
- All client accounts are managed under a single master Site License subscription owned by the Partner
- New clients are added to the master subscription and co-terminate with the same renewal date
Technical Setup
- Partner creates a separate API application per client to track usage and manage billing
- Branding can be configured per client within the Partner environment
- Emails are sent from the default mail@signnow.com domain
Best for
- Fully embedded experiences
- Centralized management and billing
- ISVs building a seamless, native workflow inside their product
Option 2 – Referral Model (Individual Client Licenses)
In this model, the Partner introduces SignNow as part of their offering, but the customer purchases and owns the SignNow subscription directly.
Billing Structure
- SignNow bills the end customer directly
Subscription Structure
- Each client owns their own Site License subscription
- Each client manages their own renewal cycle
Technical Setup
- Client provides API credentials (secret key, username, password) to enable the integration
- Documents can be sent from the client’s own domain email address
- Branding is configured per client
Once you have chosen your business model, create a free developer account and test your integrations. Note that signature invites sent via a developer account are not legally binding.
Partner and developer resources and tools
Build your integration using SignNow’s free developer resources and tools.
- Detailed SignNow API documentation guides developers through the integration process and provides them with clear code examples.
- The SignNow SDKs present the SignNow API functionality into the language of your choice.
- Video tutorials allow ISVs to achieve best practices for integrating SignNow eSignatures into their software.
Contact our solution engineers at api@signnow.com to learn more.
SignNow products and concepts
The SignNow API core concepts and terms are connected to SignNow’s product terms. Among them, the most critical include:
Explore sample apps to learn more about the key eSignature workflows for ISVs.
Getting started for ISVs
Create a Developer’s account in Sandbox
signNow offers a free testing environment to explore the eSignature REST API — the Developer Sandbox. It provides access to every signNow feature for eSigning and document management.
Note: Documents signed in the sandbox environment are not legally binding.
To create a developer's account in Sandbox, enter your email below and click Create my API sandbox.
Follow these steps to launch your application integration.
1. Create your free developer account
Test SignNow functionality by registering a free account.
- Enter your email and password in the sign-up window and click *Get Started*.
- You will instantly receive an activation email. Click the *Verify Email* button.
- After verification, you will be taken to your developer account dashboard.
2. Get your application credentials
Your first application is automatically created in *Development mode*.*Note*: Documents signed in Development mode are not legally binding.
Click on the application to review its details:
- To make an API call, you need to copy the *API key* on the *API Keys tab*.
- Alternatively, create an access token using the *Basic Authorization Token* found on the *OAuth 2.0 tab*.
3. Make your first API call
Upload a document to SignNow using the `POST /document` request.
After this, you can add fields to the document and send it for signature
4. Go Live
When you are ready to move your application to production, switch the mode to *Go Live*
Explore the *Developer Go-live Checklist* for more tips.
SignNow SDKs and API examples for ISVs
Your applications can call the SignNow APIs directly or use SDKs.
Download SignNow SDKs and save time using these ready-to-go wrappers for the SignNow REST API in your favorite language. SignNow provides users with PHP, .Net, Java, Python, and Node.js SDKs.
Use the SignNow Postman Collection to call SignNow APIs directly. You can import the SignNow API collection into your Postman client or open it in your browser by clicking the Run in Postman button on the API Dashboard.
Use sample apps to jumpstart your integration and explore core SignNow API features, including embedded signing, embedded sending, the embedded editor, branding, document pre-filling, and data collection.
Below, you can find the most popular SignNow API features. Follow the links in the feature names and get the code examples in five programming languages.
- Invite to sign — get legally binding signatures from your customers, partners, and employees in seconds.
- Create templates — generate new copies of your most used documents and forms.
- Embedded signing — embed documents for eSigning into your application or website, and make them accessible to non-SignNow users.
- Embedded sending — enable users to send documents for signature directly from your application using their own custom settings.
- White labeling — apply custom branding to the sending, signing, editing, and email notification experiences, keeping the SignNow service invisible to customers.
To learn more about the SignNow API, check the OpenAPI Specification.
Authentication for ISVs
Learn how to obtain an access token using the SignNow API.
The SignNow API relies on OAuth 2.0 protocol for authorization. During the authorization flow, every user should obtain a token for each application. The Basic Authorization token is generated automatically for the Test app in your account and every other app you create. It’s available in your Sandbox account on the API Dashboard.
In order to request a Bearer token, users should make a call to POST/oauth2/token.
All requests must include an access token in the Authorization Header. POST requests for creating a user or requesting an access token must include the client credentials and a Basic Authorization token. Check the code example and steps here.
Supported grant types
SignNow supports several grant types: authorization_code, refresh_token, and password.
Client credentials options for ISVs
ISVs can obtain signNow API credentials in the following ways:
- Shared API credentials — an ISV partner invites customers to their organization under the subscription plan.
- Separate API apps per customer — an ISV partner creates an application for each customer and shares a Basic Authorization token with them.
- Separate API accounts per customer — an ISV partner creates an API account for each customer.
Key SignNow features
The SignNow API provides ISVs with flexible functionality for any use case and workflow. Learn more about the SignNow features and how to integrate them into your apps.
Fillable fields — add different types of fields for different types of content such as Signature Field, Text Field, Date Field, Formula Field, etc.
Conditional fields — set certain execution conditions for fillable fields. For example, a recipient won’t be able to complete Field B unless they complete Field A.
Calculated fields — add numeric fields that automatically calculate amounts in a document according to the preset formula.
Text Tags — add specific combinations of symbols and letters in a document that represent fillable fields.
Data validators — add parameters to the fields or text tags that specify a data format or type of numeric data that must be entered.
Webhooks — subscribe to events and receive callbacks when documents are signed upon various conditions.
Organizations — create organizations and invite your colleagues and partners for collaboration under the same SignNow subscription.
Teams — create Teams and invite team members to collaborate on documents. In contrast with Organizations, Teams are entities within a user’s account. Team members may not have a SignNow account — in that case, their activity is limited by the Team.
Document Group — create packages of documents to send them out for signing.
Integration Apps — send documents for signature from the apps you already use. SignNow offers native integrations with Salesforce, NetSuite, HubSpot, QuickBooks Online, Microsoft 365, and more.
API usage monitoring
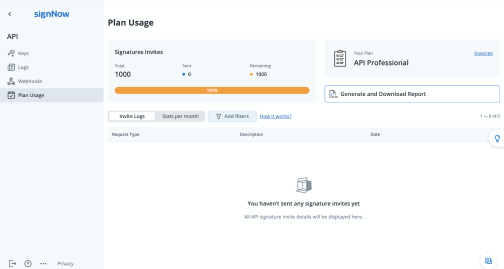
Monitor SignNow API usage in your Dashboard > Plan Usage tab.
This tab displays your API plan statistics for applications in Development and Live mode.
Note: For users without a free trial or active subscription, only Development mode statistics are shown.
Signature Invites indicate the total number of invites available under your API plan, how many have already been sent, and how many remain until the plan expires.
Note: If you have a free trial or active subscription, signature invites sent in Development mode won’t count toward your limit. If you don’t have a free trial or active subscription, you can send up to 500 signature invites in Development mode.
Different request types count towards your signature invites total:
| Request Type | Description | How We Charge |
|---|---|---|
| Invite to Sign | An invite to sign a document is sent via email. The document has fields that need to be completed. The invite is role-based: you can set up a multi-step process with different people processing a document at different steps. | Charging applies per invite sent. If multiple signers are included in one invite, it counts as a single invite. |
| Signing Link | A link to the document that requires a signature is generated. | Charging applies when the last signer completes the signing process (if there is more than one signer). |
| Freeform Invite | An email invitation to sign a document/document group without predefined fields. Signers can place their signature anywhere in the document. | For a document: You can add one signer per invite. Charging applies per invite sent. If you send a freeform invite to multiple signers, each invite is charged separately. For a document group: You can add multiple signers in a single invite. Charging applies per invite sent. |
| Bulk Invite | Invites to sign a document are sent to multiple signers simultaneously. Each recipient will receive their own copy of the document to fill out and sign. Documents are generated from a template. | Charging applies per invite sent (for each record in the CSV file, which contains signers’ roles, emails, and document names). |
| Embedded Invite | A link to sign a document is generated and you can embed it into your website. | Charging applies per invite sent (via a link or email), even if multiple signers are included in one invite. |
| Document Group Invite | An invite to sign a document group is sent via email. Documents have fields that need to be completed. The invite is role-based: you can set up a multi-step process with different people processing documents at different steps. | Charging applies per invite sent. If multiple signers are added to a document group invite, it counts as a single invite. |
| Document Group Signing Link | A link to the document group that requires a signature is generated. | Charging applies when the first signer completes the signing process (if there is more than one signer). |
| Document Group Freeform Invite | An email invitation to sign a document group without predefined fields. Signers can place their signature anywhere in the documents. | Charging applies per invite sent. If you send a freeform invite to multiple signers, each invite is charged separately. |
| Embedded Group Invite | A link to sign a document group is generated and you can embed it into your website. | Charging applies per invite sent (via a link or email), even if multiple signers are included in one invite. |
You can view your plan usage from two perspectives:
- The Invite Logs displays logs of all time signature invites (sent via API and web) during the billing period. You can see each log in detail by clicking the log entry. The logs are only available for the last 30 days.
- The Stats per month shows the number of invites sent per month. All invites are sorted by month and type.
Click Generate and Download Report to set the report of your signature invites by selecting the date range and app. Click Generate to receive your report in the XLSX file.
Go live with SignNow
SignNow uses a single URL https://api.signnow.com for both development and production. There are no separate production keys. Going live is a straightforward process that includes billing and configuration changes.
Account and billing
✅ Confirm active subscription: To use the SignNow API in Live mode, you must have an active paid subscription or a valid free trial.
You can choose between an API-specific plan or a Site License subscription.
For ISV users, we recommend the Site License subscription for the following reasons:
- Multi-user access to the API dashboard
- Unlimited user seats
- Full access to the Web App, API, and premium integrations
- Volume discounts on per-signature pricing
✅ Ensure that all API users are added to the subscription plan.
Learn how to add users to the subscription plan.
Tip: You can access your subscription details from the API dashboard. Go to Plan Usage > Manage subscription.
Go-Live switch
✅ Toggle app to Live: In the SignNow API dashboard, go to Apps and Keys, locate your application, and switch the mode from Development to Go Live.
Configuration final check
Ensure your code is pointing to the right infrastructure.
✅ Production webhooks: Update your SignNow dashboard to point event subscriptions to your production callback URLs (must be HTTPS), removing any test or ngrok addresses.
✅ Secure credentials: Move your existing Client ID, Client Secret, and user credentials out of code and into a secure production secrets manager.
✅ Test refresh token flow: Verify your code automatically and successfully refreshes access tokens before they expire to prevent downtime.
Performance and stability
Avoid service disruptions caused by high volume.
✅ Check rate limits: Review the API rate limits associated with your specific subscription plan. Ensure your anticipated production volume will not exceed these limits.
In Live mode, applications have a default limit of 1,000 requests per hour. Each API request receives the following parameters in the response header:
X-RateLimit-Limit     => Total allowed requests per hour.
X-RateLimit-Remaining => Count of remaining requests for this hour.
X-RateLimit-Reset     => Timestamp when the limit will reset.
If the limit is exceeded, you will receive a 429 error with the message:
“You exceeded the rate limit of {limit} API requests per hour”.Note: If your application consistently exceeds 1,000 calls per hour, contact SignNow support to request a limit increase.
✅ Handle 429 errors: Verify your code includes logic to gracefully handle 429 Too Many Requests errors (e.g., implement an exponential backoff retry mechanism) instead of crashing.
Final test
Send a document for signature in Live mode. If the signed PDF has no Development watermark, you are live.
Have questions about the ISV Partner Program?
Our representatives are ready to help you choose the right business model.