Da Form 67 9 1a 2010-2026


What is the DA Form 67-9-1A?
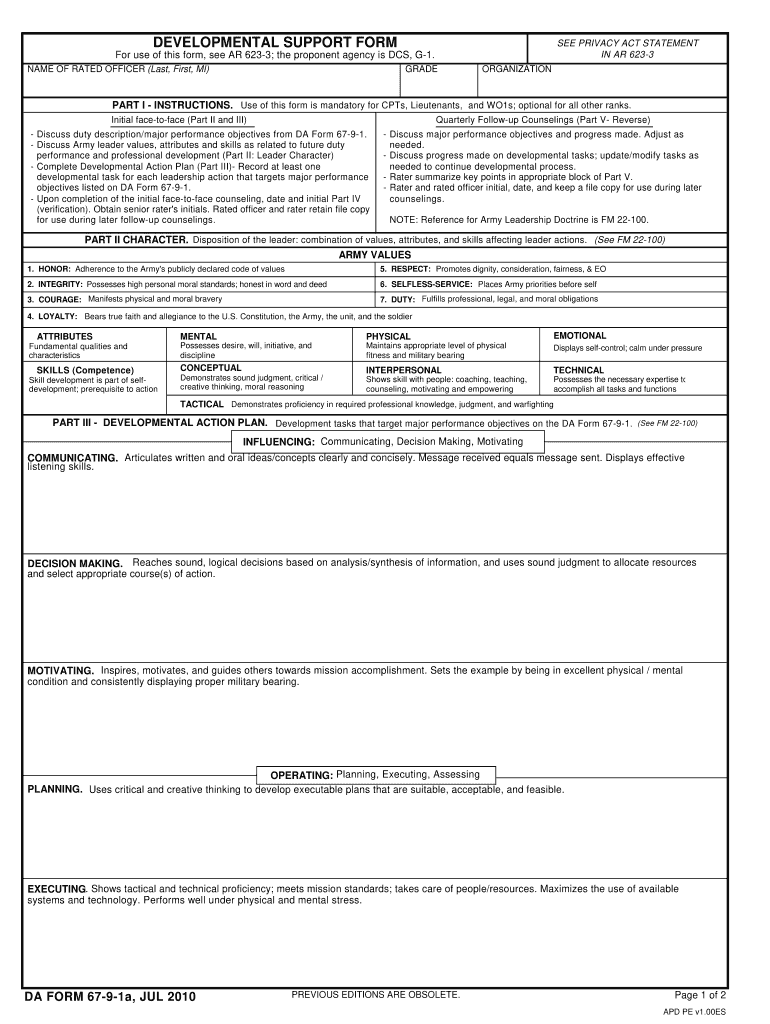
The DA Form 67-9-1A, also known as the Army Officer Evaluation Report Support Form, is a critical document used within the U.S. Army. It serves as a tool for officers to provide supporting information for their evaluations. This form captures essential details about an officer's performance, achievements, and potential, allowing for a comprehensive assessment during the evaluation process. The DA Form 67-9-1A is designed to ensure that all relevant accomplishments and contributions are documented effectively, aiding in career progression and development.
How to Use the DA Form 67-9-1A
Using the DA Form 67-9-1A involves several key steps to ensure accurate and effective completion. First, gather all pertinent information regarding the officer's performance and achievements. This includes specific accomplishments, leadership roles, and any notable contributions to the unit. Next, fill out the form by clearly articulating these details in the appropriate sections. It is important to be concise yet thorough, as the information provided will directly influence the evaluation outcome. Finally, review the completed form for accuracy and completeness before submission to ensure it reflects the officer's true capabilities.
Steps to Complete the DA Form 67-9-1A
Completing the DA Form 67-9-1A requires attention to detail and adherence to specific guidelines. Follow these steps for successful completion:
- Begin by downloading the latest version of the DA Form 67-9-1A from a reliable source.
- Fill in the officer's personal information, including rank, name, and unit details.
- Document significant achievements and contributions in the designated sections, using clear and specific language.
- Ensure all required signatures are obtained from relevant parties, such as the immediate supervisor.
- Review the form thoroughly to check for any errors or omissions before final submission.
Key Elements of the DA Form 67-9-1A
The DA Form 67-9-1A consists of several key elements that are crucial for a comprehensive evaluation. These include:
- Personal Information: Basic details about the officer, including name, rank, and unit.
- Performance Summary: A section dedicated to outlining the officer's accomplishments and contributions.
- Leadership Qualities: Insights into the officer's leadership skills and potential for future roles.
- Goals and Objectives: A space for the officer to outline personal and professional goals.
Legal Use of the DA Form 67-9-1A
The DA Form 67-9-1A must be used in compliance with Army regulations and guidelines to ensure its legal validity. It is essential that the information provided is truthful and accurately represents the officer's performance. Misrepresentation or falsification of information can lead to serious consequences, including disciplinary action. Therefore, all parties involved in the completion and submission of the form should adhere strictly to ethical standards and the Army's policies regarding evaluations.
Examples of Using the DA Form 67-9-1A
Practical examples of how the DA Form 67-9-1A is utilized can enhance understanding of its application. For instance, an officer may use the form to highlight their successful leadership in a training exercise, detailing specific outcomes and feedback received. Another example could involve documenting participation in community service projects, showcasing the officer's commitment to the Army's values and mission. These examples illustrate the form's role in capturing a well-rounded view of an officer's contributions and impact within their unit.
Quick guide on how to complete 9 1a 2010 2019 form
Discover the simplest method to complete and endorse your Da Form 67 9 1a
Are you still spending energy preparing your official documents on paper instead of online? airSlate SignNow presents a superior way to finalize and endorse your Da Form 67 9 1a and comparable forms for public services. Our intelligent eSignature platform delivers everything necessary to manage paperwork swiftly and in compliance with formal stipulations—robust PDF editing, managing, securing, signing, and sharing tools all available within a user-friendly interface.
Just a few steps are needed to finish filling out and signing your Da Form 67 9 1a:
- Upload the editable template to the editor by clicking the Get Form button.
- Review what information is required in your Da Form 67 9 1a.
- Navigate between the fields using the Next option to ensure nothing is overlooked.
- Utilize Text, Check, and Cross tools to fill in the blanks with your information.
- Enhance the content with Text boxes or Images from the top toolbar.
- Emphasize what is important or Conceal sections that are irrelevant.
- Click on Sign to generate a legally enforceable eSignature using any method you prefer.
- Add the Date next to your signature and complete your task with the Done button.
Store your completed Da Form 67 9 1a in the Documents folder within your profile, download it, or transfer it to your preferred cloud storage. Our platform also offers flexible file sharing. There’s no need to print out your forms when submitting them to the appropriate public office—do it via email, fax, or by requesting a USPS “snail mail” delivery from your account. Give it a try today!
Create this form in 5 minutes or less
FAQs
-
How do I fill a W-9 Tax Form out?
Download a blank Form W-9To get started, download the latest Form W-9 from the IRS website at https://www.irs.gov/pub/irs-pdf/.... Check the date in the top left corner of the form as it is updated occasionally by the IRS. The current revision should read (Rev. December 2014). Click anywhere on the form and a menu appears at the top that will allow you to either print or save the document. If the browser you are using doesn’t allow you to type directly into the W-9 then save the form to your desktop and reopen using signNow Reader.General purposeThe general purpose of Form W-9 is to provide your correct taxpayer identification number (TIN) to an individual or entity (typically a company) that is required to submit an “information return” to the IRS to report an amount paid to you, or other reportable amount.U.S. personForm W-9 should only be completed by what the IRS calls a “U.S. person”. Some examples of U.S. persons include an individual who is a U.S. citizen or a U.S. resident alien. Partnerships, corporations, companies, or associations created or organized in the United States or under the laws of the United States are also U.S. persons.If you are not a U.S. person you should not use this form. You will likely need to provide Form W-8.Enter your informationLine 1 – Name: This line should match the name on your income tax return.Line 2 – Business name: This line is optional and would include your business name, trade name, DBA name, or disregarded entity name if you have any of these. You only need to complete this line if your name here is different from the name on line 1. See our related blog, What is a disregarded entity?Line 3 – Federal tax classification: Check ONE box for your U.S. federal tax classification. This should be the tax classification of the person or entity name that is entered on line 1. See our related blog, What is the difference between an individual and a sole proprietor?Limited Liability Company (LLC). If the name on line 1 is an LLC treated as a partnership for U.S. federal tax purposes, check the “Limited liability company” box and enter “P” in the space provided. If the LLC has filed Form 8832 or 2553 to be taxed as a corporation, check the “Limited liability company” box and in the space provided enter “C” for C corporation or “S” for S corporation. If it is a single-member LLC that is a disregarded entity, do not check the “Limited liability company” box; instead check the first box in line 3 “Individual/sole proprietor or single-member LLC.” See our related blog, What tax classification should an LLC select?Other (see instructions) – This line should be used for classifications that are not listed such as nonprofits, governmental entities, etc.Line 4 – Exemptions: If you are exempt from backup withholding enter your exempt payee code in the first space. If you are exempt from FATCA reporting enter your exemption from FATCA reporting code in the second space. Generally, individuals (including sole proprietors) are not exempt from backup withholding. See the “Specific Instructions” for line 4 shown with Form W-9 for more detailed information on exemptions.Line 5 – Address: Enter your address (number, street, and apartment or suite number). This is where the requester of the Form W-9 will mail your information returns.Line 6 – City, state and ZIP: Enter your city, state and ZIP code.Line 7 – Account numbers: This is an optional field to list your account number(s) with the company requesting your W-9 such as a bank, brokerage or vendor. We recommend that you do not list any account numbers as you may have to provide additional W-9 forms for accounts you do not include.Requester’s name and address: This is an optional section you can use to record the requester’s name and address you sent your W-9 to.Part I – Taxpayer Identification Number (TIN): Enter in your taxpayer identification number here. This is typically a social security number for an individual or sole proprietor and an employer identification number for a company. See our blog, What is a TIN number?Part II – Certification: Sign and date your form.For additional information visit w9manager.com.
-
How do I fill out a CLAT 2019 application form?
Hi thereFirst of all, let me tell you some important points:CLAT 2019 has gone OFFLINE this yearBut the application forms for CLAT 2019 have to be filled ONLINEThe payment of the application fees also should be made onlineNow, kindly note the important dates:Note the details regarding the application fees:Here, if you want the Previous Year Question papers, Rs.500 would be added to the application fees.Apart from this, there would be bank transaction charges added to the application fees.The application fees is non-refundable.Note one important point here that before you fill the application form, check for your eligibility.To know the complete details of filling the application form along with other information like the eligibility - in terms of age, educational qualification, list of NLUs participating and the seats offered under each category, CLAT Reservation policies, CLAT exam pattern, marking scheme, syllabus, important documents required to be kept ready before filling the form, kindly go to the link below:How to fill CLAT 2019 Application form? Registration OPEN | All you need to knowTo know how to prepare for one of the very important section of CLAT exam, GK and Current Affairs, kindly go to the link below:How to prepare GK & Current Affairs for CLAT 2019To practice, daily MCQs on Current Affairs, kindly go to the link below:#CLAT2019 | #AILET2019 | #DULLB2019 | GK and Current Affairs Series: 5 in 10 Series: Day 12For any other queries, kindly write to us at mailateasyway@gmail.comThanks & Regards!
-
How do I fill out the NEET 2019 application form?
Expecting application form of NEET2019 will be same as that of NEET2018, follow the instructions-For Feb 2019 Exam:EventsDates (Announced)Release of application form-1st October 2018Application submission last date-31st October 2018Last date to pay the fee-Last week of October 2018Correction Window Open-1st week of November 2018Admit card available-1st week of January 2019Exam date-3rd February to 17th February 2019Answer key & OMR release-Within a week after examAnnouncement of result-1st week of March 2019Counselling begins-2nd week of June 2019For May 2019 Exam:EventsDates (Announced)Application form Release-2nd week of March 2019Application submission last date-2nd week of April 2019Last date to pay the fee-2nd week of April 2019Correction Window Open-3rd week of April 2019Admit card available-1st week of May 2019Exam date-12th May to 26th May 2019Answer key & OMR release-Within a week after examAnnouncement of result-1st week of June 2019Counselling begins-2nd week of June 2019NEET 2019 Application FormCandidates should fill the application form as per the instructions given in the information bulletin. Below we are providing NEET 2019 application form details:The application form will be issued through online mode only.No application will be entertained through offline mode.NEET UG registration 2019 will be commenced from the 1st October 2018 (Feb Exam) & second week of March 2018 (May Exam).Candidates should upload the scanned images of recent passport size photograph and signature.After filling the application form completely, a confirmation page will be generated. Download it.There will be no need to send the printed confirmation page to the board.Application Fee:General and OBC candidates will have to pay Rs. 1400/- as an application fee.The application fee for SC/ST and PH candidates will be Rs. 750/-.Fee payment can be done through credit/debit card, net banking, UPI and e-wallet.Service tax will also be applicable.CategoryApplication FeeGeneral/OBC-1400/-SC/ST/PH-750/-Step 1: Fill the Application FormGo the official portal of the conducting authority (Link will be given above).Click on “Apply Online” link.A candidate has to read all the instruction and then click on “Proceed to Apply Online NEET (UG) 2019”.Step 1.1: New RegistrationFill the registration form carefully.Candidates have to fill their name, Mother’s Name, Father’s Name, Category, Date of Birth, Gender, Nationality, State of Eligibility (for 15% All India Quota), Mobile Number, Email ID, Aadhaar card number, etc.After filling all the details, two links will be given “Preview &Next” and “Reset”.If candidate satisfied with the filled information, then they have to click on “Next”.After clicking on Next Button, the information submitted by the candidate will be displayed on the screen. If information correct, click on “Next” button, otherwise go for “Back” button.Candidates may note down the registration number for further procedure.Now choose the strong password and re enter the password.Choose security question and feed answer.Enter the OTP would be sent to your mobile number.Submit the button.Step 1.2: Login & Application Form FillingLogin with your Registration Number and password.Fill personal details.Enter place of birth.Choose the medium of question paper.Choose examination centres.Fill permanent address.Fill correspondence address.Fill Details (qualification, occupation, annual income) of parents and guardians.Choose the option for dress code.Enter security pin & click on save & draft.Now click on preview and submit.Now, review your entries.Then. click on Final Submit.Step 2: Upload Photo and SignatureStep 2 for images upload will be appeared on screen.Now, click on link for Upload photo & signature.Upload the scanned images.Candidate should have scanned images of his latest Photograph (size of 10 Kb to 100 Kb.Signature(size of 3 Kb to 20 Kb) in JPEG format only.Step 3: Fee PaymentAfter uploading the images, candidate will automatically go to the link for fee payment.A candidate has to follow the instruction & submit the application fee.Choose the Bank for making payment.Go for Payment.Candidate can pay the fee through Debit/Credit Card/Net Banking/e-wallet (CSC).Step 4: Take the Printout of Confirmation PageAfter the fee payment, a candidate may take the printout of the confirmation page.Candidates may keep at least three copies of the confirmation page.Note:Must retain copy of the system generated Self Declaration in respect of candidates from J&K who have opted for seats under 15% All India Quota.IF any queries, feel free to comment..best of luck
-
Why did my employer give me a W-9 Form to fill out instead of a W-4 Form?
I wrote about the independent-contractor-vs-employee issue last year, see http://nctaxpro.wordpress.com/20...Broadly speaking, you are an employee when someone else - AKA the employer - has control over when and where you work and the processes by which you perform the work that you do for that individual. A DJ or bartender under some circumstances, I suppose, might qualify as an independent contractor at a restaurant, but the waitstaff, bus help, hosts, kitchen aides, etc. almost certainly would not.There's always risk in confronting an employer when faced with a situation like yours - my experience is that most employers know full well that they are violating the law when they treat employees as independent contractors, and for that reason they don't tolerate questions about that policy very well - so you definitely should tread cautiously if you want to keep this position. Nonetheless, I think you owe it to yourself to ask whether or not the restaurant intends to withhold federal taxes from your checks - if for no other reason than you don't want to get caught short when it comes to filing your own return, even if you don't intend to challenge the policy.
-
How can I fill out the BITSAT Application Form 2019?
BITSAT 2019 Application Forms are available online. Students who are eligible for the admission test can apply online before 20 March 2018, 5 pm.Click here to apply for BITSAT 2019Step 1: Follow the link given aboveStep 2: Fill online application formPersonal Details12th Examination DetailsTest Centre PreferencesStep 3: Upload scanned photograph (4 kb to 50 kb) and signature ( 1 kb to 30 kb).Step 4: Pay application fee either through online payment mode or through e-challan (ICICI Bank)BITSAT-2019 Application FeeMale Candidates - Rs. 3150/-Female Candidates - Rs. 2650/-Thanks!
-
How can I fill out the COMEDK 2019 application form?
COMEDK 2019 application is fully online based and there is no need to send the application by post or by any other method. Check the below-mentioned guidelines to register for the COMEDK 2019 exam:Step 1 Visit the official website of the COMEDK UGET- comedk.orgStep 2 Click on “Engineering Application”.Step 3 After that click on “Login or Register” button.Step 4 You will be asked to enter the Application SEQ Number/User ID and Password. But since you have not registered. You need to click on the “Click here for Registration”.Step 5 Fill in the required details like “Full Name”, “DOB”, “Unique Photo ID Proof”, “Photo ID Proof Number”, “Email ID” and “Mobile Number”.Step 6 Then click on the “Generate OTP”Step 7 After that you need to enter the captcha code and then an OTP will be sent to the mobile number that you have provided.Step 8 A new window having your previously entered registration details will open where you need to enter the OTP.Step 9 Re-check all the details, enter the captcha code and click on the “Register” button.Step 10 After that a page will appear where you will be having the User ID and all the details that you entered. Also, you will be notified that you have successfully registered yourself and a User ID and Password will be sent to your mobile number and email ID.COMEDK 2019 Notification | Steps To Apply For COMEDK UGET ExamCheck the below-mentioned guidelines to fill COMEDK Application Form after COMEDK Login.Step 1 Using your User ID and Password. Log in using the User ID and passwordStep 2 You will be shown that your application form is incomplete. So you need to go to the topmost right corner and click on the “Go to application” tab.Step 3 Go to the COMEDK official website and login with these credentials.Step 4 After that click on “Go to application form”.Step 5 Select your preferred stream and course.Step 6 Click on “Save and Continue”.Step 7 Carefully enter your Personal, Category and Academic details.Step 8 Upload your Photograph and Signature, Parents Signature, your ID Proof, and Declaration.Step 9 Enter your “Payment Mode” and “Amount”.Step 10 Enter “Security code”.Step 11 Tick the “I Agree” checkbox.Step 12 Click on the “Submit” button.
-
I received my late husband's W-9 form to fill out for what I believe were our stocks. How am I supposed to fill this out or am I even supposed to?
You do not sound as a person who handles intricasies of finances on daily basis, this is why you should redirect the qustion to your family’s tax professional who does hte filings for you.The form itself, W-9 form, is a form created and approved by the IRS, if that’s your only inquiry.Whether the form applies to you or to your husband’s estate - that’s something only a person familiar with the situation would tell you about; there is no generic answer to this.
Create this form in 5 minutes!
How to create an eSignature for the 9 1a 2010 2019 form
How to make an eSignature for your 9 1a 2010 2019 Form online
How to create an eSignature for the 9 1a 2010 2019 Form in Chrome
How to generate an eSignature for signing the 9 1a 2010 2019 Form in Gmail
How to generate an eSignature for the 9 1a 2010 2019 Form from your smart phone
How to create an electronic signature for the 9 1a 2010 2019 Form on iOS devices
How to create an eSignature for the 9 1a 2010 2019 Form on Android devices
People also ask
-
What is Da Form 67 9 1a and why is it important?
Da Form 67 9 1a is a crucial document used in the U.S. Army for officer evaluations. It captures the essential performance and potential of officers, making it vital for career progression. Understanding and properly filling out the Da Form 67 9 1a can signNowly impact an officer's career, ensuring they receive the recognition they deserve.
-
How can airSlate SignNow assist with completing Da Form 67 9 1a?
airSlate SignNow streamlines the process of completing Da Form 67 9 1a by providing an easy-to-use platform for document signing and collaboration. Users can fill out the form electronically, ensuring accuracy and compliance. Our solution also allows for seamless sharing and eSigning, making the entire process more efficient.
-
Is there a cost associated with using airSlate SignNow for Da Form 67 9 1a?
Yes, airSlate SignNow offers various pricing plans tailored to meet the needs of organizations looking to manage documents like Da Form 67 9 1a. Our cost-effective solutions ensure that you can efficiently handle document workflows without breaking the bank. You can choose a plan that fits your budget while accessing all necessary features.
-
What features does airSlate SignNow offer for managing Da Form 67 9 1a?
airSlate SignNow offers a range of features specifically designed to simplify the management of Da Form 67 9 1a. Key features include customizable templates, secure eSigning, and real-time tracking of document status. These tools help ensure that the form is filled out correctly and submitted on time.
-
Can I integrate airSlate SignNow with other applications for handling Da Form 67 9 1a?
Absolutely! airSlate SignNow integrates with various applications, allowing you to manage Da Form 67 9 1a seamlessly within your existing workflow. This includes integrations with popular tools like Google Drive, Dropbox, and CRM systems, enhancing your document management capabilities.
-
What are the benefits of using airSlate SignNow for Da Form 67 9 1a?
Using airSlate SignNow for Da Form 67 9 1a provides numerous benefits, including increased efficiency, enhanced security, and improved collaboration. Our platform ensures that all sensitive information is protected while making it easy for multiple users to contribute to the document. This leads to faster completion times and ensures compliance.
-
Is there customer support available for assistance with Da Form 67 9 1a on airSlate SignNow?
Yes, airSlate SignNow offers robust customer support to assist you with any questions regarding Da Form 67 9 1a. Our support team is available via chat, email, and phone to provide guidance and resolve any issues you may encounter while using our platform.
Get more for Da Form 67 9 1a
- Certificate of purchase sample form
- Peru visa application form pdf
- Application for regular pioneer service s 205 form
- Recibo justificante de pago lanbide form
- Sa002 form
- Blank po form
- Zoning verification permit ministerial meteorological testing met facility form
- Self exclusion form cgcc 037 rev 0511 california gambling cgcc ca
Find out other Da Form 67 9 1a
- How Do I Sign New Jersey Legal Word
- Help Me With Sign New York Legal Document
- How Do I Sign Texas Insurance Document
- How Do I Sign Oregon Legal PDF
- How To Sign Pennsylvania Legal Word
- How Do I Sign Wisconsin Legal Form
- Help Me With Sign Massachusetts Life Sciences Presentation
- How To Sign Georgia Non-Profit Presentation
- Can I Sign Nevada Life Sciences PPT
- Help Me With Sign New Hampshire Non-Profit Presentation
- How To Sign Alaska Orthodontists Presentation
- Can I Sign South Dakota Non-Profit Word
- Can I Sign South Dakota Non-Profit Form
- How To Sign Delaware Orthodontists PPT
- How Can I Sign Massachusetts Plumbing Document
- How To Sign New Hampshire Plumbing PPT
- Can I Sign New Mexico Plumbing PDF
- How To Sign New Mexico Plumbing Document
- How To Sign New Mexico Plumbing Form
- Can I Sign New Mexico Plumbing Presentation