Printable Embroidery Placement Guide Form


What is the Printable Embroidery Placement Guide
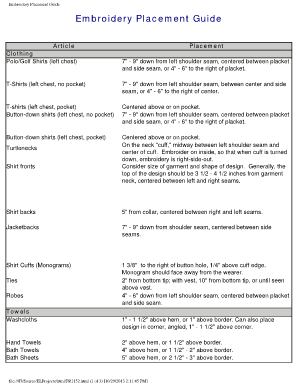
The printable embroidery placement guide is a valuable tool designed to assist individuals and businesses in accurately positioning embroidery designs on various fabric types. This guide typically includes clear measurements and visual references to ensure that the embroidery is placed correctly, enhancing the overall aesthetic of the finished product. It is particularly useful for those involved in machine embroidery, as it helps streamline the process and reduces the likelihood of errors that can occur during design placement.
How to Use the Printable Embroidery Placement Guide
Using the printable embroidery placement guide involves several straightforward steps. First, print the guide on high-quality paper to ensure clarity. Next, select the fabric you will be working with and determine the desired location for the embroidery. Place the printed guide over the fabric, aligning it according to the specified measurements. Mark the placement area lightly with a fabric pencil or chalk. Finally, use your embroidery machine to stitch the design in the marked area, ensuring precision and accuracy throughout the process.
Steps to Complete the Printable Embroidery Placement Guide
Completing the printable embroidery placement guide requires attention to detail. Follow these steps:
- Print the guide at the correct size.
- Choose your fabric and prepare it for embroidery.
- Align the guide with the fabric, ensuring it is straight and centered.
- Mark the placement points as indicated in the guide.
- Load your embroidery machine with the appropriate thread and design.
- Begin stitching, following the marked guidelines for accuracy.
Key Elements of the Printable Embroidery Placement Guide
Several key elements define the effectiveness of a printable embroidery placement guide. These include:
- Measurement Guidelines: Clear dimensions for various fabric types.
- Visual References: Diagrams showing correct placements for different designs.
- Fabric Compatibility: Recommendations on which fabrics work best with specific designs.
- Adjustment Tips: Suggestions for modifying placements based on design size and fabric characteristics.
Legal Use of the Printable Embroidery Placement Guide
When utilizing the printable embroidery placement guide, it is essential to understand its legal implications. The guide itself is not legally binding; however, the designs created using it may be subject to copyright laws. Ensure that any designs you embroider do not infringe on existing copyrights or trademarks. When sharing or selling items made using the guide, consider obtaining permission for any copyrighted designs to avoid legal issues.
Examples of Using the Printable Embroidery Placement Guide
Examples of using the printable embroidery placement guide can vary based on the project. For instance, a small business may use it to ensure consistent logo placements on uniforms, while hobbyists might employ it for personal projects like custom gifts. Another example includes using the guide for creating personalized items, such as monogrammed towels or blankets, where precise placement enhances the overall quality and appeal of the finished product.
Quick guide on how to complete printable embroidery placement guide
Accomplish Printable Embroidery Placement Guide effortlessly on any gadget
Digital document management has become favored by businesses and individuals alike. It offers an excellent environmentally friendly substitute for traditional printed and signed documents, allowing you to find the necessary form and securely keep it online. airSlate SignNow equips you with all the resources you need to create, modify, and eSign your files quickly and without interruptions. Handle Printable Embroidery Placement Guide on any device using airSlate SignNow Android or iOS applications and enhance any document-driven process today.
How to alter and eSign Printable Embroidery Placement Guide with ease
- Find Printable Embroidery Placement Guide and then click Get Form to begin.
- Utilize the tools we provide to finish your document.
- Emphasize relevant sections of your documents or obscure sensitive information with specialized tools that airSlate SignNow offers precisely for that purpose.
- Generate your signature using the Sign tool, which takes only seconds and holds the same legal validity as a conventional wet ink signature.
- Verify the details and then click the Done button to save your modifications.
- Choose your preferred delivery method for your form, whether by email, SMS, or invitation link, or download it to your computer.
Put an end to lost or misplaced documents, monotonous form searches, or errors that necessitate printing new document copies. airSlate SignNow fulfills your document management needs in just a few clicks from any device you prefer. Modify and eSign Printable Embroidery Placement Guide and ensure effective communication at every stage of the form preparation process with airSlate SignNow.
Create this form in 5 minutes or less
Create this form in 5 minutes!
How to create an eSignature for the printable embroidery placement guide
How to create an electronic signature for a PDF online
How to create an electronic signature for a PDF in Google Chrome
How to create an e-signature for signing PDFs in Gmail
How to create an e-signature right from your smartphone
How to create an e-signature for a PDF on iOS
How to create an e-signature for a PDF on Android
People also ask
-
What is a printable embroidery placement guide?
A printable embroidery placement guide is a handy tool designed to help you accurately position your embroidery designs on fabric. It provides clear markings and dimensions, ensuring that your designs are placed perfectly every time. This guide is especially useful for beginners and professionals alike, streamlining the embroidery process.
-
How can I purchase a printable embroidery placement guide?
You can easily purchase a printable embroidery placement guide directly from our airSlate SignNow website. Simply select the guide that best fits your needs and proceed to checkout. Payments are securely processed, ensuring a smooth purchase experience.
-
Are there different sizes available for the printable embroidery placement guide?
Yes, our printable embroidery placement guide comes in various sizes to accommodate different projects and preferences. You can choose the size that works best for your specific embroidery needs. This versatility ensures that you have the right tool for every project.
-
What features does the printable embroidery placement guide offer?
The printable embroidery placement guide includes clear, precise measurements, easy-to-follow instructions, and customizable templates for different embroidery techniques. These features enhance your workflow and make it easier to achieve professional results. Whether you're a hobbyist or a seasoned pro, this guide is an invaluable resource.
-
Can I use the printable embroidery placement guide for different types of fabrics?
Absolutely! The printable embroidery placement guide is versatile and can be used with various types of fabrics, including cotton, linen, and fleece. This adaptability means you can rely on the guide for all your embroidery projects, regardless of the fabric type you're working with.
-
What are the benefits of using the printable embroidery placement guide?
Using a printable embroidery placement guide enhances accuracy, saves time, and reduces the risk of mistakes in your embroidery projects. It also provides a visual reference, making it easier to achieve your desired outcomes. With this guide, you can take your embroidery skills to the next level.
-
Is the printable embroidery placement guide suitable for beginners?
Yes, the printable embroidery placement guide is designed with beginners in mind. It offers step-by-step instructions and easy-to-read measurements, making it accessible for those new to embroidery. By using this guide, beginners can learn and improve their skills with confidence.
Get more for Printable Embroidery Placement Guide
- Certificate of conformity coc for enabling work
- Apc diary template excel form
- Bill of sale for boat amp trailer form
- Annexure 1 of schedule b form
- Ncc junior division wing enrolment form pdf download
- Service acceptance certificate form
- Motor vehicle transfer forms uganda pdf
- Haccp validation and verification examples pdf form
Find out other Printable Embroidery Placement Guide
- eSign Wisconsin Lawers LLC Operating Agreement Free
- eSign Alabama Legal Quitclaim Deed Online
- eSign Alaska Legal Contract Safe
- How To eSign Alaska Legal Warranty Deed
- eSign Alaska Legal Cease And Desist Letter Simple
- eSign Arkansas Legal LLC Operating Agreement Simple
- eSign Alabama Life Sciences Residential Lease Agreement Fast
- How To eSign Arkansas Legal Residential Lease Agreement
- Help Me With eSign California Legal Promissory Note Template
- eSign Colorado Legal Operating Agreement Safe
- How To eSign Colorado Legal POA
- eSign Insurance Document New Jersey Online
- eSign Insurance Form New Jersey Online
- eSign Colorado Life Sciences LLC Operating Agreement Now
- eSign Hawaii Life Sciences Letter Of Intent Easy
- Help Me With eSign Hawaii Life Sciences Cease And Desist Letter
- eSign Hawaii Life Sciences Lease Termination Letter Mobile
- eSign Hawaii Life Sciences Permission Slip Free
- eSign Florida Legal Warranty Deed Safe
- Help Me With eSign North Dakota Insurance Residential Lease Agreement