Pressure Injury Staging Guide Form


What is the Pressure Injury Staging Guide
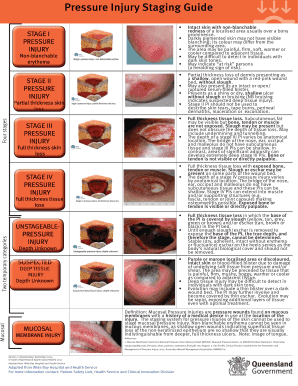
The Pressure Injury Staging Guide is a comprehensive resource designed to assist healthcare professionals in assessing and documenting the severity of pressure injuries. This guide categorizes pressure ulcers into specific stages, ranging from one to four, based on their characteristics and depth. Understanding these stages is crucial for effective treatment planning and monitoring patient progress. The guide aligns with the National Pressure Ulcer Advisory Panel (NPUAP) standards, ensuring that practitioners utilize a consistent framework for evaluation.
How to use the Pressure Injury Staging Guide
Using the Pressure Injury Staging Guide involves several key steps. First, assess the wound's appearance and characteristics, including size, depth, and the presence of necrotic tissue. Next, compare these observations to the defined criteria for each pressure ulcer stage. Document your findings accurately in the patient's medical records, ensuring that the staging is clear and consistent. Regularly update the staging as the wound heals or changes, which is essential for tracking treatment efficacy and making necessary adjustments in care.
Key elements of the Pressure Injury Staging Guide
The Pressure Injury Staging Guide includes several critical elements that enhance its utility. These elements comprise:
- Definitions: Clear definitions of each pressure ulcer stage, including Stage I (non-blanchable erythema) to Stage IV (full-thickness tissue loss).
- Assessment criteria: Detailed criteria for evaluating wound characteristics, such as color, depth, and tissue type.
- Photographic examples: Visual representations of each stage to aid in accurate identification and classification.
- Documentation tips: Guidance on how to record findings effectively in patient charts for legal and clinical purposes.
Steps to complete the Pressure Injury Staging Guide
Completing the Pressure Injury Staging Guide involves a systematic approach to ensure accuracy and reliability. Follow these steps:
- Conduct a thorough assessment of the wound, noting its size, depth, and tissue condition.
- Utilize the guide to compare your observations with the established criteria for each stage.
- Document the findings in the patient’s medical records, including the stage, date of assessment, and any relevant observations.
- Review and update the staging regularly, especially when there are changes in the wound's condition.
Legal use of the Pressure Injury Staging Guide
The legal use of the Pressure Injury Staging Guide is significant in healthcare settings. Accurate documentation of pressure ulcer staging can impact liability and compliance with healthcare regulations. It is essential for healthcare providers to ensure that their assessments align with the guide to meet legal standards. Properly documented stages can serve as evidence in cases of malpractice or disputes, reinforcing the importance of thorough and precise record-keeping.
Examples of using the Pressure Injury Staging Guide
Examples of applying the Pressure Injury Staging Guide can illustrate its practical use in clinical settings. For instance:
- A nurse assesses a patient with a reddened area on the sacrum and identifies it as Stage I based on non-blanchable erythema.
- A clinician observes a deep wound with exposed muscle and classifies it as Stage IV, noting the need for surgical intervention.
- During a routine check, a healthcare provider updates the documentation of a healing Stage II ulcer, reflecting improved condition and treatment effectiveness.
Quick guide on how to complete pressure injury staging guide
Complete Pressure Injury Staging Guide effortlessly on any device
Online document management has become increasingly favored by companies and individuals. It offers an excellent eco-friendly substitute for traditional printed and signed papers, allowing you to find the correct form and securely store it online. airSlate SignNow equips you with all the tools necessary to create, modify, and electronically sign your documents swiftly without delays. Manage Pressure Injury Staging Guide on any platform using airSlate SignNow's Android or iOS applications and enhance any document-driven workflow today.
The simplest way to modify and electronically sign Pressure Injury Staging Guide without effort
- Obtain Pressure Injury Staging Guide and click on Get Form to begin.
- Utilize the tools we provide to finish your form.
- Emphasize pertinent sections of your documents or redact sensitive data using tools specifically designed for that purpose by airSlate SignNow.
- Create your eSignature with the Sign tool, which takes mere seconds and holds the same legal validity as a conventional handwritten signature.
- Review all the information and click on the Done button to save your updates.
- Select how you want to send your form, via email, SMS, or invite link, or download it to your computer.
Forget about lost or misplaced documents, tedious form searches, or errors that necessitate printing new document copies. airSlate SignNow meets all your needs in document management with just a few clicks from any device you choose. Edit and electronically sign Pressure Injury Staging Guide and ensure excellent communication at every stage of the form preparation process with airSlate SignNow.
Create this form in 5 minutes or less
Create this form in 5 minutes!
How to create an eSignature for the pressure injury staging guide
How to create an electronic signature for a PDF online
How to create an electronic signature for a PDF in Google Chrome
How to create an e-signature for signing PDFs in Gmail
How to create an e-signature right from your smartphone
How to create an e-signature for a PDF on iOS
How to create an e-signature for a PDF on Android
People also ask
-
What is a pressure ulcer staging guide?
A pressure ulcer staging guide is a systematic method used by healthcare professionals to classify the severity of pressure ulcers, helping to determine appropriate treatment plans. This guide typically includes stages ranging from mild to severe, providing a clear understanding of the wound's depth and tissue involvement.
-
How can the pressure ulcer staging guide benefit my organization?
Utilizing a pressure ulcer staging guide can signNowly enhance patient care by ensuring consistent assessment and documentation of pressure ulcers. This guide helps healthcare professionals stay informed about best practices, which can ultimately lead to better patient outcomes and reduced complications.
-
Is the pressure ulcer staging guide compatible with airSlate SignNow?
Yes, the pressure ulcer staging guide can be easily integrated into the airSlate SignNow platform. Our solution allows you to streamline document workflows and electronic signatures, ensuring that the staging guide and any related documents are easily accessible and securely signed.
-
What features does airSlate SignNow provide for managing pressure ulcer staging documents?
airSlate SignNow offers features such as document templates, real-time collaboration, and customizable workflows specifically designed for managing important documents like the pressure ulcer staging guide. These features help simplify the signing process and improve efficiency across your organization.
-
How much does it cost to implement a pressure ulcer staging guide with airSlate SignNow?
The cost to implement a pressure ulcer staging guide with airSlate SignNow varies based on your organization's needs and user count. We offer flexible pricing plans that accommodate businesses of all sizes, ensuring you have access to essential tools for managing medical documentation efficiently.
-
Can I customize the pressure ulcer staging guide in airSlate SignNow?
Absolutely! You can customize the pressure ulcer staging guide within airSlate SignNow to meet your specific protocols and requirements. This allows for a tailored approach to pressure ulcer management, ensuring that all relevant information is included for accurate assessments.
-
What industries can benefit from using the pressure ulcer staging guide?
The pressure ulcer staging guide is beneficial for various industries, particularly healthcare facilities, nursing homes, and rehabilitation centers. These organizations can enhance their documentation and care processes by effectively utilizing the staging guide within airSlate SignNow.
Get more for Pressure Injury Staging Guide
Find out other Pressure Injury Staging Guide
- Help Me With Sign New Mexico Healthcare / Medical Medical History
- Can I Sign Ohio Healthcare / Medical Residential Lease Agreement
- How To Sign Oregon Healthcare / Medical Living Will
- How Can I Sign South Carolina Healthcare / Medical Profit And Loss Statement
- Sign Tennessee Healthcare / Medical Business Plan Template Free
- Help Me With Sign Tennessee Healthcare / Medical Living Will
- Sign Texas Healthcare / Medical Contract Mobile
- Sign Washington Healthcare / Medical LLC Operating Agreement Now
- Sign Wisconsin Healthcare / Medical Contract Safe
- Sign Alabama High Tech Last Will And Testament Online
- Sign Delaware High Tech Rental Lease Agreement Online
- Sign Connecticut High Tech Lease Template Easy
- How Can I Sign Louisiana High Tech LLC Operating Agreement
- Sign Louisiana High Tech Month To Month Lease Myself
- How To Sign Alaska Insurance Promissory Note Template
- Sign Arizona Insurance Moving Checklist Secure
- Sign New Mexico High Tech Limited Power Of Attorney Simple
- Sign Oregon High Tech POA Free
- Sign South Carolina High Tech Moving Checklist Now
- Sign South Carolina High Tech Limited Power Of Attorney Free