Dish Wally Installation Diagram Form


What is the Dish Wally Installation Diagram
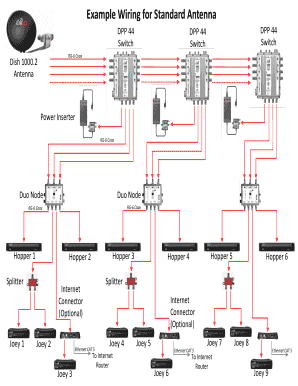
The Dish Wally installation diagram serves as a visual guide for setting up the Dish Network Wally receiver. This diagram outlines the connections and configurations necessary for a successful installation, ensuring that users can easily understand how to connect their devices. It typically includes details such as the wiring layout, the placement of components, and the necessary ports for satellite and internet connections. Understanding this diagram is crucial for both first-time installers and those looking to troubleshoot existing setups.
How to Use the Dish Wally Installation Diagram
Using the Dish Wally installation diagram involves a few straightforward steps. First, locate the diagram, which can often be found in the installation manual or online resources. Next, familiarize yourself with the symbols and labels used in the diagram, as these will indicate various components and connections. Follow the diagram step-by-step to connect the Wally receiver to your television, satellite dish, and any additional devices. It is important to double-check each connection to ensure proper functionality and avoid any potential issues.
Steps to Complete the Dish Wally Installation Diagram
Completing the Dish Wally installation diagram requires careful attention to detail. Start by gathering all necessary components, including the Wally receiver, remote control, HDMI cables, and satellite dish. Next, refer to the installation diagram and follow these steps:
- Connect the satellite dish to the Wally receiver using the appropriate coaxial cables.
- Link the Wally receiver to your television via an HDMI cable.
- Ensure that the power supply is connected and the receiver is plugged into a power source.
- Turn on the television and the Wally receiver, and follow the on-screen prompts to complete the setup.
By following these steps, users can ensure a smooth installation process.
Key Elements of the Dish Wally Installation Diagram
The Dish Wally installation diagram includes several key elements that are essential for a successful setup. These elements typically consist of:
- Component Labels: Clear identification of each part, such as the Wally receiver, satellite dish, and television.
- Connection Types: Indications of the types of cables required, including coaxial, HDMI, and power cables.
- Wiring Layout: A visual representation of how to connect each component, ensuring users understand the flow of connections.
- Installation Steps: Sequential instructions that guide users through the installation process.
Understanding these elements helps users effectively utilize the installation diagram for their Dish Network setup.
Legal Use of the Dish Wally Installation Diagram
The legal use of the Dish Wally installation diagram pertains to ensuring compliance with copyright laws and manufacturer guidelines. Users should only use diagrams provided by Dish Network or authorized sources to avoid potential legal issues. Additionally, it is important to follow any specific instructions outlined in the diagram to ensure that the installation meets safety and operational standards. Misuse of the diagram or deviation from the provided instructions could lead to equipment malfunction or void warranties.
Examples of Using the Dish Wally Installation Diagram
There are various scenarios in which users might refer to the Dish Wally installation diagram. For instance:
- A new customer setting up their Dish Network service for the first time will rely on the diagram to ensure proper connections.
- A user relocating their equipment may consult the diagram to re-establish connections correctly.
- Technicians performing maintenance or troubleshooting can use the diagram to identify potential issues in the wiring or setup.
These examples illustrate the practical applications of the Dish Wally installation diagram in real-world situations.
Quick guide on how to complete wally dish network setup
Effortlessly Complete wally dish network setup on Any Device
Managing documents online has become widespread among businesses and individuals. It offers an excellent eco-friendly substitute for conventional printed and signed documents, allowing you to obtain the necessary form and securely store it online. airSlate SignNow provides all the tools required to create, modify, and electronically sign your documents swiftly without delays. Handle dish wally installation diagram on any device using airSlate SignNow's Android or iOS applications and simplify any document-based process today.
How to alter and electronically sign dish network wiring diagram with ease
- Obtain dish component and click Get Form to begin.
- Utilize the tools we provide to complete your form.
- Emphasize important sections of your documents or redact sensitive information with tools specifically designed by airSlate SignNow for that purpose.
- Generate your electronic signature using the Sign tool, which takes seconds and has identical legal validity as a traditional wet ink signature.
- Review the details and click the Done button to save your edits.
- Choose how you want to send your form, via email, text message (SMS), or invitation link, or download it to your computer.
Eliminate worries about lost or misplaced files, tedious form searches, or mistakes that necessitate printing new document copies. airSlate SignNow meets your document management needs in just a few clicks from any device you prefer. Edit and electronically sign dish network wally setup and ensure effective communication at any stage of your form preparation process with airSlate SignNow.
Create this form in 5 minutes or less
Create this form in 5 minutes!
How to create an eSignature for the dish component
How to create an electronic signature for a PDF online
How to create an electronic signature for a PDF in Google Chrome
How to create an e-signature for signing PDFs in Gmail
How to create an e-signature right from your smartphone
How to create an e-signature for a PDF on iOS
How to create an e-signature for a PDF on Android
People also ask wally dish network setup
-
What is a dish wally installation diagram?
A dish wally installation diagram is a visual guide that provides step-by-step instructions for installing your dish wally. It includes important details such as placement, angle settings, and necessary tools. This diagram ensures that users can set up their dish system effectively and helps avoid common installation mistakes.
-
How can I obtain a dish wally installation diagram?
You can obtain a dish wally installation diagram by visiting the manufacturer’s official website or checking the product packaging. Many manufacturers also provide downloadable resources and videos that illustrate the installation process in detail. Make sure to reference the correct diagram for your specific model.
-
Are there any special tools needed for the dish wally installation diagram?
Yes, the dish wally installation diagram typically indicates certain tools required for installation, such as a wrench, screwdrivers, and a drill. Having the right tools on hand will make the installation process smoother and more efficient. Always consult the diagram for the complete list of necessary tools before starting your project.
-
What are the benefits of using a dish wally installation diagram?
Using a dish wally installation diagram can signNowly simplify the installation process. It allows users to follow precise instructions, ensuring the dish is properly aligned for optimal signal reception. Additionally, it helps prevent errors and enhances the overall effectiveness of your dish setup.
-
Is there a cost associated with a dish wally installation diagram?
Most dish wally installation diagrams are provided free of charge by manufacturers or can be accessed online. However, some premium guides or additional resources may have associated costs. Always check the available options to find a suitable and cost-effective solution for your installation needs.
-
Can I use the dish wally installation diagram for different models?
While some basic components may be similar, it is crucial to use the specific dish wally installation diagram designed for your particular model. Each dish model may have unique requirements or configurations that could impact performance. Following the correct diagram ensures optimal functionality and prevents installation errors.
-
What common mistakes can a dish wally installation diagram help me avoid?
A dish wally installation diagram can help you avoid several common installation mistakes, such as improper alignment and incorrect mounting locations. By following the diagram closely, you can ensure the dish is positioned correctly for best signal quality. This proactive approach minimizes the need for future adjustments or troubleshooting.
Get more for dish wally wiring diagram
Find out other wally dish setup
- Sign Delaware High Tech Rental Lease Agreement Online
- Sign Connecticut High Tech Lease Template Easy
- How Can I Sign Louisiana High Tech LLC Operating Agreement
- Sign Louisiana High Tech Month To Month Lease Myself
- How To Sign Alaska Insurance Promissory Note Template
- Sign Arizona Insurance Moving Checklist Secure
- Sign New Mexico High Tech Limited Power Of Attorney Simple
- Sign Oregon High Tech POA Free
- Sign South Carolina High Tech Moving Checklist Now
- Sign South Carolina High Tech Limited Power Of Attorney Free
- Sign West Virginia High Tech Quitclaim Deed Myself
- Sign Delaware Insurance Claim Online
- Sign Delaware Insurance Contract Later
- Sign Hawaii Insurance NDA Safe
- Sign Georgia Insurance POA Later
- How Can I Sign Alabama Lawers Lease Agreement
- How Can I Sign California Lawers Lease Agreement
- Sign Colorado Lawers Operating Agreement Later
- Sign Connecticut Lawers Limited Power Of Attorney Online
- Sign Hawaii Lawers Cease And Desist Letter Easy