Notarization is the official process by which a notary public verifies that the documents being signed are authentic and legally valid. Online notarization is changing how we authenticate documents, offering a convenient and legally valid option in many states. SignNow notary service provides a seamless and secure way to get your documents notarized remotely.
- Online notarization platforms allow documents to be notarized remotely via secure digital platforms, connecting individuals with a certified notary.
- What can you notarize online? Legal documents like affidavits, power of attorney, and travel consent forms can be notarized online.
- Is remote notarization legitimate? Yes, it is legal in 29 states and holds the same validity as in-person notarization, where allowed.
- Why choose SignNow? SignNow online notary service offers secure, efficient, and user-friendly online notarization with 24/7 availability and advanced document management features.
- How to notarize with SignNow? Upload your document, eSign it, and use the Notarize integration to complete the process remotely.
Introduction
Whether you’re buying a property, signing a job contract, or submitting immigration-related papers, the documents need to be legally valid in case of a potential court dispute. Notarization helps you do that by preventing fraud, ensuring that your document is accurate, and that all involved parties understand the document’s contents and sign it voluntarily.
This article covers the basics of notarization and explains how to notarize a document remotely using SignNow’s eSignature solution. Let’s dive right in.
What is notarization?
Notarization is the official process conducted by a notary public (a government-authorized legal professional) to assure the parties involved in a transaction that any documents they’re signing are authentic and legally valid.
Multiple types of documents can be notarized, including power of attorney, affidavits, legal agreements, parental consent for travel, and other legally binding documents that require signer validation, notarial certificates, and electronic seals for authentication.
Notarizing a document involves three key steps:
- Vetting: A notary public reviews the document that will be notarized
- Certifying: A notary public verifies the signer’s identity to ensure they are the same individual whose signature will be placed on the document. During this step, the notary public confirms that the signers are aware of their actions and are signing the documents of their own free will
- Record-keeping: A notary public must log every transaction they witness into a notary’s journal, including time and date, information about the signatories, type of document, etc., as evidence of the completed notarial act.
Who can notarize a document?
In the United States, state government officials, such as the governor, lieutenant governor, secretary of state, or, in certain instances, the state legislature, appoint a notary public.
To provide notary services, a notary public must meet specific requirements set by each state. These include:
- Being over 18 years old
- Being a resident of the state where they wish to be a notary
- Having no felony convictions
The main responsibility of a notary public is to act as an impartial witness to deter fraud by verifying the authenticity of signatures on documents.
What can a notary public do?
Compared to notaries in most other common-law countries, U.S. notaries are less closely regulated because they need more legal authority. However, they are only allowed to perform duties outside their home state if they’re also commissioned there.
For instance, a lay notary may not offer legal advice or prepare documents – except in Louisiana and Puerto Rico – and in most cases, cannot recommend how a person should sign a document or what type of notarization is necessary.
However, there are some exceptions. For example, Florida notaries may take affidavits, draft inventories of safe deposit boxes, draft protests to pay dishonored checks and promissory notes, and solemnize marriages. In most states, a notary can certify or attest a copy or facsimile.
What documents require notarization?
Notarization adds a layer of legal assurance that the signatures on a document are authentic. While the specific requirements vary by jurisdiction and the nature of the transaction, many important documents must be notarized to be legally valid. Here are some common examples:
- Legal paperwork: Affidavits, depositions, and power of attorney documents often require a notary’s seal to verify the signer’s identity and the date of signing.
- Real estate documents: Transactions involving property, such as deeds, mortgage agreements, bills of sale, and property transfer forms, typically require notarization to prevent fraud.
- Estate planning documents: Wills, trusts, and advance directives are frequently notarized to confirm that the person signing is doing so willingly and is of sound mind.
- Parental consent forms: Documents like travel consent forms for minors or medical authorization forms often require notarization to be considered valid.
- Business and financial agreements: Certain high-value contracts, loan agreements, promissory notes, and sworn financial statements may need a notary to be legally binding.
How do you get something notarized?
1. Prepare a document for notarization
Start by identifying the type of document that needs notarization, such as a will, contract, or deed. Draft the document or use a document template. Fill out the necessary information, such as the names of the signers, payment details, etc., leaving the signature fields blank.
Once a document is notarized, it can’t be changed, so it must be accurate and factually correct before the notarization. Consider hiring a legal professional to review the draft for errors, loopholes, and wording to avoid any unwanted consequences in case of a legal dispute.
2. Find a certified notary public
Review local notary listings to find a certified notary public in your area. Depending on the type of document you want to notarize, you might need to do some research. You can also try notary associations, banks, law offices, or local government offices.
Most banks have an in-house notary, so customers can use notary services for free or for a small fee. Other options include visiting a courthouse, consulting a real estate agency (especially if you need to notarize property-related documents), or hiring a mobile notary who will come to your location.
3. Sign the document in person or online
The signers must agree on the place and time to notarize the document that is convenient for them. Each signer appears in person or online so that a notary can validate the authenticity of signatures. They must provide government-issued photo IDs to verify their identities.
It’s a good idea to arrange a notary appointment prior to the notarization to get all your questions answered. In some cases, only your signature must be notarized. In other cases, such as property sales or purchases, the signatures of other parties must be notarized.
4. The notary makes a record of the notarization
The notary public must keep records about the notarization, including the document type, names of the signing parties, and notarization date. Recordkeeping provides evidence of the notary public’s actions and can be used as proof of a transaction in case of a legal dispute. A detailed account of what occurred during the notarial act can help resolve further court disputes.
5. The notary adds seal and signature
Once all signatories have signed the document, the notary public must affix their official seal and signature along with the notarization date. The notary seal guarantees the authenticity of the document.
6. Pay the notary fee
Notary fees can vary based on the document type, complexity, and state where the notarization takes place. Many U.S. states don’t regulate notary fees. Typically, the standard notary fee ranges between $5 to $25 for a signature in the states where the fee is regulated.
7. Get the notarized document
To finalize the notarization procedure, the notary must provide you with the notarized document, which is now legally valid and authenticated.
What is remote online notarization?
In 2026, visiting a notary in person is no longer the only option to notarize a document. Remote online notarization (RON) allows individuals to have their documents notarized digitally via a secure online platform. RON is also known as webcam notarization, online notarization, or virtual notarization.
The process involves uploading the document to a secure notary platform, verifying the signer’s identity using methods like knowledge-based verification or credential analysis, and then connecting with a notary public via a live audio-video call. During the session, the notary witnesses the signing, applies their electronic seal and signature, and records the session for legal compliance.
Is remote notarization legitimate?
Yes, remote notarization is legitimate and legally recognized in many states across the U.S. Here’s what you need to know:
- Legal framework: As of 2026, most states have passed laws authorizing remote online notarization (RON). These laws ensure that online-notarized documents have the same legal weight as those notarized in person, provided RON is legal in the state.
- Interstate restrictions: Some states require the notary to reside in the same state where the transaction occurs, limiting interstate notarization.
- Electronic signatures: The ESIGN Act defines an electronic signature as any symbol attached to a document that confirms the signer’s intent to sign. This ensures that e-signed and notarized documents are legally binding.
Growing popularity
Online notarization is becoming increasingly popular due to its convenience, efficiency, and ability to meet the needs of remote transactions. By using SignNow’s notary services, you can ensure compliance with state laws while enjoying the benefits of remote notarization.
How do you notarize a document with SignNow?
SignNow integrates seamlessly with Notarize, enabling users to notarize documents online anytime, anywhere. This convenient collaboration provides 24/7 access to professional notarization, eliminating the hassle of scheduling in-person appointments. Whether you’re managing business, real estate, or personal documents, the service provides a fast, secure, and user-friendly notarization process.
We’re going to use a Minor Travel Consent Form for this tutorial.
How to notarize a document with SignNow: A step-by-step guide
1. Log in to your SignNow account using your platform credentials or via your Google, Facebook, or Microsoft accounts. If you’re a new user, sign up for a free trial.
2. From your dashboard, click +Create > Document to upload a new document to the platform. You can upload a file from your device, cloud storage, or secure URL. You can also choose a ready-to-use travel consent form template from the SignNow Forms Library.
Note: SignNow supports most in-demand document formats (PDF, DOCX, PPTX) and image formats (JPG/JPEG, PNG).
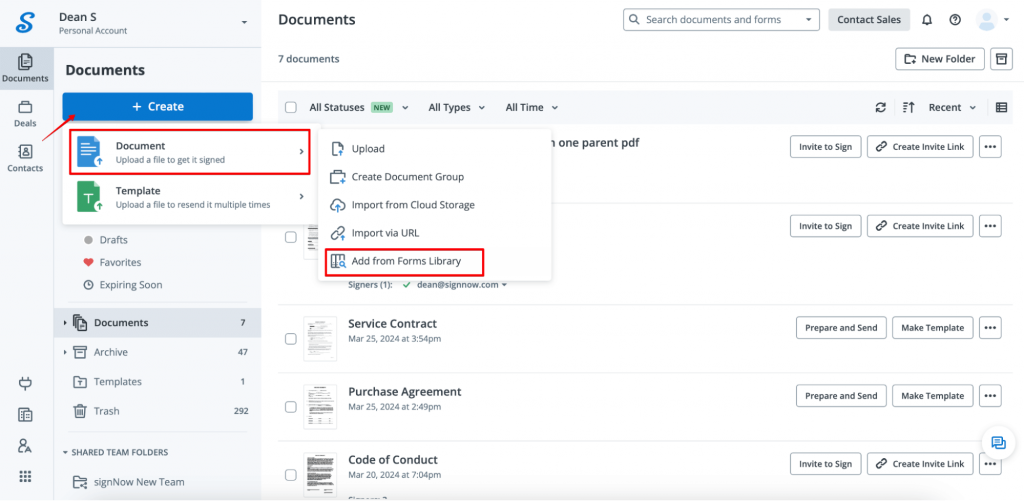
You can also drag and drop the document or form onto the SignNow dashboard. Once the document is uploaded, it will open in the editor automatically.
3. Prepare the form for fill-out and signing. If you need to fill out certain fields yourself, click Me (Fill Out Now) in the left sidebar.
The Minor Travel Consent Form template from the SignNow library already has fillable fields. You can add extra fillable fields, if needed, by dragging and dropping the relevant field from the left sidebar onto the document.
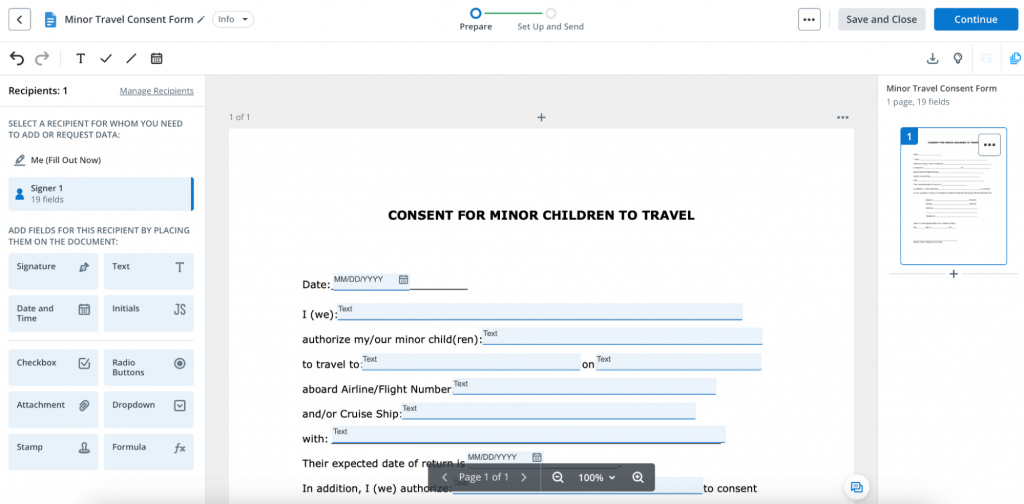
4. Once all the fields are filled out, click Save and Close at the top of the screen. Do not add your electronic signature to the document – the eSigning process must take place in the notary’s presence.
When you’re ready to eSign your document and get it notarized, in the dashboard, click the menu next to the file name (a three-dot button), and select Notarize.
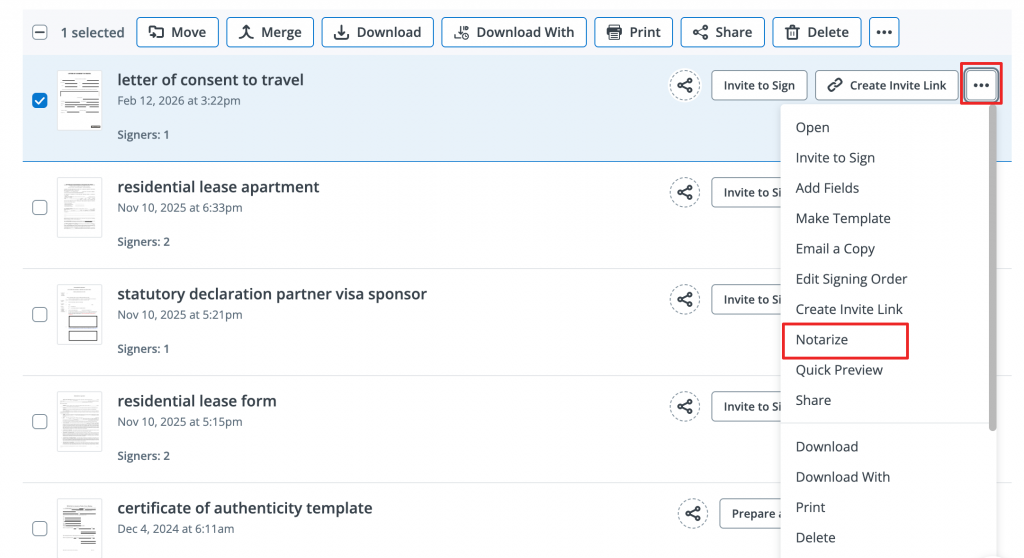
Note: You must be located in the United States for the document to be legally binding after online notarization.
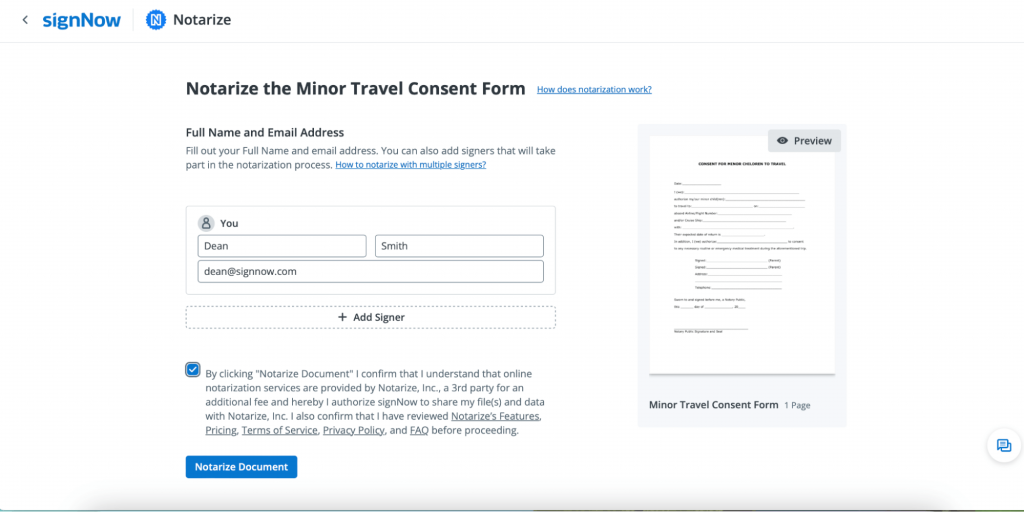
5. You will be forwarded to the next screen. Provide your full name and email address. You can also add other signatories who will participate in the notarization process. When finished, check the box to agree to the terms and conditions of the notarization service. This authorizes SignNow to share your files and data with Notarize. Click Notarize Document to continue.
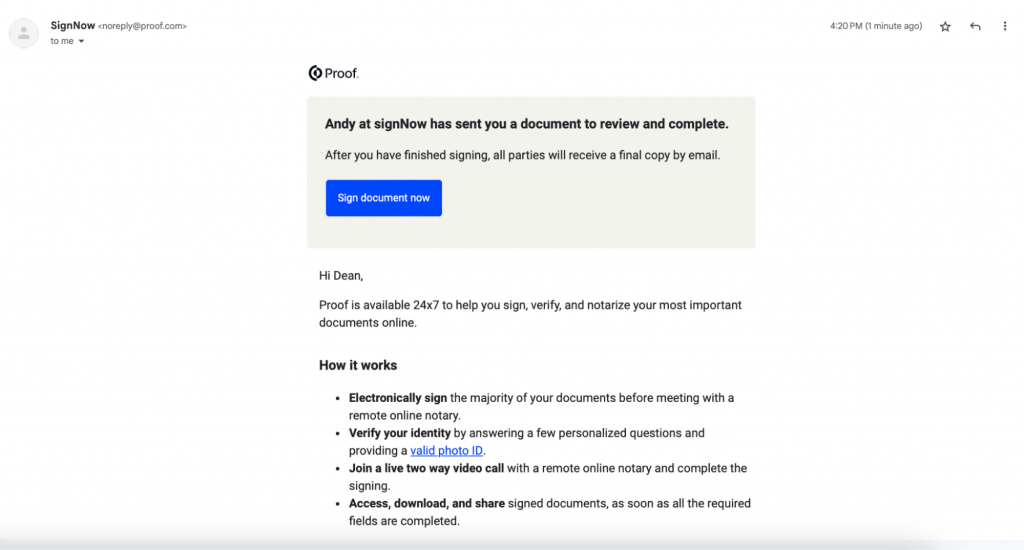
6. Navigate to your mailbox and open an email from SignNow asking you to proceed to Proof, which assists with notarization. Click Sign document now in your email to continue.
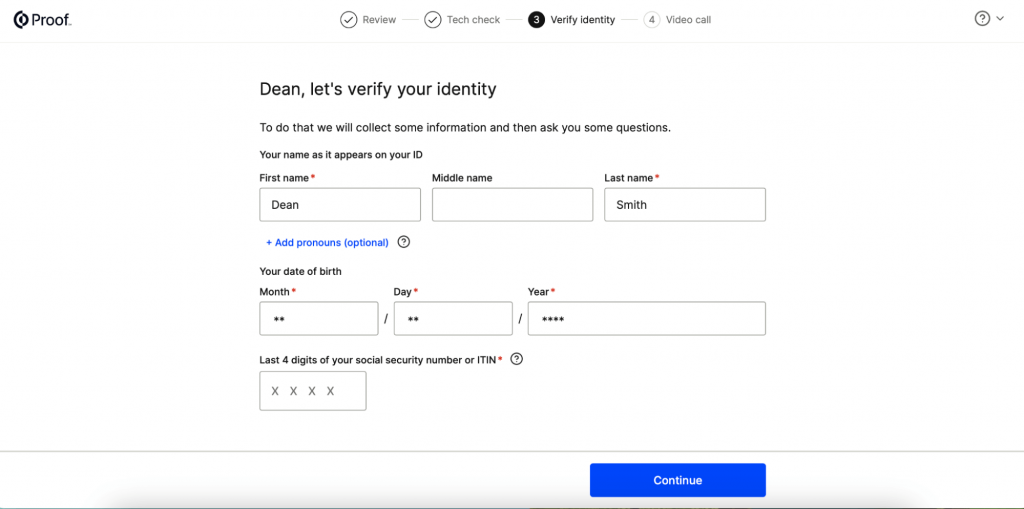
7. After being forwarded to Proof, you must complete the following four steps:
- Review the document
- Check your internet connection, video, and audio settings
- Verify your identity by providing a valid photo ID
- Get on a video chat with a notary to finalize the notarization.
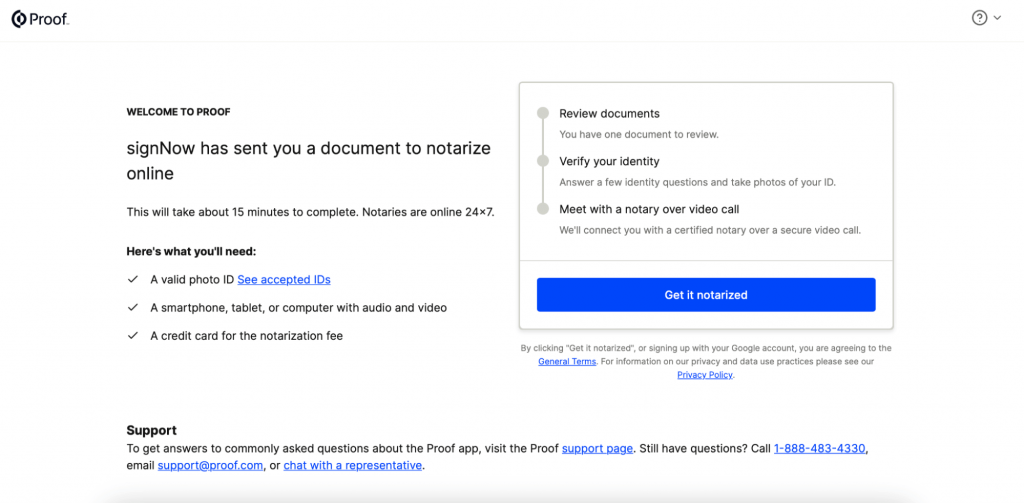
Note: You must provide your credit card details to pay the notarization fee.
8. Finish the video call with the notary and proceed to your mailbox to get your notarized document.
Features and benefits: Why people choose SignNow?
SignNow is designed to simplify and enhance the entire document signing process, even when your paperwork requires notarization. Here’s why SignNow stands out:
- Seamless integration with Notarize: SignNow integrates with Notarize, allowing users to complete the entire notarization process online. This includes identity verification, video conferencing with a notary, and secure document handling.
- User-friendly interface: SignNow’s intuitive dashboard makes it easy to upload, edit, and eSign documents. The drag-and-drop functionality lets you easily add fillable fields and assign them to specific signing parties, streamlining workflows.
- Advanced features: SignNow offers advanced features like document templates, auto-tagging, multi-device compatibility, and secure, encrypted storage.
- 24/7 availability: SignNow is a cloud-based solution, so it’s available 24/7. With notaries also available around the clock, you can notarize documents anytime, anywhere, without delays.
- Compliance and trust: SignNow adheres to industry standards and legal requirements, ensuring that your documents are valid and secure. Its compliance with the ESIGN Act and other regulations makes it a trusted choice for businesses and individuals.
Successful use cases: How SignNow transformed document transactions
SignNow has helped organizations across different industries—from government agencies and universities to law firms and notaries—ensure the security and validity of document transactions.
SignNow’s electronic signature capabilities can be easily integrated into any notary platform via API to facilitate the notarization process. Using SignNow’s e-signature API, NotaryPro, a Notary Public and Commissioner service from Canada, was able to enhance their remote online notarization experience and grow their business despite the pandemic.
SignNow’s rich features, such as auto-tagging, document templates, and automated guidance through fillable fields, allowed NotaryPro to accelerate and streamline their notarization process:
Templates and auto-tagging may save you about two minutes on each document. If you start to take into consideration the many documents we get per day, per week, or per month; time savings can add to our top line. We are looking at hours of work time saved.
Final thoughts
Remote notarization delivers great value for anyone looking to optimize document workflows. By enabling you to sign online and witness this process from anywhere, it removes barriers associated with in-person appointments and manual paperwork. Teams can securely sign important agreements without delays, improving efficiency and reducing risk. A trusted online service for document approval and witnessing helps companies stay agile and compliant, keeping business moving forward when and where it matters most.
SignNow makes it easy to take full advantage of these benefits. The platform combines an intuitive experience with powerful features, allowing you to securely sign and notarize documents in just a few steps. It delivers reliability, transparency, and real ROI every time you need a trusted solution for online signatures.
Ready to see the great value for yourself? Start your free trial with SignNow today and simplify the way you sign and notarize vital documents.
FAQ
1. Is SignNow notary service secure?
Yes, SignNow is a secure and reliable eSignature solution. It holds a SOC 2 Type II certification, ensuring compliance with industry standards for confidentiality and security. SignNow also fully complies with ESIGN Act regulations. The notarization feature is available via the platform’s API integration with Notarize, a leading RON service that ensures secure, legally valid online document notarization in the U.S.
2. Can I notarize documents from any state?
Remote notarization is legal in 29 states. However, some states have restrictions requiring the notary to reside in the same state as the transaction. It’s important to carefully review the regulations in your state before proceeding with remote notarization to avoid potential legal complications.
3. What types of documents can I notarize with SignNow?
With SignNow, you can notarize remotely any document that requires signature verification. These include legal, real estate, financial, and parental consent documents, etc. You can find the ready-to-use templates in SignNow’s Forms Library or upload your own documents from your device or cloud storage.
4. Can I edit and prepare documents in SignNow before signing?
Yes, SignNow provides users with a wide range of form-building tools to prepare documents before sending them for signature. These include adding text, checkboxes, date and signature fields, and merging multiple documents into a single file. Complete the form fields to prepare your documents for electronic signing and remote notarization.
5. Can I use SignNow on my mobile device?
You can access SignNow on any device thanks to its cloud-based nature. You can do it in a mobile browser or use the platform’s mobile apps for Android and iOS, which let you access and sign documents on the go. These apps also offer offline signing, enabling you to sign documents even without an internet connection.
6. Which subscription plan includes SignNow notary feature?
SignNow online notary is included in all our subscription plans. You can check our pricing page to learn about the different plans we offer and their features. For details on the current costs of notarization services, visit the Notarize website.
- Introduction
- What is notarization?
- Who can notarize a document?
- What documents require notarization?
- How do you get something notarized?
- What is remote online notarization?
- How do you notarize a document with SignNow?
- Features and benefits: Why people choose SignNow?
- Successful use cases: How SignNow transformed document transactions
- Final thoughts
- FAQ