Alaska Proxy Fishing Form 2014-2026


What is the Alaska Proxy Fishing Form
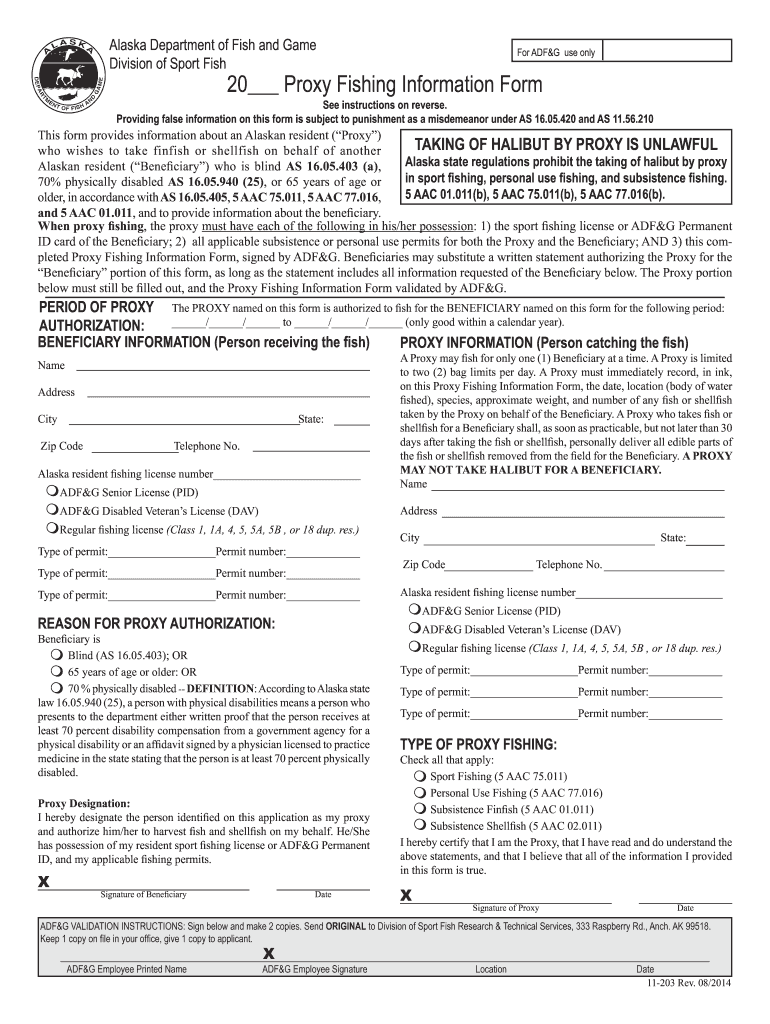
The Alaska Proxy Fishing Form allows individuals to authorize another person to fish on their behalf. This form is essential for those who may be unable to fish due to various reasons, such as health issues or other commitments. The proxy fishing license is recognized by the Alaska Department of Fish and Game, ensuring that the designated proxy can legally fish in the state’s waters while adhering to local regulations.
How to use the Alaska Proxy Fishing Form
Using the Alaska Proxy Fishing Form involves several straightforward steps. First, the individual wishing to designate a proxy must complete the form with accurate information, including the names and addresses of both the principal and the proxy. Once filled out, the form should be signed and dated by the principal. The proxy must then carry this form while fishing, as it serves as proof of their authorization to fish on behalf of the principal.
Steps to complete the Alaska Proxy Fishing Form
Completing the Alaska Proxy Fishing Form requires careful attention to detail. Follow these steps:
- Obtain the Alaska Proxy Fishing Form from the Alaska Department of Fish and Game or a designated location.
- Fill in the required personal information for both the principal and the proxy, including full names and addresses.
- Sign and date the form to validate the authorization.
- Ensure that the proxy carries the completed form while fishing to comply with regulations.
Legal use of the Alaska Proxy Fishing Form
The legal use of the Alaska Proxy Fishing Form is governed by state regulations. This form must be filled out correctly and signed by the principal to be considered valid. It is important for both the principal and the proxy to understand the specific fishing regulations that apply, including species limits and fishing seasons. Failure to comply with these regulations can result in penalties.
Key elements of the Alaska Proxy Fishing Form
Several key elements must be included in the Alaska Proxy Fishing Form for it to be valid:
- Principal's Information: Full name and address of the person granting proxy.
- Proxy's Information: Full name and address of the person receiving the proxy.
- Signature: The principal's signature and date are required to authorize the proxy.
- Fishing Regulations: Acknowledgment of understanding the applicable fishing regulations.
How to obtain the Alaska Proxy Fishing Form
The Alaska Proxy Fishing Form can be obtained through various channels. Individuals can visit the Alaska Department of Fish and Game's official website to download the form or request a physical copy from local fish and game offices. Additionally, some sporting goods stores or fishing supply shops may have printed copies available for convenience.
Quick guide on how to complete alaska proxy 2014 2019 form
Finalize Alaska Proxy Fishing Form seamlessly on any gadget
Digital document management has gained popularity among businesses and individuals alike. It offers an ideal environmentally friendly alternative to traditional printed and signed documents, allowing you to access the correct form and securely store it online. airSlate SignNow provides all the tools necessary to create, modify, and electronically sign your documents swiftly without any hold-ups. Manage Alaska Proxy Fishing Form on any device using airSlate SignNow's Android or iOS applications and simplify any document-related task today.
The easiest way to modify and electronically sign Alaska Proxy Fishing Form effortlessly
- Obtain Alaska Proxy Fishing Form and then click Get Form to begin.
- Use the tools we offer to complete your document.
- Emphasize important sections of the documents or redact sensitive information using tools specifically designed for that purpose by airSlate SignNow.
- Create your electronic signature with the Sign feature, which only takes a few seconds and carries the same legal validity as a conventional wet ink signature.
- Review all the details and click on the Done button to save your changes.
- Select your preferred method for sharing your form—via email, text message (SMS), an invite link, or downloading it to your computer.
Eliminate worries about lost or misfiled documents, tedious form searching, or errors that necessitate printing new document copies. airSlate SignNow manages all your document needs in just a few clicks from any device you choose. Modify and electronically sign Alaska Proxy Fishing Form while ensuring outstanding communication throughout the form preparation workflow with airSlate SignNow.
Create this form in 5 minutes or less
FAQs
-
How do I fill out a CLAT 2019 application form?
Hi thereFirst of all, let me tell you some important points:CLAT 2019 has gone OFFLINE this yearBut the application forms for CLAT 2019 have to be filled ONLINEThe payment of the application fees also should be made onlineNow, kindly note the important dates:Note the details regarding the application fees:Here, if you want the Previous Year Question papers, Rs.500 would be added to the application fees.Apart from this, there would be bank transaction charges added to the application fees.The application fees is non-refundable.Note one important point here that before you fill the application form, check for your eligibility.To know the complete details of filling the application form along with other information like the eligibility - in terms of age, educational qualification, list of NLUs participating and the seats offered under each category, CLAT Reservation policies, CLAT exam pattern, marking scheme, syllabus, important documents required to be kept ready before filling the form, kindly go to the link below:How to fill CLAT 2019 Application form? Registration OPEN | All you need to knowTo know how to prepare for one of the very important section of CLAT exam, GK and Current Affairs, kindly go to the link below:How to prepare GK & Current Affairs for CLAT 2019To practice, daily MCQs on Current Affairs, kindly go to the link below:#CLAT2019 | #AILET2019 | #DULLB2019 | GK and Current Affairs Series: 5 in 10 Series: Day 12For any other queries, kindly write to us at mailateasyway@gmail.comThanks & Regards!
-
How do I fill out the NEET 2019 application form?
Expecting application form of NEET2019 will be same as that of NEET2018, follow the instructions-For Feb 2019 Exam:EventsDates (Announced)Release of application form-1st October 2018Application submission last date-31st October 2018Last date to pay the fee-Last week of October 2018Correction Window Open-1st week of November 2018Admit card available-1st week of January 2019Exam date-3rd February to 17th February 2019Answer key & OMR release-Within a week after examAnnouncement of result-1st week of March 2019Counselling begins-2nd week of June 2019For May 2019 Exam:EventsDates (Announced)Application form Release-2nd week of March 2019Application submission last date-2nd week of April 2019Last date to pay the fee-2nd week of April 2019Correction Window Open-3rd week of April 2019Admit card available-1st week of May 2019Exam date-12th May to 26th May 2019Answer key & OMR release-Within a week after examAnnouncement of result-1st week of June 2019Counselling begins-2nd week of June 2019NEET 2019 Application FormCandidates should fill the application form as per the instructions given in the information bulletin. Below we are providing NEET 2019 application form details:The application form will be issued through online mode only.No application will be entertained through offline mode.NEET UG registration 2019 will be commenced from the 1st October 2018 (Feb Exam) & second week of March 2018 (May Exam).Candidates should upload the scanned images of recent passport size photograph and signature.After filling the application form completely, a confirmation page will be generated. Download it.There will be no need to send the printed confirmation page to the board.Application Fee:General and OBC candidates will have to pay Rs. 1400/- as an application fee.The application fee for SC/ST and PH candidates will be Rs. 750/-.Fee payment can be done through credit/debit card, net banking, UPI and e-wallet.Service tax will also be applicable.CategoryApplication FeeGeneral/OBC-1400/-SC/ST/PH-750/-Step 1: Fill the Application FormGo the official portal of the conducting authority (Link will be given above).Click on “Apply Online” link.A candidate has to read all the instruction and then click on “Proceed to Apply Online NEET (UG) 2019”.Step 1.1: New RegistrationFill the registration form carefully.Candidates have to fill their name, Mother’s Name, Father’s Name, Category, Date of Birth, Gender, Nationality, State of Eligibility (for 15% All India Quota), Mobile Number, Email ID, Aadhaar card number, etc.After filling all the details, two links will be given “Preview &Next” and “Reset”.If candidate satisfied with the filled information, then they have to click on “Next”.After clicking on Next Button, the information submitted by the candidate will be displayed on the screen. If information correct, click on “Next” button, otherwise go for “Back” button.Candidates may note down the registration number for further procedure.Now choose the strong password and re enter the password.Choose security question and feed answer.Enter the OTP would be sent to your mobile number.Submit the button.Step 1.2: Login & Application Form FillingLogin with your Registration Number and password.Fill personal details.Enter place of birth.Choose the medium of question paper.Choose examination centres.Fill permanent address.Fill correspondence address.Fill Details (qualification, occupation, annual income) of parents and guardians.Choose the option for dress code.Enter security pin & click on save & draft.Now click on preview and submit.Now, review your entries.Then. click on Final Submit.Step 2: Upload Photo and SignatureStep 2 for images upload will be appeared on screen.Now, click on link for Upload photo & signature.Upload the scanned images.Candidate should have scanned images of his latest Photograph (size of 10 Kb to 100 Kb.Signature(size of 3 Kb to 20 Kb) in JPEG format only.Step 3: Fee PaymentAfter uploading the images, candidate will automatically go to the link for fee payment.A candidate has to follow the instruction & submit the application fee.Choose the Bank for making payment.Go for Payment.Candidate can pay the fee through Debit/Credit Card/Net Banking/e-wallet (CSC).Step 4: Take the Printout of Confirmation PageAfter the fee payment, a candidate may take the printout of the confirmation page.Candidates may keep at least three copies of the confirmation page.Note:Must retain copy of the system generated Self Declaration in respect of candidates from J&K who have opted for seats under 15% All India Quota.IF any queries, feel free to comment..best of luck
-
How can I fill out the BITSAT Application Form 2019?
BITSAT 2019 Application Forms are available online. Students who are eligible for the admission test can apply online before 20 March 2018, 5 pm.Click here to apply for BITSAT 2019Step 1: Follow the link given aboveStep 2: Fill online application formPersonal Details12th Examination DetailsTest Centre PreferencesStep 3: Upload scanned photograph (4 kb to 50 kb) and signature ( 1 kb to 30 kb).Step 4: Pay application fee either through online payment mode or through e-challan (ICICI Bank)BITSAT-2019 Application FeeMale Candidates - Rs. 3150/-Female Candidates - Rs. 2650/-Thanks!
-
How can I fill out the COMEDK 2019 application form?
COMEDK 2019 application is fully online based and there is no need to send the application by post or by any other method. Check the below-mentioned guidelines to register for the COMEDK 2019 exam:Step 1 Visit the official website of the COMEDK UGET- comedk.orgStep 2 Click on “Engineering Application”.Step 3 After that click on “Login or Register” button.Step 4 You will be asked to enter the Application SEQ Number/User ID and Password. But since you have not registered. You need to click on the “Click here for Registration”.Step 5 Fill in the required details like “Full Name”, “DOB”, “Unique Photo ID Proof”, “Photo ID Proof Number”, “Email ID” and “Mobile Number”.Step 6 Then click on the “Generate OTP”Step 7 After that you need to enter the captcha code and then an OTP will be sent to the mobile number that you have provided.Step 8 A new window having your previously entered registration details will open where you need to enter the OTP.Step 9 Re-check all the details, enter the captcha code and click on the “Register” button.Step 10 After that a page will appear where you will be having the User ID and all the details that you entered. Also, you will be notified that you have successfully registered yourself and a User ID and Password will be sent to your mobile number and email ID.COMEDK 2019 Notification | Steps To Apply For COMEDK UGET ExamCheck the below-mentioned guidelines to fill COMEDK Application Form after COMEDK Login.Step 1 Using your User ID and Password. Log in using the User ID and passwordStep 2 You will be shown that your application form is incomplete. So you need to go to the topmost right corner and click on the “Go to application” tab.Step 3 Go to the COMEDK official website and login with these credentials.Step 4 After that click on “Go to application form”.Step 5 Select your preferred stream and course.Step 6 Click on “Save and Continue”.Step 7 Carefully enter your Personal, Category and Academic details.Step 8 Upload your Photograph and Signature, Parents Signature, your ID Proof, and Declaration.Step 9 Enter your “Payment Mode” and “Amount”.Step 10 Enter “Security code”.Step 11 Tick the “I Agree” checkbox.Step 12 Click on the “Submit” button.
-
How can I fill out the application form for the JMI (Jamia Millia Islamia) 2019?
Form for jamia school have been releaseYou can fill it from jamia siteJamia Millia Islamia And for collegeMost probably the form will out end of this month or next monthBut visit the jamia site regularly.Jamia Millia Islamiacheck whether the form is out or not for the course you want to apply.when notification is out then you have to create the account for entrance and for 2 entrance same account will be used you have to check in the account that the course you want to apply is there in listed or not ….if not then you have to create the different account for that course .If you have any doubts you can freely ask me .
-
How do I fill out the JEE Main 2019 exam application form?
Steps to fill out the JEE Mains 2019 application form?How to Fill JEE Main 2019 Application FormJEE Main 2019 Registration Process to be followed on the NTA Website:Step 1: Visit the website of NTA or CLick here.Step 2: Click on NTA exams or on Joint Entrance Examination under the Engineering Section given on the same page.Step 3: You will see the registration button as shown in the image below. Read all the eligibility criteria and click on “Registration”Step 4: Candidates will be redirected to the JEE Main 2019 official website where they have to click on “Fill Application Form”.Step 5: Now, Click on “Apply for JEE Main 2019”. Read all instructions carefully and proceed to apply online by clicking on the button given at the end of the page.Step 6: Fill in all the details as asked. Submit the authentication form with correct details.Step 7: Upload the scanned images in correct specification given on the instructions page.Step 8: Pay the Application fee and take a print out of the filled up application form.Aadhar Card Required for JEE Main 2019 RegistrationFor the last two years, Aadhar card was made mandatory for each candidate to possess for the application form filling of JEE Main. However, since JEE Main 2019 is now to be conducted by NTA, they have asked the candidates to enter their Aadhar card number. The Aadhar card number is necessary for JEE Main 2019 Application form and candidates must be ready with their Aadhar card number to enter it in the application form.JEE main 2019 Application Form will be available twice, once in the month of September for the January 2019 exam and again in the month of February for the April exam. Thus, first, the candidates have to fill out the application form of January 2019 examination in the month of September 2018.
-
How many forms are filled out in the JEE Main 2019 to date?
You should wait till last date to get these type of statistics .NTA will release how much application is received by them.
Create this form in 5 minutes!
How to create an eSignature for the alaska proxy 2014 2019 form
How to generate an eSignature for the Alaska Proxy 2014 2019 Form in the online mode
How to make an eSignature for your Alaska Proxy 2014 2019 Form in Google Chrome
How to generate an electronic signature for signing the Alaska Proxy 2014 2019 Form in Gmail
How to generate an electronic signature for the Alaska Proxy 2014 2019 Form from your smartphone
How to create an eSignature for the Alaska Proxy 2014 2019 Form on iOS
How to generate an electronic signature for the Alaska Proxy 2014 2019 Form on Android OS
People also ask
-
What is the Alaska Proxy Fishing Form and why is it important?
The Alaska Proxy Fishing Form is a legal document that allows individuals to designate another person to fish on their behalf in Alaska. This form is essential for ensuring compliance with state regulations while enabling absentee fishing. By utilizing the Alaska Proxy Fishing Form, you can enjoy fishing in Alaska even if you are not physically present.
-
How can I obtain the Alaska Proxy Fishing Form?
You can easily obtain the Alaska Proxy Fishing Form through the airSlate SignNow platform. Our user-friendly interface allows you to access, fill out, and eSign the form digitally, making the process quick and efficient. Simply visit our website to get started with your Alaska Proxy Fishing Form today.
-
What features does airSlate SignNow offer for the Alaska Proxy Fishing Form?
airSlate SignNow provides a range of features for the Alaska Proxy Fishing Form, including customizable templates, secure electronic signatures, and real-time tracking. These features streamline the completion process, ensuring your form is filled out accurately and submitted on time. With our platform, managing your Alaska Proxy Fishing Form has never been easier.
-
Is there a cost associated with using the Alaska Proxy Fishing Form on airSlate SignNow?
Yes, airSlate SignNow offers competitive pricing plans for using the Alaska Proxy Fishing Form. We provide various subscription options to fit your needs, ranging from individual plans to business solutions. This flexibility ensures that you can manage your forms economically while benefiting from our comprehensive features.
-
Can I integrate the Alaska Proxy Fishing Form with other tools?
Absolutely! airSlate SignNow allows seamless integration with a variety of popular applications and tools, enabling you to enhance your workflow. Whether you’re using cloud storage services or CRM systems, you can easily incorporate the Alaska Proxy Fishing Form into your existing processes.
-
What are the benefits of using airSlate SignNow for the Alaska Proxy Fishing Form?
Using airSlate SignNow for the Alaska Proxy Fishing Form offers numerous benefits, including time savings, enhanced security, and improved collaboration. Our platform ensures that your document is stored securely and can be accessed anytime, anywhere. Additionally, the ease of eSigning accelerates the approval process, allowing you to focus on enjoying your fishing experience.
-
Is the Alaska Proxy Fishing Form legally binding?
Yes, the Alaska Proxy Fishing Form is legally binding when completed correctly and signed using airSlate SignNow's secure electronic signature feature. Our platform adheres to all legal requirements for electronic signatures, ensuring that your form is valid and enforceable under Alaska law. This gives you peace of mind when delegating your fishing rights.
Get more for Alaska Proxy Fishing Form
- Exercitii matematica clasa pregatitoare pdf form
- Fire drill record template form
- Hbl biometric verification form
- Santander schadensmeldung auto form
- Glaze trading india private limited company details pdf form
- Testul valorilor demartini form
- Application for transfer of registration vicroads form
- Accuratebiometrics comfilesfd 1164cardfbi fd 1164 fingerprint form with instructions for using fbi
Find out other Alaska Proxy Fishing Form
- How Do I eSign Oklahoma Government Separation Agreement
- How Do I eSign Tennessee Healthcare / Medical Living Will
- eSign West Virginia Healthcare / Medical Forbearance Agreement Online
- eSign Alabama Insurance LLC Operating Agreement Easy
- How Can I eSign Alabama Insurance LLC Operating Agreement
- eSign Virginia Government POA Simple
- eSign Hawaii Lawers Rental Application Fast
- eSign Hawaii Lawers Cease And Desist Letter Later
- How To eSign Hawaii Lawers Cease And Desist Letter
- How Can I eSign Hawaii Lawers Cease And Desist Letter
- eSign Hawaii Lawers Cease And Desist Letter Free
- eSign Maine Lawers Resignation Letter Easy
- eSign Louisiana Lawers Last Will And Testament Mobile
- eSign Louisiana Lawers Limited Power Of Attorney Online
- eSign Delaware Insurance Work Order Later
- eSign Delaware Insurance Credit Memo Mobile
- eSign Insurance PPT Georgia Computer
- How Do I eSign Hawaii Insurance Operating Agreement
- eSign Hawaii Insurance Stock Certificate Free
- eSign New Hampshire Lawers Promissory Note Template Computer