Detección de campos
Identifica ubicaciones de firma y campos comunes dentro del documento importado para acelerar la preparación.


Importar Word a signNow acelera la preparación de documentos, reduce errores manuales y conserva la integridad del contenido para firmas electrónicas con registro de auditoría y cumplimiento normativo.

Gestiona plantillas contractuales y exige control de versiones y auditoría. Usa la importación para convertir borradores Word en acuerdos firmables, añade campos de firma y configura aprobaciones internas antes del envío a contrapartes.
Prepara paquetes de incorporación y acuerdos laborales listos para firma. Importa formularios Word con cláusulas específicas, aplica campos obligatorios y conserva registros para cumplimiento interno y auditorías futuras.
Empresas y profesionales de áreas legales, recursos humanos y ventas usan la importación para estandarizar contratos y acelerar ciclos de firma.
Identifica ubicaciones de firma y campos comunes dentro del documento importado para acelerar la preparación.
Convierte documentos Word en plantillas con campos bloqueables para uso repetido por equipos.
Configura órdenes de firma y aprobaciones secuenciales o paralelas tras la importación.
Programación de notificaciones para firmantes pendientes con intervalos personalizables.
Mostrar u ocultar campos según respuestas previas dentro del documento importado.
Vincula documentos importados con sistemas de archivo para retención y auditoría centralizada.
Permite importar archivos directamente desde Google Drive, mantener versiones y editar en entorno colaborativo antes de convertirlos a documentos firmables en signNow.
Sincroniza carpetas para importar Word desde almacenamiento en la nube y actualizar documentos firmados automáticamente en la ubicación designada.
Integración con CRM permite generar contratos Word desde plantillas de cliente y enviarlos para firma sin abandonar el registro del cliente.
Permite gestionar importaciones automatizadas desde aplicaciones internas, controlando conversión, campos y envío programático de las solicitudes de firma.

| Setting | Configuration |
|---|---|
| Reminder Frequency | 48 hours |
| Default Expiration | 30 days |
| Signature Order | Sequential |
| Archive Location | Cloud folder |
La función de importación es compatible con navegadores web modernos y aplicaciones móviles oficiales, con ligeras diferencias en la experiencia de edición.
Para edición avanzada y preparación de plantillas se recomienda usar la versión de escritorio o web; las apps móviles permiten carga y envío rápidos pero con edición limitada.
Una empresa de servicios importó plantillas Word para estandarizar renovaciones
Resulting in ciclos de renovación más cortos y menor carga administrativa.
Un departamento de RR. HH. importó paquetes de contratación desde Word como formularios electrónicos
Leading to procesos de incorporación más rápidos y registros centralizados.
| Criteria | signNow (Recommended) | Paper |
|---|---|---|
| Acceso remoto | Sí | |
| Verificación del firmante | Email/2FA | Firma manuscrita |
| Almacenamiento seguro | Encriptado | Archivo físico |
| Auditoría y registros | Trazable | Limitado |
7 años
Diaria
Anual
Borrado irreversible
Exportación completa
| Criteria | signNow (Featured) | DocuSign | Adobe Sign | PandaDoc | HelloSign |
|---|---|---|---|---|---|
| Monthly starting cost (per user) | Desde $8 | Desde $10 | Desde $9 | Desde $19 | Desde $15 |
| Free trial availability | Sí, versión limitada | Sí | Sí | Sí | Sí |
| API access included | Con planes | Con planes | Con planes | Con planes | Con planes |
| HIPAA compliance option | Add-on disponible | Opcional | Opcional | Opcional | Opcional |
| Bulk send capability | Incluido | Add-on | Incluido | Incluido | Limitado |
Antes de subir un archivo de Word a tu cuenta de airSlate SignNow, considera incluir etiquetas de texto que generen campos en él. Una vez que subas el documento, estas etiquetas se convertirán automáticamente en campos rellenables.
Alternativamente, sube un documento de Word tal cual y luego agrega campos rellenables usando el editor de clic y arrastrar de airSlate SignNow.
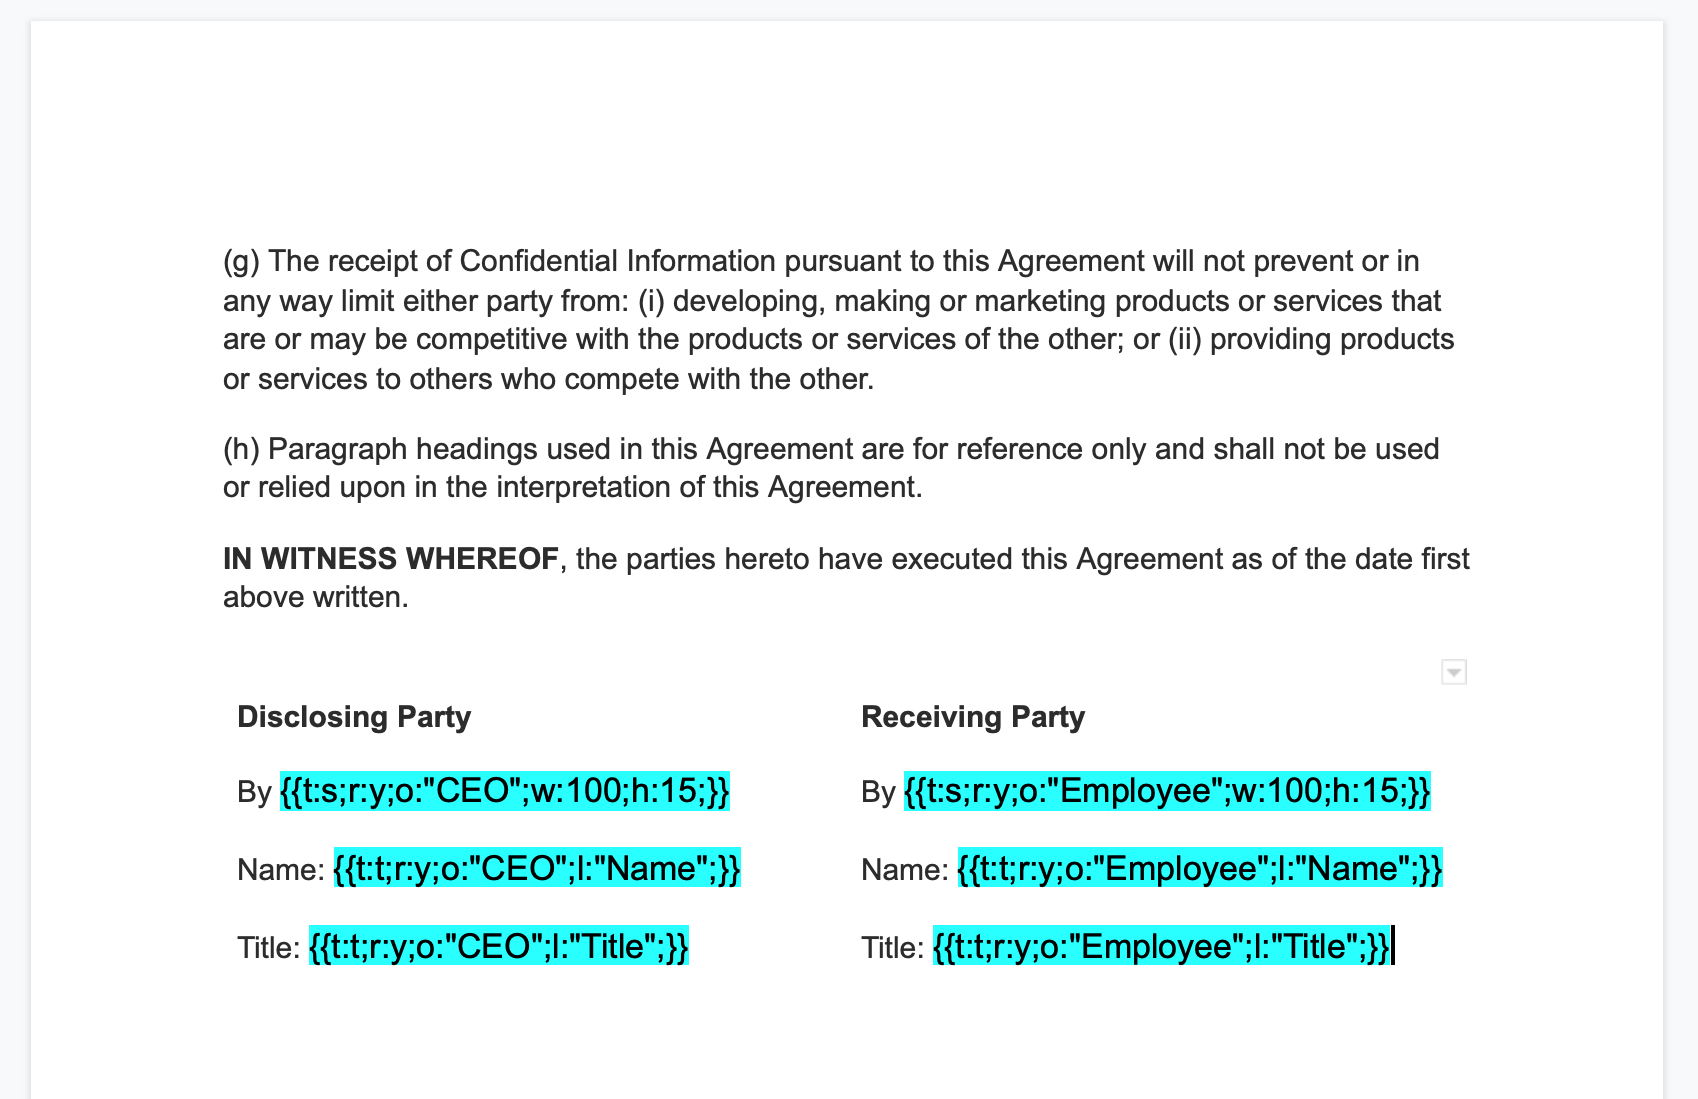
Abre un documento de Word en cualquier editor de texto e inserta las siguientes etiquetas de texto donde quieras que aparezcan los campos rellenables.
{{ t:t;r:y;o:"Firmante 1";l:"Texto"; }}
En esta etiqueta, “Firmante 1” describe el rol del firmante, y “Texto” es la etiqueta del campo. Puedes establecer estos valores según tus necesidades.
Ejemplo: {{ t:t;r:y;o:"Cliente";l:"Nombre"; }}
{{ t:s;r:y;o:"Firmante 1";w:100;h:15; }}
“Firmante 1” representa el rol del firmante. Este valor puede cambiarse. La etiqueta del campo por defecto es “Campo de firma”. Puedes ajustar el tamaño del campo modificando los valores “w:100” (ancho) y “h:15” (alto).
Haz clic en Subir documentos y busca el archivo de Word que acabas de editar. Una vez subido, abre el documento en el editor de airSlate SignNow.

Después de abrir el documento en airSlate SignNow, verás que las etiquetas de texto que agregaste se han convertido en campos rellenables.
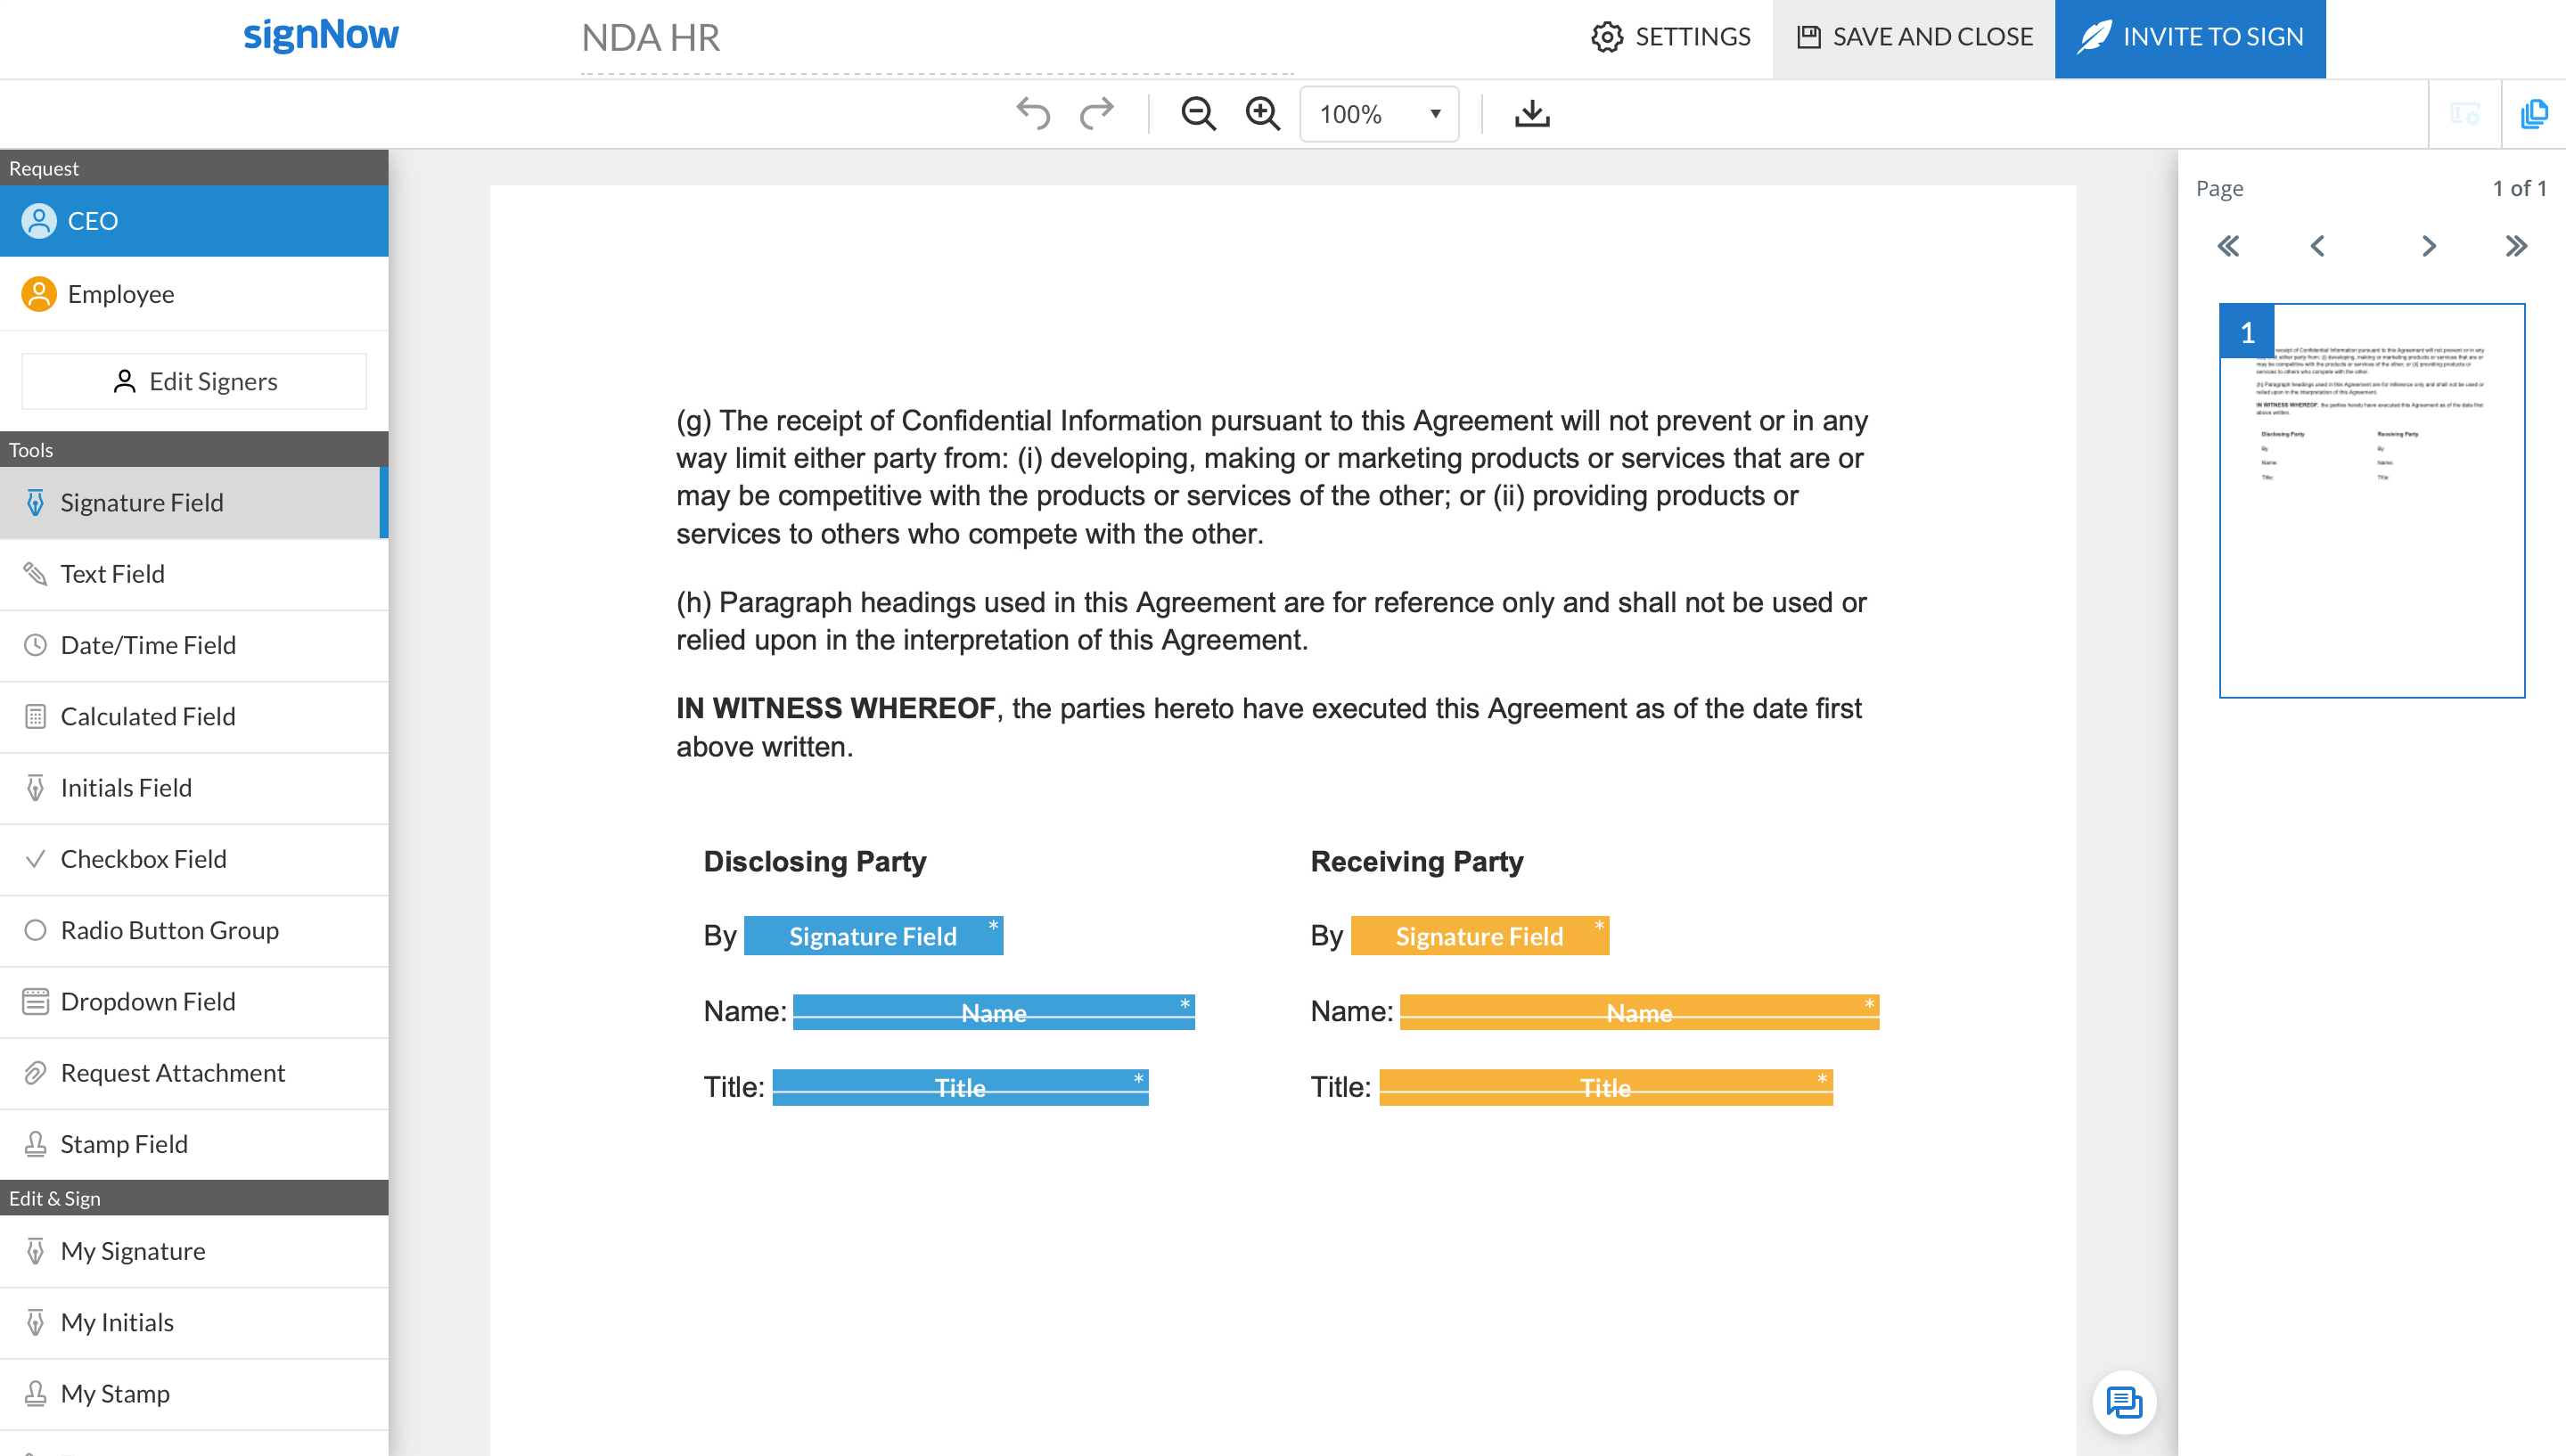
Ahora puedes guardar y cerrar el documento o enviarlo para firma. También puedes seguir agregando campos seleccionando elementos de la barra de herramientas a la izquierda y haciendo clic en el lugar del documento donde necesitas colocar un campo.


