
Fill and Sign the Field 10 Form
Helpful tips for completing your ‘Field 10’ online
Are you exhausted by the inconvenience of managing paperwork? Look no further than airSlate SignNow, the premier eSignature service for individuals and organizations. Bid farewell to the lengthy process of printing and scanning documents. With airSlate SignNow, you can effortlessly complete and sign documents online. Utilize the robust features integrated into this user-friendly and cost-effective platform to transform your method of document handling. Whether you need to authorize forms or collect electronic signatures, airSlate SignNow manages everything efficiently, with just a few clicks.
Follow this detailed guide:
- Log in to your account or sign up for a complimentary trial with our service.
- Click +Create to upload a file from your device, cloud storage, or our template library.
- Open your ‘Field 10’ in the editor.
- Click Me (Fill Out Now) to prepare the form on your end.
- Add and designate fillable fields for others (if needed).
- Proceed with the Send Invite settings to request eSignatures from others.
- Save, print your copy, or convert it into a multi-use template.
No need to worry if you need to collaborate with others on your Field 10 or send it for notarization—our platform provides all the tools you need to complete these tasks. Create an account with airSlate SignNow today and elevate your document management to new levels!
FAQs
-
What is Field 10 in airSlate SignNow?
Field 10 in airSlate SignNow refers to a customizable field option within the document signing process. It allows users to add specific information or data points that are essential for their particular documents, enhancing the overall efficiency of document management.
-
How does Field 10 improve document signing efficiency?
Field 10 improves document signing efficiency by enabling users to tailor the information required from signers. This customization reduces the time spent on manual data entry, streamlining the signing process and ensuring that all necessary details are captured accurately.
-
What are the pricing options for using Field 10 in airSlate SignNow?
Pricing for using Field 10 in airSlate SignNow varies based on the selected plan. Users can choose from different tiers that include access to advanced features like customizable fields, ensuring they only pay for what they need while benefiting from an easy-to-use solution.
-
Can I integrate Field 10 with other applications?
Yes, Field 10 can be integrated with various applications through airSlate SignNow's extensive API. This allows businesses to automate their workflows and enhance their document management processes by connecting with tools they already use.
-
What are the benefits of using Field 10 for businesses?
Using Field 10 provides businesses with increased flexibility and accuracy in their document management. By allowing for customization, it ensures that all relevant information is captured, which can lead to faster processing times and improved compliance with regulatory requirements.
-
Is Field 10 easy to set up and use?
Absolutely! Field 10 is designed to be user-friendly, allowing even those with minimal technical skills to set it up easily. The intuitive interface of airSlate SignNow makes it simple to add and customize fields according to specific document needs.
-
Can I track the status of documents that include Field 10?
Yes, airSlate SignNow provides real-time tracking for all documents, including those that utilize Field 10. Users can monitor when a document is viewed, signed, and completed, ensuring transparency and efficient follow-up.
The best way to complete and sign your field 10 form
How to fill out and sign paperwork online
Previously, coping with paperwork required lots of time and effort. But with airSlate SignNow, document management is quick and simple. Our powerful and easy-to-use eSignature solution enables you to effortlessly fill out and eSign your field 10 form online from any internet-connected device.
Follow the step-by-step guidelines to eSign your field 10 form template online:
- 1.Sign up for a free trial with airSlate SignNow or log in to your account with password credentials or SSO authorization option.
- 2.Click Upload or Create and import a file for eSigning from your device, the cloud, or our form library.
- 3.Click on the file name to open it in the editor and use the left-side toolbar to fill out all the empty areas properly.
- 4.Place the My Signature field where you need to eSign your form. Type your name, draw, or import a picture of your regular signature.
- 5.Click Save and Close to finish modifying your completed document.
As soon as your field 10 form template is ready, download it to your device, save it to the cloud, or invite other parties to electronically sign it. With airSlate SignNow, the eSigning process only takes several clicks. Use our powerful eSignature solution wherever you are to deal with your paperwork successfully!
How to fill out and sign paperwork in Google Chrome
Completing and signing documents is easy with the airSlate SignNow extension for Google Chrome. Installing it to your browser is a quick and effective way to deal with your paperwork online. Sign your field 10 form template with a legally-binding eSignature in just a couple of clicks without switching between tools and tabs.
Follow the step-by-step guidelines to eSign your field 10 form template in Google Chrome:
- 1.Go to the Chrome Web Store, locate the airSlate SignNow extension for Chrome, and add it to your browser.
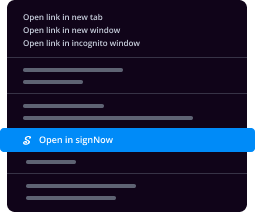
- 2.Right-click on the link to a document you need to sign and choose Open in airSlate SignNow.
- 3.Log in to your account using your password or Google/Facebook sign-in buttons. If you don’t have one, you can start a free trial.
- 4.Use the Edit & Sign toolbar on the left to fill out your sample, then drag and drop the My Signature option.
- 5.Insert an image of your handwritten signature, draw it, or simply type in your full name to eSign.
- 6.Verify all data is correct and click Save and Close to finish modifying your form.
Now, you can save your field 10 form template to your device or cloud storage, email the copy to other individuals, or invite them to eSign your form via an email request or a protected Signing Link. The airSlate SignNow extension for Google Chrome enhances your document workflows with minimum time and effort. Try airSlate SignNow today!

How to complete and sign paperwork in Gmail
When you get an email containing the field 10 form for approval, there’s no need to print and scan a file or save and re-upload it to a different program. There’s a better solution if you use Gmail. Try the airSlate SignNow add-on to promptly eSign any documents right from your inbox.
Follow the step-by-step guide to eSign your field 10 form in Gmail:
- 1.Navigate to the Google Workplace Marketplace and look for a airSlate SignNow add-on for Gmail.
- 2.Install the tool with a corresponding button and grant the tool access to your Google account.
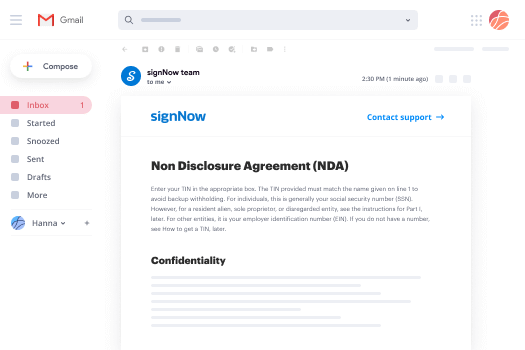
- 3.Open an email with an attachment that needs approval and utilize the S key on the right panel to launch the add-on.
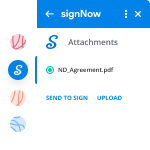
- 4.Log in to your airSlate SignNow account. Opt for Send to Sign to forward the document to other people for approval or click Upload to open it in the editor.
- 5.Place the My Signature field where you need to eSign: type, draw, or upload your signature.
This eSigning process saves time and only requires a couple of clicks. Utilize the airSlate SignNow add-on for Gmail to adjust your field 10 form with fillable fields, sign paperwork legally, and invite other individuals to eSign them al without leaving your inbox. Enhance your signature workflows now!
How to complete and sign paperwork in a mobile browser
Need to quickly complete and sign your field 10 form on a mobile phone while working on the go? airSlate SignNow can help without the need to set up additional software programs. Open our airSlate SignNow solution from any browser on your mobile device and add legally-binding electronic signatures on the go, 24/7.
Follow the step-by-step guidelines to eSign your field 10 form in a browser:
- 1.Open any browser on your device and follow the link www.signnow.com
- 2.Create an account with a free trial or log in with your password credentials or SSO authentication.
- 3.Click Upload or Create and add a file that needs to be completed from a cloud, your device, or our form catalogue with ready-made templates.
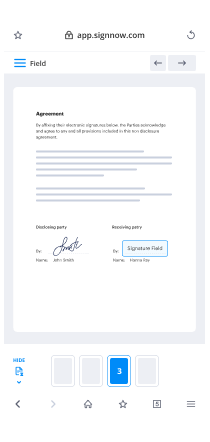
- 4.Open the form and fill out the blank fields with tools from Edit & Sign menu on the left.
- 5.Place the My Signature field to the form, then type in your name, draw, or add your signature.
In a few simple clicks, your field 10 form is completed from wherever you are. Once you're done with editing, you can save the document on your device, create a reusable template for it, email it to other individuals, or invite them eSign it. Make your paperwork on the go quick and effective with airSlate SignNow!
How to fill out and sign paperwork on iOS
In today’s corporate environment, tasks must be done rapidly even when you’re away from your computer. Using the airSlate SignNow mobile app, you can organize your paperwork and sign your field 10 form with a legally-binding eSignature right on your iPhone or iPad. Install it on your device to conclude contracts and manage documents from anywhere 24/7.
Follow the step-by-step guide to eSign your field 10 form on iOS devices:
- 1.Go to the App Store, find the airSlate SignNow app by airSlate, and set it up on your device.
- 2.Launch the application, tap Create to import a form, and choose Myself.
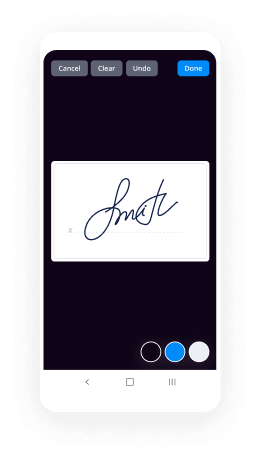
- 3.Opt for Signature at the bottom toolbar and simply draw your autograph with a finger or stylus to eSign the form.
- 4.Tap Done -> Save after signing the sample.
- 5.Tap Save or utilize the Make Template option to re-use this document later on.
This process is so simple your field 10 form is completed and signed in just a couple of taps. The airSlate SignNow app works in the cloud so all the forms on your mobile device are kept in your account and are available whenever you need them. Use airSlate SignNow for iOS to boost your document management and eSignature workflows!

How to fill out and sign documents on Android
With airSlate SignNow, it’s simple to sign your field 10 form on the go. Install its mobile app for Android OS on your device and start improving eSignature workflows right on your smartphone or tablet.
Follow the step-by-step guide to eSign your field 10 form on Android:
- 1.Go to Google Play, search for the airSlate SignNow app from airSlate, and install it on your device.
- 2.Log in to your account or register it with a free trial, then import a file with a ➕ button on the bottom of you screen.
- 3.Tap on the imported file and select Open in Editor from the dropdown menu.
- 4.Tap on Tools tab -> Signature, then draw or type your name to eSign the sample. Complete empty fields with other tools on the bottom if required.
- 5.Utilize the ✔ key, then tap on the Save option to finish editing.
With an easy-to-use interface and full compliance with primary eSignature standards, the airSlate SignNow app is the perfect tool for signing your field 10 form. It even works offline and updates all document changes when your internet connection is restored and the tool is synced. Complete and eSign forms, send them for eSigning, and create multi-usable templates whenever you need and from anywhere with airSlate SignNow.
Get more for field 10 form
Find out other field 10 form
- Close deals faster
- Improve productivity
- Delight customers
- Increase revenue
- Save time & money
- Reduce payment cycles
