Over the past decade, digital workflows have replaced their paper-based counterparts in many spheres. Paper trails are growing obsolete due to being bulky, high-priced, and unsustainable. In the US alone, corporate expenses on printed forms have reached a staggering $120 billion a year.
Today, why organizations are signing e-documents with eSignatures comes as no surprise. Electronic signature solutions have made business processes headache-free and cost-effective. You no longer need to print out a document, hard sign, scan, and/or physically return it to the sender. Once you receive a PDF file, you can eSign it and send it back to the owner via email or public link in just a few clicks.
The most popular eSignature solutions allow users to sign documents in collaboration with other people. Send signature invites, customize signature workflows, and more. In this article, you’ll learn about how to add electronic signatures to a PDF, regardless of the operating system and device you’re using. Also, you’ll get step-by-step instructions on how to sign in addition to the previous signature already applied to the form or contract.
Why is PDF format so popular despite being hard to edit?
The Portable Document Format (PDF) appeared in 1993. Since the very beginning, it has been used as a convenient output format for document exchange. PDFs are famous for being hard to edit. However, this pitfall is offset by their universal nature. PDFs look exactly like their original documents regardless of the software, hardware, or operating system being used to view them. That’s probably without a doubt the reason why PDF format continues to be the most popular format for exchanging information in many spheres of life and business.
Users employ different programs to create documents that contain raster images, vector graphics, text, links, etc. Once they have everything arranged in a document, they output it to PDF. All parts of the document merge to become a single file. In this way, the possibility of modifications to the already-completed documents is kept to a minimum.
The concept of layers came with the introduction of the PDF 1.5 format in 2003. Layers, or Optional Content Groups (OCGs), are content units in a PDF file that can be hidden by document authors. Once you “flatten” the PDF, it becomes a single-layered file, which makes it difficult to edit. Most application software does not tell the difference between the objects in a PDF file. This is why modifications to one object may impact other objects in the document.
Despite the inconveniences it has, PDF format continues to be one of the most widely used formats worldwide. According to the PDF Association, in 2018, PDFs accounted for 85% of file formats on the web.
What are the advantages and disadvantages of the PDF format?
| Advantages |
Disadvantages |
| Independence. The PDF format is independent of any software, hardware, or operating system. It’s possible to view PDFs on PC/Mac and Android/iOS. |
Security issues. Some PDF attachments may carry viruses and exploits targeting vulnerabilities in popular PDF readers. |
| Small file size. Owing to image compression algorithms, PDF files do not take up a lot of hard disk space. |
Limited editing possibilities. One can edit PDFs in special software that typically requires a premium subscription. |
| Support of various content types. Apart from text, PDFs support vector and raster graphics, multimedia objects, hyperlinks, etc. |
|
|
Password protection. PDFs can have two types of password protection.
-
- A user password encrypts the PDF document and prevents it from opening.
- An owner password restricts operations with the document. However, it can be removed using special software.
|
|
| Use of electronic signatures. One can put a signature on a PDF file and use it for electronic paperwork. |
|
Use cases: signing a PDF with an electronic signature
In 2020, a worldwide pandemic forced many businesses to go remote. This transition was especially challenging due to the number of tasks that required fast decision making. In day-to-day operations, companies in different sectors rely on forms, contracts, agreements, and other documents. Hence the rising need to adopt digital workflows.
During the COVID-19 times, eSignatures became an essential part of almost any business, government, or legal application. According to the Technavio report, the market for electronic signature is showing a growth of 22.52%. The global market is expected to grow by $2.77 billion within the next four years.
PDF is considered the most convenient file format for signing electronically. Companies and individuals use PDF workflows because it’s easier to check if any changes have been made to the initial document. Also, it’s possible to set up signature workflows for a PDF file. For instance, with eSignature services like airSlate SignNow, you can have documents signed in a specific or random order.
Small and medium-sized businesses
Before the possibility to electronically sign PDFs appeared, businesses would handle their paper-based workflows in several stages. The first stage involved printing out the documents. Next, the papers were submitted for the client’s review. In case there were no objections, the signature followed. After that, the signed documents needed scanning and converting to PDF.
The use of electronic signatures is crucial to small businesses as they need to stay ahead of the competition. eSignatures reduce the signing process to several clicks. They also decrease the number of interactions each time there’s a need to sign a document. The typical eSignature use cases for SMBs are supplier contracts, partnership agreements, NDAs, purchase orders, etc.
Healthcare industry
Information security and time management are the biggest challenges of the healthcare industry. Using eSignatures ensures the security of personal data and accelerates decision making. Medical organizations have to deal with sensitive information on a daily basis. It’s important to maximize the accuracy of data collection and prevent any falsification while processing documents.
When it comes to efficiency, eSignatures decrease the time typically needed to get signatures in wet ink from patients, doctors, and insurance companies. This is especially handy during pandemics when the possibility of meeting in person is limited. eSignature solutions like airSlate SignNow offer a freeform invite option allowing recipients to fill out forms and sign documents in real-time.
The typical eSignature use cases for the healthcare industry are patient intake forms, medical history forms, privacy policies, CMS 1500s, medical records transfer requests, etc.
Legal industry
When it comes to law firms, eSignature services ensure that documents comply with laws and regulations. PDFs are signed with legally-binding electronic signatures that conform to the ESIGN and EIDAS standards. This makes them valid and recognized by law across the globe. As for security and confidentiality, eSignature software protects document data with advanced threat protection technology and SOC 2 Type II certification.
Another argument in favor of using electronic signatures to sign a PDF is minimizing the possibility of human error. In paper-based workflows, mishandling important legal transactions can result in setbacks, penalties, or court action. Automating a workflow helps decrease the human factor and streamline how forms and contracts get signed.
The typical eSignature use cases for the legal industry are loan agreements, promissory notes, affidavits, demand for payment letters, prenuptial agreements, etc.
Education
Long before the health crisis, educational systems worldwide started a shift towards digitization. Only in 2019, global investments in education technology reached $18.66 billion. The United States accounted for 42.9% of all funding. The COVID-19 pandemic revealed gaps in the US education system and issues that limited students’ access to distance learning. Still, students were not the only ones to experience inconveniences from going remote.
Educators nationwide had to digitize their paper-based workflows. Apart from teaching lessons, they had to fulfill plenty of administrative tasks, gather and process information from students and their families. eSignature services facilitate document exchange between all parties of the educational process. With their help, teachers, students, and parents can share and electronically sign PDFs.
Using electronic signatures in education workflows can cut paper and ink costs reaching up to $20 per document. Paper accounts for around 40% of the typical school waste. Going paperless also eliminates expenses associated with printing, sending, and storing documents.
The typical eSignature use cases for the education industry are enrollment verification, FAFSA applications, teacher reports, weekly plans, timesheets, etc.
Insurance industry
The insurance industry is a document-heavy sphere. Insurance brokers are looking for ways to make the signing process less burdensome and time-consuming. This is why eSignatures are becoming more popular among insurance companies. On average, signing an insurance document takes an hour or more if meeting in person is necessary. eSignature services reduce this timespan to about five minutes. Customized fillable forms make document creation fast and easy.
Adding an electronic signature on a PDF insurance policy is possible on any device from anywhere in the world. Customers can sign and keep copies of insurance documents. No need to wait for paper delivery or mail the signed documents back to the insurance company. The same applies to payments, which can be made using eSignature services via a payment request.
The typical eSignature use cases for the insurance industry are claims reporting forms, certificates of insurance, policy application forms, policy declaration forms, etc.
What’s the difference between an electronic and digital signature?
When it comes to signing a PDF, few people can tell the difference between electronic and digital signatures. Both of these definitions need clarification.
- An electronic signature, or eSignature, is a digital mark attached to a document with an intention to sign it. In many countries, eSignatures replace a handwritten signature in digital workflows.
- A digital signature is a mathematical algorithm used to authenticate a digital document or message. Digital signatures prove the identity of the sender and the integrity of the document through the use of cryptography.
How to electronically sign a PDF
In a nutshell, an eSignature is an image with a signature or signer’s full name placed on the top layer of a PDF document. It’s possible to create and integrate eSigning into a PDF using different apps and devices.
These are the two options when creating an electronic signature. For instance, a courier asks you to confirm the delivery by signing papers on their iPad or tablet. The symbol you draw on the screen is your electronic signature. Alternatively, you can take a photo of your handwritten signature and attach it to a digital document or type your full name.
You can request an eSignature from your business partners, contractors, or clients when sending them a PDF. For businesses used to paper-based workflows, receiving a PDF file that requires an electronic signature can be confusing.
An electronic signature shows that both the sender and the recipient intend to sign the document and accept to do business digitally. When it comes to contractual relationships, the parties consent to fulfill their commitments by signing a contract or agreement. Thus, the electronic signature becomes legally-binding.
Today, electronic signatures are used for a majority of document transactions. The eSignature use cases range from school field trip slips and insurance policies to prenuptial agreements, court orders, etc.
What is a digital signature and how does it work?
In contrast to an eSignature, a digital signature does not have a visual presentation. It employs mathematical algorithms and encryption to verify the document source and check it for any third-party alterations.
A digital signature generates a digital code (hash) of the document. Then, it gets encrypted with the help of the sender’s private key. The generated hash is unique for every document. Tampering with any part of it – intentionally or by accident – completely changes the hash.
Once the encryption procedure is over, the sender signs the document with their digital signature and forwards it to the recipient. The recipient generates a unique digital code to decrypt the sender’s hash with the sender’s public key. After that, both hash codes get compared to ensure a match. In the event the digital document has not been altered, the sender is authenticated.
To sum up all the differences between electronic and digital signatures, take a look at the comparison chart below:
| Digital signature |
Electronic signature |
| 1. A digital signature lacks a visual presentation. It uses mathematical algorithms and encryption to check a document’s origin and integrity. |
1. An electronic signature has a visual component in the form of an image or a symbol embedded in a document. It represents a signer’s consent to its content. |
| 2. It utilizes a certificate-based ID to provide proof of signing and authenticate a signer’s identity. |
2. It uses different proof of signing methods like phone verification, email, etc. |
| 3. Its primary purpose is to secure a document. |
3. Its primary purpose is to verify a document's authenticity. |
| 4. It’s more like an “electronic fingerprint”. Comes in no comparison with a wet ink signature. |
4. Similar to a wet ink signature. |
Understanding the above differences will help you choose an eSignature solution that fits your needs. There are several factors that can influence your choice. But it all comes down to the type of document you want to sign and the authenticity level expected by you or the recipient/author.
Are electronic signatures legally-binding?
Is an electronic signature on PDF legally-binding? Absolutely! Electronic signatures are as legally-valid as signatures in wet ink in the US and most developed nations worldwide. The US legislation ensures the validity of eSignatures in every state where federal law applies.
The United States Electronic Signatures in Global and National Commerce Act (ESIGN, 2000) and the Uniform Electronic Transactions Act (UETA, 1999) guarantee the validity and legal effect of electronic signatures. The states of Illinois and New York, have their own legislation to make sure eSignatures are equally enforceable as paper-based signatures.
What makes an electronic signature legal?
So, what exactly does “legally-binding” mean? There are several important conditions for an electronic signature to be recognized by US law.
1. Intent to sign. Similarly to a paper and ink signature, an eSignature is valid if each signer showed a clear intent to sign a document electronically. The scenarios may differ, as parties can either choose to type their names or draw signatures by hand. Irrespective of the entry method, they must confirm their intention to sign the document in question by clicking the “Accept” button or something equivalent.
2. Electronic consent agreement. Apart from showing an intent to sign, all parties must prove their consent to conduct business electronically. Many electronic signature services have a standard consent clause or an option to add a one. It only requires a click to accept.
3. Signed copies and record retention. After the parties sign the documents with their electronic signatures, they should receive or download fully executed copies. The ESIGN Act addresses the record retention requirements. Under the law, electronic records are valid as long as they precisely reflect the agreement and are easy to reproduce.
How to create an electronic signature
Take a look at how eSignature technology works on different operating systems and mobile platforms.
How to create an electronic signature in Windows
So, let’s cover how to electronically sign a document on a PC with the help of Windows powered tools. Microsoft Word is the default document processing software for most Windows users. Users can create and edit documents as well as use MS Word to embed electronic signatures. Its built-in feature makes it possible to insert eSignatures into documents.
For the time being, MS Word could be a viable solution for those who don’t want to invest in third-party apps. Still, this application does not meet the needs of most small and medium-sized businesses and enterprises. Complicated document workflows demand a more sophisticated eSignature toolset.
Follow the steps below to insert an electronic signature into a Microsoft Word document:
- Open a Word document and click where you’d like to add your signature.
- Go to the “Insert” tab at the top of the application window. Next, click “Signature List”, then proceed to “Microsoft Office Signature Line”.
- Once the Signature Setup window shows up, fill in the required fields.
- Choose and upload a signature image stored on your computer's hard drive. You can also choose to type your name in the box. Mobile users can draw their signature on their device’s touch screen with a stylus.
The process of eSigning documents in Word looks seamless for a single user. However, this does not apply to workflows that involve multiple signers, as the process often gets complicated.
Each signer has to download a document on their computer. Then, they have to follow the above steps to insert their electronic signature. The next step is to email the document back to the sender. Complex electronic signature workflows aren’t meant to be handled manually because the possibility for human error increases tenfold.
Despite the selection of document processing tools, MS Word has limited use when it comes to electronic signatures. Word’s “Signature Line” feature may be sufficient enough to complete simple daily tasks. However, in comparison, an advanced electronic signature solution provides much broader functionality.
How to create an electronic signature on a Mac
Starting with macOS Lion (10.7), Mac users could add their written signatures to PDF documents. The procedure was slightly altered in the later macOS versions. Today, macOS Catalina allows eSigning PDF files using MacBook’s trackpad and a built-in Preview app. The pressure-sensitive trackpad helps to make signatures more precise.
Follow these steps to add an electronic signature to a PDF on a Mac:
- Open a PDF file in Preview. Click the Show Markup Toolbar button to access the markup tools.
- Click the Sign button. Alternatively, you can click Tools > Annotate > Signature.
- Next, click Create Signature and pick the Trackpad, Camera, or iPhone to create a signature.
-
- The Trackpad option allows you to sign your name with a finger using a MacBook’s trackpad. Press any key to save the signature.
- The Camera option lets you save a signature that’s written on a piece of paper. All you need to do is write your name on white piece of paper and place it in front of the camera. Next thing you know, the signature will show up in the Camera window.
- The iPhone option allows you to create a signature using your device’s screen. This applies to other Apple devices such as iPad and iPod touch. All you need to do is sign your name on the screen when prompted.
- To complete the signature creation process, click Done.
- To add the electronic signature to a PDF, select the signature you want to use in the pop-up window.
- Move and resize the signature anywhere on the document.
The Preview app is not the only macOS application that allows users like yourself to sign PDFs electronically. The Mail app has a similar eSignature feature. In case you need to sign a PDF file in Mail, follow the instructions below:
- Go to Mail > Preferences, and click Signatures in the In the Mail app.
- Choose the email account where you intend to use the signature from the left sidebar. In case the “All Signatures” option is active, you’ll need to drag the signature to a specific email account prior to using it.
- Click the Add button under the middle column.
- Label your signature by typing in the middle column. It’ll appear in the Signature pop-up menu for you to use later.
- Create your e signature in the right column. To change the formatting and/or run a spellcheck, use the Edit or Format menu functions.
- Reply to an email with your eSignature above or below your written text. If you tick the box labeled “Place signature above quoted text”, your signature will appear on top of any quoted text. If you untick the box, your signature will be placed at the very bottom of the email, after your message and quoted text.
While the built-in e signature service in macOS is a handy tool, its functionality is very limited. It won’t suit complicated eSignature workflows that require signatures to be obtained from multiple signers.
How to create an electronic signature on iOS
iPhone and iPad made it possible to use eSignature functionality while on the go. The process of creating electronic signatures on iOS is very similar to how it’s done in macOS. Both iOS and iPadOS have the inbuilt Markup tool that works across different apps. Whether you open a PDF file in Mail, preview a document in Files, or edit an image in Photos, Markup is always accessible.
Markup has a Signature feature allowing you to create and reuse eSignatures on Apple’s mobile and tablet devices. Learn how to eSign a PDF on iOS and/or iPadOS by following the steps below:
- Open a PDF in the Files app or the Mail app.
- In the top-right corner, you’ll find the Markup icon that looks like the tip of a felt pen. Tap on it to access the Signature feature.
- The drawing and annotation tools will appear at the bottom of the screen. Tap the plus button on the right and choose “Signature” in the pop-up menu.
- If this is the first time you’re using this feature, the app will offer that you create a Signature.
- Switch to landscape mode and draw your signature with your finger or an Apple Pencil if you’re using an iPad. When finished, tap Done in the top-right corner.
- To make your signature appear in the document where you want it, tap the signature box to select it. Feel free to resize it or move it around the document. To accept the changes, tap Done in the top-left corner of the screen.
- After that, your eSignature will show up on the PDF and you’ll be able to send it.
- To reuse the already-existing electronic signature, go back to the Signature menu and add it to a PDF.
Despite its convenience, eSignature for iOS has the same drawback as other default solutions. A standalone signature app installed on your iPhone or iPad will offer a lot more flexibility in terms of eSigning PDF documents.
How to create an electronic signature on Android
Typically, Android devices don’t have any built-in functionality for creating eSignatures. Android users with smartphones and tablets need to download and install third-party software to eSign a PDF. There are plenty of great apps in the Google Play Store that allow users to eSign PDFs for free, and in some cases, without having to register or sign up for an account.
How to create an eSignature with airSlate SignNow?
As you see, the default methods offered in popular operating systems and mobile platforms are suitable for simple tasks. While these built-in features may be enough for personal needs, most businesses require advanced eSignature tools. SMBs and enterprises need a solution to run complex digital workflows with multiple participants irrespective of the operating system and device.
airSlate SignNow has a selection of tools that let you generate and sign PDF documents, accept payments, and create automated workflows. As a part of the airSlate Business Cloud, airSlate SignNow facilitates professional contract negotiation and management.
Follow the step-by-step instructions below to create an electronic signature using airSlate SignNow:
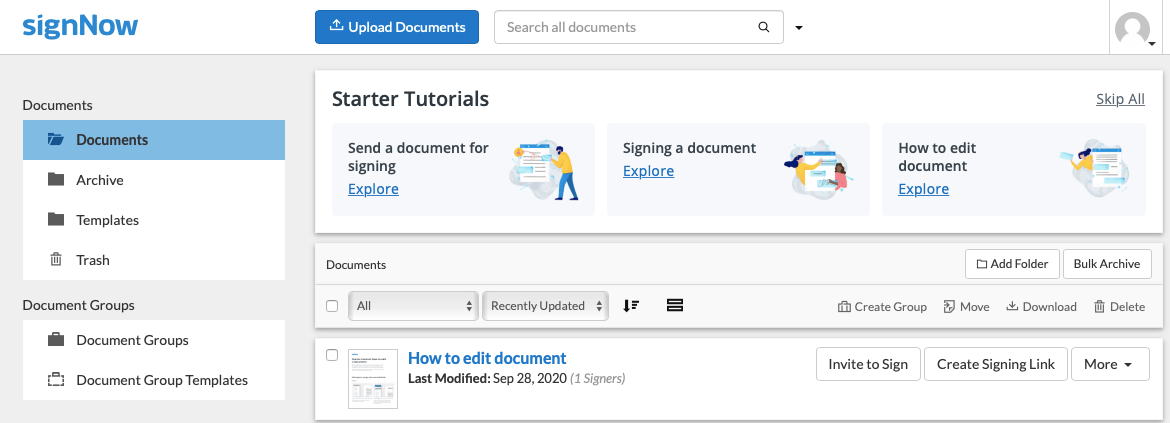
1. First, you need to log in to your airSlate SignNow account and pick a document you want to sign with an electronic signature. From your Homepage, you can:
- select an existing document or template from your airSlate SignNow Documents folder;
- import a new document stored on your device.
airSlate SignNow is compatible with the most popular document formats such as PDF, DOCX, PPTX, as well as image file formats like JPG/JPEG and PNG.
2. Make changes to the PDF you’ve uploaded using the airSlate SignNow editor before eSigning it or forwarding it to another signer. To add or delete signers, click the Edit Signers button under the Request section in the top-right corner of the document. In the pop-up window, type in the names and email addresses of the signers that need to sign the document. In addition, you can create a signing order for the document.
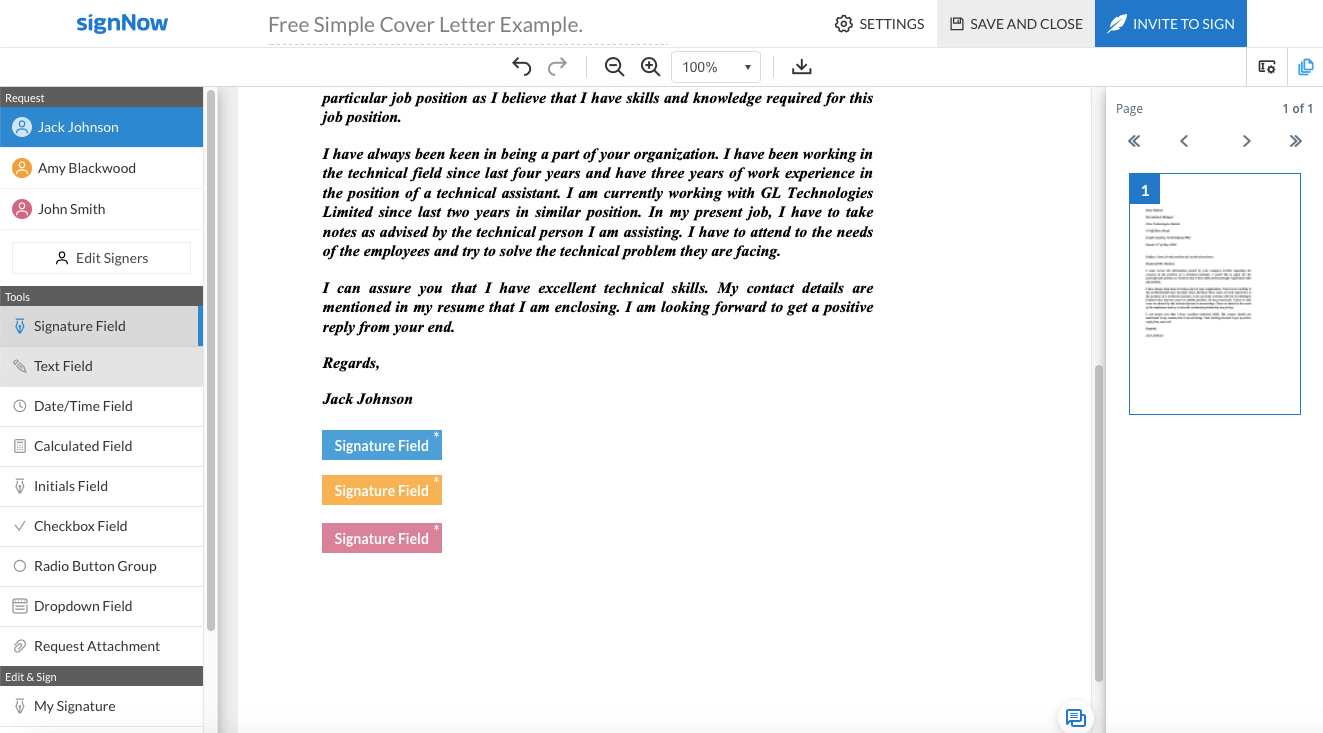
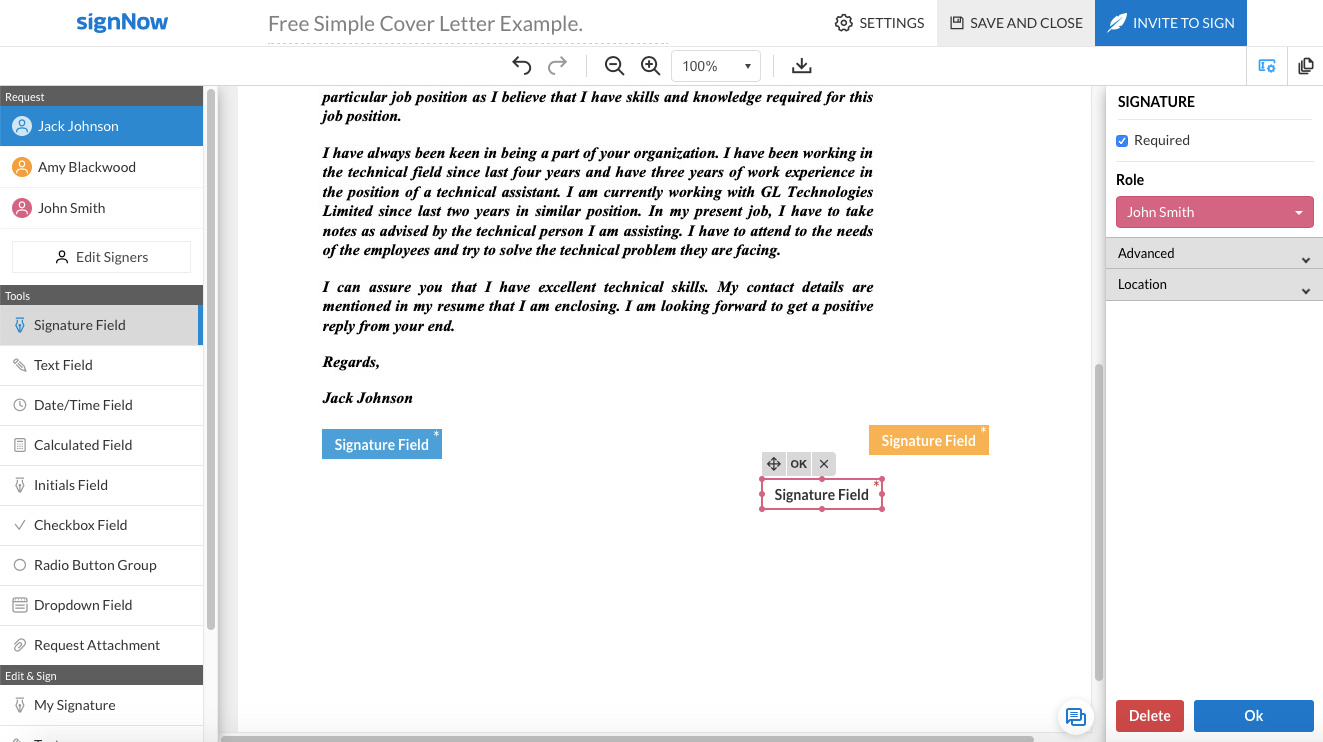
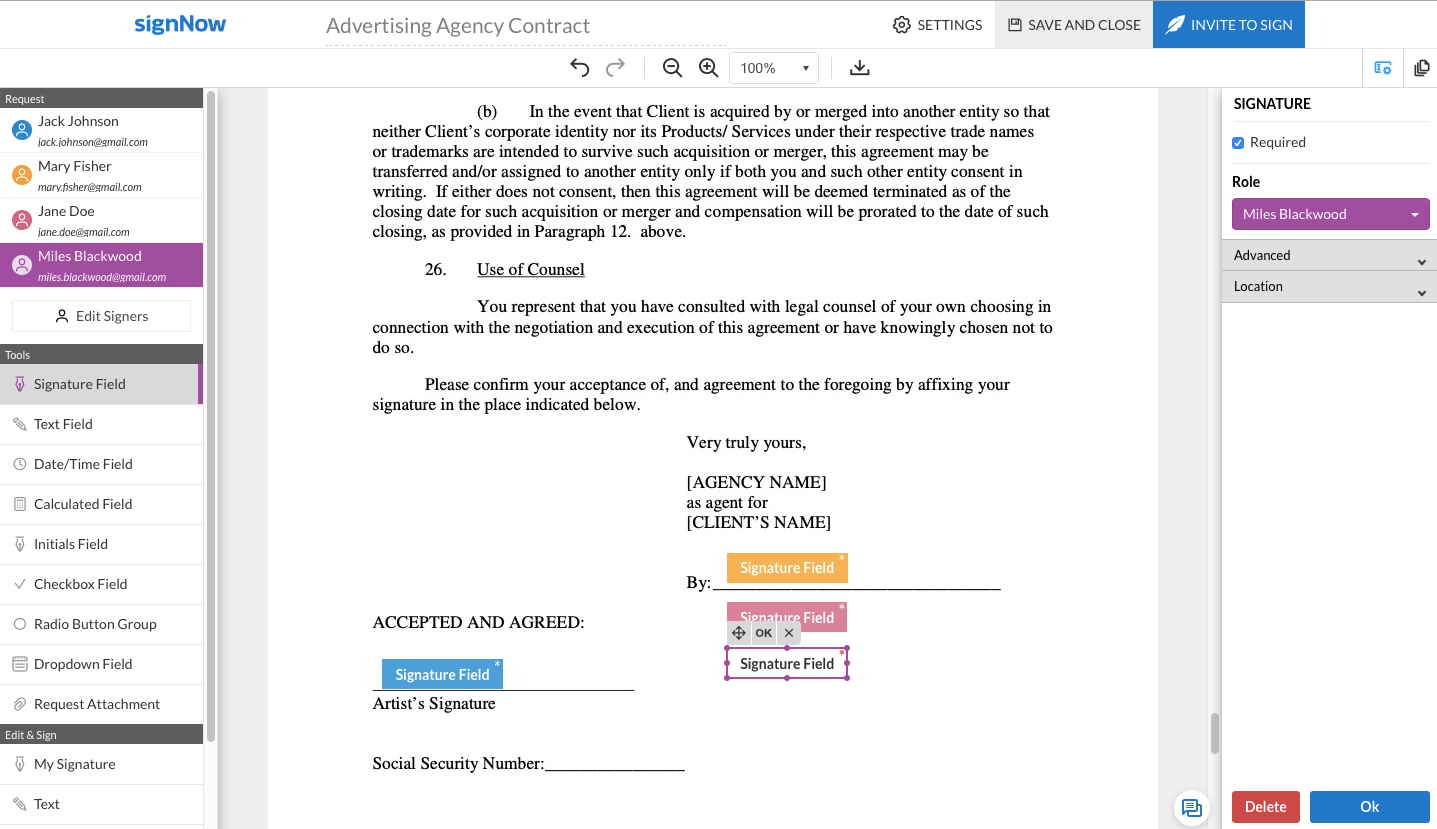
3. To create signature fields for each signer, click the Signature Field button in the Tools section. Place the cursor anywhere on the document and click OK to save the newly-created signature field. It is possible to change the position of a signature field by dragging and dropping it exactly where you need it.
4. If you want to sign a PDF with your own eSignature first, click the My Signature button in the Edit & Sign section.
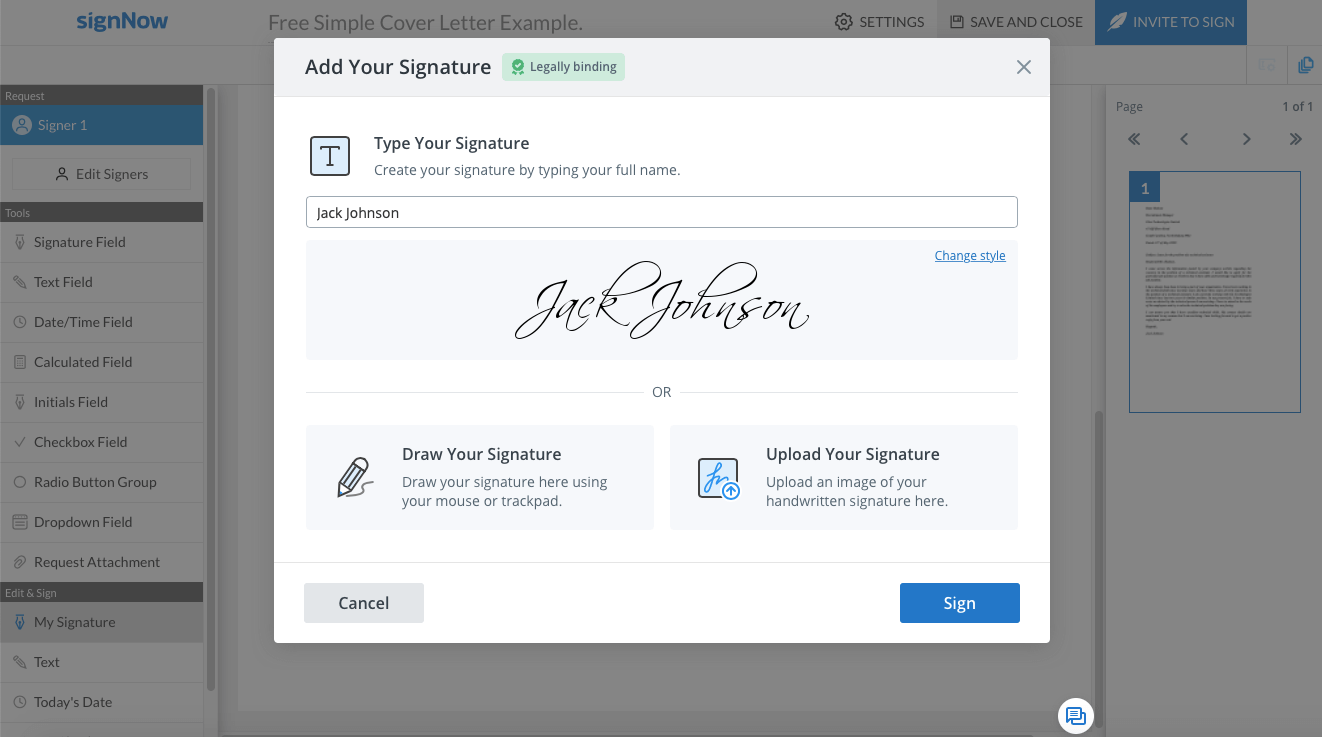
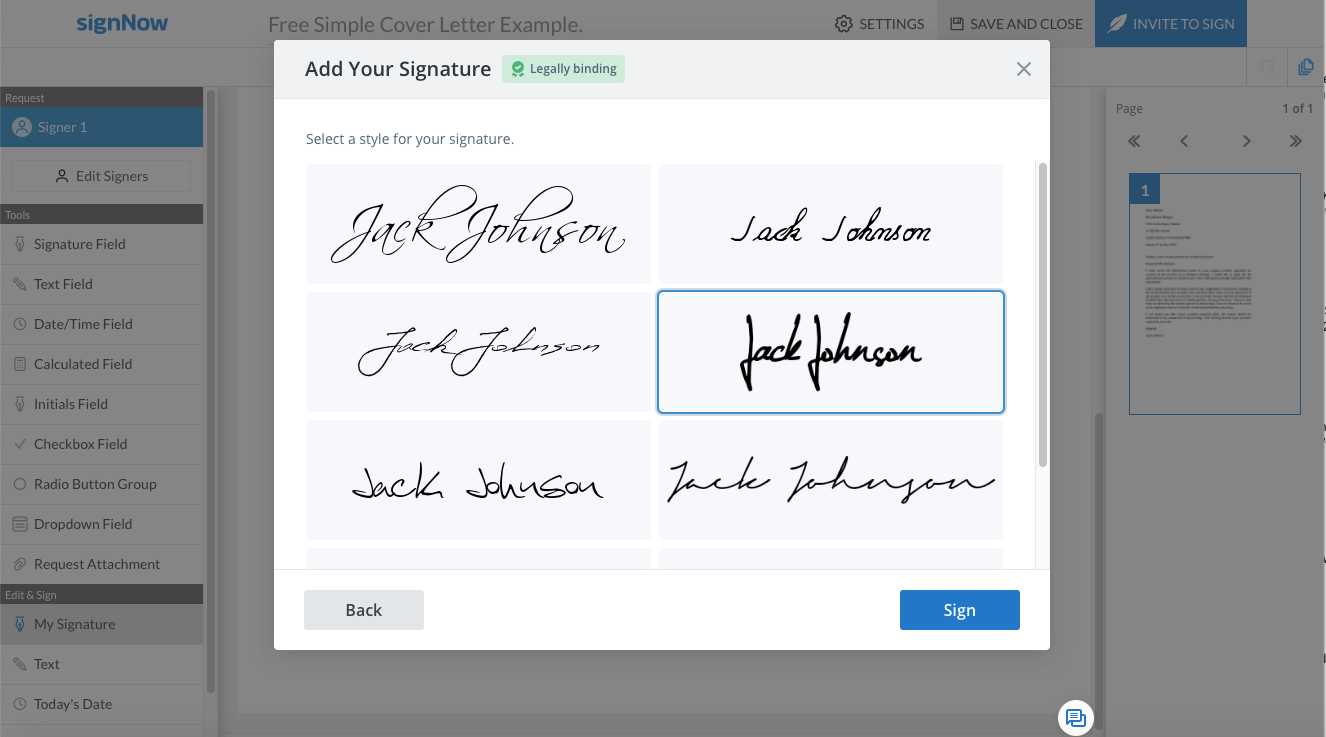
Click on the signature field to activate it and sign the document. Next thing you know, a pop-up window will appear where you can choose how you want to eSign your PDF. Use one of the following three options:
- Type Your Signature. Type your full name to create a new signature.
Modify the look and style of your signature by clicking Change Style and selecting a different typeface.
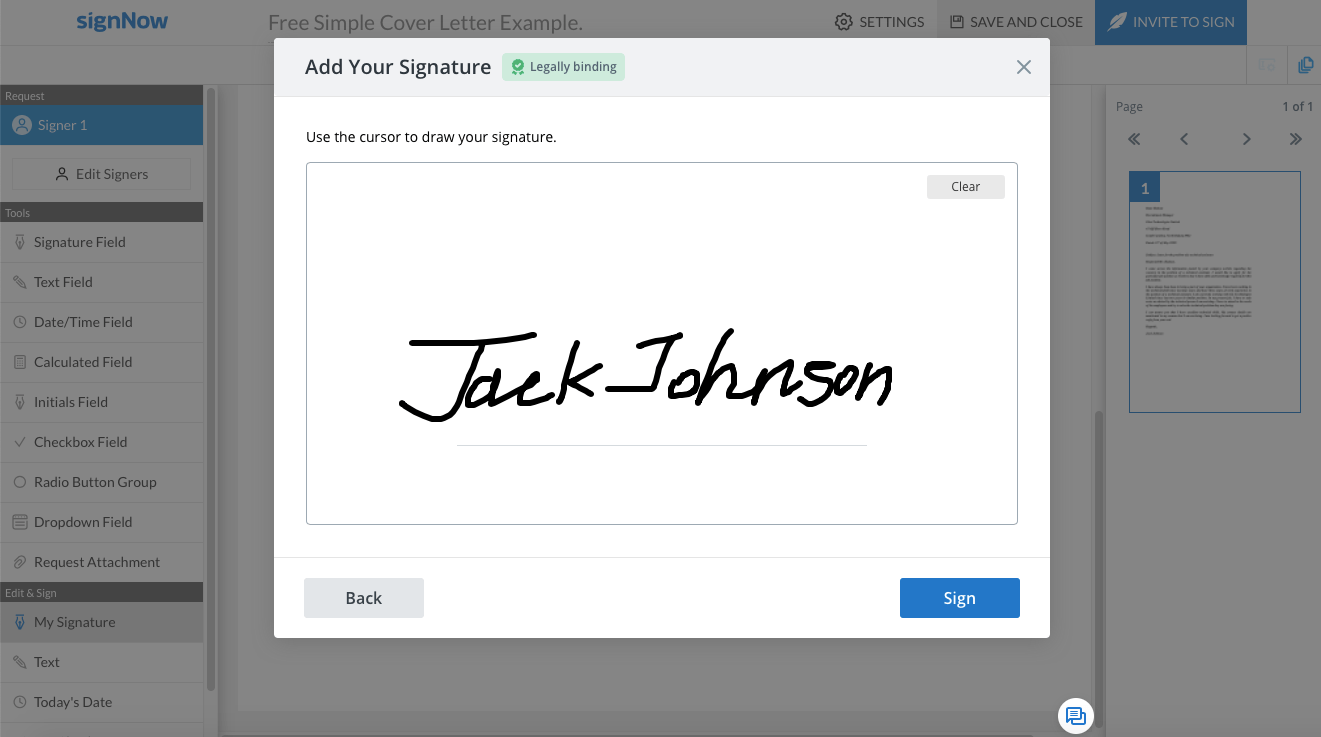
- Draw Your Signature. Draw a signature by hand using a mouse or trackpad in the empty field.
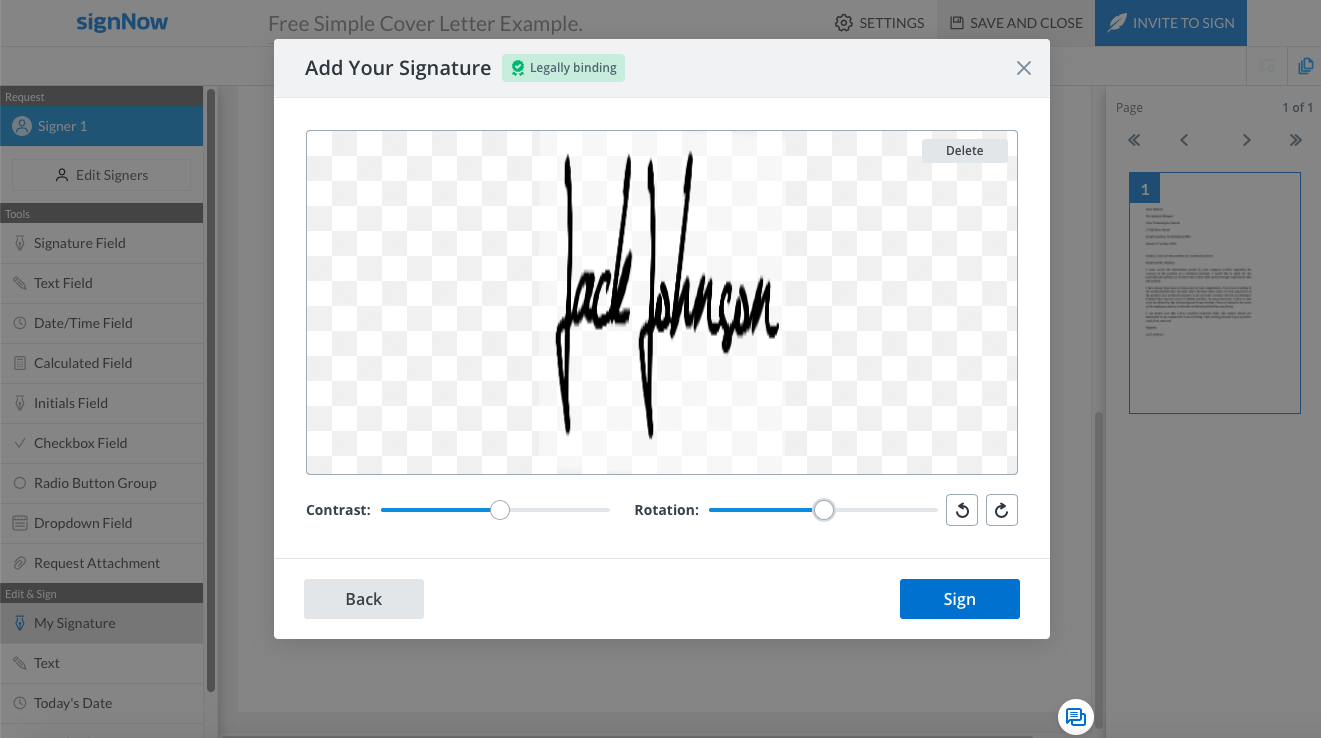
- Upload Your Signature. Drag and drop or upload an image of your signature in JPG, GIF, or PNG format from your device. Make sure the image size is under 4 Mb.
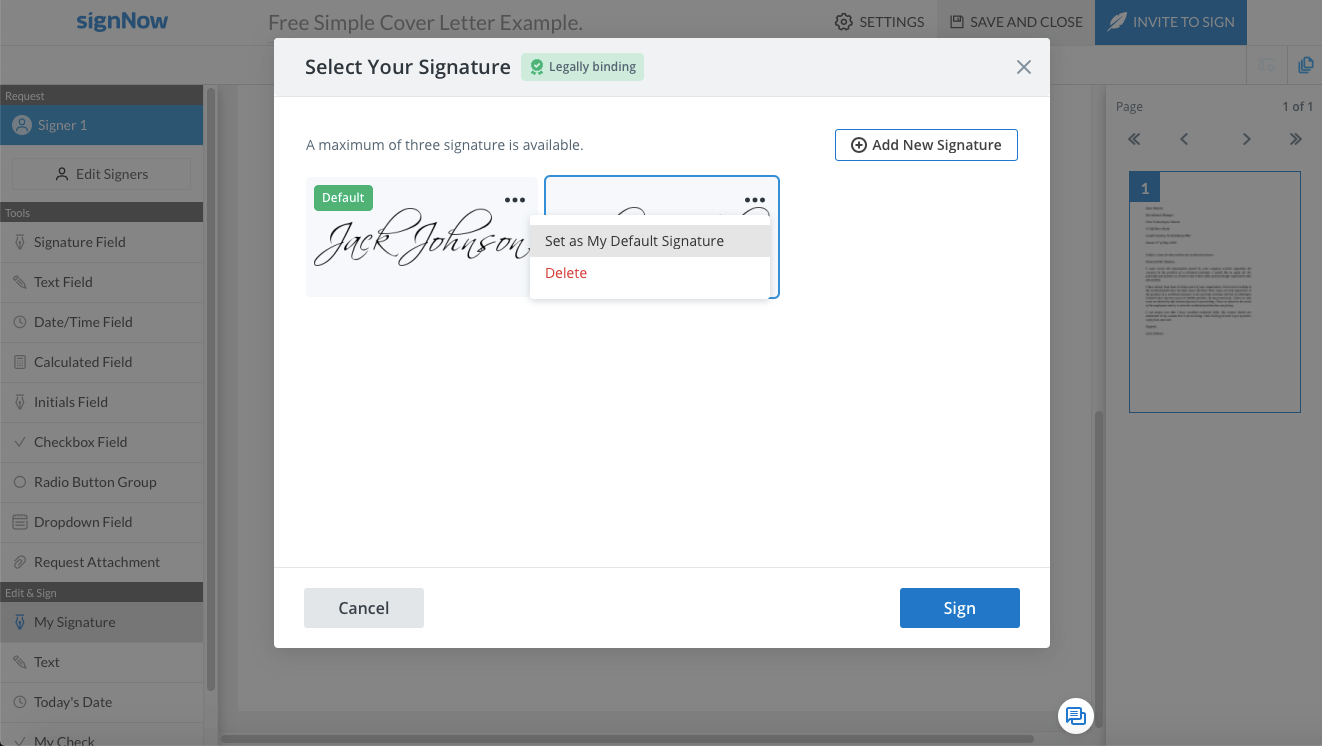
5. In case you created several signatures, you can set one of them as a default. In the Select Your Signature pop-up, pick the signature you like most and click “Set as My Default Signature”.
6. If everything looks fine, click the Sign button to complete the process. Click Save and Close to go back to the dashboard.
Apart from generating powerful eSignature, airSlate SignNow provides more options for working with PDFs. For instance, it’s possible to create document templates, view History with an audit trail, and even download documents with History. Also, you can merge, archive, move, rename, etc.
How to sign over a previous signature already on a PDF
There are several ways to sign a PDF that’s already been signed by someone else. For instance, with the help of airSlate SignNow’s Invite to Sign feature.
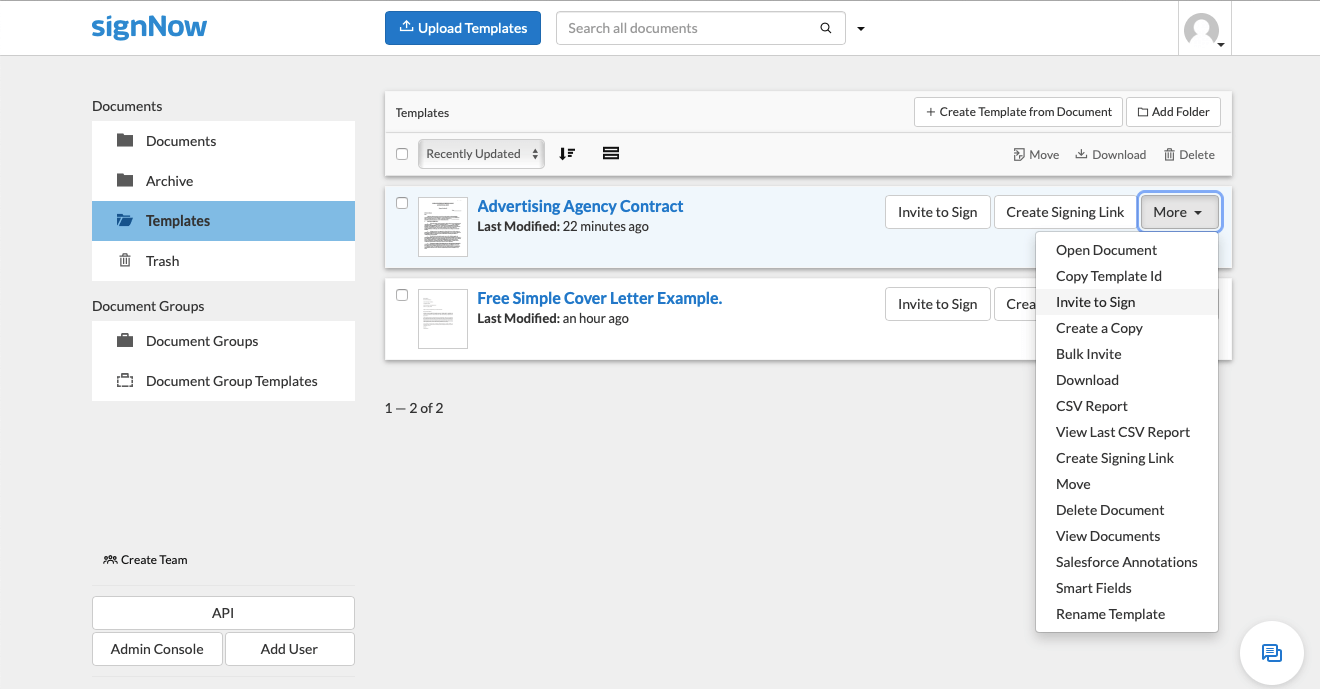
1. Choose a PDF file and click the More button on the right. Select and click Invite to Sign from the dropdown menu. You’ll then be redirected to a new window where you can fill in the signer’s name and email address.
It’s possible to add more signers and send a carbon copy to anyone who needs to follow the signing process. If you want to invite more people to sign a PDF file, make sure to specify the signing order.
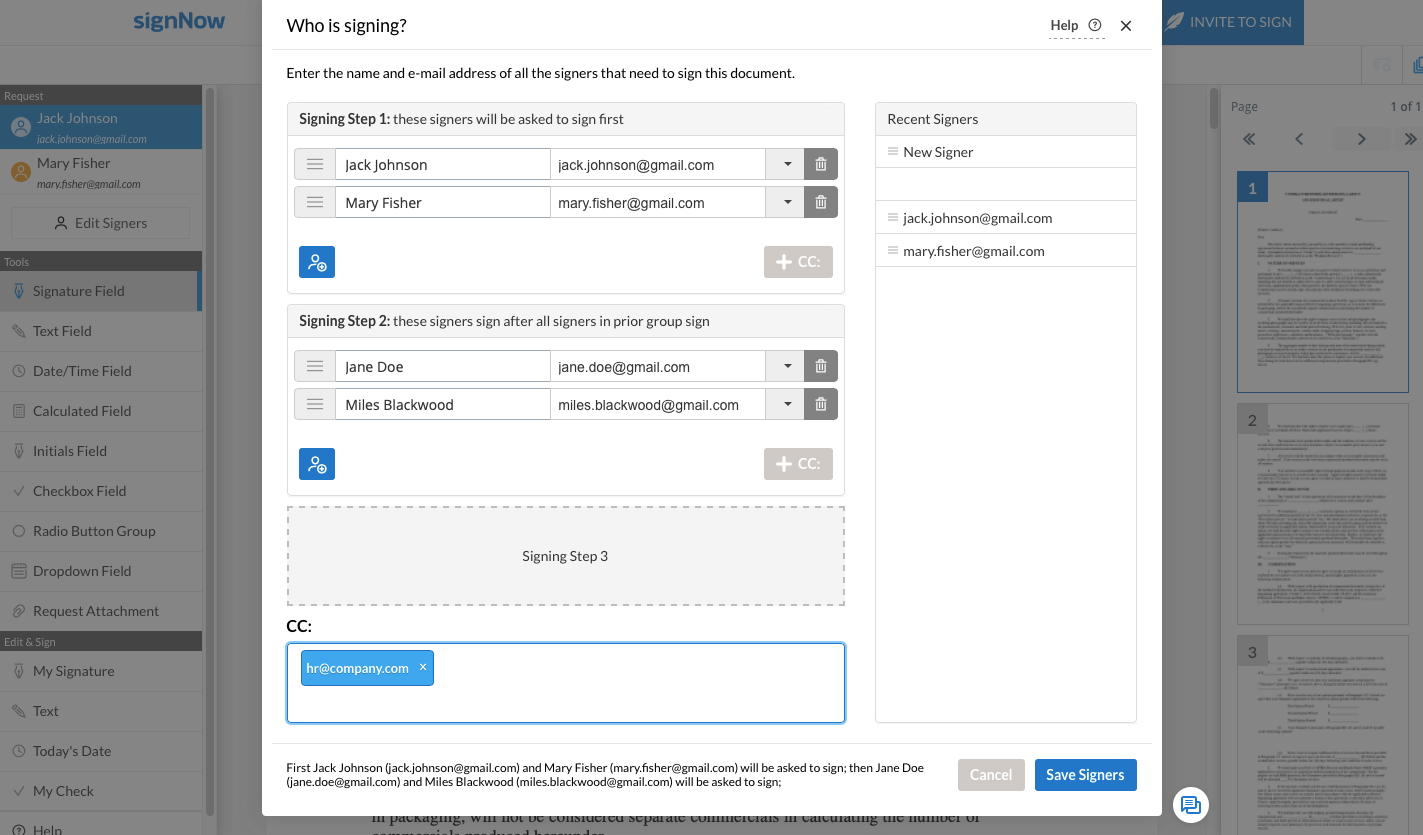
2. After you’ve defined the signing order, click the Save Signers button in the bottom-right corner of the pop-up. Proceed to add the signature fields to the document. Once you’re happy with how everything looks, click the Invite to Sign button in the top-right corner of the screen.
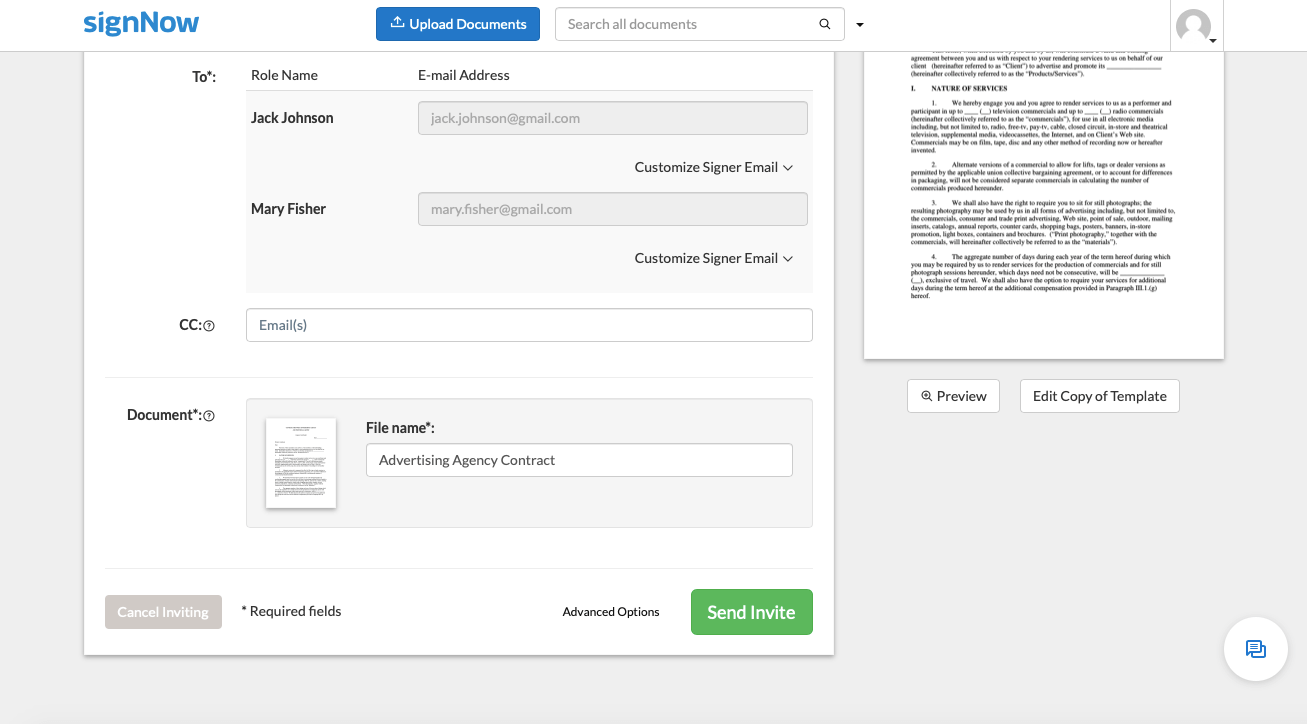
3. You’ll be forwarded to the final stage where you can check if the recipient’s name and email address is correct. Click the Send Invite button. The recipient will then get an invitation to eSign your PDF.
Note: if you change your mind about sending the invitation(s), click the Cancel Inviting button to revoke your signature invitation.
4. If you want to apply other settings, click the Advanced Options button. You can set an expiration date between 3 to 180 days and send out automatic reminders if the document hasn’t been eSigned. Activate the Allow Forwarding and Show Decline on Signatures options if needed.

How can I sign a PDF that has been signed by someone else?
airSlate SignNow provides users with the possibility to collect signatures with a signing link. It is a unique link generated for a specific document that you can forward to other signers. Every recipient can sign and get their own copy of the PDF.
To share a PDF with other signers, click the Create Signing Link button next to the document. Copy the signing link and send it via email, messenger, etc. The signing link will expire if an owner of the document modifies or deletes it, or when a guest signer enters the signing session. It’s possible to track the changes made to the document using the History option.
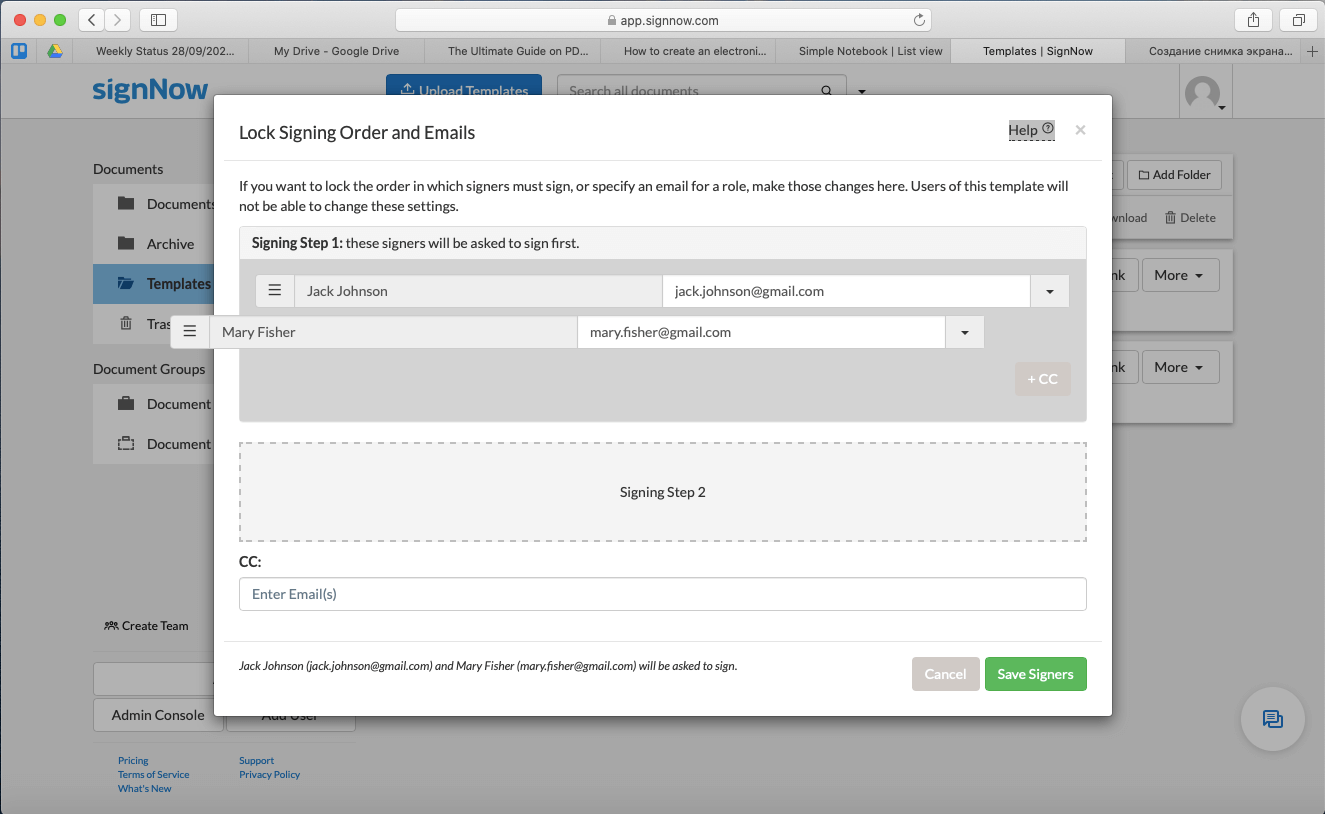
How to change the signing order in airSlate SignNow
In case you want eSignatures to come in a particular order, use the Edit Signing Order feature. For this, add a document to the Templates folder and click the More button on the far right.
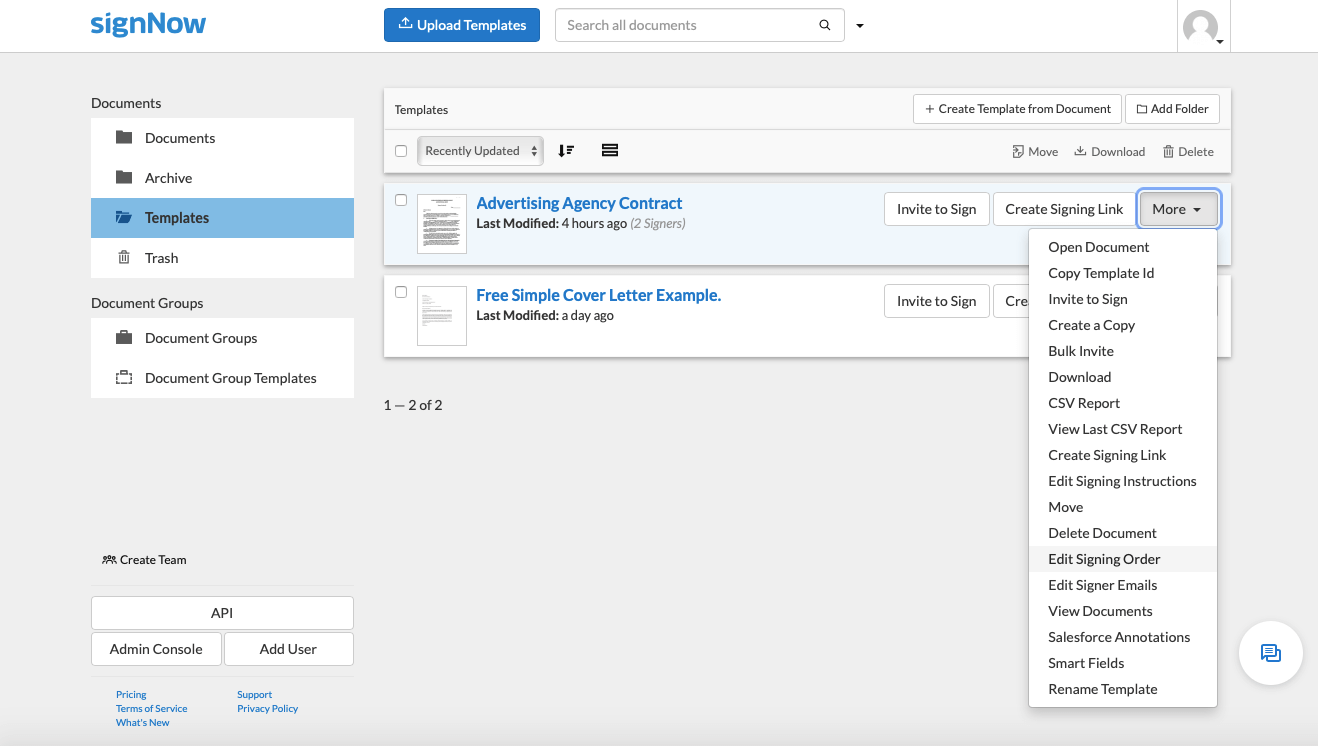
In Lock Signing Order and Emails, change the order of the signatures by moving the bar with the signer’s name and email to the top or to the bottom of the list. Feel free to change email addresses and select additional options if necessary. Click Save Signers to save the new order.
Elevate your eSigning experience with more airSlate SignNow features
Apart from signature workflows, airSlate SignNow offers a spectrum of other features for business and personal use.
1. Create templates from documents. In airSlate SignNow, templates make it possible to reuse a document for signing multiple times by creating new copies. Follow the step-by-step instructions below to turn a frequently used document into a template:
- Go to the Templates folder and click Create Template from Document at the top of the page.
- Select a document you want to reuse as a template and click Next.
- Use the input field to the new template a unique name.
- Click the Create Template button. The new template will appear at the top of the list.
Use the Invite to Sign and Create Signing Link features to share a template with other signers. All of the standard airSlate SignNow features are available as well.
2. Conditional routing. Multiple signers can collaborate on a single document in airSlate SignNow. The Conditional routing feature makes fillable fields dependent (conditional) on the signers’ roles. That is, a conditional field becomes visible and fillable only when the field it depends on, has a value or is left empty. Once you set the conditional fields, you won’t be able to change the signing order and/or add the document to any Document Group.
3. Request payments from signers. This feature is one of the Advanced Options of Invite to Sign. Scroll down to the Payment Settings and tick Request payment from a signer. To be able to accept payments, you need to set up a merchant provider account and configure the currency. Make sure you have a valid payment system account to receive payments.
4. Request attachments. The owner of the electronic document can request that signers attach additional files. For instance, you can get a document package from the signer by requiring them to upload attachments before they sign a contract or agreement. Just add a Request Attachment field where necessary and specify the attachment type.
5. Calculated fields. airSlate SignNow provides users with the possibility to automate business calculations in the document. Calculated fields use formulas that compute values from text and dropdown fields. The available calculations include addition, subtraction, multiplication, division, and parentheses.
To add a calculated field in the airSlate SignNow editor, place a Text field or a Dropdown field anywhere on the document. It’s impossible to fill in the Calculated field by hand. Once all required fields have numerical values, the total sum will automatically be generated and appear in the Calculated field.
The bottom line
As SMBs and enterprises worldwide are switching to paperless workflows, PDF format is getting more and more popular. PDFs look the same regardless of the device and operating system used to open them. Electronic signature services allow users to eSign PDF documents with legally-binding signatures and save those signatures again later. Obtain electronic signatures from multiple signers and create signature workflows. With an electronic signature solution like airSlate SignNow, you and your team can run digital workflows on any device and operating system, anytime, from anywhere.