To start, a light introduction to validating documents digitally
To better understand how to sign a PDF with a digital certificate, we first need to know what a digital certificate is. It's easy to use, but it takes some studying to understand why and how it works. And to understand digital certificates, we must first understand digital signatures.
What is a digital signature?
Applying a digital signature is a process that involves a set of digital keys, one of which is private and the other is public. These keys allow a user to put a document or other data through a process known as hashing, then it is encrypted using the user’s private key before being sent along with the original. Hashing turns a document or piece of data into a series of numbers and, depending on the mathematical algorithms used, letters. Many digital signature software systems use the cryptographic hash function known as SHA-256. The name comes from the algorithm’s etymology. SHA-1 and the SHA-2 series were developed by the National Security Agency, and the subsequent numerical value stands for the depth in which the data is digested. SHA-256 creates a 32-bit “word” as its output, whereas SHA-512 creates a 64-bit output. The original SHA hash function, known as SHA-0, was published in 1993 by the National Institute of Standards and Technology for the United States Federal Information Processing Standards.
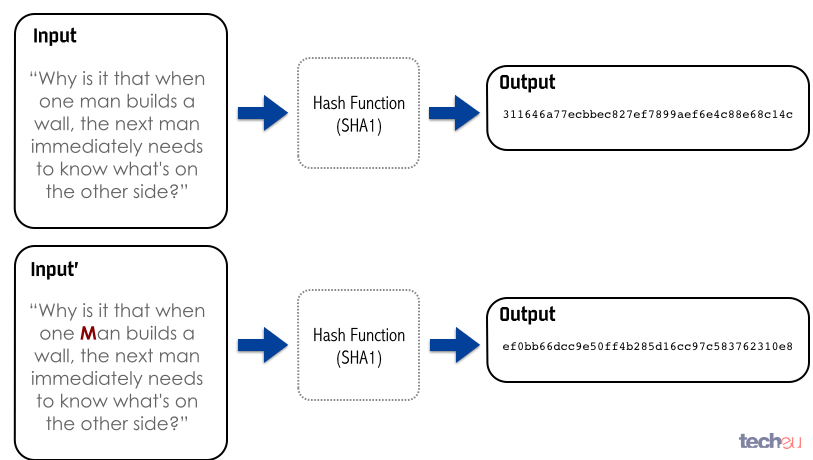
Original image
In the image above, we get an illustration of the hashing process in action. You can notice that even the smallest of alterations of the original input text results in a completely different output, and this is the most essential purpose of the entire process; to ensure that documents are original and unaltered while coming from the intended source. This data is even further encrypted by the signature process using the signatory’s private key. But sometimes this two key process isn’t enough to ensure the validity or source of the text we’re receiving, which is where digital certificates come in, though, we’ll get to that soon.
When it comes to digital signatures, and we’ll use Bitcoin as an example, our two keys may look something like this:
- Private: 5Kb8kLf9zgWQnogidDA76MzPL6TsZZY36hWXMssSzNydYXYB9KF
- Public: 1EHNa6Q4Jz2uvNExL497mE43ikXhwF6kZm
Oh boy, it’s alphabet soup!
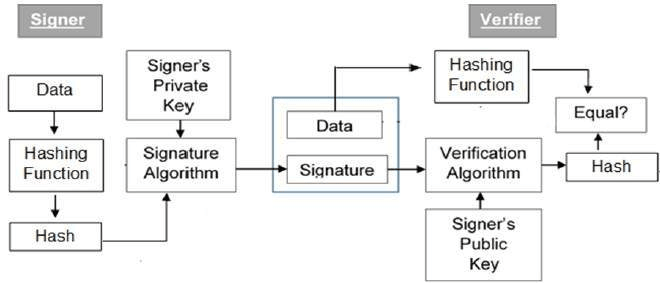
Original image
Once the data has been hashed, the data is then further encrypted using the signatory’s private key using a signature algorithm, this is the part of the process that is “digitally signed”. The public key is not included or embedded in the document being sent, but it can be included in the same email or transmission. It can also be uploaded to a website, it really doesn’t matter if anyone else sees the public key at this point. The most important point is that the recipient is using the same software to ensure a matching hash function and verification algorithm, as well as that they have the original document or data alongside the encrypted data.
After the recipient receives the original data or document, its digitally signed encrypted counterpart, and once they have the signatory’s public key, they can then begin the verification and decryption process. How this works is that the recipient has the signed, or encrypted, data and uses the public key they received from the signatory to decrypt it into its original hashed value, before it was encrypted using the signatory’s private key. If the decryption process is a success, the recipient knows the document came from the sender.
Next, the original document or data is subjected to the hash function. Once hashed, the result is compared with the aforementioned decrypted data. If this hashed value and the decrypted hash data is a match, then we have successfully completed a digital signature transaction.
But what if someone was pretending to be the signatory from the start?
What is a digital certificate?
For example, someone might ask coming from the Army, Air Force, or DoD, how to digitally sign a PDF? Why? Because they move so often and carrying paperwork around becomes a big problem. The answer for them may not be as simple as using a digital signature. If the transaction requires the utmost security and verification, we can use a digital certificate.
Creating a digital certificate is a process that requires a suitable and trusted Certification Authority, Certificate Authority, or CA. Some famous examples include Global Sign, Symantec, and Verisign. A digital certificate does require paying a fee. Always be cautious if the Certification Authority does not ask for any type of payment, they’re liable for the verification of individuals and businesses.
To begin, we need to generate or use an existing pair of keys; again one private and public. Afterward, the Certification Authority will require the public key. They’ll also ask for a number of details to verify the identity of the signatory for certifying the signature and therefore by technicality, certify the document. Some of these details may include:
- Full name
- Mother’s maiden name
- Addresses
- Phone Numbers
- Tax or Social Security Number
- An uploaded copy of your physical ID
- An uploaded copy of other forms of identification
- A credit card or bank transaction
- Scanned copies of utility bills
- Etc.
Once the requirements of identification have been met, the Certification Authority will issue a special file that includes details about the signatory and the Certification Authority. This file will also include an expiration and embedded within the file, the signatory’s public key. This file is the digital certificate. The key included has been guaranteed by the Certification Authority to be genuinely from the intended signatory, and the certificate itself is essentially the way in which the Certification Authority vouches for the identity of the signatory.
From here, the process is quite similar but with the addition of some information that the recipient can inspect for its validity and authenticity. They can then use the public key the same way it was used above to decrypt the digitally signed version of the data or document and compare it to the hash function output of the original document.
Let’s discuss what a PDF is so we can better understand why and how to sign a certified PDF.
What is a PDF?
A PDF, or Portable Document File, is a well known, high-quality, and read-only file format which was developed by Adobe Systems Incorporated in 1991, originally under the name of “the Camelot Project”. By 1992, Camelot matured into PDF and quickly became an industry standard. The main idea at the time was simple, the target of the project was to have a universally accepted file format for high quality printing on any machine. Dr. John Warnock, the co-founder of Adobe Systems Incorporated is responsible for the vision that gave way to this well-established file format.
Some features of PDFs include:
- Javascript code execution
- Password protection
- Standardized structure
- A variety of data types
- Appending pages and data
- Automatic image integration
- Cross-platform
- Secure
- Signable
- Searchable
Unlike many file formats available, PDFs can be used on practically any operating system or common internet browser by default. Because they’re generally secure, it’s possible to use them for proprietary information as well as legal documents or records. PDFs are also used in Governments and militaries across the world. The ability of PDFs to automatically integrate high-quality images makes them a great tool for scientific papers, presentations, theses, technical documentation, manuals, and much, much more.
Because PDFs are so robust, the format has a variety of data types built-in. These include booleans, dictionaries, arrays, names, numbers, streams, null objects, indirect objects, and strings. If you don’t know what that means, that’s alright, each of them are a type of data that is used in program logic and data storage.
One of the biggest security pitfalls of PDFs is their ability to remotely execute Javascript, just by being opened. While it’s very, very rare that a PDF you’ll encounter in your day-to-day life will have malicious code embedded within it, some hackers have disassembled the format so that they can rebuild it to do just that. Just like the tech war between Youtube and ad-blockers (we know who you’re rooting for), it’s a constant technological battle that continues to this day. Using the latest versions of PDF readers and browsers and checking the sources of PDF files that you receive, can help keep you, your machine, and your data safe.
But how to sign a smart PDF? Well, what is a smart PDF?
What is a smart PDF?
A smart PDF is a PDF that appears absolutely identical to a traditional one when viewed on a PC or laptop, the differences start with an internet connection being required. A smart PDF is loaded within a browser, not locally on a computer, and it cannot be downloaded. Additional differences are that in a smart PDF embedded or linked videos and GIFs can be played. Whereas, in a traditional PDF only a thumbnail is presented to the reader, which when clicked opens their browser. When a traditional PDF is viewed on a mobile device, the document is reduced in size and, to read or view it comfortably, the reader must zoom in. In a smart PDF the file itself is responsive, that’s to say that each of the elements therein resize themselves automatically to match the device's screen size.
If a smart PDF is viewed like a website by anyone who has access, it probably isn’t wise to sign a smart PDF and expose your information or personal signature to the world. So let’s move on to electronic signatures, compare a few names in the industry, and then wrap up by revisiting how to sign a PDF using certificates.

What’s the difference between an electronic and digital signature?
While a digital signature is typically very secure, it isn’t required in the US to affirm the signature on our contracts and agreements. A digital signature is required in the European Union under the law known as eIDAS (Electronic Identification and Trust Services for Electronic Transactions), while an electronic signature is invalid. Alternatively, in the United States of America, we have the UETA (Uniform Electronics Transactions Act) and more importantly the ESIGN Act (Electronic Signatures in Global and National Commerce).
According to the ESIGN Act, so long as an adequate record of the signing process exists, consent to electronic transactions is given, the information regarding the software and hardware requirements is given and maintained, and any changes of the storage or availability of the document is told to the signator (preferably in advance), the signature is valid. The sender must also be willing and able to provide the signator with a paper copy of the contract to sign, should consent, verification, or technical limitations arise.
This signature can be typed and is often represented as a font that is cursive or calligraphic in appearance, it can also be drawn using a variety of methods such as touch screens, by computer mouse input, stylus pads, or special eSignature pads. Additionally, if you have a digital version of your signature saved as an image, almost all eSigning platforms accept the uploading of an image when signing a document; this is how to import an electronic signature.
An electronic signature is the simplest and easiest method of obtaining signatures in a paperless and remote fashion. So let’s start with how to visibly sign a PDF.
To get started, you might ask yourself, can I do this myself? You should absolutely use a service and not try to do this by yourself. If you make a mistake in record keeping, creation, or completion, your bottom may very well be toast.

What eSignature services are available?
How do I enable signatures on a PDF? Let’s take a look at three eager competitors: airSlate SignNow, DocuSign, and HelloSign.
We’ll start with HelloSign and see what they have to offer.
HelloSign
The interface
HelloSign’s user interface is pretty simple and easy to navigate. Unfortunately, the non-editor site design doesn’t seem to accommodate responsiveness to compressed browser windows or various mobile screen sizes as well as other sites do. The main page after logging in will take you directly to a page titled “Sign documents”. From this page you can get started with the two options “Sign or send” and “Create a template.”
Using the solution: editing features and eSigning
With HelloSign, you’re able to send up to three documents a month for free, and without entering credit card information.
The next page on the left will be “Bulk send”, which allows you to use a previously saved template to send to many users. A template is a document you’ve already prepared with fields for the signatories to fill in.
After that, we have “Templates”, “Documents”, “Team”, and “Integrations.” Templates are a core feature for HelloSign, as well as other services which allows you to have a standardized and pre-prepared document for specific agreements, such as non-disclosure agreements.
If on the main page you select “Sign or send”, you’ll be prompted to upload your first document or select a template. You can manually locate your file by selecting upload or drag and drop it from your file browser. Once done, you will need to find the “Next” button in the top-right corner, which isn’t as obvious as it could be but let’s not knock off any points, it’s a minimalist and clean design. You’ll now need to enter the names and email addresses of the recipients, which according to our research does appear to be editable after the document is prepared and even after completion. Although, if you edit the document and the signatories list after it has already been completed, it’ll need to be resent and signed again. Next up, the interface that allows you to add fields to your file or PDF.
Their field selections leave a lot to be desired. You have the option to add signature, initials, date signed, textbox, and checkbox fields. From here, you can drag and drop them into the document.
What’s quite nice from a user perspective is that when you have to place down a field, you can choose yourself as the assignee for various fields, as opposed to only the recipients. This means that you can sign the document as well, without having to spend extra time fumbling about externally to the editor.
Once a document has been signed, the records required are automatically appended to the end of the PDF file on the last page which are immediately made available to both the sender and signer.
Payment plans
- The Pro plan at HelloSign is $13 per month, billed annually and allows for unlimited signature requests every month but is restricted to one sender and only one template.
- The Business plan allows for 5 senders, but also only 5 templates. The business plan is $40 per month, billed annually and it allows for branding, in-person signing, signer access codes, and a team transaction overview.
- The Enterprise plan only lists that it includes all business features but does not include a price or details regarding how many team members or templates would be available for use. It also includes some additional features which are pretty important to organizations and would probably be better served in lower tier packages.
DocuSign
The interface
DocuSign’s platform is also pretty clean and minimalist in design. While it has a smooth and responsive theme, the navigation is completely within dropdown menus and there is a loading screen between each interaction regarding existing and new documents. Even after the page has loaded, there is a loading wheel while the system gets your page ready. When performing a network throttle test, this can be rather unnerving.
Using the solution: editing features and eSigning
The menus themselves are pretty straightforward, although in some cases a little convoluted. The settings page is a little overwhelming at first, but does allow for immediate access to anything you could ever possibly need to tweak. If you ever get lost, use the primary navigation menu, and select “manage” to return to the main overview of your existing transactions and notifications. However, once here, you need to select the second menu titled “Inbox” to navigate through your documents and forms. But enough of that, let’s tarry on.
DocuSign gives you a very generous 30 day free trial with access to every feature, and without credit card information to boot. As a result, there are no worries about sneaky and unending subscription payments that you can’t seem to cancel and end up getting a new card just to sort out.
Let’s hit that big old main menu in the top left of the screen and go “Home”, we’re going to check out how to upload a document. Once here, we can select “Start Now” and manually navigate to our file, or again drag and drop it from our file browser. Now we can select the big yellow “Next” button on the bottom to proceed, and here we’ll find the area in which to enter our recipients.
Under “More” we can also add an access authentication method, for now it looks like only an access code is available to us. This allows us to use a password and give it to the recipient, and we can add a unique access code for each recipient we add.
Once we’re done there, we simply hit “Next” and we are greeted with the editor. Here we have a wide variety of input options, but there’s a catch. Unlike with HelloSign, we don’t have the option to select ourselves to be the one who fills out specific fields. This could be a problem if you hadn’t already included your signature before uploading the document, but it’s also a bit unsafe to sign something and leave it open-ended, so it would behoove you to also send the document to yourself as a signator and add the required fields appropriately within the document.
Some of the fields available to you include:
- Signatures
- Initials
- Stamp
- Date Signed
- Name
- Email
- Company Name
- Job Title
- Text
- Checkbox
- Dropdown
- Radio
- Formula
- Attachment
- Note
- Approve
- Disapprove
- Line
- Seal Image
Additionally, some fields like radio buttons allow you to embed conditional logic into them. While the system seems a bit haphazard, it essentially allows you to only show certain entry fields when a specific selection has been made.
When a document is signed, the signature is accompanied by an ID phrase for the records.
Unfortunately, when the document is received by the signator, the records are not appended to the end of the document. However, the “DocuSign Envelope ID” is listed at the top of the document.
When the sender locates the completed document within the “Manage” section, it is possible for him or her to view the history by clicking an arrow next to the “Move” button associated with the file. Although this history may be downloaded, it does not appear to be available to the signator.
Payment plans
After your 30 day free trial has expired, you have a few options.
- The Personal plan is $10 per month and is billed annually which allows you to only send 5 documents a month from one user on your account.
- The Standard plan is $25 per month and is also billed annually. There doesn’t appear to be a limit on how many documents you can send and you’re able to buy up to 5 user slots (you can call if you need more than 5). This plan also allows for personalized branding, comments, reminders, and notifications.
- The Business Pro plan is $40 per month, again billed annually, and has the same user policy. This also allows you to collect payments and use the advanced fields, bulk send, as well as receive signer attachments on your documents.
- The Enterprise Plan requires you to contact sales. And if you’re seeking “advanced solutions”, you can also contact sales.
You are limited to only utilizing basic input fields with the Personal and Standard plans, but we aren’t aware of what is considered basic and what is advanced in this case.
airSlate SignNow
The interface
The airSlate SignNow website is modern but not too minimalist, it just makes sense. It was designed for individuals to be able to use it no matter their current experience with software for online document management. The idea is to make it so that any team member can create an account and get started immediately to make launching workflows fast. This also includes directions on how to sign a PDF.
Using the solution: editing features and eSigning
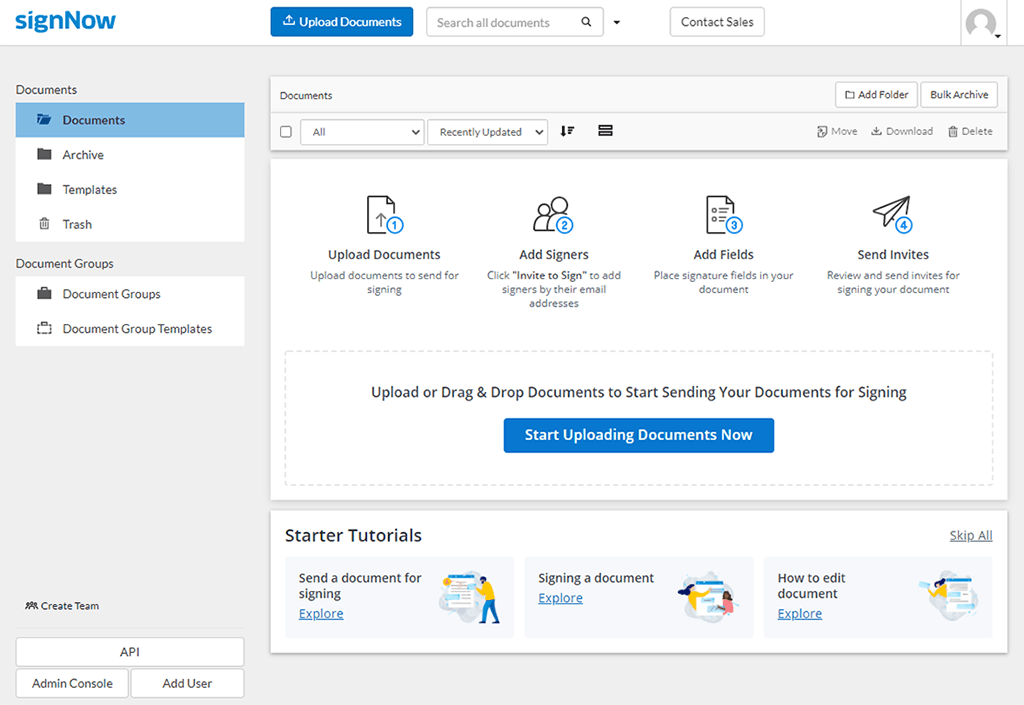
First of all, when you login you’ll be at the main page where you can either click the Upload Documents button on the top of the page, or drag and drop one from your file browser into the window. When it uploads there are numerous ways to open it and prepare it for editing.
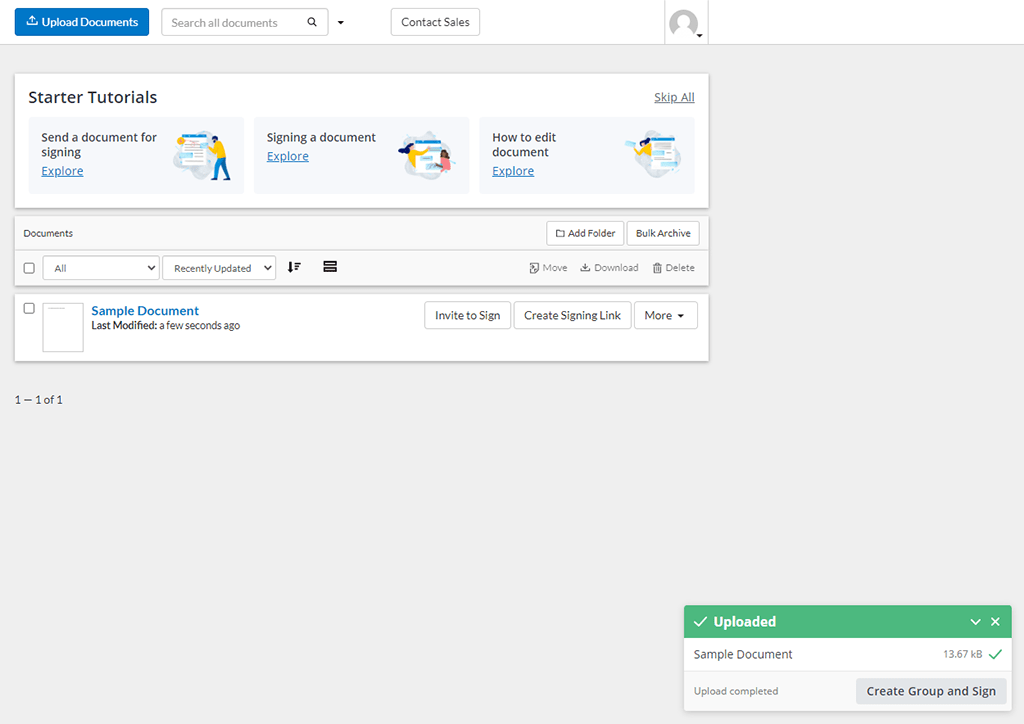
You can click on the name of the file, you can select More next to the document and then select Open Document, or if you’re still on the same page from when you’ve uploaded the file, you can click the green upload completed notification on the bottom right of the screen.
After the document is open, you will find yourself in the editor. Now here, not only can you drag and drop elements into the file, you can also simply select the element you wish to use and click on the document where you’d like it to be.
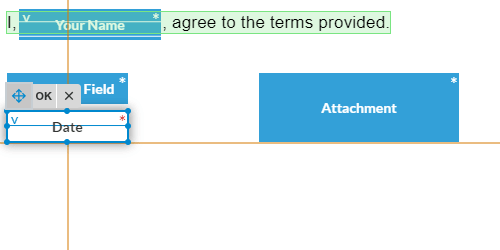
You can either manually change its location on the right hand panel, in pixels from the top right edge, or use the button with the field selected and drag it into place. If other elements are present an orange line will show up to help with auto-alignment to other element fields you’ve already situated to your needs.
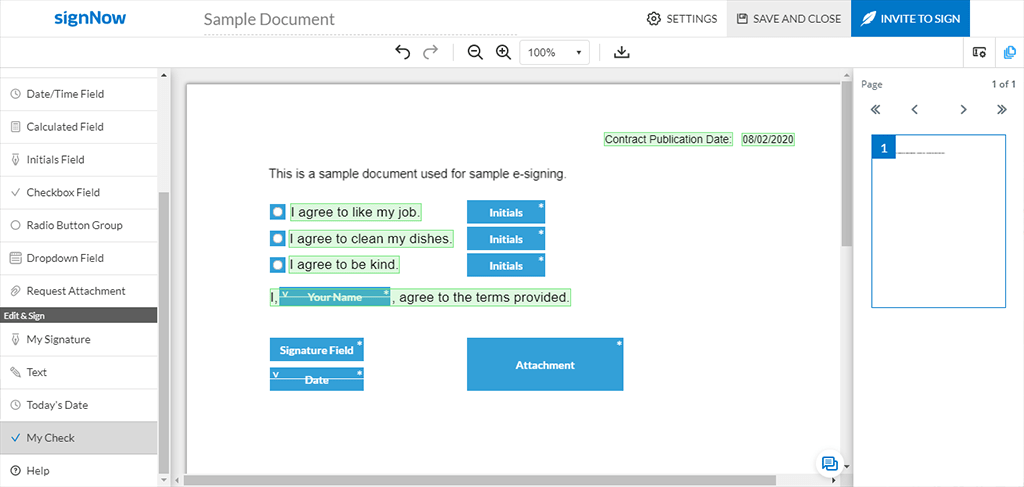
The types of fields available are:
- Signature Field
- Text Field
- Date/Time Field
- Calculated Field
- Initials Field
- Checkbox Field
- Radio Button Group
- Dropdown Field
- Request Attachment
- My Signature
- Text (only editable by you, the sender)
- Today’s Date (again, only for your needs)
- My Check
When you’ve placed something like the Radio Button Group, under the advanced settings on the right hand panel, you can select Make this Field Conditional and use Conditional Logic if your plan covers that behavior. You can hide and show fields based on the signator’s choices so they don’t fill in unnecessary fields that are mandatory otherwise.
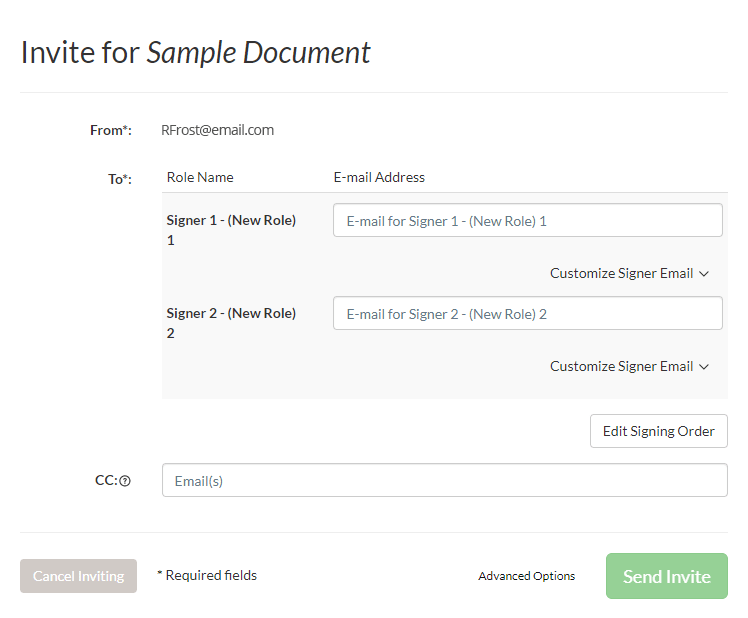
What’s also great is that you can add more signers right in the editor and assign fields to these new signers on-the-fly. When you select Edit Signers, the pane that shows up also includes signing order to ensure that the sequence of signatures is followed based on your corporate or organization’s protocol. Simply select the add signers button to add more.
Once you’ve set up your document to your needs, simply click Invite to Sign on the top right corner. From here, you have a number of options. You will need to add the emails for each of the signers you’ve added, and have the option to carbon copy (CC) it to any requisite parties. Just press space after each required email address to start writing another.
Here you can customize the email with a custom subject and message and in the advanced settings you can set a bouquet of options. These options include days until expiration, reminder notifications N days from today, or N days before the document’s expiration, notifications every N days, and authentication methods. Authentication can be done via SMS, phone call, or with a password.
Additionally, you may allow or deny forwarding, show declines on signatures, redirect the signer to a specific webpage once they’ve completed the process, set payment settings, and what to do when they’ve completed everything.
After you’ve finished, hit Send Invite and it’s off to the races.
The document, when viewed on airSlate SignNow by the signator, is immediately available for download upon signature completion with history by clicking Settings on the top right and then Download with History.

Payment plans
When it comes to pricing and plans, there are a variety of selections.
- Business is $8 per user per month with a 10 sender limit, unlimited templates, in-person signatures with one signer, reminders and notifications, audit trail and history, cloud storage integration, 1 team, access to the live chat, and more.
- Business Premium is $15 per user per month. It has the same numbers and features of the Business Plan with some extras like unlimited teams, personalized branding, sending in bulk, document groups, signing link invites, and in-person signatures with 2 or more signers.
- Enterprise is $30 per user per month and goes even a step further adding access to request payments, use of calculated and conditional fields, advanced threat protection, signer attachments, redirect after signing, smart fields, advanced authentication, and PDF Filler.
- airSlate Business Cloud goes above and beyond at $50 per user per month, but has a 10 user minimum. This is for the big boys and it includes phone support, enterprise grade eSignatures, business process automation, US Legal forms library, an organizational Dashboard, advanced HIPAA compliance, SSO, CRM/ERP integration, and personal integration support.
Now that we’ve talked about eSignatures and some of our competitors, let’s revisit digital signatures and certificates briefly before closing.
How do I digitally sign PDF documents with a digital certificate?
Well, as we covered earlier, if you’re sure electronic signatures won’t do, then you’ll need to find software that’s suitable to your needs that can handle the digital signature process. This will require the software to handle the public and private keys as mentioned earlier, as well as the hashing function.
How to digitally sign a PDF with a certificate
You will first need your digital signature software and public and private keys sorted, then you’ll need to use an appropriate Certification Authority such as Verisign, Global Sign, or Symantec to acquire a digital certificate. Once you’ve hashed your data and further encrypted it with your key, you’ll need to provide the certificate, encrypted data, and original document to your recipient.
We hope that answers all of your questions and that you found it informative. So far we’ve covered digital and electronic signatures, digital certificates, PDF’s, the ESIGN Act and eIDAS, smart PDFs, the difference between electronic and digital signatures, eSignature platforms, how to sign a PDF without certification, and we’ve covered two of our competitors.
With all of that said, figuring out which solution is best for you should be much easier. Happy signing! And if for any reason you need more information, visit our Questions & Answers page for more about eSignatures. Get started with airSlate SignNow today!