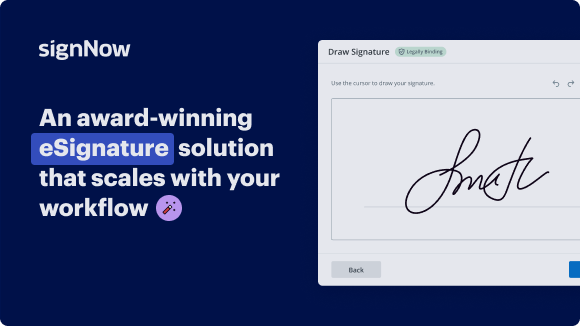
Firma De Borrador Con airSlate SignNow
Solución de firma electrónica galardonada


Obtenga las capacidades de firma electrónica poderosas que necesita de la empresa en la que confía
Seleccione el servicio profesional diseñado para profesionales
Configure la API de firma electrónica con facilidad
Colabore mejor juntos
Firma de borrador, en minutos
Reduzca su tiempo de cierre
Mantenga la seguridad de datos importante
Vea las firmas electrónicas de airSlate SignNow en acción


Soluciones de airSlate SignNow para una mayor eficiencia
Las reseñas de nuestros usuarios hablan por sí mismas


Por qué elegir airSlate SignNow
-
Prueba gratuita de 7 días. Elige el plan que necesitas y pruébalo sin riesgos.
-
Precios honestos para planes completos. airSlate SignNow ofrece planes de suscripción sin cargos adicionales ni tarifas ocultas al renovar.
-
Seguridad de nivel empresarial. airSlate SignNow te ayuda a cumplir con los estándares de seguridad globales.

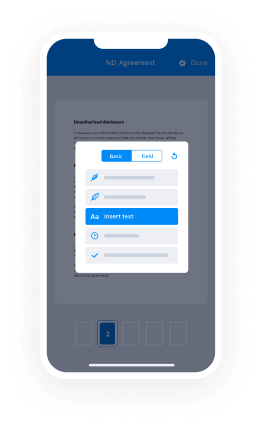
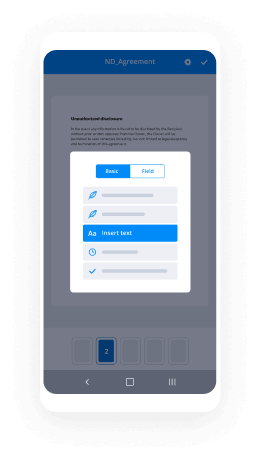
Tu guía paso a paso — draft signature
Con la firma electrónica de airSlate SignNow, cualquier negocio puede aumentar los flujos de firma y firmar electrónicamente en tiempo real, ofreciendo una mejor experiencia a clientes y empleados. redactar firma en unos pocos pasos sencillos. Nuestras aplicaciones móviles portátiles hacen posible trabajar en movimiento, ¡incluso sin conexión a internet! Firma electrónicamente desde cualquier lugar del mundo y acelera las tareas.
Sigue la guía paso a paso para redactar firma:
- Inicia sesión en tu cuenta de airSlate SignNow.
- Encuentra tu documento en tus carpetas o importa uno nuevo.
- Accede a la edición del documento usando la lista Herramientas.
- Agrega áreas rellenables, añade texto y firma.
- Lista múltiples firmantes usando sus correos electrónicos y configura la secuencia de firma.
- Especifica qué usuarios pueden obtener una copia firmada.
- Utiliza Opciones avanzadas para limitar el acceso a la plantilla y establecer una fecha de vencimiento.
- Presiona Guardar y cerrar cuando termines.
Además, hay funciones más avanzadas disponibles para redactar firma. Incluye usuarios en tu espacio de trabajo colaborativo, navega por los equipos y monitorea la cooperación. Numerosas personas en EE. UU. y Europa reconocen que una solución que integra todo en un solo lugar digital unificado, es exactamente lo que las empresas necesitan para mantener los flujos de trabajo funcionando sin problemas. La API REST de airSlate SignNow te permite integrar firmas electrónicas en tu aplicación, sitio web, CRM o nube. Prueba airSlate SignNow y disfruta de flujos de firma electrónica más rápidos, fáciles y, en general, más eficientes.
Cómo funciona
Funciones de airSlate SignNow que los usuarios adoran


Vea resultados excepcionales firma de borrador con airSlate SignNow

Cómo enviar y firmar electrónicamente un documento en línea
Prueba la forma más rápida de redactar una firma. Evita flujos de trabajo en papel y gestiona documentos directamente desde airSlate SignNow. Completa y comparte tus formularios desde la oficina o trabaja sin problemas sobre la marcha. No se requiere instalación ni software adicional. Todas las funciones están disponibles en línea, solo ve a signnow.com y crea tu propio flujo de firma electrónica.
Una breve guía sobre cómo redactar una firma en minutos
- Crea una cuenta en airSlate SignNow (si aún no te has registrado) o inicia sesión usando tu Google o Facebook.
- Haz clic en Subir y selecciona uno de tus documentos.
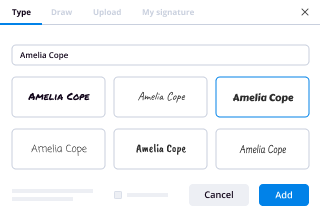
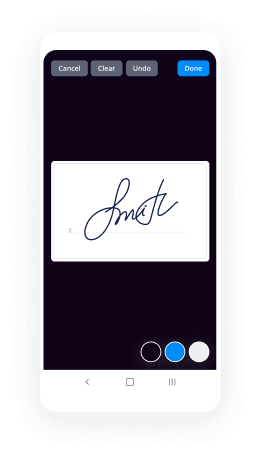
- Utiliza la herramienta Mi Firma para crear tu firma única.
- Convierte el documento en un PDF dinámico con campos rellenables.
- Llena tu nuevo formulario y haz clic en Hecho.
Una vez terminado, envía una invitación para firmar a múltiples destinatarios. Obtén un contrato ejecutable en minutos usando cualquier dispositivo. Explora más funciones para crear PDFs profesionales; añade campos rellenables, redacta firma y colabora en equipos. La solución de firma electrónica proporciona un proceso confiable y funciona con base en la Certificación SOC 2 Tipo II. Asegúrate de que todos tus registros estén protegidos y que ninguna persona pueda modificarlos.
Cómo firmar electrónicamente un PDF en Google Chrome
¿Buscas una solución para redactar firma directamente desde Chrome? La extensión airSlate SignNow para Google Chrome está aquí para ayudarte. Encuentra un documento y, directamente desde tu navegador, ábrelo en el editor. Añade campos rellenables para texto y firma. Firma el PDF y compártelo de forma segura según GDPR, Certificación SOC 2 Tipo II y más.
Usando esta breve guía, expande tu flujo de trabajo de firma electrónica en Google y redacta firma:
- Ve a la tienda web de Chrome y busca la extensión airSlate SignNow.
- Haz clic en Añadir a Chrome.
- Inicia sesión en tu cuenta o regístrate una nueva.
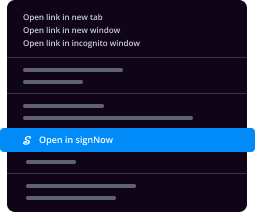
- Sube un documento y haz clic en Abrir en airSlate SignNow.
- Modifica el documento.
- Firma el PDF usando la herramienta Mi Firma.
- Haz clic en Hecho para guardar tus ediciones.
- Invita a otros participantes a firmar haciendo clic en Invitar a Firmar y seleccionando sus correos electrónicos/nombres.
Crea una firma que esté integrada en tu flujo de trabajo para redactar firma y obtener PDFs firmados electrónicamente en minutos. Di adiós a las pilas de papeles en tu lugar de trabajo y comienza a ahorrar tiempo y dinero en tareas más importantes. Elegir la extensión de Google de airSlate SignNow es una opción inteligente y conveniente con muchas ventajas diferentes.
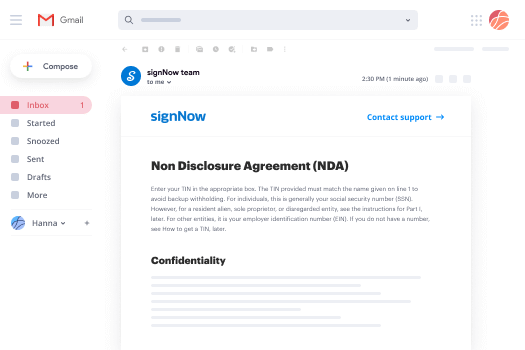
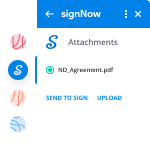

Cómo firmar un adjunto en Gmail
Si eres como la mayoría, estás acostumbrado a descargar los adjuntos que recibes, imprimirlos y luego firmarlos, ¿verdad? Bueno, tenemos buenas noticias para ti. Firmar documentos en tu bandeja de entrada ahora es mucho más fácil. El complemento airSlate SignNow para Gmail te permite redactar firma sin salir de tu buzón. Haz todo lo que necesitas; añade campos rellenables y envía solicitudes de firma con unos clics.
Cómo redactar firma en Gmail:
- Busca airSlate SignNow para Gmail en el Marketplace de G Suite y haz clic en Instalar.
- Inicia sesión en tu cuenta de airSlate SignNow o crea una nueva.
- Abre tu correo con el PDF que necesitas firmar.
- Haz clic en Subir para guardar el documento en tu cuenta de airSlate SignNow.
- Haz clic en Abrir documento para abrir el editor.
- Firma el PDF usando Mi Firma.
- Envía una solicitud de firma a los otros participantes con el botón Enviar para Firmar.
- Ingresa su correo electrónico y presiona OK.
Como resultado, los otros participantes recibirán notificaciones indicándoles que deben firmar el documento. No es necesario descargar el archivo PDF una y otra vez, solo redacta firma con unos clics. Este complemento es adecuado para quienes prefieren centrarse en objetivos más valiosos en lugar de perder tiempo en cosas sin importancia. Mejora tu rutina diaria con la aplicación de firma electrónica galardonada.

Cómo firmar una plantilla PDF en movimiento sin aplicación
Para muchos productos, cerrar tratos en movimiento significa instalar una aplicación en tu teléfono. Nos complace decir que en airSlate SignNow hemos hecho que firmar en movimiento sea más rápido y fácil eliminando la necesidad de una aplicación móvil. Para firmar electrónicamente, abre tu navegador (cualquier navegador móvil) y accede directamente a airSlate SignNow y todas sus potentes herramientas de firma electrónica. Edita documentos, redacta firma y más. No se requiere instalación ni software adicional. Cierra tu trato desde cualquier lugar.
Consulta nuestras instrucciones paso a paso que te enseñan cómo redactar firma.
- Abre tu navegador y ve a signnow.com.
- Inicia sesión o registra una cuenta nueva.
- Sube o abre el documento que deseas editar.
- Añade campos rellenables para texto, firma y fecha.
- Dibuja, escribe o sube tu firma.
- Haz clic en Guardar y Cerrar.
- Haz clic en Invitar a Firmar e ingresa el correo electrónico del destinatario si necesitas que otros firmen el PDF.
Trabajar en móvil no es diferente a hacerlo en un escritorio: crea una plantilla reutilizable, redacta firma y gestiona el flujo como lo harías normalmente. En un par de clics, obtén un contrato ejecutable que puedes descargar a tu dispositivo y enviar a otros. Sin embargo, si quieres una aplicación, descarga la aplicación móvil de airSlate SignNow. Es segura, rápida y tiene un gran diseño. Aprovecha flujos de trabajo de firma electrónica sin problemas desde el lugar de trabajo, en un taxi o en un avión.

Cómo firmar un archivo PDF en un iPad
iOS es un sistema operativo muy popular equipado con herramientas nativas. Permite firmar y editar PDFs usando Preview sin software adicional. Sin embargo, por muy buena que sea la solución de Apple, no ofrece automatización. Mejora las capacidades de tu iPhone aprovechando la aplicación airSlate SignNow. Utiliza tu iPhone o iPad para redactar firma y más. Introduce automatización de firma electrónica en tu flujo de trabajo móvil.
Firmar en un iPhone nunca ha sido tan fácil:
- Busca la aplicación airSlate SignNow en la App Store e instálala.
- Crea una cuenta nueva o inicia sesión con tu Facebook o Google.
- Haz clic en Plus y sube el archivo PDF que deseas firmar.
- Toca en el documento donde quieres insertar tu firma.
- Explora otras funciones: añade campos rellenables o redacta firma.
- Usa el botón Guardar para aplicar los cambios.
- Comparte tus documentos por correo electrónico o mediante un enlace de firma.
Haz PDFs profesionales directamente desde tu aplicación de airSlate SignNow. Aprovecha al máximo tu tiempo y trabaja desde cualquier lugar; en casa, en la oficina, en un autobús o avión, e incluso en la playa. Gestiona todo el flujo de registros fácilmente: crea plantillas reutilizables, redacta firma y trabaja en archivos PDF con socios comerciales. Convierte tu dispositivo en una herramienta poderosa para ejecutar acuerdos.
Cómo firmar electrónicamente un archivo PDF usando Android
Para los usuarios de Android que gestionan documentos desde su teléfono, deben instalar software adicional. La Play Market es vasta y está llena de opciones, por lo que encontrar una buena aplicación no es demasiado difícil si tienes tiempo para explorar cientos de apps. Para ahorrar tiempo y evitar frustraciones, sugerimos airSlate SignNow para Android. Almacena y edita documentos, crea roles de firma e incluso redacta firma.
Los 9 pasos sencillos para optimizar tu flujo de trabajo móvil:
- Abre la aplicación.
- Inicia sesión usando tus cuentas de Facebook o Google o regístrate si aún no has autorizado.
- Haz clic en + para añadir un nuevo documento usando tu cámara, almacenamiento interno o en la nube.
- Toca en cualquier parte de tu PDF e inserta tu firma electrónica.
- Haz clic en OK para confirmar y firmar.
- Prueba más funciones de edición; añade imágenes, redacta firma, crea una plantilla reutilizable, etc.
- Haz clic en Guardar para aplicar los cambios una vez termines.
- Descarga el PDF o compártelo por correo electrónico.
- Utiliza la función Invitar a firmar si quieres establecer y enviar un orden de firma a los destinatarios.
Convierte lo mundano y rutinario en algo fácil y fluido con la aplicación airSlate SignNow para Android. Firma y envía documentos para firma desde cualquier lugar donde estés conectado a internet. Crea PDFs atractivos y redacta firma con unos pocos clics. Diseña un flujo de firma electrónica impecable solo con tu teléfono inteligente y mejora tu productividad total.
¡Obtenga firmas legalmente vinculantes ahora!
Preguntas frecuentes
-
¿Cómo puedo hacer mi firma?
Clip sugerido Cómo diseñar tu propia firma increíble - YouTubeYouTubeInicio del clip sugerido Cómo diseñar tu propia firma increíble - YouTube -
¿Cómo creo una firma manuscrita electrónica?
Utiliza la pizarra "Proteger" para firmar tu nombre y guarda el archivo de salida como una imagen. Firma tu nombre en una hoja en blanco de airSlate SignNow. Usa un escáner para escanearlo, o simplemente toma una foto. Guárdalo como una imagen en formato PNG o JPG. -
¿Cómo añado una firma manuscrita a un PDF?
Clip sugerido Cómo firmar un PDF con firma manuscrita - YouTubeYouTubeInicio del clip sugerido Cómo firmar un PDF con firma manuscrita - YouTube -
¿Cómo puedo crear una firma?
Clip sugerido Cómo diseñar tu propia firma increíble - YouTubeYouTubeInicio del clip sugerido Cómo diseñar tu propia firma increíble - YouTube -
¿Tiene que ser una firma manuscrita?
Puedes tener tantas firmas como quieras, pero en cualquier documento deberías ceñirte al tipo de firma que mejor se adapte a ese documento. Por ejemplo, un documento en papel requeriría una firma manuscrita (húmeda), y un documento electrónico firmado en línea requeriría una firma electrónica legalmente vinculante. -
¿Qué debe incluir una firma?
Las firmas necesariamente no tienen que deletrear tu nombre completo. Las firmas son una marca que una persona coloca en un documento para mostrar su consentimiento o disenso respecto a la escritura del mismo, siempre que ponga su mano y reconozca que esa es su marca. -
¿Puedes cambiar tu firma en cualquier momento?
Como dice Gil Silberman, eres libre de cambiarla arbitrariamente cuando quieras. Así que la respuesta práctica es: querrás reemplazar tu Licencia de Conducir/ID estatal con tu nueva firma, y luego ir a cada banco donde tengas una cuenta y actualizar tu firma en sus registros. Eso probablemente sea todo. -
¿Es demasiado tarde para cambiar mi firma?
Nunca es demasiado tarde. Siempre puedes cambiar tu firma varias veces, pero eso sería una tarea demasiado impráctica y onerosa, ya que el procedimiento para obtener una nueva firma es realmente tedioso. ... porque de esa manera no necesitarás recordar qué firma usaste para qué propósito. -
Cuando cambias tu nombre, ¿necesitas cambiar tu firma?
Es tu deseo si quieres cambiar tus firmas en lugar del cambio en el apellido. No es obligatorio cambiar tus firmas después de tu matrimonio. Puedes mantener tus firmas de soltera. La firma es una simple escritura de una persona para identificarla. -
¿Importa la firma en el pasaporte?
Firma tu pasaporte usando tu firma habitual. Asegúrate de que la tinta esté seca antes de cerrar tu pasaporte para evitar que se corra la firma. La firma en el pasaporte no es necesaria para la Tarjeta de Pasaporte. Ahora que has firmado el pasaporte y hecho que el libro de pasaporte sea válido, abre la página siete. -
¿Podemos cambiar la firma?
Sí, puedes cambiar la firma. La firma apenas se verifica a menos que sea para propósitos bancarios. ... Así que si cambias tu firma en los registros bancarios, pasaporte, licencia de conducir y tarjeta PAN, envía una notificación a las autoridades correspondientes sobre el cambio de firma. -
¿Puede tu firma ser un dibujo?
Generalmente sí. Cualquier escritura destinada a ser una firma *es* una firma. La sección del Código Comercial Uniforme sobre comercio describe qué es una firma: ... ¿Cuáles son algunas sugerencias para identificar la firma del artista en un dibujo de 1989? -
¿Tienes que tener exactamente la misma firma?
Las firmas reales siempre son ligeramente diferentes y varían cada vez. Si las firmas son réplicas exactas, hay una posibilidad muy fuerte de falsificación. La diferencia entre firmas aumenta proporcionalmente con la complejidad. Las firmas simples son menos diferentes entre sí. -
¿Está bien cambiar tu firma?
Una persona es libre de cambiar una firma, y la mayoría de las personas alteran la forma en que escriben sus nombres entre la infancia y la adultez. Pero dado que no existe una "firma legal", no necesitas saber cómo cambiar tu firma legalmente. -
¿Puedes cambiar tu firma legalmente en el Reino Unido?
Sí, puedes cambiar tu firma cuando quieras, pero debe coincidir con tus documentos oficiales como pasaporte, licencia de conducir, cuentas bancarias, etc., para que no tengas problemas en demostrar que eres quien dices ser. UKSolicitorJA, Abogado.
Lo que dicen los usuarios activos — draft signature


Preguntas frecuentes
¿Cuál es la definición de firma electrónica según la Ley ESIGN?
¿Qué necesito para firmar un archivo PDF?
¿Cómo firmo documentos en formato PDF?
Obtén más para firma de borrador con airSlate SignNow
- Formulario cap 1040 firma electrónica
- Firma digital detallada de consentimiento médico de cap
- Authorize Manufacturing Contract Digital Signature
- Plantilla de propuesta de control de plagas con firma de correo electrónico de airSlate SignNow
- Authorize Transportation Proposal Template with Electronic Signature
- Authorize Commercial Photography Contract Template eSigning
- Autorizar factura DJ inicial
- Autorizar Carta de Presentación para Posición Interna firma digital
- Authorize Training Acknowledgement Form Email Signature
- Authorize Patient Intake Form Email Signature
- Authorize Simple One Page Lease Agreement Template Mark
- Marcar Acuerdo de Compra de Cuentas por Cobrar firmado
- Mark Promissory Note Digi Sign
- Firma de correo electrónico de la entrada dorada de Willy Wonka
- Comunicado de prensa de incorporación de nuevo empleado con firma electrónica
- Password Employment Contract Template for Digital Signatures
- Password Adoption Certificate E Sign
- Password Promotion Letter to Employee Digi Sign
- Carta de promoción de contraseña para empleado autógrafo
- Argue Contrato de Compra de Cuentas por Cobrar digi-sign
- Plantilla de Acuerdo de Alianza Estratégica eSign argue
- Plantilla de propuesta de diseño de logotipo argue inicial
- Argue Free Oregon Rental Lease Agreement Template inicial
- Publicar plantilla de acuerdo con firma en bloque
- Plantilla de firma de propuesta inmobiliaria
- Publicar Acuerdo de Arrendamiento de una Página con firma digital
- Publicar firma de correo electrónico de certificado de matrimonio gratuito
- Firma de carta de pase