Introduction
Paperwork always seems to be tedious, no matter how far technology comes. However, it does seem to make it easier, which is why you are here. You may have just learned about electronic signature, or you may have already poked around a bit. Whatever the case may be, you have run into a problem; you have encountered a document that requires more than one person to sign, so now you are wondering “How to get multiple people to sign the same PDF?”, “How many people can sign a PDF?”, “How to sign multiple pages in a PDF at once”?, and more importantly, “how do you sign a PDF in multiple places?” These are very good questions and ones that we will cover in this long-read article today.
Just in case you are not convinced you need to know these things, we want to let you know that as you read, you will learn everything there is to know about streamlining your eSignature workflows. Doing so improves several things in your business, from enhancing B2B and B2C signing experiences, speeding up time to close, creating more transparency in contract lifecycles, and so much more.
The importance of knowing how to eSign and apply eSignatures in multiple places in a PDF
Alright, so bear with us as we lay out a scenario for you. Imagine that the company, business, or organization you work for has suddenly dropped the fact on you that they have converted over to electronic signature. This can be for reasons such as to save money, enact eco-friendly plans, save space, or a mix of all of everything, but whatever the primary reason is, you now suddenly have to figure out how to use new software. That can be stressful! You poke around the program and find that it is pretty intuitive, a really easy system to use. However, you suddenly have to send out a document that requires you to place multiple signature elements and require more than one other person to sign it. This can be a challenging situation to be in if you do not know what to do. So if you have already checked out the software your company purchased, and have not been able to figure it out, this article is here to help you a lot.
How to get multiple recipients to sign a PDF in several places using airSlate SignNow
In this section here, we will go over a brief guide on the easiest way to get a document set up and sent so that you can have multiple users eSign a PDF. Take note that this short guide will show you how to do this from the beginning of account set up, all the way to sending off an email.
- Go to www.signnow.com and either sign in or register a new account if you do not already have one. You can use your google account to register, it is a bit quicker.
- Once you are in your account, you will need to upload a form or contract by clicking on Upload Documents. You will have to wait for your file to upload onto your Homepage.
- Click on the document file’s name once you see that it has successfully appeared on your Homepage.
- Take a look at the left-hand-side tool panel and select the My Signature element and place it wherever you need it to be. Your eSignature will be applied where the element sits. By clicking on this element multiple times you can sign the document multiple times allowing you to digitally sign multiple PDF pages.
- Self sign the document. To generate your own signature, just click on the element you just placed and start typing, drawing, or upload an image of your handwritten signature if you want to.
- Click Sign and drag the executed element by using the move button.
- Drag and drop the Signature Field on the left-hand tool panel and place the element wherever you need your client to eSign. Place as many Signature Field elements as you need people to sign the document.
- Click on the signature elements you just placed, and take a look at the right column.
- Under Role you will see a drop down that says Signer 1, click here and customize who will execute that eSignature. Repeat for all elements.
- Click the Save and Close button to get back to your Homepage.
- Click on the More button next to your file’s name and then on Email a Copy.
- Add your recipients and/or clients’ emails, include your subject and a message, then click Send Now and you are done. Just got to wait for them to sign it.
Note: we go into a much more detailed explanation later on in the article, so keep reading if you need more help.
Twelve steps may seem like a lot, but if you follow along, we are sure you can get the hang of it. With these twelve steps, you have learned pretty much all the basics that you are going to have to use while working in airSlate SignNow on a regular basis, plus how to sign multiple pages in a PDF. However, if you still have a hard time, do not worry; as we said, we will be going over a much more detailed explanation of how to get multiple people to sign and how to sign numerous pages later on.
If you are wanting to learn more about how airSlate SignNow works, and more importantly, how to have multiple people sign your document, continue reading. However, before we get back to airSlate SignNow, we want to go over eSignature laws and legislation.
Get familiar with eSignature laws across the globe
eSigning forms and contracts electronically is an amazing way to streamline your business and your eSignature workflows, however, how are you supposed to account for varying laws in different countries? eSignatures are serious and represent someone’s intent to do business online, meaning to make that intent legally valid, laws have to be put in place to make sure that intent is respected by individuals, businesses, and even governments. In order to do that, comprehensive legislation has popped up with the goal of protecting rights and keeping order.
Which laws regulate electronic signatures around the world?
From all the countries that have enacted legislation revolving around electronic signature, only a few have adopted laws and policies that stand out for their thoroughness and comprehensive guidelines. In order to clarify things, and to make sure you know exactly what to expect while doing business globally, we have composed a list of the most prominent eSignature laws in several different first-world countries.
Which law regulates electronic signatures in the United States?
- The Electronic Signatures in Global and National Commerce Act. The ESIGN Act ensures the validity of electronic signature records only if they accurately reflect the agreement and can be reproduced as required. When choosing an electronic signature solution, make sure it allows you to download copies of any signed document.
Which law regulates electronic signatures in Canada?
Which law regulates electronic signatures in the European Union?
Which law regulates electronic signatures in China?
- The Electronic Signature Law of the People's Republic of China, and later the amended eSignature Law, states that electronic signatures are legal for civil contracts. However, they are not recognized for real estate deals, public-utilities suspensions, inheritance documentation, adoption papers or marriage licenses.
How to eSign a DC Document in PDF Multiple Times with the help of airSlate SignNow
As promised, we will take a deep dive into airSlate SignNow and how to eSign a DC document in PDF multiple times. Hold on tight, the information that follows will be detailed, allowing you and your team to accurately follow along and understand clearly how to get several recipients to eSign a document and create a multi-signer signing order.
Step 1. Editing an uploaded document
Once you are in your account, you can start this process by pressing on the Upload Documents button on the top of your screen. However, we can also begin from your airSlate SignNow Homepage. If you start from your airSlate SignNow Homepage, you can find the Start Uploading Documents Now button in the center of the screen. After you do one of those two steps, all you have to do is wait for whatever form or contract you chose to upload.

Do not be alarmed if you see a little notification pop up in your screen's bottom right. This notification is just here to help. It will tell you a couple of different things, one of them is that you have started an upload and that it is in progress. The next thing it will let you know is when that upload is complete, it also has an added function to tell you about errors that occurred if there were any.
Once your file is uploaded, you will need to take another look at your airSlate SignNow Homepage. From your Homepage, click on the button that says Document Folder; it is in here where you will find the document or PDF that you just uploaded. It is now time for you to start editing the form to get it ready to be signed multiple times, to be digitally eSigned on several PDF pages, and to get multiple people to sign the PDF.
Step 2. Applying multiple eSignatures to a PDF to certify it

You took the first step in the process by uploading your document, and now it is time to start editing it. So let us focus and get it ready to send as soon as possible. To start editing, all you have to do is find the file and click on it, and then you will be taken to airSlate SignNow’s online document editor.
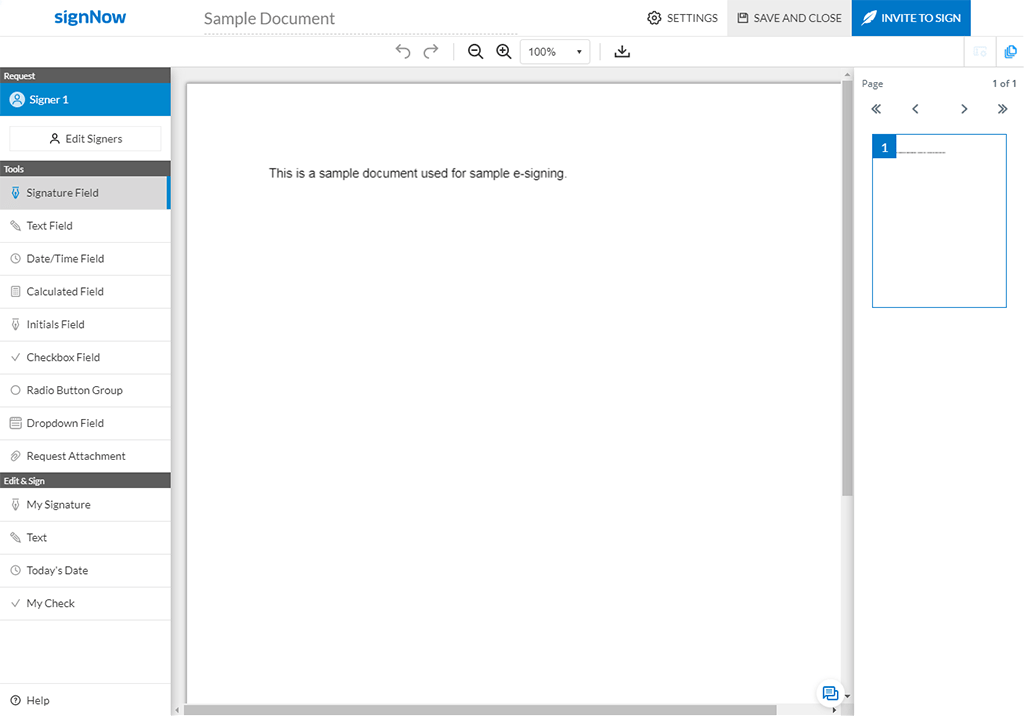
On the left-hand side of the screen you will be able to see a large column. This column is what holds all of your editing options, and its tools will make your life so much easier. There are quite a lot of tools here but we are only going to focus on the few you need to work with to be able to sign all the pages in a PDF.
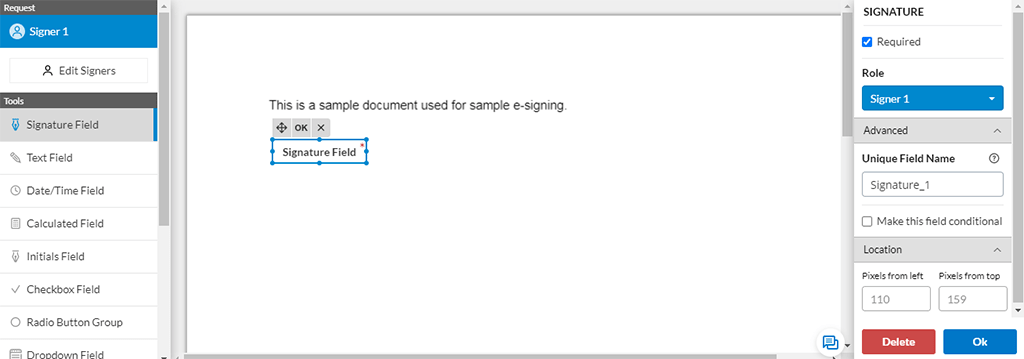
We mainly need to focus on the Signature Field option, so, we will go ahead and start with it. I am sure you can infer that the signature field is how your clients and signers will be eSigning your document. To add a signature field is very simple. All you have to do is click on the Signature Field option, then take your cursor to the page and location you want your singers to sign the document.
Note: if you do not like where the signature element is placed, you can use the move button (the move button is the four-sided arrow on the element) to move the element anywhere. Be aware that orange lines will appear if you do decide to move the element. These lines are part of the airSlate SignNow alignment function and will assist in placing the element in the desired location, helping to ensure the cleanest looking signature. Do not be afraid to use this function to place the signature where you think it looks best.
This is not all that the Signature Field can do. If you need someone to sign on more than one page, you can place the signature element down multiple times. airSlate SignNow does not restrict you to one signature per person but allows a signer to sign multiple PDF pages. In fact, it will enable you or the organization to sign multiple times in one PDF too, but we will get to that later. For now, let us learn how to add multiple signers to a document.
Step 3. Adding signers to a PDF with more than one party involved

So we have gone over how to sign multiple pages in a PDF, but now we need to figure out how to add various signers. If you look at the picture above, you will notice that there are multiple signature elements placed in the appropriate spots. You may think that all is well, and the document is ready for further editing, but that is incorrect. Take a look at the signature elements, and you will see that they are all the same color, this means that one person is assigned to sign them all. That can be a problem when you have five separate signers who need to be able to sign your document.

To remedy this issue, you will have to click on one of the signature fields. Once you do that, you need to bring your attention over to the right side column, for it has changed. What you have before you now are signature field editing options. From this little window, you can edit and delete a single signature element. What we are looking for is the Role option. Below Role, there is a small drop-down option that you need to click.

Once the drop-down is opened up, you will see two options. One is a designation, and the other is Add Role. You will now select Add Role, and a pop-up box will populate the center of your screen.

This is how you will add another signer. We recommend adding the signer’s name or designation; however, for the sake of simplicity, we are going to name them Signer 1 through Signer 5. Once you have typed out the signer’s name, you will select the Add New Role button. After this, you will notice that the new role was added under the Role drop bar.

Note: as we said before, the colors represent how many signers you have. In the picture above there are five colors, what this means is that there are five distinct signers who will be able to sign the document. It is also worth noting that you are also able to have as many people eSign a PDF as you want.
Step 4. Adding the date and time to a form or contract
Looking back to the left side column, we would like you to direct your attention to the Date/Time Field. The Date/Time Field is what allows your clients to date the contract. This is most commonly done to take note of when the client signed the contract. Adding a date/time field element is very simple. All you have to do is click on the Date/Time Field option, then take your cursor to the page and location you want your singers to date the document.

Note: again, just like the signature field, if you do not like the placement of the Date/Time element, you are more than able to use the move button on the element to place it where you would most like it. Just remember to use the airSlate SignNow alignment function to help make sure you get the Date/Time element right where you want it.
Adding the date and time when you have multiple recipients

If you look at the picture above, you will notice that there are multiple Date/Time elements placed in the appropriate spots. Again, you may think that all is well, and the document is ready for further editing, but you must remember the rule about the colors. Take a look at the Date/Time elements, and you will see that they are all the same color, this means that one person will sign them all. That can be a problem when you have five separate signers who need to be able to date your document.
Much like the signature fields, you will have to click on one of the Date/Time fields. Once you do that, you need to bring your attention over to the right side column, for it has taken the same appearance as with the signature fields. What you have before you now are Date/Time field editing options. From this little window, you can edit and delete a single Date/Time element. Again we are looking for the Role option. Below Role, there is a small drop-down option that you need to click.

In the example above, you can see that all the signers we added are in this window as well. Thankfully we do not have to add them again; all we have to do is match which date to which signer we want. So to do this, you match the color and the name to whom you want to date. So, for example, client signature 2 is labeled as signer 2, Signer 2 in this example is yellow, so you find the name Signer 2 in the drop bar menu. Make sure signer 2 is yellow, and click on it. This will make that Date/Time element only editable by signer 2.

Well we learned a lot in the last section. Actually we answered a big part of the central question that this article is about. There is still some left however; it would not be a complete guide if we did not show you how to sign and date the document yourself. Fortunately that is what we will be discussing in the next section. Follow along as we continue.
Step 5. Signing a PDF

We have made it to the section of this article where we finally talk about where and how you sign your document with airSlate SignNow. This is actually relatively easy and very intuitive. We know that you will catch on quickly and be self signing in no time at all. Time to learn not only how to sign your form, but also how to quickly sign all pages in a PDF.
We are focusing on the left column again now; you will see that there is another section at the bottom half of the bar that says Edit & Sign. In the Edit & Sign section, there is an option that says My Signature. You need to click on My Signature to produce an element. Now that you have the element ready, you will go to the location on the document that you wish to place your signature and click, just like you did with the Signature Field element.
Note: just as with the Signature element and the Date/Time element, if you do not like the placement of the My signature element you can use the move button to reposition it to your liking.
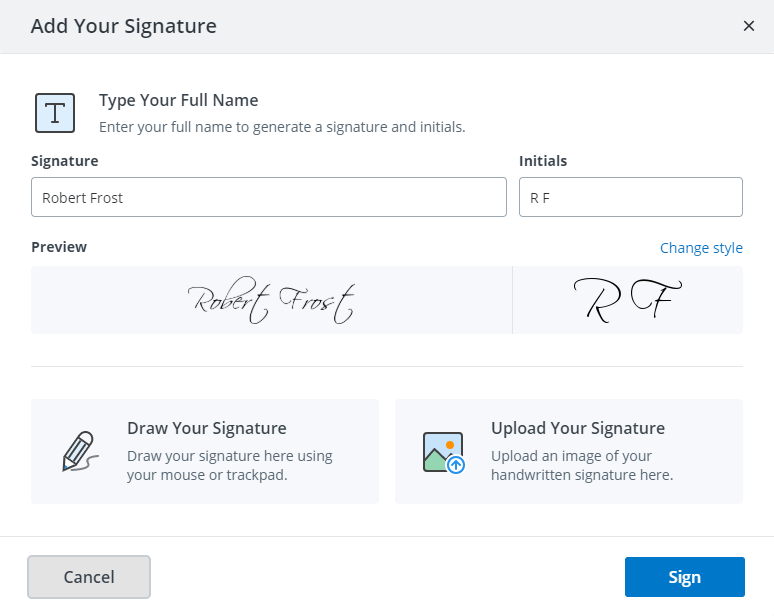
Now that the element is placed you have to click on it. Once you do, you will find yourself at what is called the signature window and see that you have three options before you.
- Write Your Signature
- Draw Your Signature
- Upload Your Signature
We will fully explain the options for you so that you can make an educated decision on what type of signature you want to use and best fits your business and needs.
Write Your Signature is an option where you will compose your complete name into the assigned bar. When you type out your name, airSlate SignNow creates your initials in the section close to the signature bar; if you don't care for how your signature looks, you can choose the Change Style button and select one that accommodates your taste.
Draw Your Signature is where you will either utilize a touch screen or your mouse cursor to draw out your mark in the airSlate SignNow program. If you are utilizing a touch screen gadget, it is as straightforward as moving your finger over the screen to make the mark you need. Nonetheless, on the off chance that you are utilizing a mouse cursor, you should press and drag the cursor into the shape of the mark you wish. Try not to stress in the event that it doesn't look clean to you when you finish it; you can redraw it any number of times as you like until it is perfect.
Upload Your Signature is a technique for eSigning your record by snapping a photo of your manually written mark and transferring it to airSlate SignNow to be utilized as an electronic signature. You can do this by snapping a picture of your hand-drawn signature by utilizing your smartphone or transferring a photograph of your signature to your PC from some sort of information transfer device like a thumb drive.

So now that you know the options for how you can sign your document, it is time to show you how to sign it multiple times. Worry not, it is incredibly easy. For simplicity's sake, we are going to call the company’s signature “Robert Frost.”

If you look at the picture above you can see that the document is indeed signed by our imaginary business owner Robert Frost, but there are four more places that he needs to sign. So all that you have to do is place another My Signature element down in the right spots.
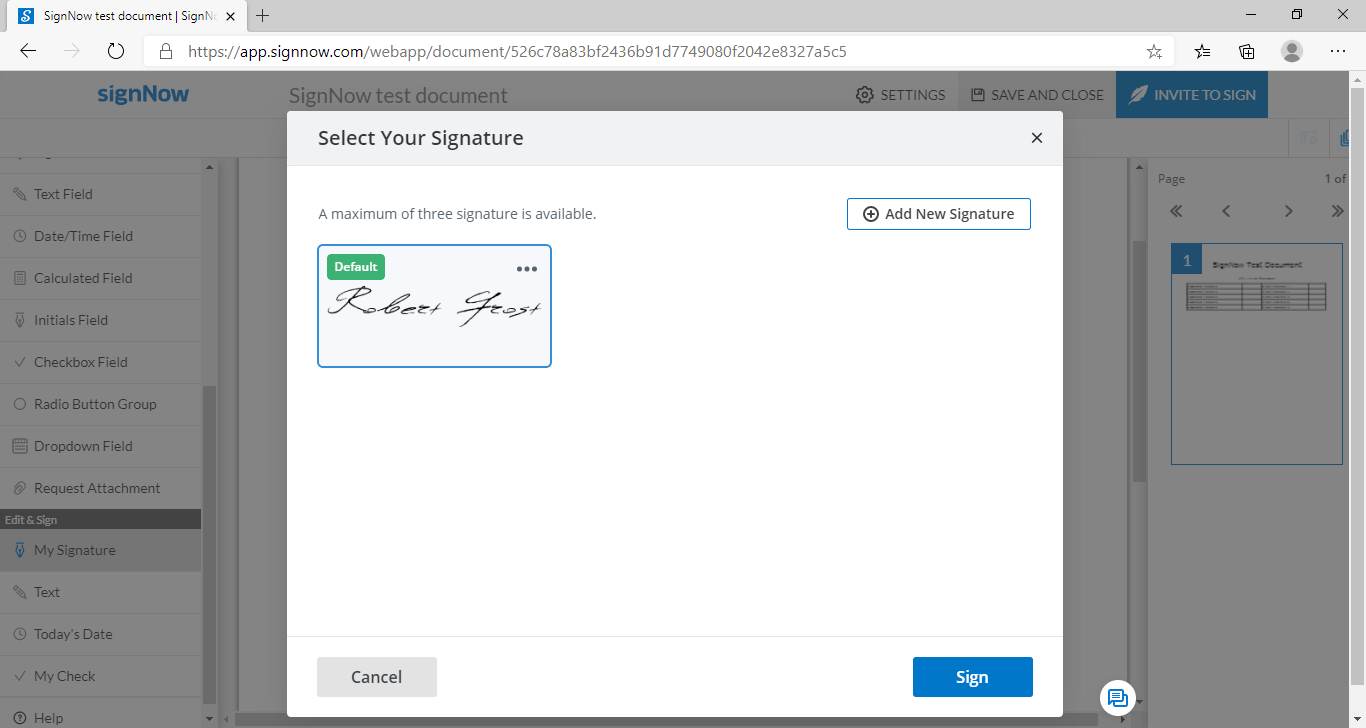
When you try to place another signature you will be met with the screen above. As you can see your signature that you already used is generated and saved to be used again. From here, you just have to press Sign and it will populate in the My Signature element that you placed. No more typing, it is done for you. And that is how you digitally sign each page in a PDF.

Once you are done it should look a little like the picture above. You can not digitally sign multiple PDF pages at once but it is still pretty quick. However, you will notice there is still a problem. You have not dated your document! So let us talk about how to do that next.
Near the bottom of the left column under Edit & Sign there is an option called Today’s Date. Much like before you are going to have to click on the button and then place and click the location you want the element to be. Unlike the others though, airSlate SignNow will auto populate the day’s date into the box for you.

And that is how to date your document! That one was really easy. Now, all we have to do is send it off!
Step 6. Sending a PDF to recipients
Now, we are going to show you how to have multiple people sign the same PDF. Now that your document is done, you will need to select the INVITE TO SIGN at the top right corner of the screen.

Once you press INVITE TO SIGN you will be redirected to the page above. From here, all you have to do is match the email to whichever signer it belongs to. You can even personalize each email by clicking on the Customize Signer Email option.

Now that you have all the emails in all you have to do is press Send Invite at the bottom right of the screen. That is it, we have shown you a complete guide on how to sign a DC document in PDF multiple times.
In the end, it is not that bad to get multiple people to sign the same PDF
As it says, in the end it was not that hard to learn how you can digitally sign each page of a PDF or how to sign a PDF using multiple signatures. We also learned that we can not digitally eSign all a PDF’s pages at once as nice as that would be. In the end, we hope that this article on how to sign a DC document in PDF multiple times was helpful to you and that we answered all of your questions. Remember that airSlate SignNow has articles on all sorts of information, so if you find yourself having issues in the future, feel free to come back and browse our FAQ articles for more extra-detailed help.
Take your organization to the next level and implement airSlate SignNow eSignature for more streamlined eSignature workflows. Get a powerful API, industry-leading security and compliance, simple-to-set conditional logic and signing orders, and a brand that is trusted by millions of daily users. Even heavy hitters like CBS Sports, GoFundMe, Colliers International, Tutor Perini, and many others trust airSlate SignNow with their internal teams, global partners, and their customers and clients.
Get started with a free trial today!