Add Signers in Editor and Assign Their Roles with SignNow

Easily organize complex signing workflows by adding multiple signers. You can also set the order of signing and assign roles for each recipient.

Award-winning eSignature solution

What it means to add signers in editor and assign their roles

Adding signers in the document editor and assigning their roles is the process of placing recipient fields, defining who must sign, who must approve, and what each participant can do within a single document workflow. In signNow this combines role-based field assignment, in-editor placement of signature and data fields, and step sequencing so administrators and senders can control signing order, permissions, and visibility while preserving a clear audit trail required for ESIGN and UETA compliance in the United States.

Why adding signers and role assignment matters

Explicit signer placement and role assignment reduce errors, enforce process rules, and streamline multi-party approvals while preserving legal admissibility and an auditable record for regulated workflows.

Why adding signers and role assignment matters

Common challenges when adding signers and assigning roles

  • Ambiguous role definitions can lead to missing signatures and delayed approvals, increasing administrative follow-up.
  • Poorly placed fields in the editor cause incorrect data entry or overlooked signature fields during execution.
  • Managing large recipient lists without role templates creates repetitive manual work and inconsistent permissions.
  • Lack of clear sequencing or conditional routing can break multi-step approvals and reduce process reliability.

Typical user roles when you add signers in editor and assign their roles

Primary Signer

A primary signer is the person expected to provide the main legally binding signature and complete any assigned fields. This user typically receives the first action request and must finish all required fields before the document advances in the workflow.

Approver

An approver reviews document content, may add comments, and confirms acceptance but may not be required to sign. Approver roles often appear in sequences where validation or compliance checks are needed prior to final signature.

Teams and professionals who rely on role-based signer assignment

Legal, HR, finance, and operations teams frequently configure signer roles in the editor to meet internal controls and compliance needs.

  • Legal and compliance teams — set approver roles and signature order for regulatory documents.
  • Human resources — assign signer and approver roles for onboarding and policy acknowledgements.
  • Sales and procurement — map contract signers, countersigners, and witnesses to streamline closings.

Role configuration supports both simple one-off signatures and complex multi-role workflows that require distinct permissions and sequence enforcement.

be ready to get more

Choose a better solution

Key editor features that support signer and role management

Several editor functions make it efficient to add signers, assign role-specific fields, and enforce workflow constraints across documents.

Role templates

Predefined role templates let you standardize signer responsibilities across documents. Templates reduce repetitive configuration by storing field mappings, default permissions, and typical signing sequences for recurring document types, improving consistency and minimizing manual errors during preparation.

Field-level permissions

Field-level permissions restrict who can edit or complete specific fields, enabling read-only, fillable, or signer-only controls. This ensures sensitive fields are editable only by appropriate roles and prevents unauthorized changes after a signing step is completed.

Conditional routing

Conditional routing directs documents to additional signers or approvers based on field values or role assignments. This supports complex decision-based workflows such as thresholds for approvals or adding countersigners when certain conditions are met.

Sequential and parallel signing

Configure whether signers act in sequence or in parallel to match business processes. The editor allows ordering of roles and simultaneous signing paths, which helps maintain control while optimizing turnaround time.

How adding signers and assigning roles works online

This sequence explains the in-editor flow from recipient setup to final execution in a typical web session.

  • Define recipients: Enter emails and role types per party.
  • Assign fields: Attach signature, date, and data fields.
  • Configure routing: Set signing order or parallel signing.
  • Send and monitor: Dispatch request and track progress.
Collect signatures
24x
faster
Reduce costs by
$30
per document
Save up to
40h
per employee / month

Quick steps to add signers in the editor and assign their roles

Follow these concise steps in signNow to place recipients, map their roles, and apply required fields within the document editor.

  • 01
    Open document: Upload or open your document in the editor.
  • 02
    Add recipient: Enter recipient email and assign a role.
  • 03
    Place fields: Drag signature and data fields to locations.
  • 04
    Set options: Define signing order and required fields.

How audit trails work when you add signers and assign roles

Understanding what the audit trail records helps teams ensure that role assignments and signer actions remain defensible and traceable for compliance and dispute resolution.

01

Record creation:

Time and user who prepared document
02

Recipient assignment:

Emails and role definitions recorded
03

Authentication events:

OTP or email verification logs
04

Field actions:

Which fields were completed and when
05

Signature timestamps:

Precise signed time logged
06

Document versioning:

Finalized PDF snapshot stored
be ready to get more

Why choose airSlate SignNow

  • Free 7-day trial. Choose the plan you need and try it risk-free.
  • Honest pricing for full-featured plans. airSlate SignNow offers subscription plans with no overages or hidden fees at renewal.
  • Enterprise-grade security. airSlate SignNow helps you comply with global security standards.
illustrations signature

Typical workflow settings for role-based signer assignment

Default workflow configuration options help define how signers and roles operate across documents and templates in signNow.

Setting Name Configuration
Signer Role Mapping Template-based mapping
Signing Order Sequential or parallel
Reminder Frequency 48 hours
Access Authentication Email or SMS OTP
Field Locking Behavior Lock after sign

Platform support for adding signers and role assignment

The editor experience for adding signers and assigning roles is available across common platforms, though exact UI elements may vary by device and operating system.

  • iOS: iOS 13 or later
  • Android: Android 8 or later
  • Desktop: Modern browsers supported

For best results, use the latest stable browser versions on desktop or the most recent mobile app builds; some advanced editor controls perform best on larger screens but core role assignment remains available on mobile.

Security controls relevant to adding signers and roles

Access Controls: Role-based permissions
Encryption: TLS and encryption at rest
Authentication: Email, SMS, or multi-factor
Field Locking: Prevent post-sign edits
Audit Trail: Detailed event records
Session Security: Timeouts and IP logging

Industry scenarios for adding signers in editor and assigning roles

Real-world examples show how role assignment in the editor adapts to different compliance and operational needs across industries.

Healthcare authorization

A hospital prepares a consent form in the editor with distinct signer fields for patient and guardian

  • role assignment ensures only the guardian can approve for minors
  • signed fields capture required medical consents and HIPAA-related acknowledgements

Resulting in a compliant, auditable authorization record that meets regulatory requirements and reduces administrative rework.

Sales contract workflow

A sales team places signature and initial fields and assigns roles for seller, buyer, and legal approver in the editor

  • conditional routing triggers legal review when contract value exceeds thresholds
  • approver role prevents final signing until review completes

Leading to consistent approvals, reduced contract cycle times, and clearer accountability for sales and legal teams.

Best practices for adding signers in editor and assigning their roles

Apply consistent conventions and verification steps to reduce errors and support compliance when configuring signer roles in the editor.

Use concise role naming conventions
Adopt short, descriptive role names like Primary Signer, Finance Approver, and Witness. Consistent naming reduces confusion among recipients, simplifies template reuse, and makes audit records easier to interpret for internal and external reviews.
Validate recipient contact information before sending
Double-check emails and phone numbers to avoid delivery failures. Accurate recipient data prevents misdirected documents, reduces the need for re-signing, and helps ensure the signer identity checks used for compliance are effective.
Lock fields once assigned and completed
Configure fields to become immutable after the assigned role completes them. Field locking preserves document integrity, prevents post-signing edits, and supports the reliability of the audit trail for legal and regulatory review.
Use templates for common role sets
Create and maintain templates for high-volume document types with predefined signers and role mappings. Templates enforce consistent setups, reduce preparation time, and lower the risk of missing required roles.

FAQs about adding signers in editor and assigning their roles

Common questions and troubleshooting tips for configuring signers and role assignments in the editor, with practical guidance for US-compliant workflows.

Feature comparison: add signers in editor and role assignment

A concise comparison of how signNow and other major vendors handle in-editor signer placement and role assignment.

Feature comparison across eSignature vendors signNow (Recommended) DocuSign Adobe Sign
Add signers in editor
Assign signer roles in editor Multiple role types Limited role templates Basic signer role
Field-level permissions available
Conditional routing support
be ready to get more

Get legally-binding signatures now!

Risks from improper signer or role configuration

Non-compliance: Regulatory fines possible
Invalid signatures: Signatures challenged legally
Data exposure: Unauthorized access risks
Process delays: Approvals stalled
Audit failures: Incomplete records
Contract disputes: Unclear signer authority

Pricing snapshot for role-capable eSignature plans (US market)

Price and plan features vary; the table summarizes entry-level monthly fees and common inclusions for providers that support in-editor role assignment.

Monthly per-user fees signNow (Recommended) DocuSign Adobe Sign PandaDoc Dropbox Sign
Entry-level monthly price $8/user/month $10/user/month $12.99/user/month $19/user/month $15/user/month
Role and template support Included role templates Template library included Role templates available Role features included Template support available
Bulk send capability Available on plans Available on business plans Available with add-on Available on higher plans Available on paid plans
API access availability Available with API plan Available with business plan Available with enterprise Available via paid plans Available with developer plan
Included cloud storage Limited included storage Limited included storage Limited included storage Varies by plan Varies by plan

How to add signers and assign roles with airSlate SignNow

Allow multiple users to eSign your document and make sure they know exactly which fields to complete. Easily set a signing order and collect signatures in multiple consecutive steps.

Add signers in the editor

Open your document in the airSlate SignNow editor and click Edit Signers.

fill-guide-illustration

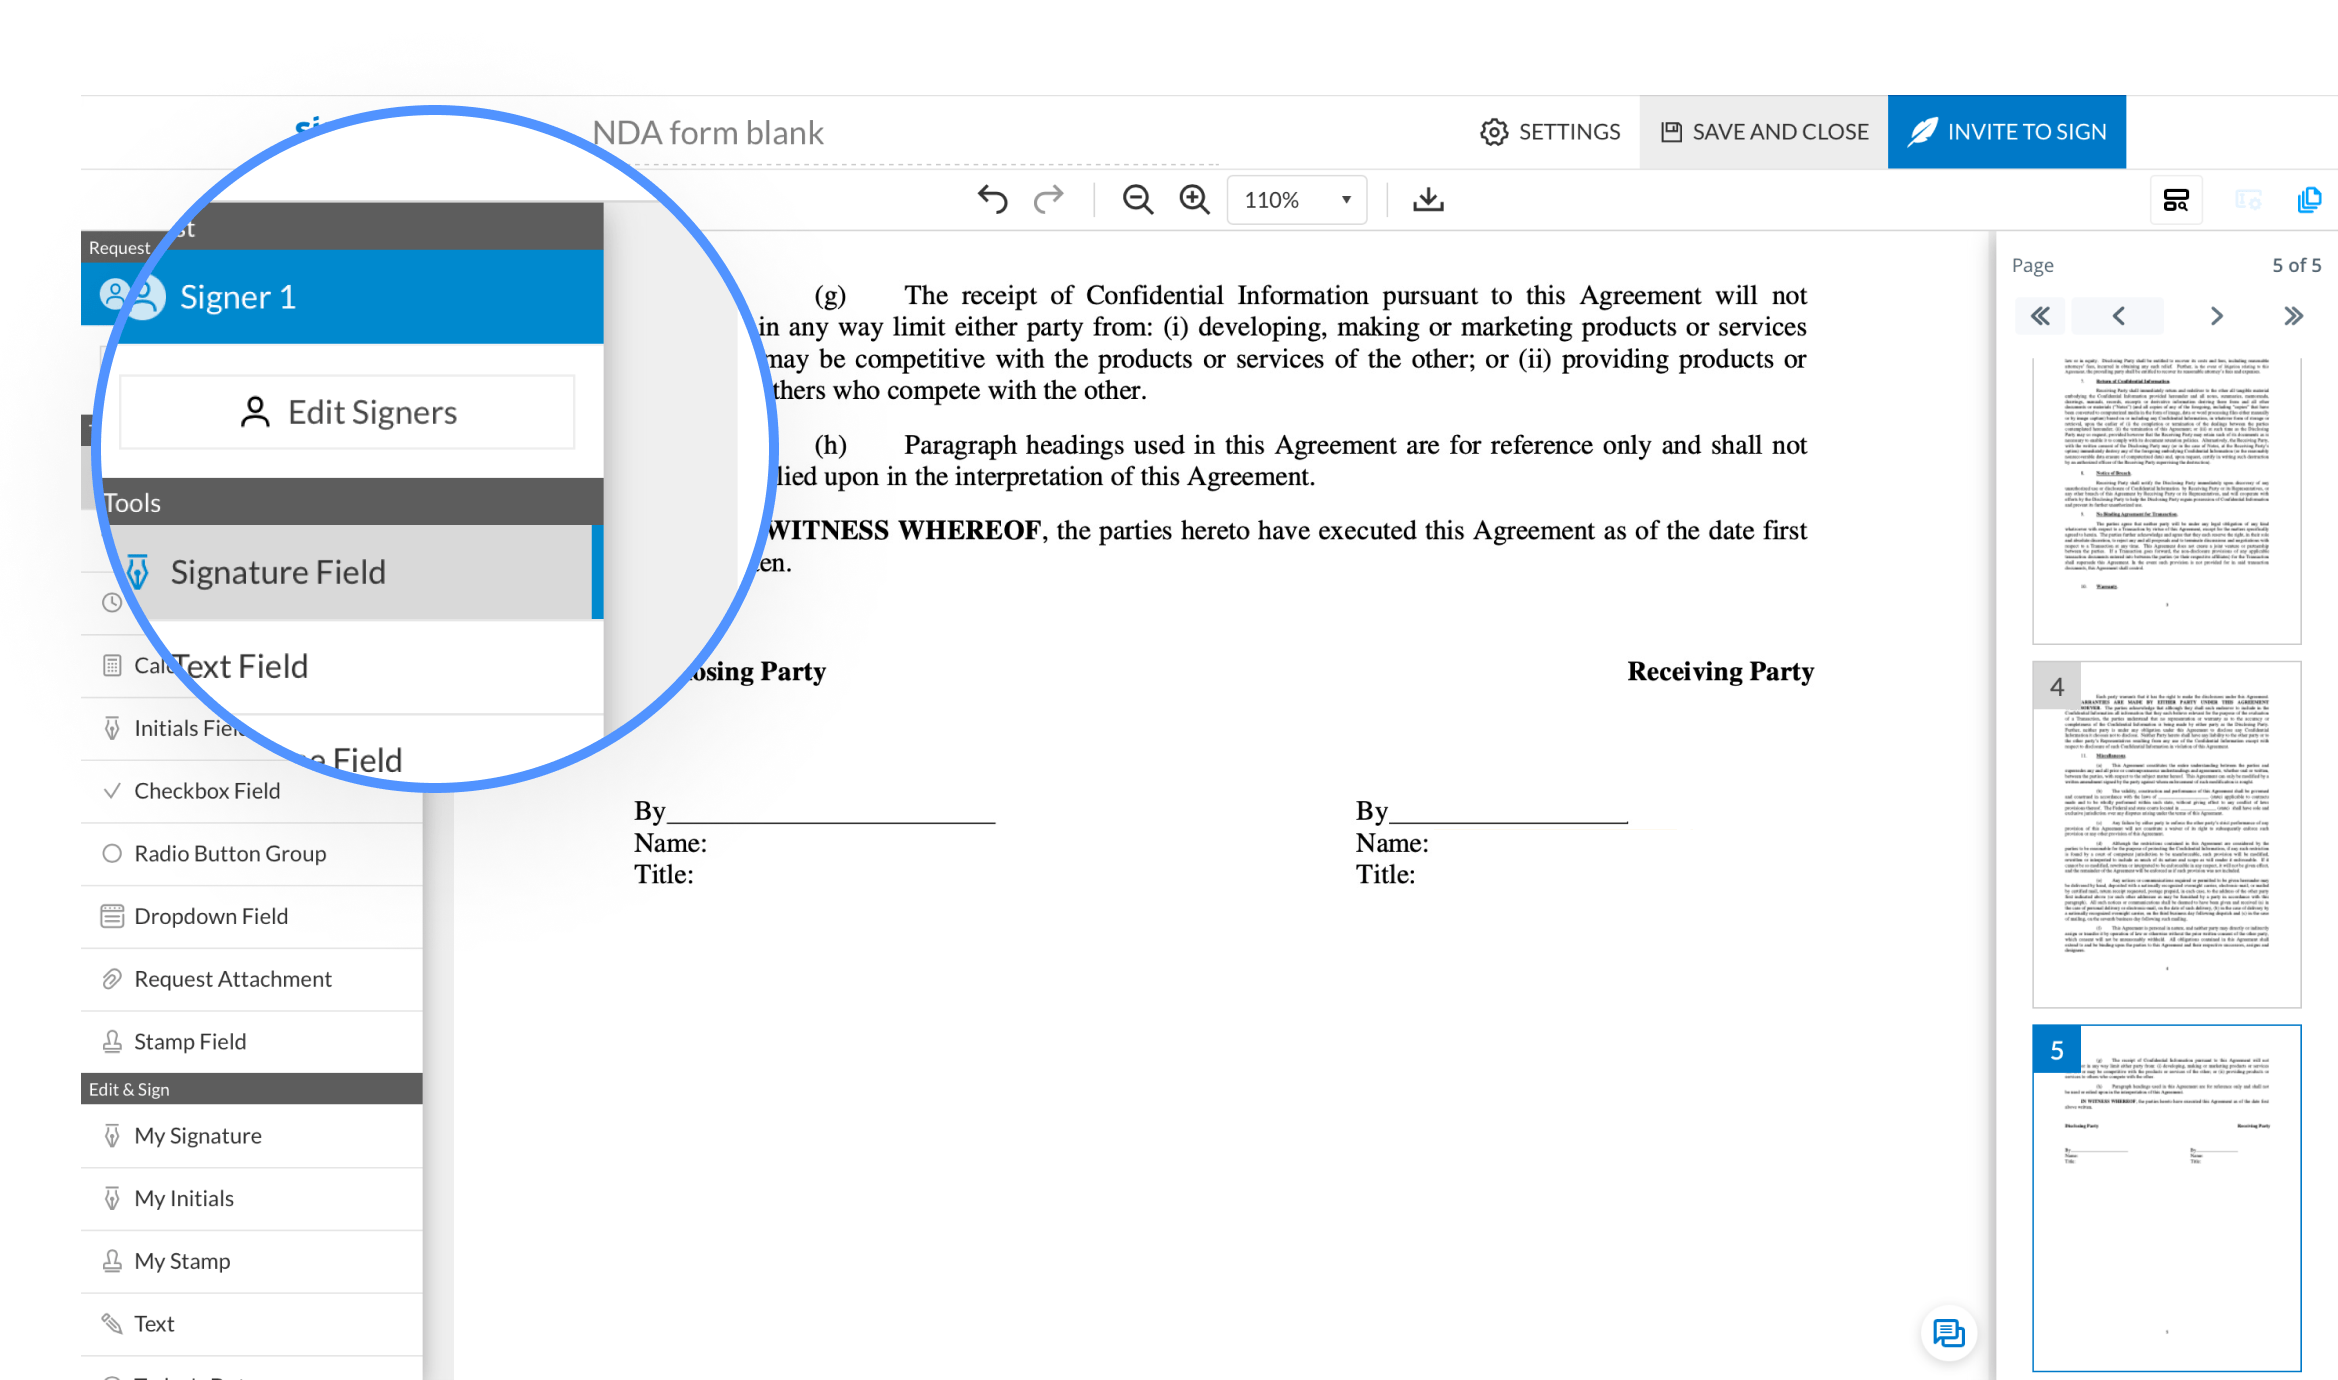
Add signers by clicking the blue silhouette icon. You can customize signer names and add their email addresses in the corresponding fields (or leave them blank).

fill-guide-illustration

Set a signing order

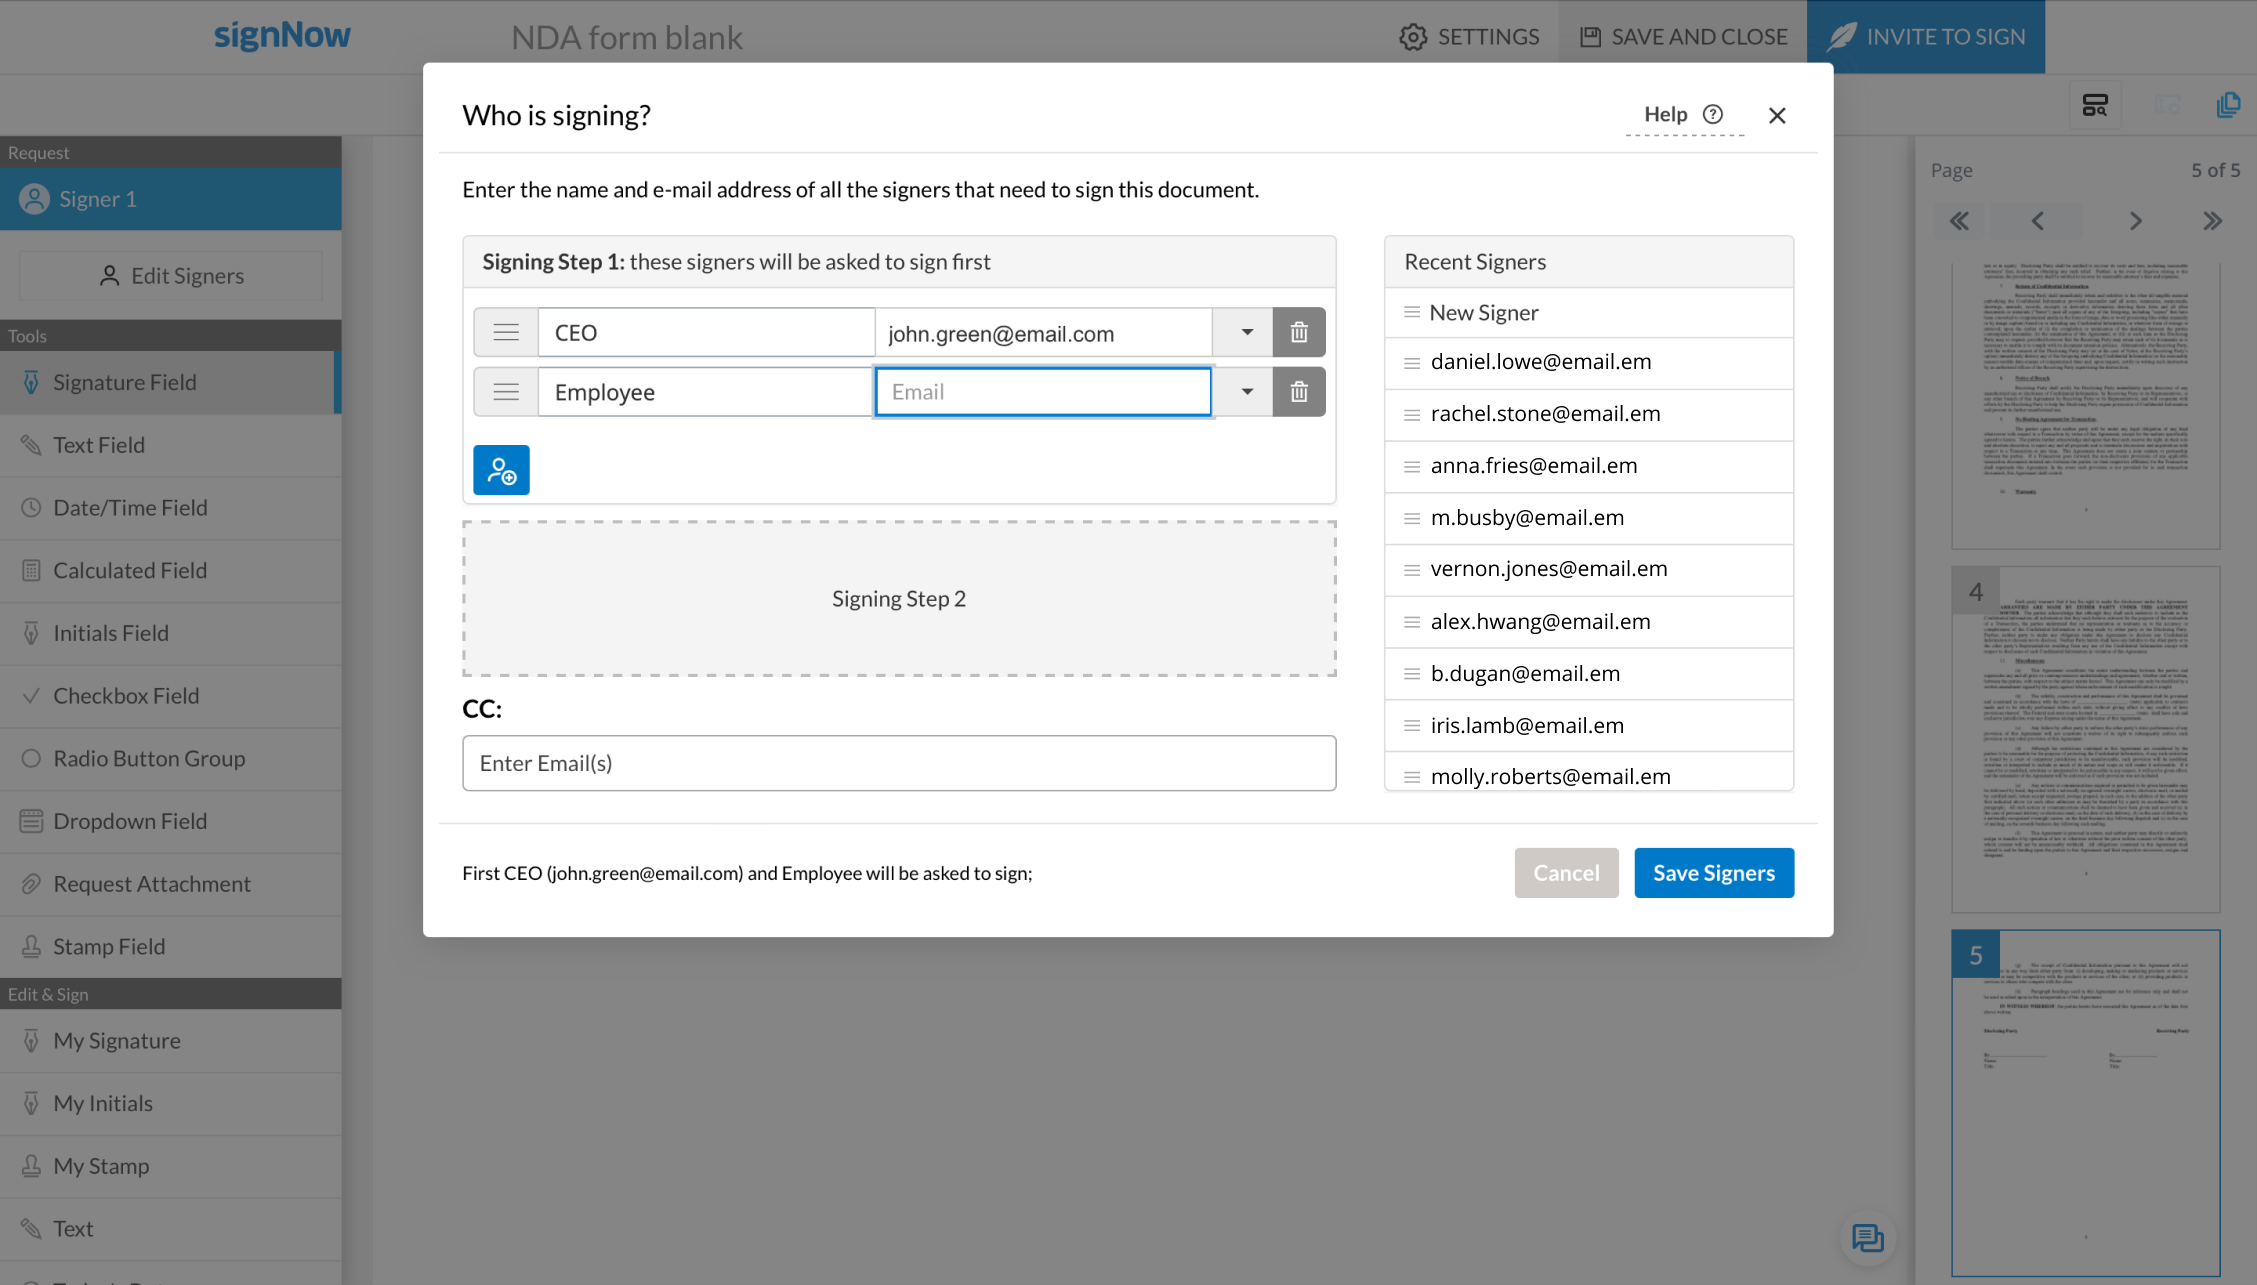
Customize a signing order to ensure that your recipients can sign your document one after the other (once Signer 1 completes the document, it is automatically forwarded to Signer 2, and so on).

To add a new signer and create another signing step, click on the Signing Step 2 area. To arrange a signing order, drag and drop signers to the corresponding signing step areas.

fill-guide-illustration

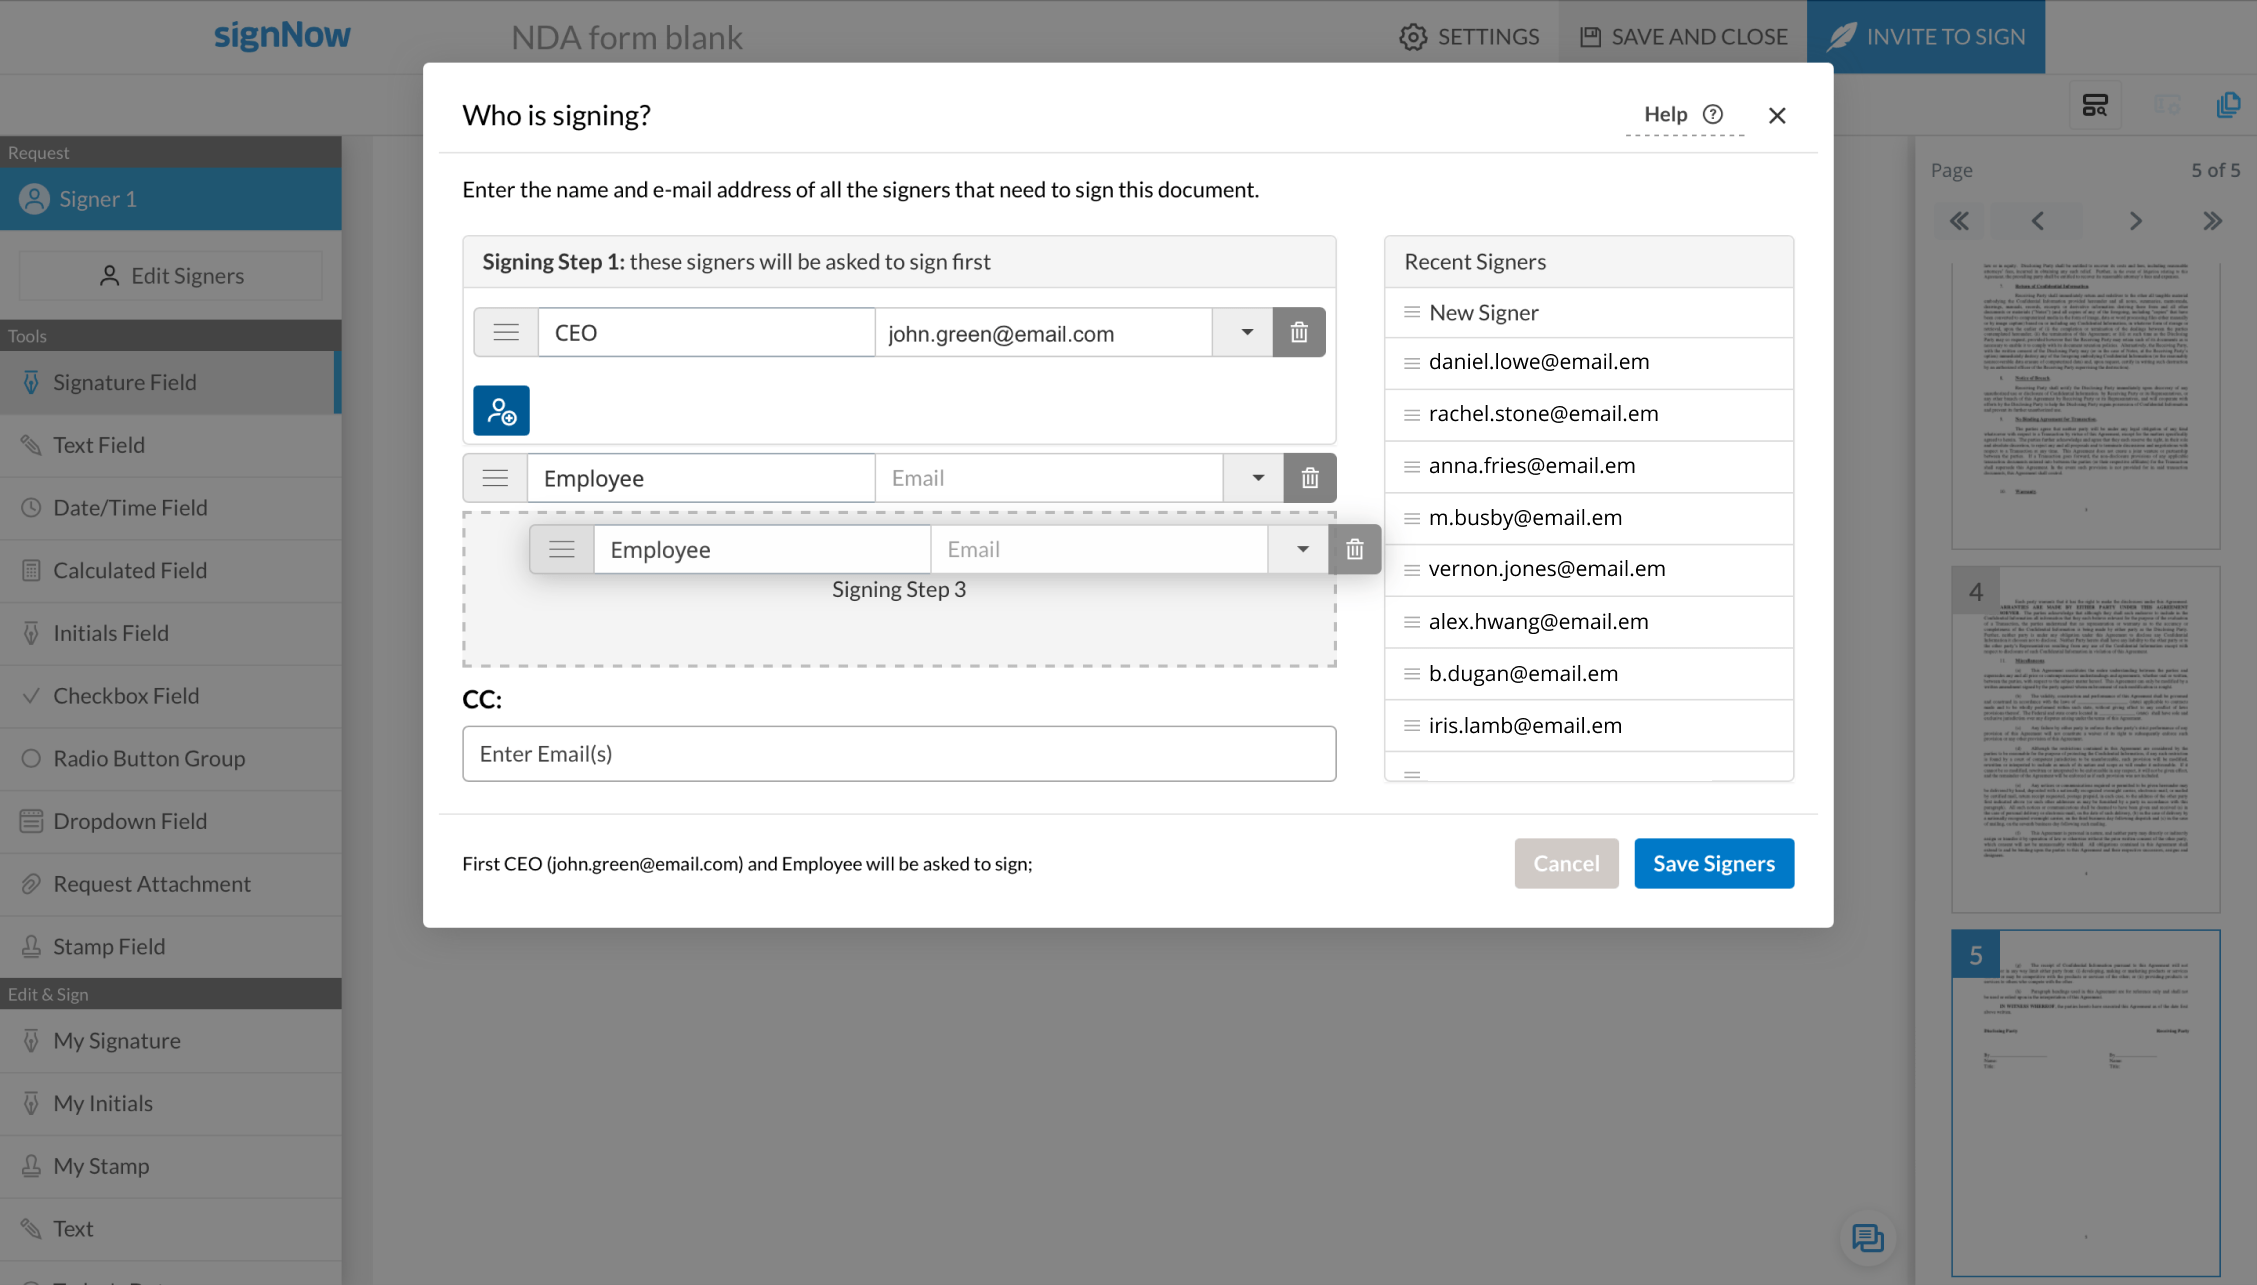
Once finished, click the Save Signers button.

Add fillable fields and assign roles

Select fillable fields from the left-hand toolbar of the editor and drop them anywhere on your document. To assign a specific role to a field, click on it, open the Role dropdown in the sidebar on the right, and select the signer you want to assign. Then, click Ok.

fill-guide-illustration

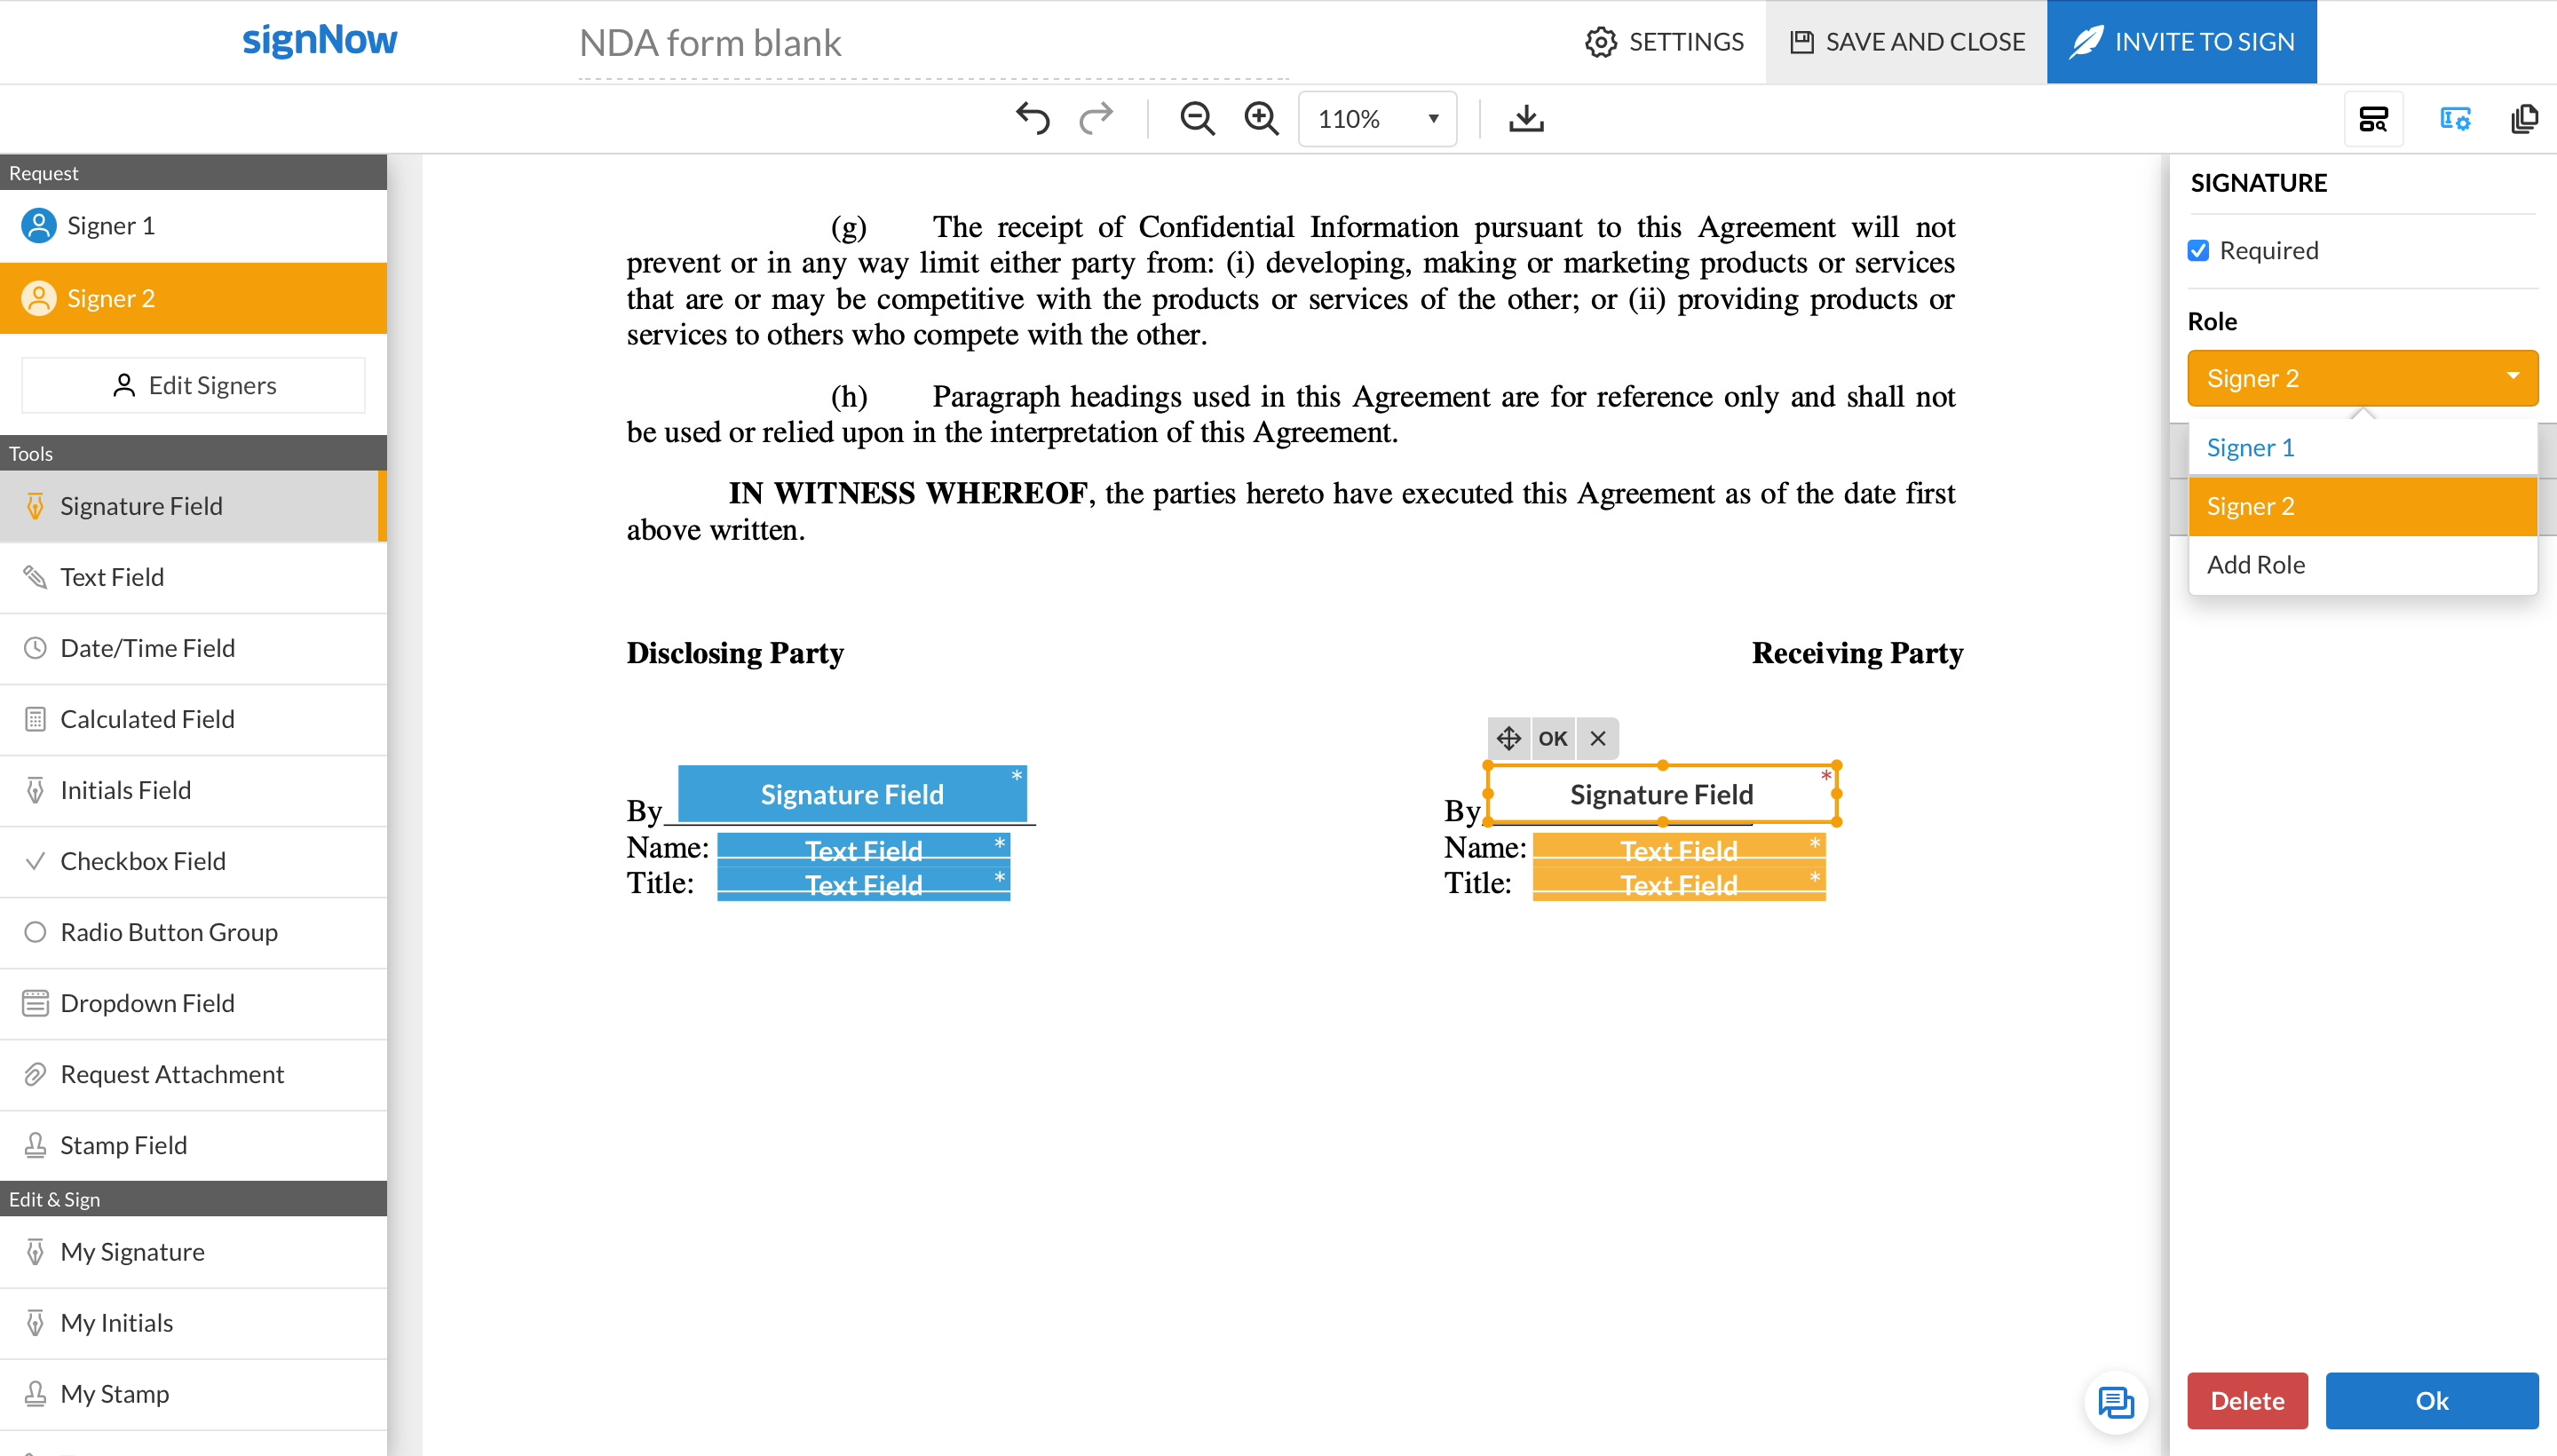
For your convenience, the fillable fields will be highlighted in different colors depending on the signer role you assigned to each of them.

Once you’ve finished assigning roles, click Invite to Sign to send your document for eSignature.

walmart logo
exonMobil logo
apple logo
comcast logo
facebook logo
FedEx logo
be ready to get more

Get legally-binding signatures now!