Building Construction Bill Format in Excel for Product Quality
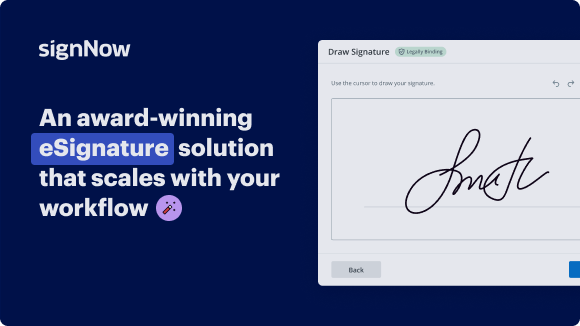
Move your business forward with the airSlate SignNow eSignature solution
Add your legally binding signature
Integrate via API
Send conditional documents
Share documents via an invite link
Save time with reusable templates
Improve team collaboration
See airSlate SignNow eSignatures in action
airSlate SignNow solutions for better efficiency
Our user reviews speak for themselves
Why choose airSlate SignNow
-
Free 7-day trial. Choose the plan you need and try it risk-free.
-
Honest pricing for full-featured plans. airSlate SignNow offers subscription plans with no overages or hidden fees at renewal.
-
Enterprise-grade security. airSlate SignNow helps you comply with global security standards.
Building construction bill format in excel for product quality
Creating a construction bill format in Excel is essential for managing project expenses effectively. This guide will walk you through the steps to utilize airSlate SignNow for electronic signatures and document management, ensuring the process is efficient and that product quality is maintained.
Building construction bill format in excel for product quality
- Open your web browser and navigate to the airSlate SignNow homepage.
- If you're new, sign up for a complimentary trial, or log in if you already have an account.
- Choose a document that requires signing or needs to be distributed for signatures.
- If you foresee using this document in the future, consider saving it as a template for ease of access.
- Access your document and make necessary adjustments, like adding fillable fields or inserting relevant data.
- Finalize your document by signing it and adding designated signature fields for recipients.
- Once everything is in place, click 'Continue' to initiate and send out an eSignature invitation.
Utilizing airSlate SignNow provides numerous advantages, including excellent return on investment due to its comprehensive features relative to expenditure. Its user-friendly interface and scalability make it an ideal choice for small to mid-sized businesses, ensuring seamless integration into your workflow.
With transparent pricing that avoids hidden fees and a robust 24/7 support system included in all paid plans, airSlate SignNow stands out as a reliable partner. Start your free trial today and optimize your document signing process!
How it works
airSlate SignNow features that users love
Get legally-binding signatures now!
FAQs
-
What is the building construction bill format in excel for Product quality?
The building construction bill format in excel for Product quality is a structured template designed to help contractors and builders efficiently manage their cost estimates and budgets. This format ensures all necessary elements, such as labor, materials, and other expenses, are clearly outlined, facilitating better financial planning and tracking throughout the construction process. -
How does airSlate SignNow integrate with the building construction bill format in excel for Product quality?
airSlate SignNow seamlessly integrates with the building construction bill format in excel for Product quality by enabling users to eSign and send these documents easily. This integration simplifies the process of obtaining approvals on construction budgets and contracts, ensuring that all parties can sign off on documents in a timely manner. -
What are the pricing options for using airSlate SignNow with the building construction bill format in excel for Product quality?
airSlate SignNow offers a variety of pricing plans to cater to different business needs, including options suitable for small contractors to large construction firms. Each plan is designed to provide access to essential features, including document templates like the building construction bill format in excel for Product quality, ensuring you get maximum value for your investment. -
What features of airSlate SignNow enhance the building construction bill format in excel for Product quality?
Key features of airSlate SignNow that enhance the building construction bill format in excel for Product quality include fast eSigning capabilities, customizable templates, and real-time tracking of document status. These features allow users to manage their construction bills more efficiently, reducing turnaround times and ensuring effective communication among stakeholders. -
How can using a building construction bill format in excel for Product quality improve project management?
Utilizing a building construction bill format in excel for Product quality improves project management by providing a clear overview of projected expenses and actual costs. This clarity allows project managers to ensure that projects remain within budget, make informed decisions, and identify potential financial issues before they escalate. -
What are the benefits of eSigning the building construction bill format in excel for Product quality?
eSigning the building construction bill format in excel for Product quality offers several benefits, including faster document turnaround, enhanced security, and reduced paper usage. By adopting digital signatures, businesses can streamline their workflows and maintain a more organized approach to document management. -
Can I customize the building construction bill format in excel for Product quality in airSlate SignNow?
Yes, airSlate SignNow allows users to customize the building construction bill format in excel for Product quality according to their specific needs. Customization options include adding or removing tasks, adjusting cost categories, and integrating necessary project information, making it a versatile tool for any construction project. -
Is there customer support available for queries related to the building construction bill format in excel for Product quality?
Absolutely! airSlate SignNow offers robust customer support to assist users with any questions or issues regarding the building construction bill format in excel for Product quality. Whether you need help with document setup, eSigning procedures, or technical support, our team is readily available to ensure you have a seamless experience.
What active users are saying — building construction bill format in excel for product quality
Related searches to Building construction bill format in excel for product quality
Building construction bill format in excel for Product quality
in this video i'll show you how to form a boq in excel from scratch including all the shortcuts that i usually use that will cut your working time on excel by half and we are starting right now so as you see i have a blank file here new file and i'll start this by writing serial number and item description and also we need the unit and we need the quantity and we need the rate and we need the amount so i have these cells here and i'll just click this arrow and i'll do all borders then i want to select these rows like that and double click in between any of them so it will just fit to the size as you can see here let's increase column c a little bit and these three columns i can select them and increase one of them so three of them will increase so let's make quantity and rate like that and i'll make the amount a little bigger then you can select this row or actually ctrl a to select everything and i want everything to be center for the time being so this was applied to everything here in this sheet after that i want to select a range like this and i'll press from the keyboard control 1 so control 1 will open this which is format cells you go to border and we need external border and we need the vertical line and we need one line from down as well so this is the shape or the looks that i get when i do that let's minimize column a and here from the down right corner we can go to page break preview i'll just click on this and ctrl and scroll to zoom in i need to bring this blue line here and this blue line here and i will reduce this column so this is what i am having right now something that looks like that then ctrl p to go to the printing menu and the first thing i want to do the letter let's change it to a4 and then these margins let's make them narrow and the scaling let's make fit all columns on one page so what happens when we do this we will now understand how our page looks like so again the next part that i want to show to you you just select any row and control plus you add rows control plus plus why i'm adding rows to see where is the end of my page so control plus i am adding adding as you can see here you see starting from here this is page two so up to here this is page one starting from top up to this part so here i can select this area and make it again all borders because i will have the total of this page here total page and for example here we can put the currency something like this and i can bring this blue line here just to have one page for the time being and i'll show you it will look something like this so it is not in the center as you can see so i can go to page setup then margins and horizontally so it will be centered horizontally as you can see here okay then we go back now we are almost ready let's make this bold so if you want to make something bold by a shortcut you select whatever a cell or a row then ctrl b so it becomes bold as you can see and i can increase the height of this row a little bit like this but you see again now this row became in page number two so i can just select one row from here control minus so i am deleting rows with control minus and i am adding rows with control plus so we have this page it looks like this but maybe i need few pages like page two page three so i will just expand this blue line up to down and i can keep adding rows here so the rows that i am adding right now are coming in page two so i'll keep adding rows control plus again so this is the end of page 2 as we discussed so i'll just make it all borders or actually what i can do i can come here and just select this then ctrl c to copy it then come here select this cell and just press enter so you paste it here okay then again you can copy for example i can go and just select from here i am selecting row number 50 which is the first row in page two and up to the end of page two actually page two is not yet fitting so i'll just delete some rows now i have page two as you can see here this is page one and this is page two but of course it is without any title so what i can do i'll just go and i'll make these rows repeating when i am printing so how to do this i'll just go to page layout and print titles and from here rows to be repeated at top i want to select these two row one and row two i want them to be repeated at top in all the pages so when i do that actually page two now is out of the printing area why because i added two more rows in the printing as you can see here now this is page one and this is page two so i added this to page two i added it to all the pages actually so the end of page two went down so what i can do i can come here to page two select any row control minus to delete some rows now you see page two is fitting so if i just press ctrl p this is page one and this is page two okay so one two and this is three why this is number three because here i have something free from anything but it's just repeating the first two rows in the beginning so now i need to create page 3 also so here page 2 is starting from row 50 i'll select row 50 and then i'll press shift and select row number 96 so you see i have selected all these rows and ctrl c to copy them then i'll come here and enter so i just copied page two and i put it as page three and this blue line is the print limits so i'll just drag it down up to here as you can see so now i have three perfect pages control p page one page two page three and if we are meeting for the first time i am ahmad adel and you are watching costa engineering professional and here i help you develop the required skills and enhance your knowledge to elevate your cost engineering career so if this is what you want you can quickly subscribe now let's start writing the items that we have so let's say bill number three for example or section c and let's say for example concrete works now i have written everything in a small so what to do you can say here equal to and just right upper you see this upper and press tab and choose this cell then press enter so you see what this formula doing equal to upper so it will just make this written in capital letters so i'll copy this and here i'll paste it as value actually i'll talk about the shortcuts for the pasting in another video but to paste as a value right now right click and from here you just select values so i pasted this here as a value then you can delete this formula so this is just sentence here that is written in capital letters after this i want everything in column c to be starting from the left so i'll just select column c like that and i'll go to home and i'll make it start from the left so everything in this column will be starting from the left except this cell i'll bring it back to the middle and now i will write everything in the boq so as you can see i wrote these items here now let me select this cell and again ctrl b to make it bold and now i want to keep rows in between these things which i wrote here so how to do this as i told you to just add row you select this row ctrl plus and actually i don't want to keep doing it one by one like that i want to add rows in all of them so i'll select the second one because if i add row here it will add a row like this so what i want to do i'll just select the first then i'll press ctrl and i'm holding the control right now select this this this this then after that you just control plus so you have added lines between all these okay now i want to make this one as bold so again ctrl b and i want to make it inclined so control i and if you want to put underline control u so we have made this as a title substructure works and this one is another title so i'll just make it bold ctrl b then these are the items for example that comes under the four concrete so i have a item a b c d and e then i can copy these i'll copy them like this what i did i just selected these rows ctrl c come here and enter and i'll just change this into let's say still reinforcement then again i'll copy them and i'll come here and paste just i'll change this to formwork so i have as you can see three titles and under the title i have the different items and just a b c d e so here f g h i j k l m n o okay so it looks something like that now as you can see the page is corrupted because i added rows so all i have to do is to come here ctrl minus to remove some rows so the page will be perfect again now ctrl p to see what happened it looks something like this now let's put the units port concrete for example i'll put here meter cube so m3 so there is one shortcut that i want to show you here if you want to edit this cell you usually double click by the mouse if you want to do this from the keyboard you just select the cell then press f2 so when i select f2 now i am inside the cell i'll press shift and left arrow to choose this tree only then ctrl 1 to open the same menu which is format cells and once i am here i'll press tab tab tab tab so when i am here i'll press e to choose superscript then enter then enter so you see how it looks like now so i can copy this and i'll paste this here then press ctrl and here and here and here then just press enter so they will be pasted like this still reinforcement for example we want kg here so i'll just take the kg copy again i'll select the first one then i'll press ctrl i'll select this this and this and then i'll press enter after this form work is in a square meter so again m2 and in order to edit this cell i'll just go to the cell then press f2 and shift with a left arrow to select this two then ctrl 1 to go to format cells and once i am here tab tab tab tab once you are here e enter enter of course when you practice this for more time you will be more faster with this but just because maybe you are seeing it for the first time you think it's complicated it is not so i'll here i'll select this cell ctrl c and then i'll select this one then again control select this this this and enter again this row is becoming out of the page so all i have to do is to select any of the rows control minus so our page control p looks like this right now after that let's go to do the super structure actually i want to make this a capital letter substructure so as you see here you see i just press f2 to be inside then by the arrow i will go shift and right then shift and s to make it capital and that's it so now i want to make the second page which is the super structure so all i have to do is to just select let's say from the beginning of the page until the end of the page so this is what i am selecting just you ctrl c to copy this and you come here and you select this one then you press enter when you press enter this page is pasted like this and as you can see this goes out of the page so again i'll select any row and i'll just delete ctrl minus and i'll just change this into super structure so i have here the substructure works and here i have the super structure works and maybe the items will be different so i'll write the items here which may be columns slabs beams parapets staircase and i can copy these items ctrl c and i'll select the first one and just enter so i replace them again ctrl c select the first one enter to replace them and i'll still have my serial number here so everything is good and the page looks fine so if i just press ctrl p i'll see this is the first page and this is the second page and here i can make this one as the summary page for example so i'll just go to this page and actually there is one thing here this should be concrete works between brackets you see again when i come to this cell f2 then space two brackets then i go in between the bracket and i'll write continued so this is the second page of this so i can copy this one come here select this enter and i can write here summary or anything then this will be page one let's say and i can copy it paste here again enter f2 to edit you go inside you change the one into two and for example page one here this cell will be equal to the summary or the submission of page one and also this one here will be equal to the submission of page two and this will be the total division if you want to take auto sum the auto sum is here yes this is the autosum and you can select the range if you want the shortcut of this you just go to the cell where you want to get the autosum and you press alt equal alt equal will give you this formula and you can just select the range that you want to get there or to sum for and you press enter so this is how you make the autosum if i want to edit any cell i can just simply double click or as i told you go to the cell and f2 from the keyboard and if i press ctrl p now as you can see this is page one and this is page two and this is page three go control a again control a so i am selecting everything control one and number here you choose number then number then just use the thousand separator so you will have thousand separator everywhere in all the cells in your page right now and here again alt equal to get the submission of these items up to here for example and actually if you copy this and you come here and put enter if you press f2 to edit it or double click just to check if it is doing properly then you have something that looks like that and in this video i show you how to make a price comparison in excel which is a similar task i hope you enjoyed this video and if you did don't forget to like it and subscribe to the channel and i'll see you in the next video
Show moreGet more for building construction bill format in excel for product quality
- Sole proprietor invoice template for corporations
- Sole Proprietor Invoice Template for Enterprises
- Sole proprietor invoice template for small businesses
- Sole Proprietor Invoice Template for Teams
- Sole proprietor invoice template for organizations
- Sole Proprietor Invoice Template for NPOs
- Sole proprietor invoice template for non-profit organizations
- Raising an Invoice for Businesses Made Easy
Find out other building construction bill format in excel for product quality
- Boost eSignature Legitimacy for Trademark Assignment ...
- ESignature Legitimacy for Terms of Use Agreement
- ESignature Legitimacy for Affidavit of Identity
- Boost Your Legal Compliance with eSignature Legitimacy ...
- Increase eSignature Legitimacy for Affidavit of Title ...
- ESignature Legitimacy for Cease and Desist Letter
- Unlock eSignature Legitimacy for Your Arbitration ...
- Boost Hold Harmless Agreements with eSignature ...
- Boost eSignature legitimacy for End User License ...
- Boost Your Letter of Intent with eSignature Legitimacy
- Unlock eSignature Legitimacy for Manufacturing and ...
- Enhance Your Security with eSignature Legitimacy for ...
- Unlock eSignature Legitimacy for Your Toll ...
- Unlock the Power of eSignature Legitimacy for Quitclaim ...
- Unlock the Power of eSignature Legitimacy for Warranty ...
- Boost Your Workforce Efficiency with eSignature ...
- Unlock the Power of eSignature Legitimacy for Contract ...
- Unlock eSignature Legitimacy for Freelance Contracts
- Boost Recruitment Proposal Legitimacy with eSignature ...
- Unlocking eSignature Legitimacy for Temporary ...