- Electronic Signature
- Questions & Answers
- Your Ultimate Guide: How Do I Send a Contract via Email With an Electronic Signature Applied
- Your Ultimate Guide: How Do I Send a Contract via Email With an Electronic Signature Applied?
- How to send a contract via email with airSlate SignNow
- How do I make my PDF a contract where people can sign it electronically?
- Setting up your E-Contract
- How to sign e-contracts
- How to send a contract via email with an electronic signature
- How do I get multiple eSignatures?
- My customer/client has eSigned the agreement/contract, now what?
- As a contractor, how do I eSign a contract?
- In Closing
Your Ultimate Guide: How Do I Send a Contract via Email With an Electronic Signature Applied?
Before we continue, let’s clear the air of any confusion, Electronic and Digital Signatures are different technologies. While digital signatures are a specialized type of eSignature, they employ a very system involving cryptographically encrypted algorithms. Each of them have their use cases, and eSignatures are more broadly used. We have an article on the topic, if you’d like to read more.
eSignatures became legally binding in the United States of America under HR 1714, also known as the ESIGN Act, which was signed into law on June 30th, 2000 by the, at the time, President of the United States, Bill Clinton. HR 1714 was also inclusive to previously existing contracts and agreements eSigned before the beginning of the Federal fiscal year (October 1st) in 2000. However, all contracts electronically signed after that date were obligated to comply with the Federal and State guidelines set forth in HR 1714.
There are some challenges when going digital, and some of the biggest challenges are convincing executives to make that change. But like many, those who choose not to go paperless are bound to lose. According to an article by FinanceOnline — businesses using eSignature tools are able to cut down document handling costs by as much as 85%. Many of us are familiar with paper contracts, stamps, seals, and the like; so how can a signature on a computer be any better? There are a few points on this subject. First of all, in today’s world of global economics, there is no need to wait for postal services to deliver (or in some cases, lose) documents, especially time-sensitive or otherwise critical ones. Second, paper signatures can be forged or scanned and copied without the consent of the signator (signer). And third, the eSign process has many benefits such as file organization, efficient recordkeeping, and the ability to audit your team. Additionally, when going digital, you can create and store backups of your backups while not having to worry about missing employment records, agreements, or legal troubles as a result of missing physical folders.
How to send a contract via email with airSlate SignNow
Follow the brief instructions below to quickly attach an eSigned form or contract to an email and send it to recipients:
- Go www.signnow.com and log in to your account or register if you do not already have one.
- Upload your form or electronic contract from your device by clicking on Upload Documents.
- Wait while your file uploads to your Dashboard.
- Click on the file’s name once you see it appear on your Dashboard.
- Drag and drop the My Signature element from the left-hand tools panel and place it on your document.
- Generate your airSlate SignNow eSignature by typing it, drawing it, or uploading an image of your handwritten one.
- Click Sign and drag the executed element using the move button.
- Click SAVE AND CLOSE to get back to your Dashboard.
- Click on More next to your file’s name and then on Email a Copy.
- Add a recipient email(s), include a subject and a message and then tap Send Now.
As stated previously, the process of getting a consumer, client, contractor, or employee to eSign is now easier than ever. In addition, PDF files are also easier than ever to make or create by converting existing documents. But, do we really need to convert our DOCX to PDF to esign an agreement or contract? Not anymore.
Tip: The most important step to any document requiring a signature is to ensure it’s valid, legible, and its clauses are within legal bounds. After your lawyers have finished, or you have gotten a standard template, you can upload your document in a number of file formats to get started.
Without further adieu, let’s get started.
How do I make my PDF a contract where people can sign it electronically?

On your airSlate SignNow Dashboard, or by selecting the Upload Documents button at the top, you can find Start Uploading Documents Now, or simply drag your file onto the same page from your standard file explorer. Once the upload is complete, your document will be available from the same page.
After you have started the upload, you will find a notification on the bottom-right-hand side of your screen. This notification tells you about upload progress, upload completion, and errors, if any.
Once complete, you will be able to select

Create Group and Sign, or by selecting the appropriate option you need next to the document within the dashboard view. But before we do any of that, let’s make sure we have everything in place.
You can now find your document in the Dashboard view in the Documents Folder. Let’s get familiar with the process! This guide will walk you through all the important steps to a successful eSignature experience and give you the information that you might have missed or not yet know.

Now that your document is available to be set up, let’s open it. To do so, click right on its name and you will be taken to the built-in editor.

Here you will find a number of tools tailored to suit your needs. Let’s break some of them down so we can have a brief understanding of how to get to our goal of emailing our new contract out!

First, foremost, and the most important is the signature field! We can’t gather signatures without it. To add the Signature Field to your document, simply select the Signature Field in the left column and click on your document. Once placed, you can manually move it by selecting the element and using the move button ( ) by holding click and dragging it.
While moving the element you may notice orange lines in relation to the document, or other elements. This orange line is the indicator for our alignment function to help make organizing and beautifying elements both faster and easier. When the orange line appears, simply let go of the element and it will settle itself in the correct and relative position. If you are dissatisfied with the placement and would like to be more precise, there is a Location function which is based in pixels that we will discuss in a moment.

There are many various types of input you or other users can add to the document, but don’t get overwhelmed; it’s been made to be quite simple.
The options for each can be found on the right-hand side of the screen.


If something is required, then the signator must provide the information to complete the signature process. The label is what is shown in the field for the signator to understand what they must do.
Location concerns the placement of the element on the document in pixels relative to the size of the document and its margins. Remember that you can manually move it by selecting the element and using the move button (). In the Advanced tab you can generally find the internal name of the input field that the user will not see, it is generally for organization and quality-of-life purposes.

Radio groups are radio buttons, or circular buttons one can check. These can be particularly useful for allowing the signator to choose one of the available options; such as gender, linguistic proficiency, or their department within an organization.
Radio groups can have internal names, which are shown in the image as Clause 1 through Clause 3. These can help you to identify the elements in the document. They are best used with pre-existing lists on the original document, or with the Text element found under Edit & Sign.
Tip: The Text Field element is editable by the signator, which is useful for names on generalized documents, and Text under Edit & Sign is not.
Other types of input include drop-down menus and checkboxes. When it comes to ease of use, they are very similar in feel and performance.
Attachment elements are files you may need for the agreement or contract process. In the case of hiring someone, you may need a copy of the candidate’s Driver’s license or State ID. In the case of hiring a contractor or a consultant, it may be necessary that they include their credentials or permit to work. The range and scope of these features aren’t limited to these use cases.

Once you have managed to arrange your document to your needs using the various tools we have provided, it is ready for your signature. You might be asking yourself «how do I esign a contract,» and that is completely normal, so let’s dive in.
How to sign e-contracts

Now that we have organized our document to suit our needs we can focus on preparing it for the signature process. Of course, no contract is complete without the signature of the contracting party.
To accomplish this, go to the left panel and under Edit & Sign click on My Signature. Then simply click in the general area of the document in which you need it to be. Remember, we can move it later.

In the Signature window we can either enter our full name and initials, or we have the option of drawing or uploading an image of our signature. When you type your name, your initials will auto-populate, you can change them if necessary. If we click on Change style, we have several options to choose from. Choose the one that suits your style the most.

Drawing your signature is as simple as dragging a file to the recycle bin. Simple click, hold, draw, and the system will handle the rest. Once you’re happy with your signature, click Sign.

After you’ve clicked Sign, the element will appear in your document where you clicked. If you select it again, the Edit option will appear. If you ever feel the need to redo or remake your eSignature before the document has been sent to recipients, simply delete it and add a new signature field.
As is good practice in all documentation and agreements, the Today’s Date option will place the current date just like other elements where you choose. This field is not editable unless you need to update it before the signator has signed.
And there you go, that is how to esign your contracts. However, you might be asking yourself about other parties — your recipients. A common question circulating in digital business, especially eSignature, is — «how do we allow customers to esign our contracts?» That question is something you and your team have probably been thinking about too. In the second half of this article, we are going to cover exactly that.
How to send a contract via email with an electronic signature
We won’t go into detail about other services here, or comparisons, instead let’s focus on the task at hand; answering that seemingly complex question in a completely understandable and human way.
We have already discussed how to sign our own documents as the author using airSlate SignNow, but what about our signatories (signers)? Whether they are tenants or contractors, the process remains the same.

On your airSlate SignNow Dashboard, if you have already uploaded a document, you can find a variety of options available under More. Let’s make sure you are prepared to proceed. First, let’s talk about the options that are probably the most important to you in an order of logical workflow.
- Open Document:This lets you open the document to continue editing it, if it has not already been signed by a signator. You may also click on the document name to do the same; e.g., in the example above, «Sample Document» in blue.
- Make Template:This allows you to make a template from the elements you’ve placed within the document to reuse the original document and its elements. This can be very useful if you plan to have many contractors, tenants, or, for example, models signing a copy of the same base format «Model Release Agreement.»
- Add Fields:Add Fields allows you to import elements from a template or another document; or edit your document.
- Create a Copy:Copies are good, especially in business. Having extra copies of base documents is always a bonus.
- Merge Documents:Merging allows you to combine two or more documents into one. This, in turn, allows you to take smaller agreements like the acceptance of HR documents and employment benefits into one file for easy access by the proper staff when needed.
- Download:Having documents online is nice, but what about copies on your computers and/or servers? It is always a good idea to keep backups of your backups, no matter what the function of the file is.
- Archive:Sure, we have downloaded our backups, and have signed forms online — but to prevent any changes and to reduce clutter in the Dashboard, we should also archive completed and signed documents.
- Download with History:This will download the document and all of its history for auditing your team as well as bookkeeping. This is a vital step to keeping track of necessary actions taken (and who took them) to a document.
- Move:Move allows you some freedom for organization between folders, such as Archive, Documents, Templates, and Trash.
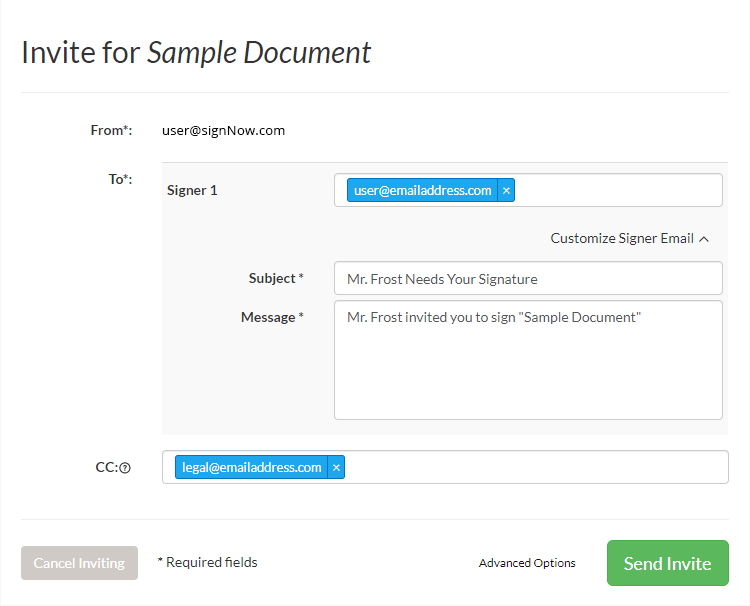
- Invite to Sign:Inviting signatories to sign your document is extremely straightforward. However, it is important to be sure your document is ready beforehand. Advanced Options will be covered later. The most important things in this window are that the primary signator’s email address is correct and that the title and message are both clear and concise.
Tip: Once invites are sent, many of the elements you have added to your document will become unchangeable, unless you cancel all invites before anyone has had a chance to add any information. Be sure your document is ready before sending it.
- Customize Signer Email:Is a function that allows you to change the invitation’s subject and message. By default, it lists your email address if you haven’t completed your profile information. This is also a good time to include instructions on how to proceed once the signator has clicked the link, what to expect, and any additional information you wish to include.
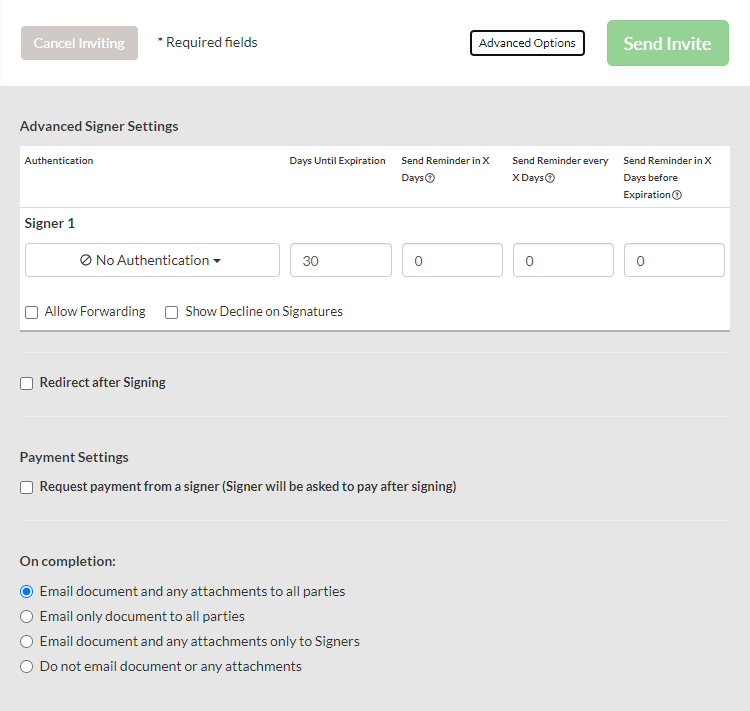
The Advanced Options may seem a little overwhelming at first, so let’s break it down in a way that’s easy to digest.


- AuthenticationUnder Authentication you can select one of several options to verify and authenticate the signer. These include No Authentication, Password, Text Message (SMS), or Phone Call.
No Authentication means that they may proceed to the document from the link directly.
Password means they can access the file with the password you add. When selecting Password Authentication, the dropdown menu turns into a text field in which you can write your desired password in. Don’t worry, you can use the dropdown menu again if you need to choose another method, it can be found just to the left of the text field.
Text Message (SMS) allows you to enter their mobile number, and the system will send them an SMS verification code which they can use to access the file. Just like with the Password selection, the dropdown menu changes to a text field to add their mobile number.

Phone Call allows you to enter a phone number in which they will receive a call with instructions. As with Text Message (SMS) and Password, the selector will change to a text field to enter the required information (recipient phone number(s)).
For both the Text Message (SMS) and Phone Call options, please check that the number is in the list of available countries. For now, the available selection includes (as seen above): The United States, Canada, The United Kingdom, Australia, Mexico, Spain, Germany, South Africa, Singapore, France, New Zealand, Italy, Belgium, The Netherlands, and Brazil.
Days Until Expiration allows you to define a period of time in which the signator(s) are able to complete the esignature process. After which, they will no longer be able to access the file.
Send Reminder in X Days gives you the ability to remind the party eSigning the document, which can be extremely helpful in the case of the employment process.
Send Reminder every X Days means that you can define how often the client or customer will be reminded about the agreement or contract.
Send Reminder in X Days before Expiration will send an email reminder to the recipient(s) prior to the expiration of the agreement’s viability based on the input you provide here.
Allow Forwarding gives you control over whether the document can be forwarded or not.
Show Decline on Signatures gives you further control over what is permitted.
Redirect after Signing gives you the opportunity to add a web address to which the signatory will be sent after they have completed the process. It could be anything, such as an HR worksheet or a welcome page.
Payment Settings allows you to choose whether they pay before or after the document has been completed.
On Completion includes several options. The actions of these options happen automatically after completion and are as follows:
- Email document and any attachments to all parties
- Email only document to all parties
- Email document and any attachments only to Signers
- Do not email document or any attachments
Once you are satisfied with your selections and settings, simply click Send Invite and the rest will happen on its own.
How do I get multiple eSignatures?

When editing your document in our editor, you can add multiple elements of the same type, and each one can be tied to a particular signator. All you need to do to add signator(s) is to select Add Role on the right-hand-side panel, and name the role, if you so choose. Once done, this role can be applied to any of the elements you have placed within the document.

When sending invitations for multiple signators, you only need to add their email addresses to the appropriate field. As you can see, naming your roles in the editor can prevent confusion at this step, and when arranging the signing order. Also, don’t forget that you can customize the subject and message of the email they will receive by selecting Customize Signer Email to add a personal touch, instructions, or whatever it is that you need to accomplish your desired results.
Sometimes it is necessary to collect esignatures in a particular sequence, or order. For example, Company ABC wants to order maize from Company XYZ. To do so, someone must draft the document, someone must approve and sign-off on the document, then the manager must sign and agree that the order is necessary, next the CEO should review and sign, and so the cycle of Corporate-joy continues.

To accomplish and set a Signing Order, you can open the pane shown above in several ways, but let’s start from the Send Invite pane. On the Send Invite pane, simply select Edit Signing Order, and now we are here, great! Next up, click and drag the vertical Move button  up or down, above or below other signatories. Signers on top are first, and those on the bottom are last. Once finished and satisfied, select Save Signers, and you will be returned to the Send Invite pane. That’s it, the same process applies now as it did for one signator, you just have to wait for the recipients to complete the agreement or contract.
My customer/client has eSigned the agreement/contract, now what?

When the document has been electronically signed and its element fields completed, the document will appear in your Dashboard with a green Signed infobox, the number of attachments, and the email address of the signator.
As we covered previously, you can download your document, with its history if necessary, on the airSlate SignNow Dashboard by going to the document in question and selecting More.
If you have multiple documents such as a benefits package, HR agreement, contract, and insurance agreement, you can merge these documents into one for recordkeeping purposes. You should keep in mind that if a document is too long, it can be difficult to locate exactly what you are after within it, and it can be overwhelming to the reader/signator. It is generally advisable to keep each document separate until the signator has finished and only merge them together once the process is complete.
That is really all there is to it, you now have a legally-binding form or contract. Congratulations!
The process, albeit seemingly overwhelming, is actually quite simple. And with airSlate SignNow’s tools to edit and add element fields to your documents, we hope the process is painless.
As a contractor, how do I eSign a contract?

When you have reached the phase of negotiations where a contract will be issued, you will receive an email from mail@signnow.com. Inside the email will include either a simple message like in the reference above, or possibly instructions if the sender included them in the invitation process. Signing this document is really quite simple, so let’s get to it!
When you open the email, simply click Sign Document and you will be guided to one of several possible variants. If the sender included a password, you must enter it before proceeding; and if they requested Text Message (SMS) or Phone Call Authentication, you will need to verify this information before continuing by following the instructions included in either.

After you successfully get to and open the document, you will be greeted with the window shown above. It highlights who invited you and how many elements you need to complete. Simply click Get Started to continue.

Within the document, there may be various elements that need to be filled out other than just a signature, such as file attachments. Attachments could be anything from a copy of your ID to credentials, instructions should be included. If it is unclear, never be afraid to ask the sender. It is always better to get clarification to avoid slowing down any processes or signing something you do not understand.
When filling out initials elements, you only need to fill out the first one and select the subsequent initials elements to autofill them with data from the first. In the case of text boxes, they can be email addresses, names, or memorandums depending on the document.
To add a date, select the date element, and at the bottom of the new pane, you will find Today’s Date. Once you select that, it will fill in the correct date for you. You can, of course, select any date you want if needed.
To complete a signature element, simply select the signature and type your full name, draw your signature, or upload an existing image of your signature. The same will be applied to subsequent fields requiring this information when you click on them.

When you have finished, press Done at the top-right-hand side of your screen. Afterward, you will be redirected to a page deemed necessary by the sender or be greeted with the message «Thanks! You’ve successfully signed the document. The originator will be notified.» You can either close this window, or go to the airSlate SignNow App, read about it, and/or create an account if you do not already have one.
In Closing
Whether it be for outsourcing or for internal documents, there are infinite applications for this technology. Generate, eSign, edit, assign roles, set signing orders, share, and store your documents, forms, agreements — really whatever — in a safe, secure platform boasting industry-leading data compliance and security. Do more business digitally this year with airSlate SignNow!

- Your Ultimate Guide: How Do I Send a Contract via Email With an Electronic Signature Applied?
- How to send a contract via email with airSlate SignNow
- How do I make my PDF a contract where people can sign it electronically?
- Setting up your E-Contract
- How to sign e-contracts
- How to send a contract via email with an electronic signature
- How do I get multiple eSignatures?
- My customer/client has eSigned the agreement/contract, now what?
- As a contractor, how do I eSign a contract?
- In Closing
Related questions
Business Cloud
Automate business processes with the ultimate suite of tools that are customizable for any use case.
-
Award-winning eSignature. Approve, deliver, and eSign documents to conduct business anywhere and anytime.
-
End-to-end online PDF editor. Create, edit, and manage PDF documents and forms in the cloud.
-
Online library of 85K+ state-specific legal forms. Find up-to-date legal forms and form packages for any use case in one place.