Help Me With Implement Sign in Android
Contact Sales
Make the most out of your eSignature workflows with airSlate SignNow
Extensive suite of eSignature tools
Robust integration and API capabilities
Advanced security and compliance
Various collaboration tools
Enjoyable and stress-free signing experience
Extensive support
Keep your eSignature workflows on track
Our user reviews speak for themselves


Award-winning eSignature solution


Assist me with implementing sign-in on Android
If you’re seeking to improve your Android application with a functional sign-in feature, you might be wondering, 'Assist me with implementing sign-in on Android.' Utilizing airSlate SignNow can simplify your document signing workflow, providing a user-friendly and budget-friendly option for organizations of any size.
Assist me with implementing sign-in on Android: Step-by-step instructions
- Launch your web browser and go to the airSlate SignNow website.
- Register for a new account for a complimentary trial or log in if you already possess an account.
- Upload the document that requires a signature or that you intend to distribute for signatures.
- If you plan to utilize the document later, think about transforming it into a reusable template.
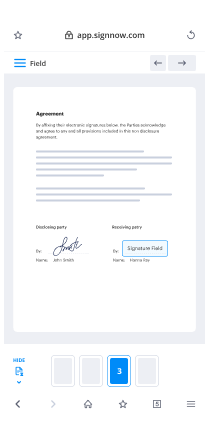
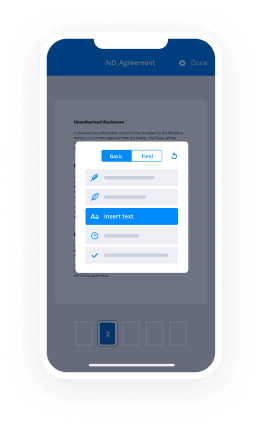
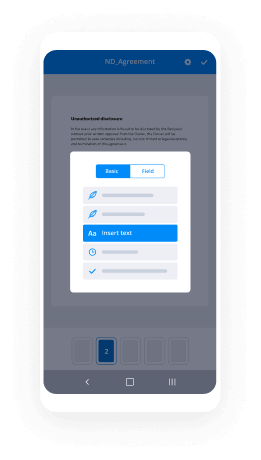
- Access your uploaded document and modify it: add fillable fields or insert necessary details.
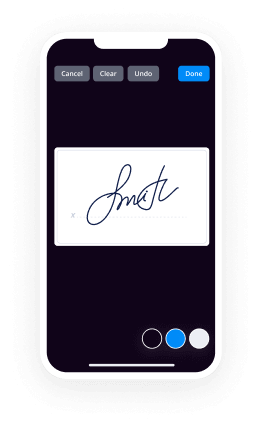
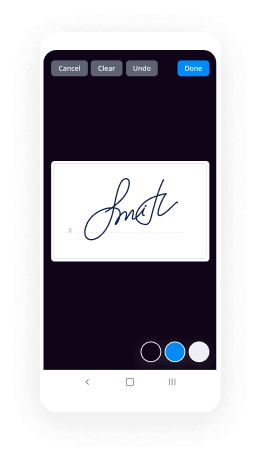
- Sign your document and assign signature fields for any involved recipients.
- Click the 'Continue' button to set up and dispatch your eSignature request.
In summary, airSlate SignNow offers a clear and effective method to oversee document signing for Android applications. With its powerful features, you can manage your signing requirements without undue complexities.
Ready to enhance your document management? Enroll in airSlate SignNow today and discover the advantages of seamless eSigning!
How it works
Rate your experience
-
Best ROI. Our customers achieve an average 7x ROI within the first six months.
-
Scales with your use cases. From SMBs to mid-market, airSlate SignNow delivers results for businesses of all sizes.
-
Intuitive UI and API. Sign and send documents from your apps in minutes.
A smarter way to work: —how to industry sign banking integrate
How to sign and complete a document online
Document management isn't an easy task. The only thing that makes working with documents simple in today's world, is a comprehensive workflow solution. Signing and editing documents, and filling out forms is a simple task for those who utilize eSignature services. Businesses that have found reliable solutions to help me with integration sign implement android don't need to spend their valuable time and effort on routine and monotonous actions.
Use airSlate SignNow and help me with integration sign implement android online hassle-free today:
- Create your airSlate SignNow profile or use your Google account to sign up.
- Upload a document.
- Work on it; sign it, edit it and add fillable fields to it.
- Select Done and export the sample: send it or save it to your device.
As you can see, there is nothing complicated about filling out and signing documents when you have the right tool. Our advanced editor is great for getting forms and contracts exactly how you want/need them. It has a user-friendly interface and full comprehensibility, offering you full control. Create an account today and begin enhancing your eSign workflows with efficient tools to help me with integration sign implement android on-line.
How to sign and complete forms in Google Chrome
Google Chrome can solve more problems than you can even imagine using powerful tools called 'extensions'. There are thousands you can easily add right to your browser called ‘add-ons’ and each has a unique ability to enhance your workflow. For example, help me with integration sign implement android and edit docs with airSlate SignNow.
To add the airSlate SignNow extension for Google Chrome, follow the next steps:
- Go to Chrome Web Store, type in 'airSlate SignNow' and press enter. Then, hit the Add to Chrome button and wait a few seconds while it installs.
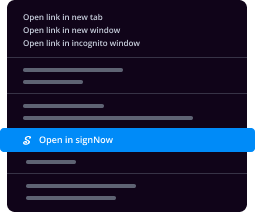
- Find a document that you need to sign, right click it and select airSlate SignNow.
- Edit and sign your document.
- Save your new file to your account, the cloud or your device.
By using this extension, you prevent wasting time on dull actions like downloading the file and importing it to a digital signature solution’s library. Everything is easily accessible, so you can easily and conveniently help me with integration sign implement android.
How to eSign documents in Gmail
Gmail is probably the most popular mail service utilized by millions of people all across the world. Most likely, you and your clients also use it for personal and business communication. However, the question on a lot of people’s minds is: how can I help me with integration sign implement android a document that was emailed to me in Gmail? Something amazing has happened that is changing the way business is done. airSlate SignNow and Google have created an impactful add on that lets you help me with integration sign implement android, edit, set signing orders and much more without leaving your inbox.
Boost your workflow with a revolutionary Gmail add on from airSlate SignNow:
- Find the airSlate SignNow extension for Gmail from the Chrome Web Store and install it.
- Go to your inbox and open the email that contains the attachment that needs signing.
- Click the airSlate SignNow icon found in the right-hand toolbar.
- Work on your document; edit it, add fillable fields and even sign it yourself.
- Click Done and email the executed document to the respective parties.
With helpful extensions, manipulations to help me with integration sign implement android various forms are easy. The less time you spend switching browser windows, opening several profiles and scrolling through your internal records seeking a document is a lot more time to you for other significant tasks.
How to safely sign documents using a mobile browser
Are you one of the business professionals who’ve decided to go 100% mobile in 2020? If yes, then you really need to make sure you have an effective solution for managing your document workflows from your phone, e.g., help me with integration sign implement android, and edit forms in real time. airSlate SignNow has one of the most exciting tools for mobile users. A web-based application. help me with integration sign implement android instantly from anywhere.
How to securely sign documents in a mobile browser
- Create an airSlate SignNow profile or log in using any web browser on your smartphone or tablet.
- Upload a document from the cloud or internal storage.
- Fill out and sign the sample.
- Tap Done.
- Do anything you need right from your account.
airSlate SignNow takes pride in protecting customer data. Be confident that anything you upload to your account is secured with industry-leading encryption. Auto logging out will protect your information from unauthorised entry. help me with integration sign implement android from your mobile phone or your friend’s phone. Security is crucial to our success and yours to mobile workflows.
How to eSign a PDF file with an iPhone
The iPhone and iPad are powerful gadgets that allow you to work not only from the office but from anywhere in the world. For example, you can finalize and sign documents or help me with integration sign implement android directly on your phone or tablet at the office, at home or even on the beach. iOS offers native features like the Markup tool, though it’s limiting and doesn’t have any automation. Though the airSlate SignNow application for Apple is packed with everything you need for upgrading your document workflow. help me with integration sign implement android, fill out and sign forms on your phone in minutes.
How to sign a PDF on an iPhone
- Go to the AppStore, find the airSlate SignNow app and download it.
- Open the application, log in or create a profile.
- Select + to upload a document from your device or import it from the cloud.
- Fill out the sample and create your electronic signature.
- Click Done to finish the editing and signing session.
When you have this application installed, you don't need to upload a file each time you get it for signing. Just open the document on your iPhone, click the Share icon and select the Sign with airSlate SignNow button. Your doc will be opened in the app. help me with integration sign implement android anything. Additionally, using one service for all your document management needs, everything is faster, smoother and cheaper Download the application right now!
How to eSign a PDF on an Android
What’s the number one rule for handling document workflows in 2020? Avoid paper chaos. Get rid of the printers, scanners and bundlers curriers. All of it! Take a new approach and manage, help me with integration sign implement android, and organize your records 100% paperless and 100% mobile. You only need three things; a phone/tablet, internet connection and the airSlate SignNow app for Android. Using the app, create, help me with integration sign implement android and execute documents right from your smartphone or tablet.
How to sign a PDF on an Android
- In the Google Play Market, search for and install the airSlate SignNow application.
- Open the program and log into your account or make one if you don’t have one already.
- Upload a document from the cloud or your device.
- Click on the opened document and start working on it. Edit it, add fillable fields and signature fields.
- Once you’ve finished, click Done and send the document to the other parties involved or download it to the cloud or your device.
airSlate SignNow allows you to sign documents and manage tasks like help me with integration sign implement android with ease. In addition, the security of your info is priority. File encryption and private web servers can be used for implementing the newest functions in data compliance measures. Get the airSlate SignNow mobile experience and work more proficiently.


FAQs
-
What features does airSlate SignNow offer to help me with implement sign in Android?
airSlate SignNow provides a comprehensive set of features designed to help you with implement sign in Android. Users can easily create, send, and eSign documents directly from their Android devices. With robust security measures and user-friendly interfaces, it's the perfect solution for managing electronic signatures on the go.
-
How can airSlate SignNow benefit my business when I need help with implement sign in Android?
By using airSlate SignNow, your business can streamline document workflows and enhance productivity, especially when you need help with implement sign in Android. The platform allows for quick access to documents and signatures, reducing turnaround times and improving efficiency. This ultimately leads to better customer satisfaction and increased revenue.
-
Is there a free trial available for airSlate SignNow to help me with implement sign in Android?
Yes, airSlate SignNow offers a free trial that allows you to explore its features and see how it can help you with implement sign in Android. This trial gives you hands-on experience with the platform, letting you test the ease of use and efficiency in signing documents. It's a great opportunity to assess whether it meets your business needs.
-
What are the pricing plans for airSlate SignNow if I need help with implement sign in Android?
airSlate SignNow offers various pricing plans to accommodate different business sizes and needs, especially if you need help with implement sign in Android. The plans are competitively priced, ensuring that you get a cost-effective solution without sacrificing essential features. You can choose a plan that best fits your budget and requirements.
-
Can I integrate airSlate SignNow with other applications to help me with implement sign in Android?
Absolutely! airSlate SignNow supports integration with numerous applications, making it easier to help you with implement sign in Android. Whether you use CRM systems, cloud storage, or project management tools, you can streamline your workflows by connecting them with airSlate SignNow.
-
What types of documents can I sign using airSlate SignNow when I need help with implement sign in Android?
With airSlate SignNow, you can sign a wide variety of documents, including contracts, agreements, and forms, making it ideal for anyone needing help with implement sign in Android. The platform supports multiple document formats, ensuring flexibility and convenience in your electronic signature processes.
-
How secure is airSlate SignNow for signing documents on Android?
airSlate SignNow prioritizes security, providing a secure platform for signing documents on Android, especially when you need help with implement sign in Android. Advanced encryption and compliance with industry standards ensure that your sensitive information remains protected throughout the signing process.
-
As a competitive programmer, how did you learn and implement projects in machine learning from scratch?
I am not a competitive programmer at this stage, but I think I am qualified to answer your question.I am currently in my 2nd year for B.Tech CS degree and I can say I am pretty much a beginner with algorithms and stuff. But what excites me is the mathematics behind everything.Machine Learning has a lot of mathematics behind it, which is very interesting and I love to explore more of it. There are two types of people of learn machine learning.First, Those who read up how things work in an intuitive manner, look up some code and start writing their own projects.Second, Those who dive deep into the theory and mathematics behind the algorithms before implementing it.Both kinds of people are right about their kind of approach, so feel free to choose your path. (P.S. The second path is very time consuming ofcourse).So if you are starting out from scratch with Machine Learning. I deeply recommend Andrew Ng’s course on Machine Learning in Coursera. He gives the best explanation on every ML algorithm from ground-up and it’s easy to follow.The programming assignments are in Octave, but feel free to use your own programming language for learning purpose(I use Python).Bonus: After you are through with his course, check out his Deep Learning Specialization Course on Coursera too.All the best :) And welcome to the Machine Learning community.
-
How do I get started with Android application development with only a very basic knowledge about programming?
Thanks for the A2A Rahul , It’s very easy to get start with Android Application Development. Few months back I read an Awesome article about Android Apps Development ,I thought it would be very helpful for a Beginner in Android App development. So , I have shared the article here. I hope so , sure It will be a very helpful Guide For Apps developing beginners. So you have a killer app idea and you’re ready to turn it into a reality and take it to market. No doubt you’re itching to start getting your first downloads, reviews and profits… But there’s just one problem: you don’t have a clue where to start! Learning to code is difficult enough on its own but with Android development it can be more complicated. Not only do you need to understand Java, you also need to install all the Android-specific software and learn all of the unique quirks of Android app development. In general, creating an Android app requires the SDK (Software Development Kit), an IDE (Integrated Development Environment) like Android Studio or Eclipse, the Java Software Development Kit (JDK) and a virtual device to test on. All this takes work to set up, and that’s before you’ve even started looking into things like Google Play Services, screen sizes, API levels… It’s just such a dense amount of information and it’s enough to put an awful lot of people off before they even begin. My aim with this article then, is to provide an approachable guide to try and make the whole prospect of creating an app a little less daunting… I’ll explain the bits you need to know and gloss over the rest and by the end you should have a basic app that you can start iterating on and experimenting with. Go and make yourself a cup of tea first though, this may take a while… Step 1: Download Android Studio To program in most languages, you need a piece of software called an IDE or ‘Integrated Development Environment’. The most common IDE for Android development is Android Studio, which comes direct from Google itself. You can get it here [ http://developer.android.com/sdk/index.html?gclid=Cj0KEQiAm-CyBRDx65nBhcmVtbIBEiQA7zm8lWCaBd9n9KYYunFXxXsQCPojBVHk5eIH4p9CWM1eLfUaAmd28P8HAQ ]. An IDE is what gives you the main UI where you’ll enter your code (you can’t just start typing into notepad). It also highlights things you get wrong, offers suggestions and lets you run and test your creations conveniently. It creates the files you need, it provides basic layouts and generally it saves you a lot of time and effort. What’s great about Android Studio is that it is designed specifically for Android development (unlike the second most popular option, Eclipse). This means that when you download the software, you’ll also get a lot of the other bits you need including the Android SDK (a selection of tools including the Android platform itself) and the Android Virtual Device, which is an emulator you can test your apps on. When you go through the installation, make sure you leave the boxes ticked to confirm that you want these additional components. You could manually add them later, but this will just complicate matters. As mentioned, there are some alternatives to Android Studio. Eclipse [ https://eclipse.org/downloads/ ] is an older IDE that can be used for developing other things too (such as iOS apps) and that is a bit more flexible overall. It’s also a much more fiddly to get started with though and not nearly as beginner-friendly. Another personal favorite of mine is Basic4Android [ http://www.b4x.com/ ]. Basic4Android is an IDE that lets you code Android apps with the BASIC programming language. It makes things easier in a number of other ways too and is focused on ‘rapid development’. There are other options too, such as Unity3D and numerous app builders, each of which has specific strengths and weaknesses depending on what you’re planning on building. For the sake of simplicity though, we’re focusing on Android Studio because it has become the ‘main’ way to build basic apps and pretty much the industry standard. If you think you might ever sell your business, if you want to give yourself the most flexibility and control possible, or if you’d like to become a professional app developer, you’ll need this tool. That said, if you read through all this and you find it too much still, you might want to consider Basic4Android as a simpler approach and I’ll be covering that in a future post. Okay, just to recap: we now have Android Studio downloaded and installed. But, don’t run it until you read step two! So far so good… What could possibly go wrong? Step 2: Setting Up Android Studio Now you have Android Studio installed you’ve taken your first, bold step toward becoming a developer! A lot of people only manage it this far and then leave the software installed on their computer for months on end, feeling guilty every time they see it in the Start Menu. Eventually they end deleting it to make space for the next AAA title on Steam and so ends the whole sorry affair… Don’t end up like them – it’s time for some more affirmative action! Before you can get started, you also need to install Java on your machine to use Android Studio. Specifically, you’re going to need install the Java Development Kit (JDK). Java is the programming language you’re going to be using to build your apps in this instance and you need to install the JDK in order for Android Studio to be able to interpret and compile your code (compiling means turning the source into something that is understood by the CPU – machine code). You’ll find the Java Development Kit here [ http://www.oracle.com/technetwork/java/javase/downloads/jdk8-downloads-2133151.html ]. Just download and follow the instructions to install. Now you can click on Android Studio to launch it. Once it opens up, you’ll be presented with a menu where you’ll be able to get started or configure some options. The great thing is that everything is handled for you at this point, though you may want to familiarize yourself with the SDK Manager(Configure %3E SDK Manager) which is where you’ll update your Android SDK to support newer versions, as well as download things like code samples or support for Google Glass. But don’t worry about that now but if Android Studio says you’re missing something, this is where you’ll probably need to go to find it. So really there are three main things interacting when you use Android Studio to create your apps. * Android Studio itself, which is an IDE that provides you with a nice interface for coding. * The code you write in Java, which you installed a moment ago… * And the Android SDK which you’ll access through your Java code in order to do Android-type things If you find this all a bit complicated and daunting then… well, you don’t know you’re born. This used to be way worse. Maybe that offers some consolation… Step 3: Starting a New Project Once you’ve installed your samples, you can go back to the first page you saw when you loaded up Android Studio. Now you want to choose Start a new Android Studio Project – it’s finally happening! Enter the name you want for your application and your ‘company domain’. Together these elements will be used to create your package name with the following format: com.companyname.appname The package will be the compiled file or APK (‘Android Package File’) that you’ll eventually upload to the Google Play Store. There are ways that people can see this, so if you’re planning on making something you’ll eventually release, try to stay away from using ‘funny words’. The last field to enter is the directory where you want to save all the files pertaining to your app. I like to save in DropBox to make sure I always have a backup of my code. Click Next again and guess what… More options! Huzzah! Don’t worry, we’re nearly there… Next you need to decide what type of device you’re going to be developing for and in this case we’ll start with the Phone and Tablet option. Other options are TV, Wear and Glass. It’s fine if you want to develop for a myriad of platforms in the future – that’s one of the wonders of Android – but let’s start with something a bit more straightforward to begin with, okay? The other choice you have to make at this stage is the ‘Minimum SDK’. This is the lowest version of Android you want to support. Why not just enter the latest version of Android in here? Well, because relatively few people actually have the latest version of Android installed on their device at any given time. You want to support phones that are still running older versions in order to signNow the largest possible audience – especially overseas. Why not just go with Android 1.1? Well, apart from this not being an option (Froyo is as low as you can go), that would also prevent you from using any of the fancy new features from the latest updates. The best bet at this stage is to go with the default option, so just leave this field as it is. On the next page, you’ll be given the option to pick the way you want your app to look at the start. This will be the look of your main ‘Activity Module’ which is basically the main page of your app. Think of these like templates; do you want to have the title of your app along the top of the screen, or do you want your UI to fill the whole display? Do you want to start off with some elements ready-designed for you? Is your app primarily going to use Google Maps (don’t go here for a bit, things get more complicated with Google Play Services). Bear in mind that an app can have multiple activities that act like separate pages on a website. You might have a ‘settings’ activity for instance and a ‘main’ activity. So the activity isn’t the app per say but rather one stand-alone page of your app. For your first creation though, you’ll probably do best to make something really simple that just displays a single, basic activity. Select ‘Basic Activity’ to keep things as simple as possible and for all intents and purposes, this will now be your app. Click Next again you get the last few options. Now you get to pick the name for your activity and the layout name (if you chose ‘Basic Activity’ you’ll also have the title option and the ‘menu_resource’ name). The activity name is how you’ll refer to your activities in your code, so call it something logical (good advice for coding generally) like ‘MainActivity’. Creative, I know. The layout name meanwhile describes a file that determines the layout of an activity. This is a separate piece of code that runs in concert with the main activity code to define where elements like images and menus go and what fonts you’ll use. This is actually not Java but XML – or Extensible Markup Language if you want to impress your friends. For anyone with a background in web development, your XML is going to work a little like HTML or a CSS style sheet. The Java code for the activity meanwhile says what the elements on the screen do when pressed etc. It’s fine to leave the default name here as ‘activity_main’. Lastly, choose a name for the menu and for the title. Pick something nice for the title, as your users will be able to see this at some points. Click next… and now you get to see your app! Your blank, useless app… All that just to get started! You see why people give up? But really we can break it down into the following very basic steps: * Download and install Android Studio, making sure to include the Android SDK * Install Java SDK * Start a new project and select the basic details So it’s really not that bad… And remember: once you’ve done all this once, you can forget about it forever and focus on the fun stuff: creating apps! Your tea is probably cold at this point, so the next very important step, is to get more. Step 4: Making an Actual Thing Once your app opens, you should see a directory tree on the left with all the different files and folders that make up your app and a picture of a phone displaying ‘Hello World!’ in the center. Well, hello to you as well! (A basic app that displays ‘Hello World’ is what most new developers make first when they learn to program in a new language. Android Studio cheats though, because it does it for you!) You might notice that the open tab (along the top) is ‘activity_main.xml’, which is what the big phone is showing on its display. You may recall that activity_main.xml is the XML code that defines the layout instructions for your main activity. If you selected ‘Basic Activity’ when you started your project, then you’ll see a second XML file too called ‘content_main.xml’. For the most part, these two do the same thing but the ‘acitvity_main.xml’ contains the basic layout that Android Studio created for you when you selected ‘Basic Activity’. The stuff you want to edit is in content_main.xml, so open that up and don’t worry about it for now. (If this isn’t what is open to start, then use the directory on the left to open it by choosing: app %3E res %3E content_main.xml.) The Layout Android Studio is not showing the XML code itself here but rather a rendering of how the layout will appear on the screen. This is a visual editor a bit like Dreamweaver for web design and it makes life a little easier for us developers. You also have a bunch of options called ‘widgets’ down the left that you can add to your app. This is your basic app stuff; so for instance, if you want to add a button saying ‘OK’ to your activity, you can simply drag it over to the screen and drop it anywhere you like. Go ahead and dump an ‘OK’ button right underneath the ‘Hello World’. Something else you’ll find is that you can click on either of these elements in order to change the text and the ‘ID’. The ID is how you’re refer to each element (called a ‘view’) in your Java code, while the text is of course what you display to the user. Delete the ‘Hello World’ widget (or view) and change the text on the button to ‘Hello?’. Likewise, change the ‘id’ on the button to ‘button1’. I am now stealthily getting you to write a little program… Notice as well that when you select a view, you get options in the bottom right to change the text color and size etc. You can play around with these variables if you like to change the look of your button. We’re coming back here in a minute though so make a mental note! Now open up your MainActivity.java. The tab will be along the top but in case it isn’t, find it under:App %3E Java. This is the code that defines the behavior of your app. At this stage, you’re going to add in a little passage of code: [code]public void buttonOnClick(View v) { Button button1 = (Button) v; ((Button) v).setText("Hello!"); } [/code]This is going to go right underneath the first lone closed bracket ‘}’, just before the “@Override, Public Boolean”. It should look like this: What does it all mean? Well basically, anything following “void buttonOnClick” will be carried out when someone clicks on the button. We’re then finding the button with the “Button button1 = (Button) v;” code and then changing the text. Yes, there are other ways you could achieve the same thing but I feel like this keeps it nice and simple and thus easy to understand. Spend some time reading it and try to get your head around what is doing what… At the top of the page is the word ‘import…’. Click on that to expand it and make sure that somewhere there is the line: “import android.widget.Button;”. It should have appeared on its own when you typed out the last bit (Android Studio is smart like that) but you can add it yourself if it didn’t. (Notice as we type that lines end in “;”. This is basic Java formatting and if you forget one, it will throw up an error. Get used to searching around for them!) Now go back to your content_main.xml and click on the button. In the right corner, where you have your parameters for the button, you should be able to find an option called ‘onClick’. Click on this and then select the ‘onClick’ line of code you just wrote from the drop down menu. What you’ve just done, is told Android Studio that you want to associate the section of code with the button you created (because you’ll have lots of buttons in future). Now all that’s left to do is run the app you just made. Simple go to ‘run’ along the top and then select ‘run app’ from the drop down menu. You should already have your AVD (Android Virtual Device) installed but if not, you can go to: tools %3E Android %3E AVD Manager %3E + Create Virtual Device. Don’t forget you also need to install an Android version onto the device. Follow the steps to launch the emulator running your app. Be patient, it can sometimes take an age to load up… If it neverloads up, you can consider ‘packaging’ the app in order to create an APK. Drag this onto your Android device and double click on it to install and run it. Once it’s finally up and running you can have a go with this fun, fun app. What you should find is that when you click the button, the text from ‘Hello?’ to ‘Hello!’. We’re going to be rich… (If it doesn’t work… something has gone wrong. It wasn’t me, my one works! Look for red text in your code and hover your mouse over it to get suggestions from Android Studio.) Step 5: How to Get Better At App Development Okay, so that was a lie. We’re probably not going to be rich. At the moment the app we’ve made is pretty lame. You can try and sell it sure but you probably won’t get that many good reviews. The reason I talked you through this basic app creation though is because it teaches you the very fundamentals of programming. You have an action and a reaction – pressing on a button doessomething. Throw in some variables and some math, add some pretty images and a useful function and that’s genuinely enough to make a very basic app. So where do we go from here? There’s so much more to learn: we haven’t looked at the Android Manifest yet, we haven’t talked about your private keysign (or how fun it is when you lose that) and we haven’t even studied the Android app ‘lifecycle’ (nothing to do with The Lion King). There’s issues with supporting different screen sizes and there’s just so much more to learn. Unfortunately, it would take an entire book to teach you the entirety of Android app development. So that’s a good place to start: buy a book! But more important is just to play around and try things. Don’t set out to make your world-changing app on day one. Instead, focus on making something simple and straightforward and then build on that. Try changing the layout of the text and try adding in more buttons and more rules to make your app actually useful. Eventually, you’ll find there’s something you want to do that you can’t figure out on your own. Maybe you want a sound to play when someone clicks on your button, for example. This is where the real learning starts. Now all you need to do is search in Google: “How to play sound onClick Android” You’ll find a bunch of complicated answers but eventually someone, probably on Stack Overflow [ http://stackoverflow.com/ ], will break down the answer simply for you. Then what you do is you copy that code and you paste it into your app, making a few changes as you go. Likewise, try out some of the code samples available through Android studio. See how they work, try changing things and just experiment. Things will go wrong and error messages will come up but for the most part, if you just follow the instructions, it’s easy enough to handle. Don’t panic! And that’s pretty much how you learn to make apps. A lot of it boils down to reverse engineering and copying and pasting. Once you have the main program in place, the rest you pick up as you go. If you want the absolute easiest way to start, then just find some sample code that’s close to what you make and change it. No one is going to be able to explain all this to you in a way that makes any sense and if you worry about not grasping everything to begin with, you’ll never get anywhere. So instead, dive in, get your hands dirty and learn on the job. It’s complicated and it’s frustrating but ultimately it’s highly rewarding and more than worth the initial effort. EDIT: Added Source : http://www.androidauthority.com/android-app-development-complete-beginners-658469/
-
I'm teaching myself to code, and I'm fortunate to be able to do so full-time. How would you recommend I structure my DAY to be p
I'm teaching myself to code, I'm fortunate to be able to do so full-time. No other obligations. How would you recommend I structure my day? I will give you some tips that I have learned:Start small, write small apps and don’t get discouraged if you can’t write it on your own, follow tutorials (that is why they are there)It takes a lot of time to start writing your own apps (I mean something that you wish to make, a website that is your idea)You are not alone, there are a lot of people who will help you from friends who are not programmer to a guy who works at google that will answer your question on forumDon’t rush, programming takes time, you can’t learn it within a day, or week or even a year, it is a proces that takes foreve...
-
What is the fastest way to test a website across all browsers and browser version?
As a freelance developer, I don’t have the equipment available to run all browsers and versions. But I do run and test on all the browsers available for my computer. Then I go and do the same on the computer of someone who has a windows machine - if at all possible.I find that most clients aren’t willing to pay the extra it would cost to do back-version testing and debugging. Not with Mobile compatibility now being mandatory and taking more and more time every year.The best you can do is all you can do. Using emulators like Browserstack (that’s just one of many) is probably the most efficient way, but can be expensive.Using the user-agent setting on your browser (Safari has this feature) will NOT show you how it actually looks on old versions of other browsers - especially IE. Even proper emulators don’t show that sometimes.If your code (including CSS) validates with W3C and the site works on all major browsers and devices, anything else needs to be extra unless this was stipulated when you gave your quote.Back-compatibility is extremely time consuming and sometimes futile, depending how far back you need to go. If a client wants a fancy, modern website with all the modern bells and whistles, they don’t generally care about whether someone living in the stone age with IE 8 can use all the bells and whistles or not.If they do care, that costs more. But there is no fast way to do it, so that needs to be accounted for in the budget.
-
I want to change my career. What should I do to be an Android Developer? I am 29 years old.
Making a career shift isn’t an easy decision but if you are thinking to start a career in android, you are doing the best thing tbh and its not too late. To start learning Android Development, follow just these steps:Start Learning Java or React Native - Java is probably the best and easiest to learn programming language. Concepts are easy to implement and also, mostly android apps are made in either Java or React Native. But React is a better choice in my opinion because it can be used for both IOS and Android Development but Java can only be used in Android Dev (but its easier to get started in Java than React).Start a learning path course online. There are so many options out there (Udacity Nanodegree, EdX, Coursera). I found Udacity the best of the lot. The best way to learn is to actually utilise the structured learning path so i’d strongly recommend you to join a learning path from above options. (Research and choose which one suits you the best).After when you are a bit comfortable in making apps, just try to think of a new “IDEA” and start working on it. There are so many android developers out there and they know how to make android apps but why there are only few apps that are best sellers? Because the idea behind those apps was new and unique. It can be simple but must be something new that someone never worked upon.An example of this would be Flappy Bird game.In just a few weeks, the mobile app Flappy Bird became a global phenomenon. It was a simple game, but frustrating, endless and last but not the least, unique. It's safe to say Flappy Bird took over the web. The game was designed and built by Dong Nguyen.I am sure many of us played that game and if you notice the interface of that game is really simple. Simple controls, 2D game and not so good graphics. But the idea was unique and it clicked exceptionally well in android users and it jumped to #7 in the list of most downloaded android apps. Nguyen earned millions just by creating a simple app but a Unique one.Whatsapp took the world by storm when released. And currently its the most used chat app by android users. The idea was unique. But after whatsapp release, many developers followed the same idea and made apps like (Viber, We Chat,etc) but never got success like whatsapp. Because the idea was unique. So my point is really simple, just think of something unique and start working on it. Who knows, may be its gonna be the next big thing in android apps world ;)Best of Luck!-Mujahid
-
Can any one tell me a good new app idea for Android?
You can build an app that helps people know about sign boards and other traffic signs.In india people are mostly unaware about traffic signs, so if there is an app which scans the sign board and tells people about what that mean, I think that kind of application would be of great help.You can also use machine learning with android to implement this.There are many api like google play services mobile vision api which will help you a lot.Always try to build things which will help others ^_^
-
What are the best English learning apps?
There are many applications available that promise to make you learn English language, but the natural and best way is to only follow the same trend as you have learnt your Native language. Try to read Newspaper, Books might help you but, if you try conversating with persons will boost your skills fastly. If you have no one to help you in this exercise the “Ethereal Tute” is available to help you to come up with a charm of English. You can Inbox your questions and doubts on facebook id and you will get better results.
-
What were the most signNow announcements made at Google I/O 2016?
I watched the entire keynote on a live stream and was following Google I/O throughout and here’s what I think were the most signNow announcements at Google I/O 2016 -Android NThe new JIT compiler. Not only does it speed up system updates but also improves app install times by a whopping 75%.Multi-Window support. Even though Samsung and some Xposed modules have already brought this to Android, native multi-window support is a pretty signNow update.The new update system - Similar to how Chrome handles updates. A new update, when available, will be downloaded in the background and will seamlessly update the old system image with the new one, keeping your apps and data intact. This means no more ‘Android is starting’ and ‘Optimizing apps’ dialogues after an update! :DDaydreamGoogle’s platform for creating rich VR experiences on Android devices. Google has created a basic reference design for a VR headset and remote for other manufacturers. VR will also be heavily supported in Android N, with OS-level optimizations allowing latency to drop to only 20ms for a butter-smooth performance. Also, Android N will feature a VR based interface and also a full dedicated app market in Google Play for VR.Google AssistantGoogle Now is getting a lot smarter now with intelligent detection of contexts. Two way conversation while understanding your context. For example, if you ask Google “Where is the Taj Mahal?” and after that “How old is it?”, it intelligently learns the context of what you are referring to. Pretty cool, eh?FirebaseA brand new Firebase SDK, launching today, will work on Android, iOS and the web. It has got a slew of new features like Firebase crash reporting which help to identify issues and bugs and take action on them accordingly. It should help developers see app crashes updating in real time. Also there are other tools in the SDK which help developers send specific targeted notifications to users without writing a single line of code and a remote configuration tool which helps in app testing and experimenting at scale. How cool is that? :DAndroid Studio 2.2A new layout editor, constraint layouts which help build UIs for multiple screens and resolutions easily. Enhanced support for C++. cmake and NDK build support apart from Gradle. Also there is Test recording which will help you test your app locally or in a cloud and will give you an auto-generated signed report.Android Instant AppsUse an app (rather specific parts of it) without even installing it. Once implemented in your app, even clicking on a link pertaining to your app will download only those specific parts or modules of the app from Google Play and run them. There would also be an install option if the user wishes to install. A big big step forward.Android Wear 2.0Pretty cool new features like support for cellular data, using it seamlessly even when the phone is not with you or even switched off for that matter. Introduction of standalone apps is also a really awesome addition. One can also now customize watch faces easily now as Android Wear 2.0 allows you to display only the information you want on your watch face. New features also include a keyboard and smart-reply similar to what Google Inbox has to offer.Advancements in Machine Learning, Natural language Processing and AI.If there was one thing that Google was determined to announce and show at Google I/O was their advancements in Machine Learning, AI and Natural Language Processing. Google has open-sourced parts of its TensorFlow and Cloud Platform APIs allowing developers to access its Computer Vision APIs. Google has also made progress in the robotics field, an example of which showed us robotic arms picking up specific things without any special programmed instructions (that’s the power of Deep Learning for you!) Google has also started building specialized hardware called Tensor Processing Units or TPUs which was the same hardware that powered AlphaGo in its match against Lee Sedol (again, Deep Learning, Machine Learning and AI together in tandem!) They displayed their prowess and progress consistently throughout the keynote and these three are definitely going to be kinda the 3 pillars which they intend to build on.Google HomeGoogle Home is just a small speaker that sits in your living room, bedroom, kitchen or just about anywhere you want it to. So what’s so special about this speaker? Well, you can do pretty much everything you can do with Google Now (Google Assistant?) on the Google Home, totally hands-free! Wanna see your calendar appointments, make new ones, make reservations at places? You can literally just ask Google Home to do so. Integration with Nest will enable controlling the lights, thermostats, etc. and integration with Chromecast and Chromecast Audio will enable controlling your media devices like TVs at home, just with your voice! :DAndroid Apps are coming to ChromeOSAfter months of speculation, Google finally announced that Android Apps can now run natively run on ChromeOS. The apps will run just like they would on a phone or tablet, albeit maybe with a different orientation. What’s more is that Google Play Services too, will be making their way over to ChromeOS! This means the gigantic and ever increasing catalog of apps available for Android would also now be available for ChromeOS! :DAlloAllo is Google’s newest messaging app. Its got some pretty nice features like Google Assistant integration, Snapchat-like photo inking, end-to-end encryption (in incognito mode) and WhisperShout with which you can change the font size of that particular message to make an impression. Although this looks to be a nicely built app from the first look, I really think that Google is very very late to the messaging app party and I can’t really see people switching over and adopting Allo anytime soon.DuoGoogle’s latest video calling app. Some nice features include reliable performance on slower networks and some gimmicks like ‘Knock-Knock’ which allows the receiver to see the caller or whatever the caller chooses to show, on the other side. Once again, this app too has some serious competition, I feel user-adoption for this app will be more than that of Allo.So these, in my opinion were the most signNow announcements at Google I/O 2016! :DEnjoy! :DEDIT: Edited my answer to include all signNow announcements from Google I/O 2016 instead of announcements just from the keynote. Also added Allo and Duo, which I originally intentionally left out as a lot of people feel that these two apps were also signNow announcements. :)
-
I have a business idea. For that, I am planning to start an app in Android and iOS. What is some help in the process of starting
Great !! But how to make it to the top? The same question most of the startups and small budget company strives to get an answer for. To have a business idea and willingness to step into hugely competitive world of mobile application development is one minute step towards your dream. Take one more step and put all that you have on a piece of paper. Brainstrom your idea and chose prototyping tools on the Internet and create a detailed, serial wise mock-up/wireframes of your app. Once you’re clear about your requirements, look for the best fit company that can design and develop it for you. But, before your dive in think about the following aspects :1. Purpose behind developing the app – Do you have an unique idea or just want to ride the wave like other successful entrepreneurs. Answer to this question decides how passionate you are about the idea of developing your application and it will proportionally reflect in the outcome.2. Target audience – As application development demands great efforts from both developers and developing team, dig deep and take well thought decision. Depending upon your idea, percentage of total mobile users predicted to use the application decides whether its worthy to think over or change the direction.3. Timeline - This factor decides so many aspects of app development. As there are 50k + development companies and 30K+ developers, only a few deliver on time.4. Level of competition – How good your turned out product is to give tight rope competition to others? To top up all the counterparts your product should be statically good5. Expenditure – How much you are willing to pay to a development firm to develop your idea. Total estimate is breakdown into following :a. Type of app you want – Choose between native, hybrid or web app.Native Applications - Building a native app provides the most optimal product experience on mobile devices. However, a higher budget is needed to build across multiple platforms and keep native apps updated.Example – InstagramHybrid Applications - A hybrid app can be built faster across multiple mobile platforms and cost less compared to native app development. However, if your app has a complex feature set, you should consider building a native app to keep your product experience strong.Example – BasecampWeb Application - A web app is an app written in web code that is similar to a website but more interactive so it feels like an app on mobile devices.Example – Moodboardb. Login feature - Social applications mostly have login features where user enter email address/username and password with some more personal details like phone number, city, pin code, Address, security questions etc.c. Personal profile – Leverage application customization is one key to attract users at par. Sometimes, there is an option to maintain several profiles through same email address for instance - naukari .com.d. In app purchases – One way to indulge users in financial transaction is through in-app purchases.e. Review and Rating system – One influential feature that drives in or away users is users rating. Users decide the usability as per other users reviews and ratings.f. Website connectivity – Option to connect to the website through application is one good prevailing feature.g. UI/UX excellence – How good your application looks and feels like covers good percentage of total amount.h. App icon – Designing and decoration is also one important goal to achieve.6. Marketing strategy - Pre Plan how you are going to launch your product to grasp maximum attention. Great marketing strategy always.7. Multiple version to single application – It helps user to decide as per their requirement instead of making them to have an application with unnecessary features.8. Feedback and improvise – Pilot the application and request feedback for each version to improvise the existing modal. It helps to mould the application as per the intended users.Still confused what to do? No wonder, as there are countless companies battling against each other. You might want to go with the one with excellent work history and innovative brains. One such company that I would like to recommend is BrainMobi. It is because recently someone I know developed an app and he was quiet impressed with that. Hence, you need to take care before you select a mobile app development company to work with you according to your requirements.
Trusted esignature solution— what our customers are saying


Get legally-binding signatures now!
Frequently asked questions
How do i add an electronic signature to a word document?
How to know if an electronic signature was actually signed?
How to track electronic signature for us mail?
Get more for Help Me With Implement Sign in Android
- Can I Implement eSignature in Word
- How Do I Install Electronic signature in G Suite
- How To Use Electronic signature in Box
- Help Me With Install Electronic signature in G Suite
- How Do I Install Electronic signature in Oracle
- Help Me With Install Electronic signature in Oracle
- How Do I Implement eSignature in PaperWise
- How Can I Install Electronic signature in Oracle
Find out other Help Me With Implement Sign in Android
- Bail de logement quebec form
- Concert band seating chart pdf form
- Structure of a narrative essay form
- 2013 4803 form
- Kenya passport form
- Caqh fax cover sheet form
- Self employment ledger documentation form 100415445
- Rw1138 consent to compensation for personal representative andor attorney registers maryland form
- Tr 128161907pdf form
- Turkey work permit application form
- Statistics of divorces form
- De8401 form
- Sb 16778 superior court san bernardino sb court form
- Power attorney lic form
- 28a endorsement form
- Snap periodic report ny 2013 2019 form
- Medical source statement pdf form
- Form h1535 at
- Form hc 5 2015 2019
- Substance abuse discharge summary form johns hopkins hopkinsmedicine