How Do I Integrate eSignature in Word
Contact Sales
Make the most out of your eSignature workflows with airSlate SignNow
Extensive suite of eSignature tools
Robust integration and API capabilities
Advanced security and compliance
Various collaboration tools
Enjoyable and stress-free signing experience
Extensive support
Keep your eSignature workflows on track
Our user reviews speak for themselves


Award-winning eSignature solution


How can I incorporate eSignature in Word?
If you're aiming to optimize your document signing procedure, you may be asking, "How can I incorporate eSignature in Word?" By utilizing airSlate SignNow, you can smoothly integrate electronic signatures into your Word files, improving efficiency and minimizing turnaround periods. This manual will guide you through the process of getting started with airSlate SignNow and emphasize its main advantages for your organization.
How can I incorporate eSignature in Word?
- Launch your web browser and go to the airSlate SignNow webpage.
- Create an account for a complimentary trial or log in to your current account.
- Choose the document you want to sign or dispatch for signatures.
- If you intend to reuse this document, consider saving it as a template.
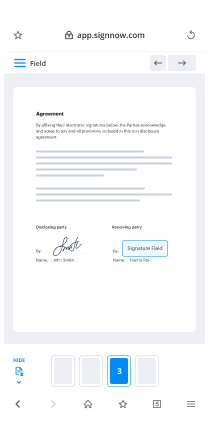
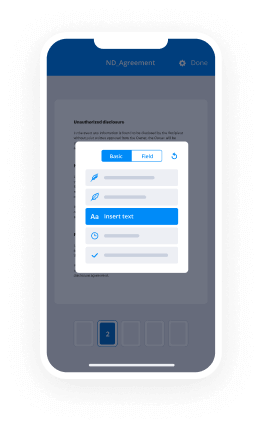
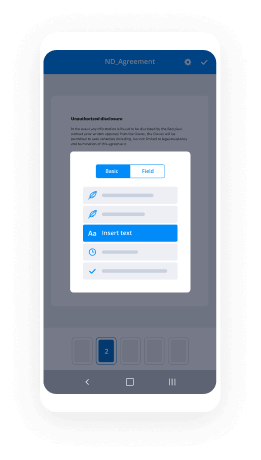
- Open the document and make any necessary modifications, including adding fillable fields or inserting required details.
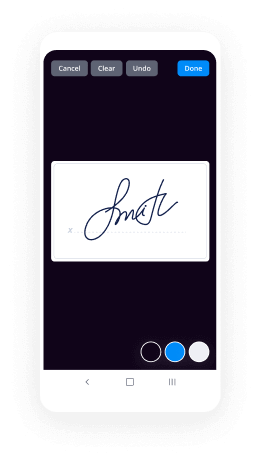
- Add your signature and specify signature fields for additional recipients.
- Click 'Continue' to configure and send out an eSignature invitation.
Integrating airSlate SignNow into your operations not only streamlines the signing method but also provides a variety of features that ensure excellent value for your investment. With clear pricing and no concealed charges, you can benefit from a complete eSignature solution without straining your budget.
Ready to elevate your document management with effortless eSigning? Initiate your free trial with airSlate SignNow today and enjoy outstanding support and a rich array of features tailored for your requirements!
How it works
Rate your experience
-
Best ROI. Our customers achieve an average 7x ROI within the first six months.
-
Scales with your use cases. From SMBs to mid-market, airSlate SignNow delivers results for businesses of all sizes.
-
Intuitive UI and API. Sign and send documents from your apps in minutes.
A smarter way to work: —how to industry sign banking integrate
How to eSign & complete a document online
Document management isn't an easy task. The only thing that makes working with documents simple in today's world, is a comprehensive workflow solution. Signing and editing documents, and filling out forms is a simple task for those who utilize eSignature services. Businesses that have found reliable solutions to how do i integration e signature integrate word don't need to spend their valuable time and effort on routine and monotonous actions.
Use airSlate SignNow and how do i integration e signature integrate word online hassle-free today:
- Create your airSlate SignNow profile or use your Google account to sign up.
- Upload a document.
- Work on it; sign it, edit it and add fillable fields to it.
- Select Done and export the sample: send it or save it to your device.
As you can see, there is nothing complicated about filling out and signing documents when you have the right tool. Our advanced editor is great for getting forms and contracts exactly how you want/need them. It has a user-friendly interface and full comprehensibility, supplying you with complete control. Sign up right now and start enhancing your digital signature workflows with effective tools to how do i integration e signature integrate word on the internet.
How to eSign and fill forms in Google Chrome
Google Chrome can solve more problems than you can even imagine using powerful tools called 'extensions'. There are thousands you can easily add right to your browser called ‘add-ons’ and each has a unique ability to enhance your workflow. For example, how do i integration e signature integrate word and edit docs with airSlate SignNow.
To add the airSlate SignNow extension for Google Chrome, follow the next steps:
- Go to Chrome Web Store, type in 'airSlate SignNow' and press enter. Then, hit the Add to Chrome button and wait a few seconds while it installs.
- Find a document that you need to sign, right click it and select airSlate SignNow.
- Edit and sign your document.
- Save your new file to your account, the cloud or your device.
By using this extension, you prevent wasting time and effort on monotonous actions like saving the document and importing it to an eSignature solution’s collection. Everything is close at hand, so you can easily and conveniently how do i integration e signature integrate word.
How to eSign docs in Gmail
Gmail is probably the most popular mail service utilized by millions of people all across the world. Most likely, you and your clients also use it for personal and business communication. However, the question on a lot of people’s minds is: how can I how do i integration e signature integrate word a document that was emailed to me in Gmail? Something amazing has happened that is changing the way business is done. airSlate SignNow and Google have created an impactful add on that lets you how do i integration e signature integrate word, edit, set signing orders and much more without leaving your inbox.
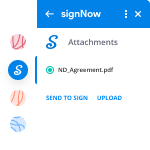
Boost your workflow with a revolutionary Gmail add on from airSlate SignNow:
- Find the airSlate SignNow extension for Gmail from the Chrome Web Store and install it.
- Go to your inbox and open the email that contains the attachment that needs signing.
- Click the airSlate SignNow icon found in the right-hand toolbar.
- Work on your document; edit it, add fillable fields and even sign it yourself.
- Click Done and email the executed document to the respective parties.
With helpful extensions, manipulations to how do i integration e signature integrate word various forms are easy. The less time you spend switching browser windows, opening multiple accounts and scrolling through your internal files looking for a template is more time to you for other essential tasks.
How to securely sign documents using a mobile browser
Are you one of the business professionals who’ve decided to go 100% mobile in 2020? If yes, then you really need to make sure you have an effective solution for managing your document workflows from your phone, e.g., how do i integration e signature integrate word, and edit forms in real time. airSlate SignNow has one of the most exciting tools for mobile users. A web-based application. how do i integration e signature integrate word instantly from anywhere.
How to securely sign documents in a mobile browser
- Create an airSlate SignNow profile or log in using any web browser on your smartphone or tablet.
- Upload a document from the cloud or internal storage.
- Fill out and sign the sample.
- Tap Done.
- Do anything you need right from your account.
airSlate SignNow takes pride in protecting customer data. Be confident that anything you upload to your account is secured with industry-leading encryption. Auto logging out will shield your profile from unauthorised access. how do i integration e signature integrate word from the mobile phone or your friend’s phone. Protection is essential to our success and yours to mobile workflows.

How to sign a PDF with an iPhone or iPad
The iPhone and iPad are powerful gadgets that allow you to work not only from the office but from anywhere in the world. For example, you can finalize and sign documents or how do i integration e signature integrate word directly on your phone or tablet at the office, at home or even on the beach. iOS offers native features like the Markup tool, though it’s limiting and doesn’t have any automation. Though the airSlate SignNow application for Apple is packed with everything you need for upgrading your document workflow. how do i integration e signature integrate word, fill out and sign forms on your phone in minutes.
How to sign a PDF on an iPhone
- Go to the AppStore, find the airSlate SignNow app and download it.
- Open the application, log in or create a profile.
- Select + to upload a document from your device or import it from the cloud.
- Fill out the sample and create your electronic signature.
- Click Done to finish the editing and signing session.
When you have this application installed, you don't need to upload a file each time you get it for signing. Just open the document on your iPhone, click the Share icon and select the Sign with airSlate SignNow button. Your doc will be opened in the app. how do i integration e signature integrate word anything. Additionally, utilizing one service for your document management requirements, everything is faster, better and cheaper Download the app right now!
How to eSign a PDF file on an Android
What’s the number one rule for handling document workflows in 2020? Avoid paper chaos. Get rid of the printers, scanners and bundlers curriers. All of it! Take a new approach and manage, how do i integration e signature integrate word, and organize your records 100% paperless and 100% mobile. You only need three things; a phone/tablet, internet connection and the airSlate SignNow app for Android. Using the app, create, how do i integration e signature integrate word and execute documents right from your smartphone or tablet.
How to sign a PDF on an Android
- In the Google Play Market, search for and install the airSlate SignNow application.
- Open the program and log into your account or make one if you don’t have one already.
- Upload a document from the cloud or your device.
- Click on the opened document and start working on it. Edit it, add fillable fields and signature fields.
- Once you’ve finished, click Done and send the document to the other parties involved or download it to the cloud or your device.
airSlate SignNow allows you to sign documents and manage tasks like how do i integration e signature integrate word with ease. In addition, the security of your info is top priority. Encryption and private servers can be used for implementing the most recent features in data compliance measures. Get the airSlate SignNow mobile experience and operate more effectively.


FAQs
-
How do I integrate eSignature in Word with airSlate SignNow?
To integrate eSignature in Word using airSlate SignNow, first, install the SignNow add-in from the Office Store. Once installed, you can easily create, send, and manage documents directly from Word. This seamless integration allows you to add eSignatures to your documents without leaving the Word application.
-
What are the pricing options for integrating eSignature in Word with airSlate SignNow?
airSlate SignNow offers various pricing plans that cater to different business needs. You can choose from monthly or annual subscriptions, with pricing tiers based on the number of users and features required. For specific details on pricing, visit our website to compare plans and find the right fit for integrating eSignature in Word.
-
What features does airSlate SignNow offer for eSignature in Word?
With airSlate SignNow, you can easily integrate eSignature in Word to streamline your document workflows. Key features include customizable templates, real-time tracking of document status, and the ability to collect signatures from multiple signers. These tools ensure a smooth and efficient signing process right within your Word documents.
-
Can I use airSlate SignNow for free to integrate eSignature in Word?
Yes, airSlate SignNow offers a free trial that allows you to explore how to integrate eSignature in Word. During the trial, you can test all features and see how they enhance your document management processes. After the trial, you can choose a plan that fits your needs.
-
Are there any specific requirements to integrate eSignature in Word with airSlate SignNow?
To integrate eSignature in Word with airSlate SignNow, you need Microsoft Word installed on your device and an active airSlate SignNow account. The add-in is compatible with both Windows and Mac versions of Word, ensuring you can eSign documents regardless of your operating system.
-
What benefits does integrating eSignature in Word provide for businesses?
Integrating eSignature in Word with airSlate SignNow signNowly enhances productivity and efficiency. It eliminates the need for printing, signing, and scanning documents, saving time and resources. Additionally, it ensures secure and legally compliant signatures, which is crucial for maintaining trust in business transactions.
-
How does airSlate SignNow ensure the security of eSignatures in Word?
airSlate SignNow prioritizes the security of your documents when you integrate eSignature in Word. All signatures are encrypted and comply with legal standards, ensuring that your documents are safe from unauthorized access. Additionally, you can track each document's status to monitor its progress securely.
-
How do I enable multiple signatures in MS word without losing the previous signatures?
Add a Digital Signature Using a Signature Line 1. To add a digital signature, open your Microsoft Word document and click where you’d like to add your signature line. 2. From the Word ribbon, select the Insert tab and then click Signature Line in the Text group. 3. A Signature Setup pop-up box appears. Enter your information in the text fields and click OK. 4. Double-click the signature line. 5. A Sign pop-up box appears. At the X, type your name. Next, look at the Signing as: field. Select the signing certificate. To ensure that this is the correct certificate, click the Change button. 6. Click on Click here to view certificate properties. 7. The Certificate Details box appears. Go to the Details tab and scroll down to Key Usage. Single-click on it. The lower text box should now display Digital Signature, Non-Repudiation. If it does, then this is the right certificate. Click OK. 8. If this is the wrong certificate, click OK. Then click More Choices to see other certificates. Select another certificate and repeat these steps until you find the correct certificate. 9. Click the Sign button to sign the document. Insert your PIV card into the card reader. Enter your Smart Card (PIV) PIN and click OK. 10. The Signature Confirmation box tells you that Word saved your digital signature. Click OK. Once you've digitally signed your document, if you edit it, Word will remove the digital signature. Don't worry. You can always go back to Step 1 and digitally sign it again. Add an Invisible Digital Signature You can add an invisible digital signature to prevent your name from appearing in a document. 1. Open your document and click the File tab. 2. Click Info and then click Protect Document. 3. From the Protect Document drop-down menu, click Add a Digital Signature. 4. Select a Commitment Type, such as created and approved this document, and then click Sign. 5. Insert your PIV card into the card reader. Enter your Smart Card (PIV) PIN and click OK. 6. The Signature Confirmation box tells you that Word saved your digital signature. Click OK. 7. Add Multiple Digital Signatures Using Signature Lines Once you digitally sign a document, you can have others also digitally sign it. (Note: If you are the first approver, you should create the signature lines for all of the approvers. Then, send the document to the second approver.) 1. If you are the second (or other) approver, open the document you’ve received. Double-click your signature line to sign. Follow Steps 4-10 from Add a Digital Signature Using a Signature Line [ https://piv.idmanagement.gov/userguides/signworddoc/#add-a-digital-signature-using-a-signature-line ]. 2. A Signature Setup pop-up box appears. Enter your information in the text fields and click OK 3. Double-click your signature line. 4. A Sign pop-up box appears. At the X, type your name. 5. Next, look at the Signing as: field. You should see your name and certificate information. If you don’t, click the Change button to select a different certificate and click Sign. 6. Insert your PIV card and enter your Smart Card (PIV) PIN. Click OK. 7. The Signature Confirmation box tells you that Word saved your digital signature. Click OK. 8. Send the digitally signed document to the next approver. Each successive approver will be able to open the document and double-click the Signature Line with his/her name and complete the signing process. Add Multiple Invisible Digital Signatures Multiple approvers may digitally sign a document. Use the same procedures as you would to add one invisibile digital signature: Add an Invisible Digital Signature [ https://piv.idmanagement.gov/userguides/signworddoc/#add-an-invisible-digital-signature ]. The final approver will see multiple “invisible” signatures in the document. View Digital Signatures If you use Word 2013 and open a digitally signed Word 2007 or 2010 document, you may have compatibility issues. You can view digital signatures in an incompatible Word document in one of two ways: 1. Click the View Signatures button just below the Word ribbon. OR 1. Click the File tab and select Info. Then click View Signatures. For either option, you will be able to see the digital signature details in the Signatures box. Remove a Digital Signature 1. If you want to remove a digital signature, open your Word document and go to the signature line. 2. If there is no signature line, click the View Signatures button just below the Word ribbon. 3. From the Signatures box, select the signature you want to to delete. 4. Right-click on the signature and then click Remove Signature. 5. When prompted, click Yes. Verify Digital Signature Settings Please ask your Technical Support staff for help. Administrator privileges are required for these steps. By default, Microsoft Word uses the SHA-1 hash algorithm to generate digital signatures. The SHA-1 hash algorithm is no longer considered secure. More secure hash algorithms, such as SHA-256, should be used. (See NIST’s guidance on hash functions) [ https://csrc.nist.gov/Projects/Hash-Functions/NIST-Policy-on-Hash-Functions ] You can use either option below to verify/change the hash algorithm settings for Microsoft Office: 1. Group Policy settings: Digital Signature Settings in Office 2013 [ https://technet.microsoft.com/en-us/library/cc545900.aspx ]. (For additional information, consult Microsoft’s technical documents.) 2. Computer registry settings. Change the Microsoft Office signature algorithm, as follows: [code]Word 2010: Computer\HKEY_CURRENT_USER\Software\Policies\Microsoft\Office\14.0\common\signatures Word 2013: Computer\HKEY_CURRENT_USER\Software\Policies\Microsoft\Office\15.0\common\signatures Word 2016: Computer\HKEY_CURRENT_USER\Software\Policies\Microsoft\Office\16.0\common\signatures [/code]Enable digital signatures so that users can sign part of a form 1. On the Tools menu, click Form Options. 2. Under Category, click Digital Signatures, and then click Enable digital signatures for specific data in the form. 3. Click Add. 4. In the Set of signNow Data dialog box, type a name for the part of the form template for which you want to enable digital signatures.Tip: The name you use cannot contain any spaces. 5. Click Select XPath next to the Fields and Groups to be signed box. 6. In the Select a Field or Group dialog box, click the field or group for which you want to enable digital signatures, and then click OK. 7. Under Signature options in the Set of signNow Data dialog box, do one of the following:To allow only one signature for this part of the form template, click Allow only one signature.To allow multiple signatures that are independent of each other, and that can be added or removed without affecting the other signatures, click All the signatures are independent (co-sign).To allow multiple signatures that sign preceding signatures, click Each signature signs the preceding signatures (counter-sign). 8. In the Signature confirmation message box, type the text that you want to show the user when they sign this part of the form, and then click OK twice. 9. In the form template, associate the part of the form template for which you enabled digital signatures with a section.How?Place your cursor where you want to insert the section.If the Data Source task pane is not visible, click Data Source on the View menu.In [ http://menu.In ] the Data Source task pane, do one of the following:To add a control that is bound to a field, right-click the field, and then click the control that you want to bind to this field.To [ http://field.To ] add a section that is bound to a group, right-click the group, and then click Section with Controls.Note: If the field or group that you specified repeats, you must select a non-repeating group that contains that field or group. 10. In the form template, double-click the Section label below the section that contains the other sections or controls that you just inserted. 11. Click the Digital Signatures tab. 12. Select the Allow users to digitally sign this section check box. 13. In the Sign the following data in the form when this section is signed box, click the name of the section that you created a digital signature for in step 4. 14. To display signatures in the section as they are added, select the Show signatures in the sectioncheck box. 15. To make the controls in the section read-only once they are signed, select the When signed, make controls read-only check box. Top of Page [ https://support.office.com/en-us/article/enable-or-disable-digital-signatures-d5050d09-c39e-470f-a548-7f2b98c6e4e1#top ] Disable digital signatures 1. On the Tools menu, click Form Options. 2. Under Category, click Digital Signatures, and then do one of the following:To disable digital signatures for the entire form template, click Do not enable digital signatures.To disable digital signatures for a specific part of the form template, click Enable digital signatures for specific data in the form, click the part of the form template in the Data in the form that can be signed list that you want to disable digital signatures for, and then click Remove.
-
How do you make an electronic signature in Word?
Does this option work - How to Create an Electronic Signature in Microsoft Word Documents?
-
How do I use a signature line in Microsoft Word?
You’ve had this problem, right? You type on the underscored line but the underscore moves and then you’ve got to underline what you just typed. Then you need to delete some of the underscores. Here’s an example of the first part of a legal document done the usual way, with underscores. As soon as you start typing, this is what happens: This is obviously a pain. But there’s a much simpler way. You can create a one-line table and use separate columns for sections that need to be typed into. Here’s the same information as a table. You can see the gridlines now, but won’t when you’re done. Now all you have to do is place bottom borders in the second and fourth columns and turn off the gridline display. Now you can type onto the lines with no problem. Here’s another example of using a table for signatures: If you click on View Gridlines, it looks like this: Create one or two of these tables and copy them with other names whenever you need a signature section.
-
How do I add a digital signature in word?
To add digital signature first decide on which side of the page you want this signature, then place cursor accordingly.After that go to Insert tab click on signature line window will appear, In that insert text which you would like to appear underneath the signature line;-· Suggested signer: The name of the person signing the document· Suggested signer’s Titel: Title means Dr or Ms etc· Suggested signer’s email id: Email of person who signs the document.· Instructions to the signer: If you want to give some instruction to signer person add here.Below that there are two check boxes are self-explanatory. After that press OK. A signature will be added.
-
How do I calculate indefinite integral of [math]e^{x^2}[/math]?
Integration of e^(x^2)
-
How do I add a signature into a word document?
First, be aware that this solution will add a signature image — and not a “digital signature” that may be required for legal reasons. Best to check what is required first.Signature images will look more authentic shown in color, and if they appear to have been “written” over the letter content.I recommend scanning (or photographing) a good color version of the letter-writer’s signature written on a white sheet. Save it as a GIF or PNG format image with the white background chosen as the “color” to be transparent. (Many image-editing applications can do this; search for a “transparency” opti...
-
How do I start startups in India?
Before starting I’d like to put a point that diving into the business after reading the overnight success stories is not a good idea. This is not to demoralize anybody. Everything encouraging and motivating starts below. This is a long answer because I have covered mostly everything you may need to know.-: If you're a student :-If you're a student, you can (and should) start your entrepreneurship now because currently you don't have to worry about earning your bread and butter as long as your parents are feeding you.You can start by:creating your own games/fun apps and upload them on play stores and earn by advertising.by creating tutorial videos on programming and upload them on YouTube and earn by advertising.Start blogging on a subject which is your favorite, you're well-skilled in and people may also find interesting. And again, earn by advertising.Ask the shoppers in your local market if they need any website/software (if you're from a small city; be mentally ready for this scenario: 1 out of 100 local vendors will be interested in your proposal, 1 out of 100 interested ones will give you a project and 1 out of 10 will give you full payment). This is slowest but the best approach. Once you have built a project, all you need to do is resell the same with minor changes to many business. And you don't realize but you really go in depth while learning the technologies, increasing your professional skills.Don't expect too much earnings in beginning. All the above-mentioned ideas need too much time for earning good. Unfortunately there are plenty of people who have idea and want to startup. Fortunately, few of them really start.Don't ignore your college. If you can't earn your bread and butter from your startup, you won't be able to survive after college. Situations may come when you may need to leave your business and find a job. At that time you may lack some skills you need to get the job — the skills you missed learning them in college because you were busy building your own company.-: If you're not a student :-Get experience. Find a job and continue it if you have already. Get to learn how companies bring new projects. How they advertise and do marketing. Learn how they execute and deliver the project. What difficulties do they face after delivery. After diving into business, you'll have to do/manage all that stuff by yourself.Don't leave the job until your business makes you earn more than your job. Really! You may have read a number of stories saying leave your job today and start business. But don't forget that they are selling their stories. They may write whatever they find interesting.Start your business when you have not a problem of survival. Without a job, you'll have to worry about your survival. Manage your bread and butter from your job, save money and invest it into your business. Once you feel you earn enough from your business to feed yourself and your family, leave the job immediately and concentrate on your business.In other words, I'm neither discouraging you to start a business nor insisting upon to continue your job for too long; I'm just pointing out that it will be good to wait for the right time to start your business. The time when you have enough knowledge of business, clients base and a rough idea of business processes and SOPs.-: About the legal things :-In India, there are many ways to start a business. Two of the most suitable for you:Setting up a private limited company: Needs at least 100000 rupees of initial capital, 20-30 days and at least two directors. Contact any CA (Chartered Acountant) or CS (Company Secretary) to start your own private limited company.At the end of every fiscal year (1 Apr - 31 Mar) you will need to file your balance sheets.Registering as a firm at local Administrative offices. If you want to start quickly and easily without hassles and large investments, this is the best option. Contact your Nagarpalika/Mahanagarpalika. They will issue you a certificate for a minimal charge of less than Rs. 300. It will take hardly 2-3 days. All you need to show them are your identity, the kind of business, address proofs of a physical office (may be a rented office or your friend's office or your own office) in a commercial building. (Don't show your home as your office otherwise your father may need to pay commercial taxes instead of residential taxes. Commercial Taxes are 3 to 4 times then residential taxes)Not necessary but recommended: If you're following this option, get a separate PAN card and Bank Account for your firm. In a long run, it will be beneficial when you will convert your firm into a company.About taxes: Don't worry for now. You do not need to pay income tax if you're earning less than 2.5 lakh a year. Once you cross this, you'll pay 10% of your income.Service tax: (at 14.5% on your services and that too payable by your customers) After your income has increased 10 lakh rupees a year.Other options are also available such as setting up a Public Limited Company or Limited Company or LLC. But they need too much investment and staff. So leave them for now.
-
What is the antiderivative of [math]e^{-x^2}[/math]?
The integral in this question can be expressed in terms of what is called a special function.The series expansion of [math]\displaystyle e^{-x^2}[/math] around [math]x = 0[/math] is expressed as (verified with Mathematica):[math]\displaystyle 1-x^2 +\frac{x^4}{2}-\frac{x^6}{6} +\frac{x^8}{24}-\frac{x^{10}}{120}+ …[/math]The series expansion above is symbolically written as:[math]\displaystyle e^{-x^2}=\sum _{n=0}^{\infty } \frac{\left(-x^2\right)^n}{n!}=\sum _{n=0}^{\infty } \frac{(-1)^n \left(x^2\right)^n}{n!}[/math]Using the last result above and integrating, we get:[math]\displaystyle \int e^{-x^2} \, dx = \int \left(\sum _{n=0}^{\infty } \frac{(-1)^n \left(x^2\right)^n}{n!}\right) \, dx=\sum _{n=0}^{\infty } \frac{(-1)^n x^{2 n+1}}{(2 n+1) n!}+C[/math]If we examine the infinite sum obtained above, and look at the series expansion of the error function which is given by:[math]\displaystyle \operatorname {erf} (x)={\frac {2}{\sqrt {\pi }}}\sum _{n=0}^{\infty }{\frac {(-1)^{n}x^{2n+1}}{n!(2n+1)}} \\ \displaystyle \qquad ={\frac {2}{\sqrt {\pi }}}\left(x-{\frac {x^{3}}{3}}+{\frac {x^{5}}{10}}-{\frac {x^{7}}{42}}+{\frac {x^{9}}{216}}-\cdots \right),[/math]we see that the integral in this question can be expressed as:[math]\displaystyle \boxed{\int e^{-x^2} \, dx =\sum _{n=0}^{\infty } \frac{(-1)^n x^{2 n+1}}{(2 n+1) n!}+C = \frac{1}{2} \sqrt{\pi }* \text{erf}(x)+C}[/math]Below is a plot of the integration solution:Note that the solution to the given indefinite integral could be found by using the definition of the error function:[math]\displaystyle \text{erf} (x)={\frac {2}{\sqrt {\pi }}}\int _{0}^{x}e^{-x^{2}}\,dx={\frac {2}{\sqrt {\pi }}}\int e^{-x^{2}}\,dx,[/math]so that we have:[math]\displaystyle \int e^{-x^{2}}\,dx = \frac {\sqrt{\pi}}{2} \text{erf}(x)+ constant[/math]Considering the representation of the error function via other general functions, the given integral can be also expressed in terms of the generalized hypergeometric function [math]\, _pF_q (a;b;x)[/math] in the following form:[math]\displaystyle \int e^{-x^2} \, dx= x* \, _1F_1\left(\frac{1}{2};\frac{3}{2};-x^2\right) + constant [/math]
-
How do you startup a online business in india?
Starting an online business in india is much simpler than ever. Even the government of India has taken initiatives (Startup India Scheme) to encourage individuals to start their own business. With the digital boom a lot of unprecedented opportunities started to pop. There are lot of businesses that are able to leverage this opportunity and create a successful establishment.Before you jump in and start an online business make sure that you have followed all the process to establish the enterprise as a legal entity. Comply with all the legal formalities so that if future you won’t be muddled with legal ramifications.The startup India scheme was launched in 2016 with a key idea to promote entrepreneurial spirits in India. The primary objective of this scheme is to promote startups, create wealth, and generate employment.You can register your startup online. When applying for registration your startup you need to consider presenting the below documents;Letter of recommendationLetter of funding (by state government or the government of India) to specify the scheme applicableCertificate of IncorporationBrief description of the businessThe information technology act has provisions to submit electronic forms. All filings done by the companies/LLPs under MCA21 e-Governance programme are required to be filed using Digital Signatures.Filing INC -29 for Certificate of Incorporation. When applying to apply for INC-29 you need to have the below particulars ready;DIN ( Director’s Identification Number )Name approvalMemorandum and Articles of association ( MOA & AOA )Registered office verificationFew opportunities that you could consider for starting an online businessStart an ecommerce businessStart online tutoring classCreate and monetize a blogBecome an affiliateStart a dropshipping businessStart freelancing opportunitiesStart an Ecommerce BusinessIt’s quite easy to start an ecommerce business. With a manifold of pre-built ecommerce platforms available you get the opportunity to test individual platforms before writing off a paycheck. Almost all the pre-built platform providers gives you a 15 day trial period to fiddle around. This gives you an addon advantage to experience the platform in realtime and understand the pros and cons. Every platform has a set of limitations, it’s better you keep yourself informed.Create an Ecommerce Business - Start A Trial Store!Starting an eCommerce business is like opening a new Facebook account. One small signup and you get everything you want to sell online. Ecommerce business is gaining a lot of significance among people. A lot of newbie entrepreneurs has tasted success with this online business opportunity.Few eCommerce Platforms to Start your Online StoreShopnixShopnix is a Bangalore based eCommerce platform provider. The eComm company was founded in the year 2011. The platform provider is custom created to meet the entrepreneurial needs of Indian entrepreneurs.Shopnix PlansQuicky:- INR 1,000/ monthStandard:- INR 2,000/ monthPro:- INR 5,000/ monthPremium:- INR 10,000/ monthShopifyShopify is a canadian based ecommerce platform provider. There are about 600,000 online stores and is considered as a leading eCommerce company. The Shopify platform support both online and offline sales.Shopify PlansBasic Shopify:- USD 29/ monthShopify:- USD 79/ monthAdvanced Shopify:- USD 299/ monthKartrocketKartrocket PlansEssential:- INR 3,500/ monthPremium:- INR 7,000/ monthPlatinum:- INR 12,000/ monthStart online tutoring classWhy start an online tutoring. There are lot’s of digital nomads who are looking for courses that will help them wet their skill sets on specific areas. Let’s say you are good in cooking. Why not create an online website through which you could share your talent with people who really want to learn cooking.Be it yoga, music, whatever it be if you have the talent/ skill sets, then try to teach people who are looking out for it. People are looking for online tutoring course because they could learn whatever they want, taht too based on their convenience.Create and monetize a blogBlogging is another opportunity that allows you to create your own digital identity. Through blogging you will get an opportunity to establish your domain authority in a specific niche. Blogging has so far helped a lot of people to gain recognition in the digital sphere. Once you are successful with blogging and succeed in establishing an authority you will be able to leverage on it. There are a lot of business entities that are looking out for genuine and passionate bloggers who could help them scale their business.At the same time once you realize that you are able to generate enough traffic to your website, then you could apply for Google Adsense. Through Google adsense you will get amazing opportunities to commercialize your website.Lookout for Affiliate Marketing OpportunitiesThere are lots of affiliate marketing opportunities that you could look into. There are lots of affiliates who successfully commercialize a clients product and bag a good sum as commission. Look out for websites that offers partnering programs and make sure to use the best out of it. The website will assign an affiliate link to you. When ever a customers makes a purchase through the affiliate link the website will pay a percentage of the sale as commission.Start a DropShipping BusinessDropshipping business is one business model that has gained signNow importance among newbie entrepreneurs. The initial investment for this business model is too low. You need an eCommerce store to list the products and a set budget to commercialize your business online.In dropshipping business model you don’t own the products. You will enter into an agreement with few companies agreeing that you will be happy to list few products on your website. Once a sale happens to materialize through your website then the business needs fulfill the online purchase.Create an eCommerce Store and Start Drop-Shipping
Trusted esignature solution— what our customers are saying


Get legally-binding signatures now!
Frequently asked questions
How do i add an electronic signature to a word document?
How to get electronic signature capability?
How to sign out of my comcastlnet e-mail?
Get more for How Do I Integrate eSignature in Word
- Can I eSignature California Real Estate Contract
- eSignature Oklahoma Plumbing Rental Application Secure
- How Can I eSignature Connecticut Real Estate Quitclaim Deed
- eSignature Pennsylvania Plumbing Business Plan Template Safe
- eSignature Florida Real Estate Quitclaim Deed Online
- eSignature Arizona Sports Moving Checklist Now
- eSignature South Dakota Plumbing Emergency Contact Form Mobile
- eSignature South Dakota Plumbing Emergency Contact Form Safe
Find out other How Do I Integrate eSignature in Word
- Kulsat form
- 136011 form
- Washingtonstateparksdisabilitypass form
- Aventa application form
- Point of view worksheet 15 answer key form
- Sidemount tec log book ai sergio destro diving instructor form
- Application for permit to install floating structures and form
- Va indebtedness disclosure form
- Tour de cure release form
- Mb1 form pdf
- Ihrd previous question papers form
- Office space rental contract template form
- Modelo sc 811 form
- Tawana land board form
- Ace program approval formgatefold 2 stony brook university stonybrook
- Tuition registration form
- Cif memo form
- Dd form 1610 example
- Request for compensatory time off for travel dodea am dodea form
- Navrachana international school admission form