Simplify Client Contact Management with airSlate SignNow
airSlate SignNow regularly wins awards for ease of use and setup


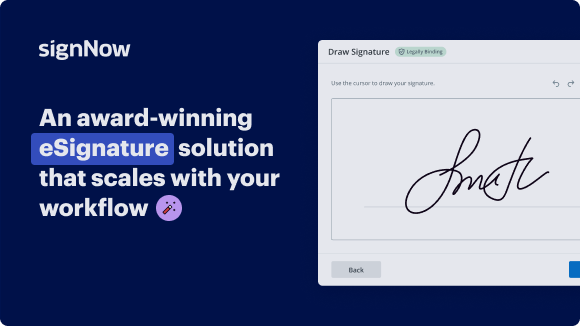
See airSlate SignNow eSignatures in action
Our user reviews speak for themselves


Why choose airSlate SignNow
-
Free 7-day trial. Choose the plan you need and try it risk-free.
-
Honest pricing for full-featured plans. airSlate SignNow offers subscription plans with no overages or hidden fees at renewal.
-
Enterprise-grade security. airSlate SignNow helps you comply with global security standards.

Client Contact Management
Steps to Use airSlate SignNow for Efficient Client Contact Management:
airSlate SignNow empowers businesses to streamline the process of sending and eSigning documents with ease. It offers a cost-effective solution that is user-friendly and scalable for businesses of all sizes. With transparent pricing and superior 24/7 support, airSlate SignNow stands out as a reliable choice for client contact management.
Improve your client contact management process today with airSlate SignNow!
airSlate SignNow features that users love


Get legally-binding signatures now!
FAQs online signature
-
What is an example of contact management?
For example, you can collect email addresses by setting up lead generation forms and then have your CRM automatically create new entries for each contact that signs up. Or customize the emails you send to a lead based on how they interact with your previous communication.
-
What is the difference between CRM and contract management?
A contract management system acts as a repository for contracts whereas a CRM or customer relationship management system keeps track of commercial opportunities and client interactions.
-
What is the difference between contact management and CRM?
While contact management is one feature of CRM, its capabilities go far beyond the scope of a simple contact management system, such as: Maintaining detailed contact profiles, leading to more personalized interactions. Tracking opportunities with a visual sales pipeline.
-
How do you manage customer contact?
8 Best Ways to Organize Client Information Centralize Access to Data. The first and foremost thing to ensure is centralized access to contact data. ... Filter & Segment Contacts. ... Add Custom Fields & Notes. ... Enrich With Social Profiles. ... Keep Data Clean. ... Ensure Security. ... Enable Synchronization & Updates. ... Invest in the Right Tools.
-
What is an example of contact management in CRM?
For example, you can collect email addresses by setting up lead generation forms and then have your CRM automatically create new entries for each contact that signs up. Or customize the emails you send to a lead based on how they interact with your previous communication.
-
What is the difference between CRM and CSM?
The primary difference between CSM and CRM is their focus. CSM focuses on ensuring that customers achieve their desired outcomes, while CRM focuses on managing and analyzing customer data to enhance the overall customer experience.
-
What is client contact management?
Contact management is the process of recording and tracking all customer interactions within an organization.
-
What is the difference between a CRM and a contact center?
A contact center performs the customer service function for organizations, assisting customers with inquiries from multiple service channels. Contact center CRM refers to the customer relationship management (CRM) application many agents use when serving customers.
Trusted e-signature solution — what our customers are saying


Related searches to make a sign

How to create outlook signature
welcome to another tech help video brought to you by accesslearningzone.com my name is richard ross your instructor in today's video i'm going to show you how to take that free customer template that we built a few weeks ago and we're going to add contacts to it so every time you talk to a customer you can track it in a sub form right on the customer's main form and i'm also going to throw in a bonus free extended cut that normally goes for just the members i'm going to show you how to create a status box on your main menu and make a button so when we click on the button it'll show hello world in that status box you can use that status box for displaying pretty much any kind of message that you want and that's going to be a free extended cut at the end of this video stay tuned today's question comes from brandon from toledo ohio a silver member brandon says i've been using your free customer template for a while now thank you it was very helpful to get me started how can i track contacts with my customers each time i talk to them i've been putting stuff in the notes field but they're getting kind of full advice well brandon i've got a separate video that covers setting up relationships between two tables you want to put the contacts for those customers in a different table that way there's no limit to the amount of information you can store there i'm going to put a link to that video in the description down below this one so go watch that first but since you brought this up i'm also going to show you how to put contacts in a subform in the template that you have right now the old customer template and the reason why is because i myself find that every time i do a new class or a tech help video i've been using that template and having to rebuild this multiple times so in this video we're going to add that contacts subform to the main form but go watch the relationships video first it better explains how relationships are made then come back and watch this one and i'll walk you through setting up that subform and then when we're done with that we'll set up this hello world stuff but that'll be at the end of the lesson okay so this is the blank template with the customer form and the customer list in it and if you haven't watched the video where i create this go watch that now i'll put a link down in the description below the video watch that first so you know how i built this now i've been using this blank template in a lot of my other videos which is why i built it in the first place and i keep finding myself wanting to add a couple of things to it because every time i start a video i always end up adding a couple of things the same things first i want to add a status box then i want to add contacts something to have a relationship with because i do a lot of videos on relationships so i'm going to make another level of this which is going to be customers with contacts and we're going to put a status box in the main menu alright the first thing i'm going to show you is a little trick now a lot of people ask me this if i open up my customer table notice how my ids go one two three eight okay this happens sometimes i must have added four five and six then deleted them added seven deleted it now eight was the next one when i typed in john lee picard if you don't have any other tables in the database yet just your customers okay so these ids aren't linked anywhere and you want to reset them one two three four here's how it's a quick little trick first we're going to copy and paste the structure of our table so copy ctrl c and then paste ctrl v and then just put structure only that will copy the table itself but not the data in it okay so my auto numbers are all reset now since the fields are the same open up customer t copy these four records ctrl c open up the copy table click and then paste them in and now i got one two three four the auto numbers will reset and they'll all be one after the other again don't do this if these ids are used in another table because it will scramble all of your data but for me i just wanted to reset that auto number because every time i open up a class right and i'm in here and i'm like oh why is it eight i want one two three four that's just it's purely cosmetic again you shouldn't worry about what that auto number is at all all right i'm just doing it for class because everybody always asks me why is it eight now i can delete the old customer t and just rename this one customer t alright and again it's purely cosmetic you don't have to worry about that there's my customer form and my customer list okay everyone is back to where i wanted them now let's add a quick contact management in here so create and then table design first up now if you if you don't know about table relationships go watch my relationships video i'll put a link down below go watch that first alright so you understand how to make relationships between two tables this is just a quickie for updating the customer template we're going to have a contact id and to me a contact is anytime you talk to somebody or they come in your store you call them on the phone that's a contact an instance of a contact that'll be my auto number then i'll have a customer id so i know who i was talking to that'll be a number of type long integer that's my foreign key it's going to point to the customer table then we've got a contact date time or just contact dates fine keep it short and that will be a date time i'm going to set the default value equals now that is the date and time and access will automatically put that in there each time i add a record again if you're not familiar with the default value property i got a video for that too go look down the links below the video and i'll point you to it then we've got description which will be short text and then notes which will be long text and i differentiate between the two the description can be something short and sweet whereas notes can be as pretty much as much information as you want to type in long details short text fields have benefits like they're better to index you can search and sort them better and stuff like that but i like to put one of each in there and then if you want to put something in here like a follow-up and that'll be a yes no field and if you want to follow up with this person just check that box okay and we can make a follow-up query later on and you can see who are all the contacts that i still have to follow up with all right so i'm going to save that as my contact t my contact table primary key yes that's the auto number right there now we're going to set up a contact form for each customer but i want to set this up so it's going to be a sub form inside of the customers form so when i open up the customer form okay maybe uh over here we'll see their cut last couple contacts now fortunately because this is my blank template i've got a continuous form blank set up right here so we can just copy this guy right that's the whole point of these templates copy paste this will be the contact f and now we just modify this guy right click design view first thing i'm going to do is change colors a little bit let's uh so it looks different all right and this is something we'll have to do each time let's go with um let's go with this reddish color here for my contacts there we go let's go with that and then maybe that one okay let's set up the record source as contact t continuous forms is good everything else looks fine in here now we don't need the contact id and we actually don't need the customer id either because as soon as we make this a sub form there's going to be a relationship formed by the link fields i'll show you that in a second so what fields do we need in here again taking a look at our table we got the contact date we can put in there the description the notes and the follow-up so here's what we're going to do this guy is already here so let's set this one equal to control source is going to be the date let's say make sure you copy that put it up here in the name i'm going to put a format in here of mm d d y y h h colon n n remember n is for minute all right now this will be in military format which is okay with me all right i like to see the 1600 but you could change that if you want to actually let me change let me change that because i know most of my students don't like that let's go am slash pm after that all right make it easy make it for better for everybody in my personal databases i just use 24 hour format all right the other fields will bring in from the add existing fields box which is right there let's take the description and put it there i'll just delete that label because i'll copy the one off the top there's a description maybe about yay big actually let's bring the description actually we have to remember this is going to fit inside of a form inside of the customer form so we're not going to get huge so let's make the description about this big and what we're going to do is we're going to put notes down here in the footer like this you'll see where i'm going with this in a second alright there's notes and follow-up will be right down here like there now maybe up top see what it looks like okay let's make that white all right that looks a little dark actually let's go a little darker down here there we go follow up and that can shrink up to there notes i'm going to make notes like that yellow background there we go all right let's see what everything looks like let's save this close it open it back up again oh i open the table my bad contacts there we go looks good let's maybe left justify that and we can actually make it a little bit smaller design view let's go left justified left align i should say all right and let's make this guy not a tab stop open it up find tab stop where is that under other tab stop is no that way when i when i open this up or when i tab to it it doesn't start here in the date field it just starts over here alright so i can type in my stuff right away let's fix our labels across the top slide this over here change this guy to date time that's a label remember and we'll put in here notes save it close it one more peek okay looks good now we're going to make this a sub form inside of this guy so right click design view where do we want to put it let's make this a bigger form going vertically so let's do this let's take this family size and all this content move it over here like that that looks good all right we'll put is active right there all right that looks good let's take these notes and slide them down here on the bottom like that the customer's notes will go there all right looks good now we got plenty of room here for that sub form so all we're going to do is take the contact f right from here click drag drop there it goes all right delete that little label that comes in with it we're going to slide this guy up here maybe put it right about there let's do it and we can make this nice and big like so all right slide this edge in if you want to put a label above that to kind of describe what that is you can right we'll just copy one of these labels copy paste slide it over here and we'll type in contacts contact history save it close it now let's open it up boom look at that form subform so now when this person contacts me you can click right here in the notes you know um called about a job tab and it goes right to the next one right uh came in for interview now what i like to do is if there's if there's stuff down here i like to put a little star in here that just kind of indicates that there's more notes down here and i was impressed with his whatever and i want to follow up on it see oh look at that i forgot to turn that off that uh that color there that's uh that's actually in the template and there's really no getting around that design view the alternating background color right we changed the color for here all right we've got to change that background color to there and you'll know what i mean if you watch the other video okay see yeah you could programmatically do it so if there are notes down here you can have a little symbol or something show up up top here you can do that this is just something that i do informally i do it in microsoft excuse me in google calendars i use google calendars and if i put something in my calendar and i want to remind myself that i've got notes down below i put a little star in the title there is a way that you could do this with vba and if anyone wants to see it let me know send me a note and i can do a video on that now how does access know that these are contacts for richard ross if i go to a different customer if i open up let's say jean-luc right there's no information there well if you go into design view and again if you watch my form and subform lesson which again i'll put i'll put a link down in the description below if you look at the properties for this object for this subform not this guy that's the form this is the form properties for the form inside of here what you want is it's slightly different it's the border right here is the sub form all right make sure it says sub form there all right but if you go to data you'll see right here link master fields link child fields customer id is in both of those okay access knew to do that when we created the relationship when we put the subform inside of the main form all right to properly guess that because it saw that was the primary key field so now you don't need contact id in here because i don't really care to see it okay and i'm not going to refer to it anywhere else and you don't have to put customer id in here because access will automatically fill the customer id in for you because of that relationship so if i open up you know jim kirk open customer all right up just a little bit more there we go all right let's save it there all right if i put in here you know uh fought klingons okay now if i go back to my record it doesn't show up there because it's related if you look in the table all right here's the here's the dates and all that and the customer id is properly put in there for you by that relationship all right and now since you're tracking follow-ups you can easily make yourself a query to pull up show me all my follow-ups all right you can do that for homework if you want to and if anyone wants to see it drop me a line maybe i'll make a video on it real easy to do i've got videos on that too i'm making queries okay so that is adding sub form and a relationship to our template which i want to do because a lot of the videos that i do have to deal with relationships oh the reason for this down here by the way is that you can put the extra information here and notice it's linked to whatever record i'm on up top okay this field down here this notes field this long text field will be for whatever record i am on up top here see that okay you can put follow-up appear if you want to i think it works fine down there okay now the next thing that i find myself putting in a lot of my videos is a status box now this is a little more advanced this involves some programming okay but i want to put it in my beginner template because i do this in pretty much all of my developer classes lately i've been adding this in and i've been using this template for it so you're getting a sneak preview of some visual basic training okay it's basically a little box in the main menu where i can click a button and it says something all right and the whatever it says is whatever i happen to be covering in that class like like lately i've been doing record sets and you can loop through tables and stuff with your visual basic code and i like to use the status box to show what's happening so here's what's going to happen right click design view we're going to put a big gray box on here so go to text boxes drop it right here delete the little label that comes in with it okay you can put it anywhere you want you can put it down on the bottom you can put it up top i like to put it like over here because sometimes these can get long you want to see status information and i want to make it gray because i don't want to let the user think they can type stuff in here okay open the properties up go to all we're going to call this guy the status box status box okay and that's it for that now i'm going to drop a button down here so i'm going to design command button drop that down here cancel the wizard all right and whatever you want to put in this box is what's going to show up in the status box so what are we going to put in here well for this class just a sample we'll put in like hello world all right that's usually your first program when you start programming like in basic i started back in the 80s in a trs-80 uh radio shack computer and what you do is you do like in basic you do like 10 print hello world and it shows up on the screen right and then you do 20 go to 10 and it just loops and everyone thinks it's cool all right so we'll do a hello world example all right and before we put some code in this button we're going to double click on it and give it a good name right here i don't like command 9 and my buddy alex will yell at me if i leave it like that so i'll just put in here hello world button btn that's the name of that button all right now we're ready to put some code in it easiest way right click go to build event that's off my screen hang on i'll let you see it right click and then build event there it is that opens up the visual basic for applications the vba window you may see a prompt before this asking you what kind of builder do you want pick the code builder c-o-d-e code builder i have my database defaulted to that because i never use the other builders so this is where we write the code that runs when you push that command button so i could just come in here and say something like message box hello world like that all right save it come back over to my database and let's save this guy and reopen it there we go now if i hit hello world there's my message box hello world but i don't want that to show up here in a message box i want it to be in my status box that's the whole reason for the status box so let's go back to the vba editor i just leave them both open on the bottom by the way never close this window just leave it open you can either minimize it or you can click on the access window behind it okay i want to put this inside that status box and i'm going to make a private subroutine to do that for me so private sub status and then i'm going to send it some information s as a string and inside of here i'm going to say status box equals s and vb new line and status box do events all right and that's it that's that simple what does that mean well i'm going to call the subroutine status i'm going to send it some information s in this case whatever it is whatever i want to appear in that box then i'm going to set the status box equal to s plus a blank line plus whatever the status box had in it previously that way i can get it to add more stuff to itself now new stuff will come up on top of the window so you got to kind of read it backwards but that's okay that doesn't bother me all right it's a whole lot easier than putting stuff in the box and having to scroll to the bottom that's possible but it causes flashing on the screen so just get in the habit for these status boxes or reading stuff backwards that's all do events is so that in case i'm calling status inside of a loop like in a record set loop i don't want the system basically freezing up it won't update the screen if you don't issue it do events do event says forget what you're doing and go ahead and let the rest of the processes that are running take over all right that's all do events is now here instead of message box hello world i'm going to say status hello world and it'll call my status subroutine right there okay so now if i come back over here and push my button boom hello world it goes in the status box hit it again hit it again hit it again hit it again all right and if you want a time on there you can put a time index in there somewhere you could do like right here you could do format uh now comma uh just h colon nnn is usually good enough like that and then maybe a colon space right that'll put the hour and minute in there and then a colon so you can do this you can go status like that and it puts the hour and minute in there okay i'm not going to do that for the final version i don't really care all right just for my template i just want that okay see this way if i'm running something else it can status we can actually make that font a little smaller let's come in here and go format let's make it maybe nine point yeah it looks better status box wouldn't have to be that big there you want to see a loop real quick because i'll give you an idea what's what's happening you could say like in here you can say like dimx as an integer for x equals 1 to 10 right and then you can status hello world and then and x and then next like that all right now i'll put 10 of them in there see there you go there's a simple loop okay but again i don't want all that in there for my template so we'll just get rid of that stuff i just want to show you a couple tricks why i want this in there because when i start doing other code other classes then you know i don't have to rebuild all this now because i just did developer 19 and i was rebuilding all this every time i did a lesson now i can just say go download the template and we're going to start from here now for those of you who are not members on my youtube channel yet this is the kind of thing that i do for the extended cut for the for the members videos like the the free tech help video would have been adding in this stuff the contact stuff and then i'm like well for members we're going to do a little something extra and i'll do this i'll show more that's what the extended cuts are for so if you're not a member yet this is some some ever some free advertising for me since i just showed you some stuff i get to advertise for a second okay uh that's how this works i strongly suggest join my channel it's it's what am i charging now 5.99 a month it's not much a month and i've got i try to do two or three extended cuts every week so there you go this template will now be added to the templates that are on my website you could download it for free just follow the links in the description down below and if you have any questions of course feel free to post them thanks take care how do you become a member click on the join button below the video silver members and up will get access to all of my extended cut tech help videos live video and chat sessions and other perks after you click the join button you'll see a list of all the different membership levels that are available each with its own special perks but don't worry these tech help videos are going to keep coming as long as you keep watching them i'll keep making more and they'll always be free if you enjoyed this video please give me a thumbs up and feel free to share it wherever you think it might help people who are interested in access make sure you subscribe to my channel which is completely free and click on the bell icon to select all to be notified every time i post a new video youtube no longer sends out email notifications when new videos are posted so if you'd like to get an email every time i post a new video click on the link below to join my mailing list click on the show more link below the video to find additional resources and links you'll see a list of other videos additional information related to the current topic free lessons and lots more now if you have not yet tried my free access level one course check it out now it covers all the basics of microsoft access it's over three hours long and you can find it on my website or on my youtube channel i'll include a link below you can click on and if you like level one level two is just one dollar and that is free for all members of my youtube channel at any level want to have your question answered in a video just like this one visit my tech help page and you can send me your question there if you have a specific problem you need help with or you'd like to discuss having a database built for your needs i do offer one-on-one consulting be sure to follow my blog and find me on facebook twitter and of course youtube once again my name is richard rost thank you for watching this tech help video brought to you by accesslearningzone.com i hope you enjoyed this video and you learned something today i'll see you again soon you
Show moreExplore other deals cases
- Streamline Your Lead Qualification Funnel with airSlate SignNow
- Streamline Lead Nurturing with airSlate SignNow
- Streamline Your Customer Development Funnel with airSlate SignNow
- Revolutionize Your Sales Funnel Development with airSlate SignNow
- Boost Sales Conversion Funnel with airSlate SignNow
- Revolutionize Your Sales Process with our Sales Automation CRM Software
- Revolutionize Your Business with our Sales Order System
- Revolutionize Your Workflow with Top Customer Service Management Tools