Streamline Lead Nurturing Activities with airSlate SignNow
airSlate SignNow regularly wins awards for ease of use and setup


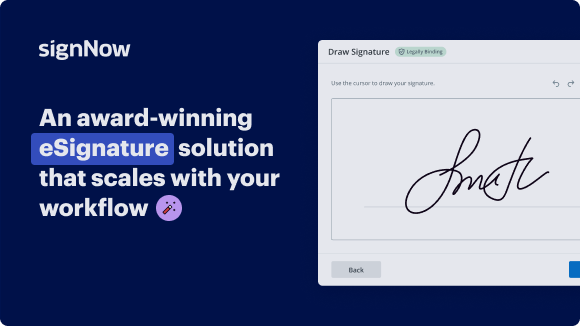
See airSlate SignNow eSignatures in action
Our user reviews speak for themselves


Why choose airSlate SignNow
-
Free 7-day trial. Choose the plan you need and try it risk-free.
-
Honest pricing for full-featured plans. airSlate SignNow offers subscription plans with no overages or hidden fees at renewal.
-
Enterprise-grade security. airSlate SignNow helps you comply with global security standards.

Lead Nurturing Activities
airSlate SignNow benefits
airSlate SignNow empowers businesses to send and eSign documents with an easy-to-use, cost-effective solution. It offers a great ROI with a rich feature set, is tailored for SMBs and Mid-Market, has transparent pricing with no hidden fees, and provides superior 24/7 support for all paid plans.
Experience the benefits of airSlate SignNow today and streamline your document signing process!
airSlate SignNow features that users love


Get legally-binding signatures now!
FAQs online signature
-
What is an example of lead nurturing?
Taking an omnichannel approach to your lead nurturing strategy will go a long way. Try retargeting your leads on social media or search, using pop-up messages or offers when they visit your website, and using live chat or chatbots to reengage them at critical moments.
-
What is an example of nurturing?
Some examples of nurturing behavior are: being fully present in your interactions with children (verbally and non-verbally), validating their feelings, providing physical affection and comfort when sought, laughing and playing games, providing safe mental, physical and social challenges that promote healthy growth and ...
-
What are lead nurturing strategies?
Lead nurturing is about helping buyers along in their educational journey. Which is why it's most effective when triggered by prospect activity or behaviors. Lead management technologies are often used to automate such real-time marketing.
-
How do you create lead nurturing?
How to create a lead nurturing strategy? Understand the stages of a sales funnel. ... Align marketing and sales to uncover common objections. ... Identify and segment high-quality leads. ... Build out your email marketing campaigns. ... Create targeted content. ... Track, measure, and analyze.
-
What are lead nurturing activities?
At its core, lead nurturing is the process of cultivating leads that are not yet ready to buy. Successful lead nurturing anticipates the needs of the buyer based on who they are (using profile characteristics, such as title, role, industry, and so on) and where they are in the buying process.
-
Which of these is an example of lead nurturing in action?
timely response to a customer engaged Call To Action is an example of nurturing a lead.
-
How do you effectively nurture leads?
The best practices below will help you streamline the lead nurturing process and avoid mistakes or missed opportunities. Clean up your contact list. ... Align sales and marketing teams. ... Pick measurable goals for each campaign. ... Use targeted, personalized content whenever possible. ... Don't forget to follow up.
Trusted e-signature solution — what our customers are saying


Related searches to make a sign

How to create outlook signature
hi and welcome to inbound explain my name is shannon and in today's video we're going to be talking about building a lead nurturing workflow within hubspot lead nurturing is an essential technique within inbound marketing because it allows you to keep in touch with your audience as well as move them along the conversion funnel to do lead nurturing we use marketing automation and within hubspot specifically we use workflows so in this video i'm going to run through three major steps to create a lead nurturing workflow which will be step one create your audience step two create your emails and then finally the third step which is to create the actual workflow itself so let's get started the first step to creating a lead nurturing workflow is to segment your different audiences this is an important first step because you're going to have different workflows depending on the different audiences audiences that you've had this is especially important for people who are more bottom of the funnel versus top of the funnel or people that are in different industries or just people who have taken different actions on your website you want to make sure that these audiences are getting the most relevant communications based on what they've already done with you so the way that you can segment your audiences is you want to go over to contacts and then at the bottom go to list then you're going to go over to the right hand corner and you're going to click create list so from here hubspot will give you a few different options for this example we're going to stick with contact based and we're also going to stick with an active list so an active list means that hubspot will continually add new contacts into this list if they meet the qualifying factors that we're going to set up in the next step so go ahead and press next and this is where we can set up the qualifying factors so hubspot gives you so many different options on ways to narrow down your list um and really i encourage you to just go into the tool and to look at the different properties uh that they give you because the options are are really endless and it's too much to go over every single option in this video but for a hypothetical let's say that we want to create an audience that is within a certain industry and that has downloaded a form on our or that has filled out a form on our website in order to download an e-book or a white paper or some sort of content piece like that so the way that we're going to do that is the first thing we want to do is we want to come over into form submissions and this will narrow down people who have downloaded this specific form so let's see if we have a test form we can go ahead and click this one and we're just going to leave it on any page for this example but you can narrow down to where the contact has filled the form so if you have a form that exists on multiple different pages on your website but you only want to narrow it down to one of those landing pages you can go ahead and do that using this drop bar right here so we're going to go ahead and apply that filter now you're going to see that in our account no contacts are going to pop up in this area right here this is because i'm using one of our test accounts right now but if you were to do this uh within your own hubspot you will begin to see hubspot narrowing down these contacts if you have anybody who applies to the qualifying factors that you're setting up so another thing that we want to say is we want to ensure that these people are in a specific industry so another way that we can do that is we can click and here and let's go to contact properties so here we can see if they are in a certain industry there we go and hubspot will give you a few different options so the great thing about hubspot is you can include but you can also exclude so say you want to build a list and you don't want to have anybody in the marketing industry um just as an example so hubspot gives you a few different ways to try to help this happen so you can take a look at the different options that it gives you and set the parameters as you need so let's say for this example we want somebody who will be in the um let's say that they're in the translations industry so we'll go with trans maybe we're a translations company and you're going to press enter on your keyboard and then you're going to apply that filter so again you're not going to see any contacts but in a real life example you would um hubspot also gives you the option to do or so right now what we're telling hubspot is anybody who has filled out this specific form on any of the pages and has indicated that they are in the translations industry will be added to this contact list but you can also tell hubspot or they can have these different qualifying factors and they should still be added to that list so that's when you can press the or button here and fill out any of the other parameters that are important to you so again i really encourage you to go ahead and look through all these different uh parameters that hubspot gives you because it's just too much to get into in in one video but hubspot does give you incredible um narrowing factors in order to build a list exactly to what you need to be one thing before we move on to the next step don't forget to name your list as it's super important for making sure that you can find it in the future um and i recommend keeping some sort of standard when when creating these names to keep it as easy as possible so the next thing we have to talk about is creating an email this is step two so the way that you'll create the email is you'll go over to marketing and then email now creating emails is a huge huge step and it's actually something that we have already reviewed in our marketing hub hubspot tutorial so i recommend that you watch that if you don't know how to build an email um also with building the emails i recommend that you go ahead and you build out these emails before you even touch anything in the workflows part of the tool um this will just be a lot easier when you actually do start to build the workflows because you can just drag and drop them instead of having to build the workflow go back to the email it'll just be easier just to have it all ready and done when creating your emails there's a few important things you want to think about including the subject line so how are you going to get people to click on your emails as well as the content within your emails so again you want to make sure that all the content that is inside of your emails is relevant to the audience that you're reaching out to and it makes sense and would be interesting for that audience you always have to be mindful of the phase of the customer journey that the audience is with your company when you create this content for them so the final step to creating a lead nurturing workflow is to actually build the workflow itself so let's go over and head into the workflows tool but actually before you should even go into the workflows section within hubspot i actually recommend that you take the time to either brainstorm with your team members or get out a piece of pen and paper and actually map the different steps that you would like the workflow to take this will just help you when you're actually creating the workflow and hubspot to keep your ideas in check and to keep everything uh in line so now let's go over to create workflow and we're going to be starting from scratch and we're also going to stay with contact based since we'll be using that list that we created and let's go ahead and give the workflow a name so we'll say inbound explained demo and click next so from here you can start to actually create your workflow so like many other features within hubspot hubspot gives you a lot a lot of options and it can be a little bit overwhelming in the beginning the first thing that i recommend that you do is to set a goal so setting a goal is super important because it helps you understand what you want the final action that you want your audience to take and it's also really important logistically because it will take the it will stop the workflow for your um for the contacts in your list who actually do take that final step so this is actually a super important thing to set up that way they're not gonna keep getting uh emails that aren't relevant to them anymore so for this example let's say we want this workflow to send them content that's that's relevant and entertaining um with the ultimate goal that they are going to want to book a phone call with us to talk about whatever it is we're selling so um within hubspot to do that we would have likely a form that they would fill out to schedule that call or schedule that demo so we'll say that a form submission is our final goal and we'll just choose any form that we have here on this account and so now what we're telling hubspot is once they have filled out this once the contact within our list has filled out this form stop the workflow so we'll already go and we'll have that and you can have a few different options if you want so if there's a few different forms that they can fill out or different qualifying factors you can go ahead and set that up so now that you've set up a goal it's time to actually build the actual workflow so this is when mapping out the workflow on a piece of paper beforehand will really come in handy because that way you won't be struggling to come up with the different options you'll already have it on deck and you can just pop them right into hubspot so the first thing we want to do is we want to set our enrollment trigger so what this is is this is the very first action that somebody in the contact list has to take in order to activate the workflow in this example we are going to say that somebody downloaded an ebook off of our website in order to activate this workflow so to do that we're going to press form submission we're going to pull up the form which we'll just use another test form and we're not going to specify a landing page on this example but for you it might be worthy to specify a landing page and we're gonna go and click apply filter so hubspot like before will give you a few different options to add some different variables go ahead and play around and see what works for you the different variables will just depend on the different factors that you want to include for including somebody into this workflow for us we'll just go ahead and click save so since they filled out an ebook on our website we want to go ahead and send them that ebook using an email so this will be our very first email in our workflow so we're going to press the add symbol we're gonna scroll down to where we see send email and we're gonna choose our already pre-created email to send to them so i'm gonna send them this one that we already have as a test email and click save so now what we're telling hubspot is anybody who has filled out this specific form on any of our landing pages will immediately get sent our bofu1 email so this is great this is a super um common workflow that you'll have but to make it a lead nurturing workflow we're going to have to add some more steps so now that the contact has already gotten one email we want to start sending them relevant content that will be related to the ebook or to the content that you send to them in the first place so but we don't want to do this right away we don't want to spam them so the first thing we're going to do is add a delay so we're going to click the add symbol and then hubspot gives you a few different options we're going to delay for a few days we'll just choose a set time and here we'll go ahead and choose three days so after that three day delay we'll go ahead and we will now send the second email so we'll go down here and press send email again and let's go and do bofu2 and click save so we've already sent them one email with the ebook we've waited three days and now we've sent them another email i recommend that we should add another delay so let's go ahead and do that we'll do another three days and click save so now this is where hubspot gets really interesting um hubspot will give you a few different options for if then scenarios so let's go ahead and press the plus sign and we'll go to the if then branch so what this is talking about is maybe we we don't want to send the third email to the contact if they haven't interacted with either of the first emails at that point it might be spam or maybe they're just not interested or maybe what we're sending them isn't as relevant as we thought it was in the beginning so in order to stop that from happening for some contacts but continue happening for others who are actually interested in the content we can use this if then branch so for this example here let's say if somebody hasn't opened the bofu 2 email they're going to stop receiving um any more emails from us but if they have continued to open that email um then they will receive the third email so the way that we do this is hubspot will give us two options they give you a yes option at the top so we'll give that a name so we'll say opened bofu to and we'll click marketing emails and then we'll find bofu too and we'll say the contact open the email and then hubspot will also give you the the no option so we'll say did not open bofu so the way that this looks on hubspot is you get a branch so just to review what we have going on here any contact that filled out a form well not any contact any contact within our list that has filled out a form on any page will be sent our bofu one email three days will go by then they'll get our bofu2 email another three days will go by and then hubspot will determine after those three days whether the this contact has or has not opened the email so if they did not open bofu too for this example we're just going to go ahead and stop the communication as you can see hubspot does give you more options here so the the workflow does not have to stop and you can have some sort of action after maybe you can send them an email that says are you still interested or something else um but for this example we're gonna go ahead and we're gonna stick with the they did with the option that says that they did open that email so we'll go ahead into openedbofu2 and we'll go ahead and we'll send them the third email so we'll go back here send email and let's pull up bofu3 and save so now that we have our third email um this is where we have a few more options so you can continue on with the workflow as is and you can keep sending them emails or um you can start working internally to reach out to this contact and and contact them personally or you can send them an email with a link to the form to set up a meeting at this point it's really up to you and i encourage you to go ahead and look through the different options that hubspot has of different actions you can take as a quick example you could set up an internal email notification so once the contact has been sent that third email we can go ahead and send up an internal email so this is an email that we'll send to somebody on your team and you can make the body you know the subject and the body open third email or send send email to this contact um it's a good way to ramp up the internal activity now that the contact has been moved along the funnel another way you can do that is you can create a task so this will be within hubspot itself um and the notification will get sent to one of the team member that gets assigned to the task so you really have a lot of options um again there's there's just too many to review every single one of them within this quick tutorial but i recommend you just go ahead and play around make some practice workflows and and see what you can come up with it's important to remember that whatever the final action that you want the contacted take which is what we set up in our goal section it's important to remember that you have to include whatever that qualifying action was into your email or into into that workflow so that the contact has the chance to take that final action so after you've set up your workflow and again it can get way more in depth than this you're not totally done yet you still have a few more things that you have to do within hubspot to activate the workflow so let's go ahead and go to settings and review what that is so hubspot will just ask you a few different questions you can also choose a campaign to to associate the workflow with and this will help you with tracking the success of the email then we can also go to unenrollment and suppression so when contacts enroll in this workflow it gives you a few different options you can choose and just read these and make sure that it all flows within the certain context that you want to be reaching out to you can also track the performance of how the workflows are going so obviously it's not going to show anything right now because the workflows aren't activated but once the workflows are activated hubspot will continually update this page with information so you understand how it's going and then hubspot will also show you the history of how the workflow is advancing so once you have that once you've set everything up to your liking you can go ahead and click review so the last step to creating your workflow is reviewing so this is where hubspot will ask you that everything's in line and this is also an important step because this is where you will go ahead and add in that list that we created in that first step so go ahead and choose whatever applies to you here and then as far as adding in that list you want to go to contacts enroll when so what hubspot is showing you right here is um the the trigger criteria so this was the first action um that we set up in our workflow but we don't just want anybody who takes that action to be enrolled in this workflow right we want to make sure that it's applicable to our list so we're going to go ahead and go and click edit and then right here where it says and is where we're going to go and apply our list that we created in that very first step so go and click list membership and then choose the the list that applies to you so we'll go ahead and click demo tutorial and apply filter and so now what we're saying is we want to trigger the workflow workflow when someone has filled out our form and they are a member of our specific list that they have created so they have to have these two qualifying factors in order to have that action take place so go ahead and click save there and then you can go ahead and choose the different factors that are important to you um again these will all just kind of depend on the specific goal of your lead nurturing and what you want to get out of this workflow and then here is where our goal comes in so this is the goal that we set up before we created the workflow again here it's the same form as we have up up here which in a real life situation this would this would not make sense so you want to make sure that those are two different forms so when once anybody has filled out that form they will be taken out of the workflow this is this way they won't keep getting emails and because they've already completed what we needed them to do so once everything looks good and everything looks like it's right you can go ahead and turn on the workflow and you are done so a super easy process um involves a little bit of planning ahead of time but but once you can do it you can easily knock it out so thanks for watching i hope that this video has helped you with creating your next lead nurturing workflow if you have any questions go ahead and leave it in the comments and don't forget to subscribe bye
Show moreExplore other deals cases
- Streamline Your Product Sales Funnel with airSlate SignNow
- Transform Your Business with Leading Property CRM Systems
- Revolutionize Your Sales Process with airSlate SignNow's Seamless SaaS Sales Funnel Solution
- Boost Your Sales Performance Management with airSlate SignNow
- Streamline Your B2B Sales Process with airSlate SignNow
- Transform Your Business Sales Process with airSlate SignNow
- Revolutionize Your Contact Management with the Best Cloud Contact Management Software
- Streamline Your Lead Pipeline Management with airSlate SignNow