Pattern Matching
Configurable anchor patterns let the system locate fields using fixed text, regular expressions, or placeholder tokens to support varied document layouts and consistent automatic placement across batches.


Using anchor tags with a compliant eSignature platform supports a legally enforceable electronic signature process under ESIGN and UETA when identity, intent, and integrity controls are in place.

A Template Administrator is responsible for creating and maintaining anchor patterns across legal and operations templates, ensuring anchors are unique and documented, and coordinating with compliance for field-level validation and required data capture.
An Integration Engineer implements API-driven anchor population, tests detection against sample documents, and maintains mapping logic between source systems (CRM, HR systems) and signNow templates to prevent field placement errors.
Configurable anchor patterns let the system locate fields using fixed text, regular expressions, or placeholder tokens to support varied document layouts and consistent automatic placement across batches.
Saved templates retain anchor mappings and field types, enabling rapid reuse for recurring forms and reducing repetitive setup when onboarding new workflows or documents.
Assign anchors to specific roles or recipients so fields populate for the right signer in the correct order, keeping routing predictable in multi-party workflows.
APIs allow developers to pass anchors and recipient data programmatically, enabling automated generation of fielded documents from CRM, HR, or custom systems.
Apply anchor-based templates to large document sets in a single operation, supporting high-volume use cases such as onboarding or contract processing.
Configure field validation and required settings on anchor-mapped fields to ensure data quality and reduce back-and-forth corrections.
Use anchor tags in templates that originate from Google Docs; automations can export a document, insert anchor text, then send to signNow for automatic field placement and signing, keeping document source control and revisions in Google Drive.
Integrate with CRMs to populate template anchors with customer data and automatically generate and send anchor-tagged agreements tied to opportunities or contacts.
When anchor-tagged templates are stored in Dropbox or similar services, trigger flows that pull documents, detect anchors, and create envelope sends with mapped fields.
APIs let developers use anchor patterns when generating documents server-side, ensuring fields appear correctly in dynamically created PDFs or DOCX files.

| Setting Name | Configuration |
|---|---|
| Anchor Tag Pattern | {{TagName}} |
| Case Sensitivity | Insensitive |
| Regex Support | Enabled |
| Default Field Type | Signature |
| Bulk Apply Behavior | Overwrite existing |
For reliable detection, use standard fonts and avoid OCR-unfriendly scans; updating the signNow app ensures consistent parsing and matching on all supported devices.
A sales team embeds anchor tags in a standard purchase agreement to auto-place signature, initials, and pricing fields
Resulting in faster close cycles and fewer placement errors during mass sends
An HR department prepares offer letters with anchors for signature, start date, and tax info
Leading to consistent onboarding and reduced administrative review
| Feature | signNow (Recommended) | DocuSign |
|---|---|---|
| Anchor tag support | ||
| Regex or pattern matching | Limited | |
| API field mapping | Direct mapping | Composite mapping |
| Bulk template apply | Batch processing | Batch available |
7 years typical
Daily snapshot backups
Immutable archives available
Secure deletion per policy
Quarterly permissions audit
| Plan / Price | signNow (Recommended) | DocuSign | Adobe Sign | Dropbox Sign | PandaDoc |
|---|---|---|---|---|---|
| Entry price (monthly) | $8 per user | $10 per user | $29.99 per user | $15 per user | $19 per user |
| API access included | Yes | Yes | Yes | Yes | Yes |
| Template library | Unlimited | Limited | Unlimited | Limited | Unlimited |
| Bulk send capability | Included | Available add-on | Included | Add-on | Included |
| Advanced field rules | Yes | Yes | Yes | No | Yes |
To instantly add signature fields or date fields to your document, simply insert the corresponding anchor tags using any word processor. Then, upload the file to airSlate SignNow.
Open a document in your preferred text editor and add anchor tags using the method in the picture below.
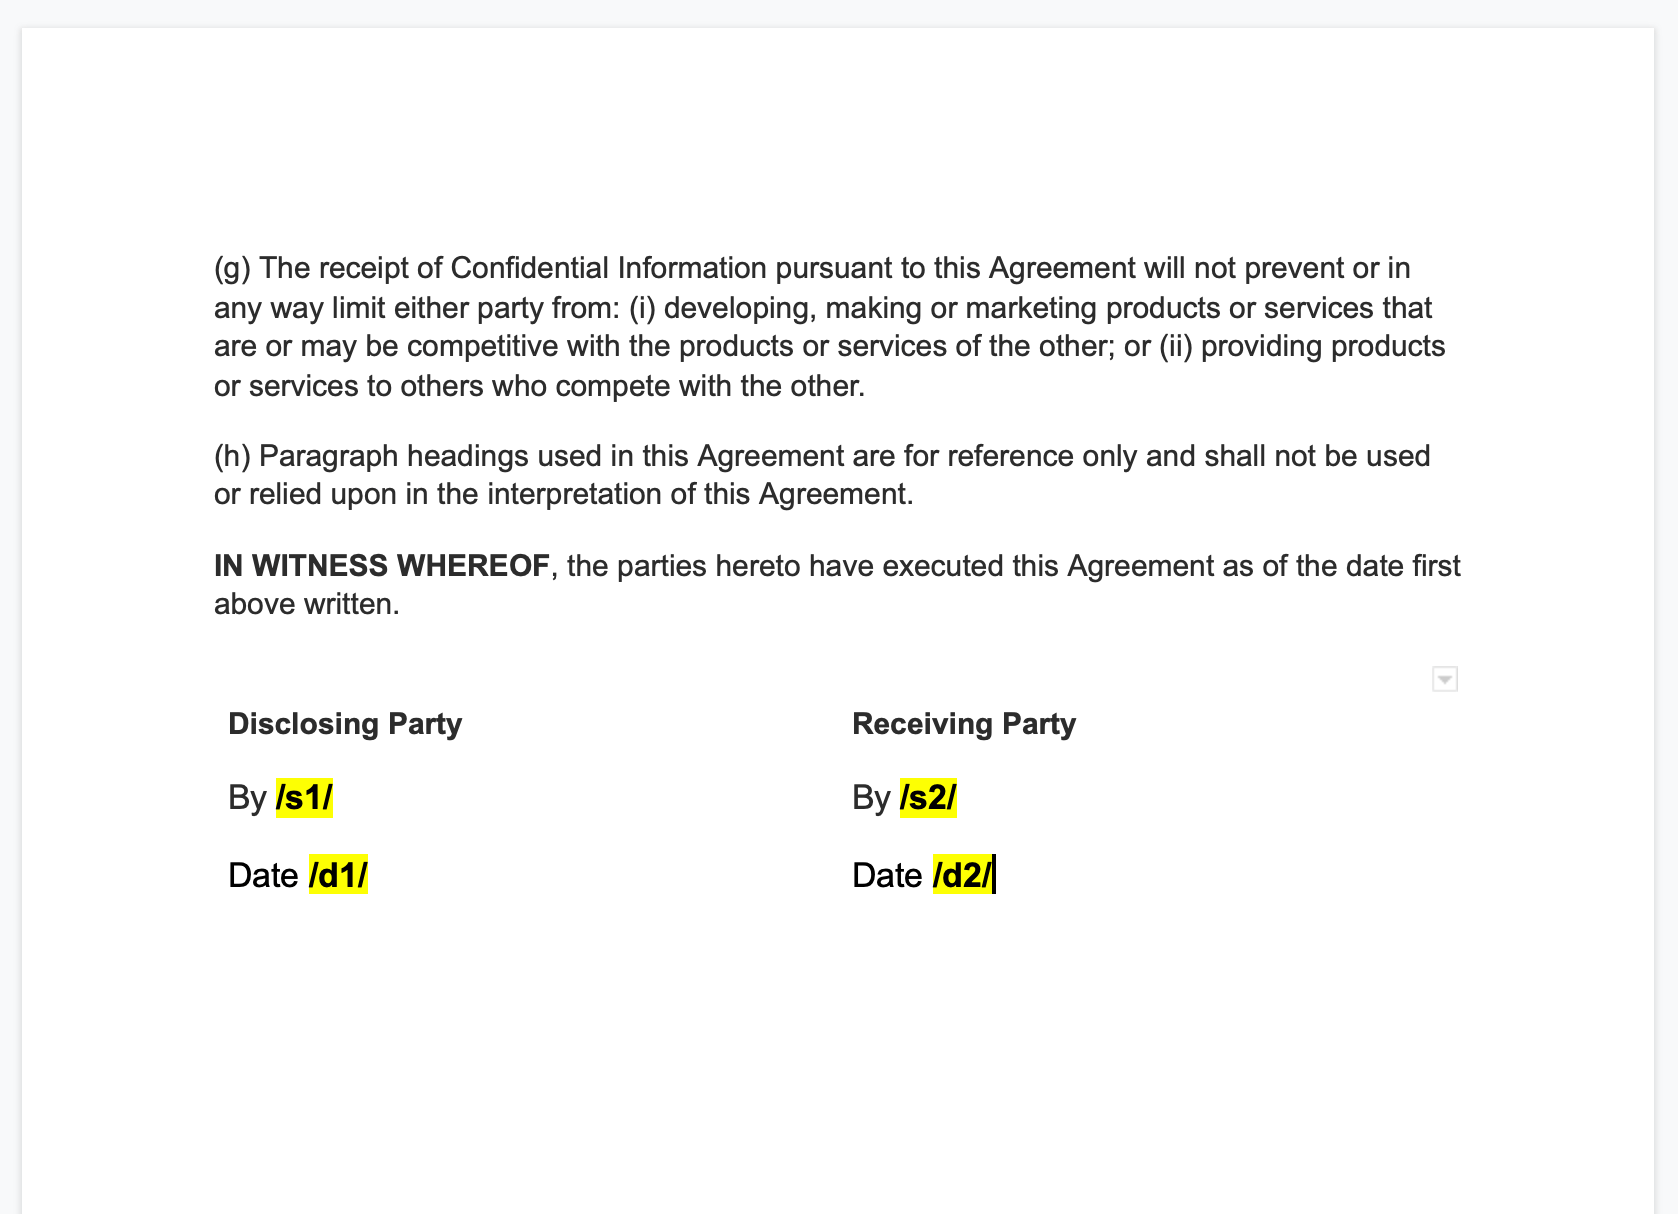
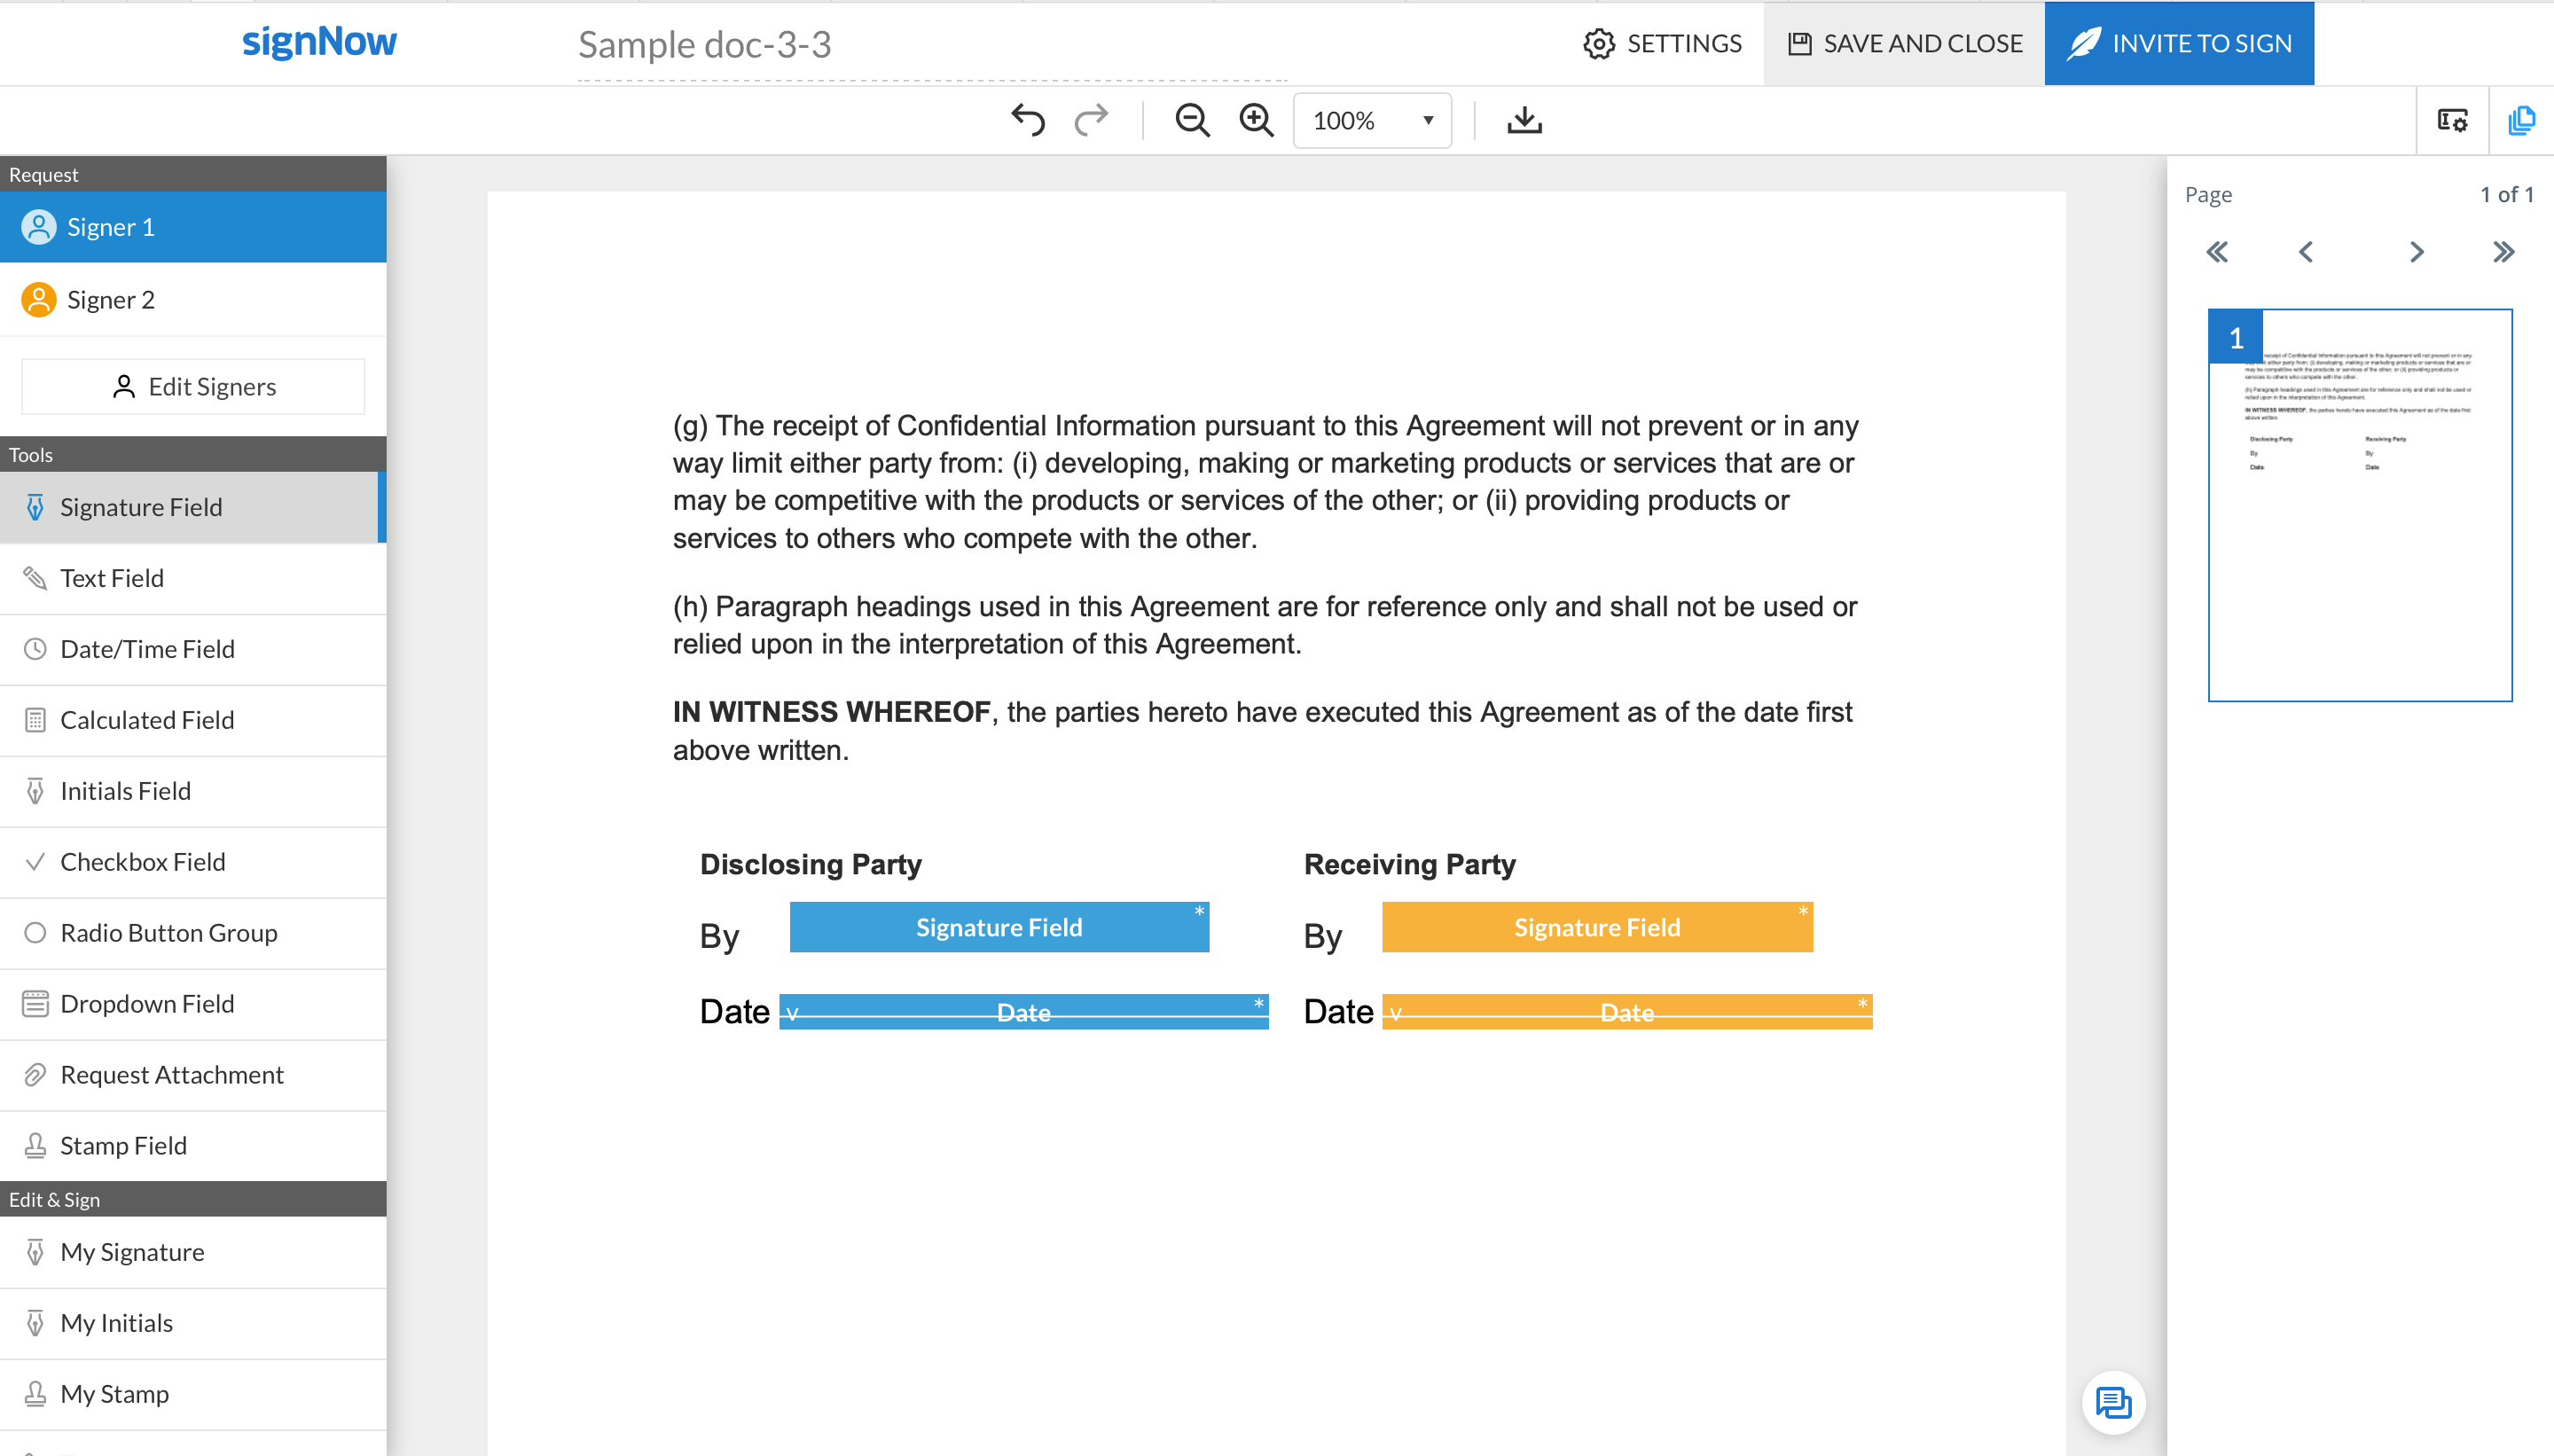
The /s1/ tag stands for a signature field. The /d1/ tag adds a date field. The number inside an anchor tag determines a signer’s role. For example, /s1/ adds a signature field assigned to the first signer. By adding /s2/ to a document, you will assign the signature field to the second signer.
When finished editing, save your document.
Go to the airSlate SignNow web app and click the Upload Documents button. Find the document that contains anchor tags on your device and select upload.
Once you open the document in the airSlate SignNow editor, you will notice that your anchor tags have already turned into fillable fields. Adjust their size and positioning as needed and save the file by clicking Save and Close.