How To Set Up eSign in CMS
Contact Sales
Make the most out of your eSignature workflows with airSlate SignNow
Extensive suite of eSignature tools
Robust integration and API capabilities
Advanced security and compliance
Various collaboration tools
Enjoyable and stress-free signing experience
Extensive support
Keep your eSignature workflows on track
Our user reviews speak for themselves


Award-winning eSignature solution


Setting Up eSign in CMS
Establishing eSign in CMS using airSlate SignNow is an uncomplicated task that can greatly improve your document management process. With airSlate SignNow, companies can effectively distribute and eSign documents, making it an economical and intuitive choice for organizations of any scale. This guide will lead you through the procedures to begin eSigning documents in CMS.
Establishing eSign in CMS
- Launch your web browser and go to the airSlate SignNow homepage.
- Register for a free trial account or sign in if you already possess an account.
- Choose the document you want to sign or send for signatures.
- To utilize the document later, change it into a template.
- Open the document and modify it by incorporating fillable fields or required information.
- Affix your signature to the document and assign signature fields for the recipients.
- Click Continue to set up the eSignature request and send it out.
By adhering to these easy steps, you can successfully establish eSign in your CMS, enhancing your document workflows and improving collaboration. With airSlate SignNow, you gain access to a robust tool that provides a comprehensive feature set at an affordable rate, ensuring a signNow return on investment.
Prepared to enhance your document signing workflow? Initiate your free trial with airSlate SignNow today and enjoy outstanding 24/7 support, clear pricing, and a user-friendly platform tailored to your business requirements!
How it works
Rate your experience
-
Best ROI. Our customers achieve an average 7x ROI within the first six months.
-
Scales with your use cases. From SMBs to mid-market, airSlate SignNow delivers results for businesses of all sizes.
-
Intuitive UI and API. Sign and send documents from your apps in minutes.
A smarter way to work: —how to industry sign banking integrate
How to electronically sign & complete a document online
Document management isn't an easy task. The only thing that makes working with documents simple in today's world, is a comprehensive workflow solution. Signing and editing documents, and filling out forms is a simple task for those who utilize eSignature services. Businesses that have found reliable solutions to how to integration e sign set up cms don't need to spend their valuable time and effort on routine and monotonous actions.
Use airSlate SignNow and how to integration e sign set up cms online hassle-free today:
- Create your airSlate SignNow profile or use your Google account to sign up.
- Upload a document.
- Work on it; sign it, edit it and add fillable fields to it.
- Select Done and export the sample: send it or save it to your device.
As you can see, there is nothing complicated about filling out and signing documents when you have the right tool. Our advanced editor is great for getting forms and contracts exactly how you want/need them. It has a user-friendly interface and full comprehensibility, offering you full control. Create an account today and begin increasing your eSign workflows with efficient tools to how to integration e sign set up cms on the internet.
How to electronically sign and fill forms in Google Chrome
Google Chrome can solve more problems than you can even imagine using powerful tools called 'extensions'. There are thousands you can easily add right to your browser called ‘add-ons’ and each has a unique ability to enhance your workflow. For example, how to integration e sign set up cms and edit docs with airSlate SignNow.
To add the airSlate SignNow extension for Google Chrome, follow the next steps:
- Go to Chrome Web Store, type in 'airSlate SignNow' and press enter. Then, hit the Add to Chrome button and wait a few seconds while it installs.
- Find a document that you need to sign, right click it and select airSlate SignNow.
- Edit and sign your document.
- Save your new file to your account, the cloud or your device.
By using this extension, you prevent wasting time on dull actions like downloading the data file and importing it to a digital signature solution’s catalogue. Everything is close at hand, so you can easily and conveniently how to integration e sign set up cms.
How to electronically sign documents in Gmail
Gmail is probably the most popular mail service utilized by millions of people all across the world. Most likely, you and your clients also use it for personal and business communication. However, the question on a lot of people’s minds is: how can I how to integration e sign set up cms a document that was emailed to me in Gmail? Something amazing has happened that is changing the way business is done. airSlate SignNow and Google have created an impactful add on that lets you how to integration e sign set up cms, edit, set signing orders and much more without leaving your inbox.
Boost your workflow with a revolutionary Gmail add on from airSlate SignNow:
- Find the airSlate SignNow extension for Gmail from the Chrome Web Store and install it.
- Go to your inbox and open the email that contains the attachment that needs signing.
- Click the airSlate SignNow icon found in the right-hand toolbar.
- Work on your document; edit it, add fillable fields and even sign it yourself.
- Click Done and email the executed document to the respective parties.
With helpful extensions, manipulations to how to integration e sign set up cms various forms are easy. The less time you spend switching browser windows, opening several profiles and scrolling through your internal records seeking a doc is more time for you to you for other crucial activities.
How to securely sign documents using a mobile browser
Are you one of the business professionals who’ve decided to go 100% mobile in 2020? If yes, then you really need to make sure you have an effective solution for managing your document workflows from your phone, e.g., how to integration e sign set up cms, and edit forms in real time. airSlate SignNow has one of the most exciting tools for mobile users. A web-based application. how to integration e sign set up cms instantly from anywhere.
How to securely sign documents in a mobile browser
- Create an airSlate SignNow profile or log in using any web browser on your smartphone or tablet.
- Upload a document from the cloud or internal storage.
- Fill out and sign the sample.
- Tap Done.
- Do anything you need right from your account.
airSlate SignNow takes pride in protecting customer data. Be confident that anything you upload to your account is secured with industry-leading encryption. Auto logging out will protect your information from unauthorised entry. how to integration e sign set up cms out of your phone or your friend’s phone. Safety is essential to our success and yours to mobile workflows.
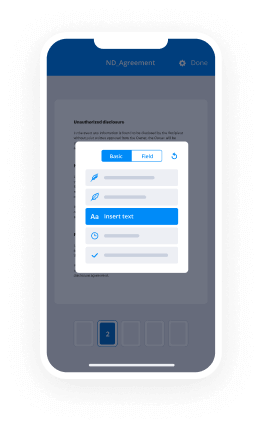
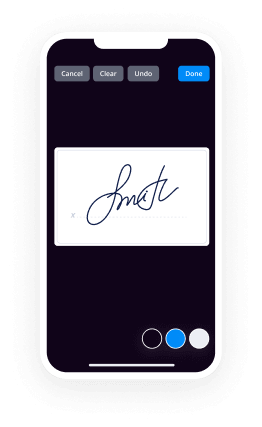
How to eSign a PDF document with an iPhone
The iPhone and iPad are powerful gadgets that allow you to work not only from the office but from anywhere in the world. For example, you can finalize and sign documents or how to integration e sign set up cms directly on your phone or tablet at the office, at home or even on the beach. iOS offers native features like the Markup tool, though it’s limiting and doesn’t have any automation. Though the airSlate SignNow application for Apple is packed with everything you need for upgrading your document workflow. how to integration e sign set up cms, fill out and sign forms on your phone in minutes.
How to sign a PDF on an iPhone
- Go to the AppStore, find the airSlate SignNow app and download it.
- Open the application, log in or create a profile.
- Select + to upload a document from your device or import it from the cloud.
- Fill out the sample and create your electronic signature.
- Click Done to finish the editing and signing session.
When you have this application installed, you don't need to upload a file each time you get it for signing. Just open the document on your iPhone, click the Share icon and select the Sign with airSlate SignNow button. Your doc will be opened in the app. how to integration e sign set up cms anything. Additionally, using one service for all your document management demands, things are quicker, smoother and cheaper Download the app right now!
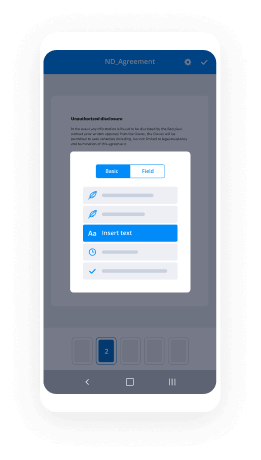
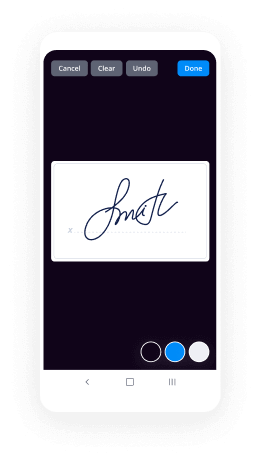
How to digitally sign a PDF on an Android
What’s the number one rule for handling document workflows in 2020? Avoid paper chaos. Get rid of the printers, scanners and bundlers curriers. All of it! Take a new approach and manage, how to integration e sign set up cms, and organize your records 100% paperless and 100% mobile. You only need three things; a phone/tablet, internet connection and the airSlate SignNow app for Android. Using the app, create, how to integration e sign set up cms and execute documents right from your smartphone or tablet.
How to sign a PDF on an Android
- In the Google Play Market, search for and install the airSlate SignNow application.
- Open the program and log into your account or make one if you don’t have one already.
- Upload a document from the cloud or your device.
- Click on the opened document and start working on it. Edit it, add fillable fields and signature fields.
- Once you’ve finished, click Done and send the document to the other parties involved or download it to the cloud or your device.
airSlate SignNow allows you to sign documents and manage tasks like how to integration e sign set up cms with ease. In addition, the security of your info is priority. File encryption and private web servers can be used for implementing the most up-to-date functions in information compliance measures. Get the airSlate SignNow mobile experience and work more effectively.


FAQs
-
What is airSlate SignNow and how does it help with eSigning?
airSlate SignNow is a powerful platform that empowers businesses to send and eSign documents efficiently. By using airSlate SignNow, you can streamline your document workflows, making it easier to manage contracts, agreements, and forms. This is essential for understanding how to set up eSign in CMS as it integrates seamlessly into your existing systems.
-
How do I get started with airSlate SignNow for eSigning?
Getting started with airSlate SignNow is easy and requires just a few simple steps. First, sign up for an account on the airSlate SignNow website. Once registered, you can follow our guides on how to set up eSign in CMS, ensuring you can send and receive documents for electronic signatures in no time.
-
What features does airSlate SignNow offer for eSigning?
airSlate SignNow offers a variety of features designed to enhance your eSigning experience. These include customizable templates, real-time tracking, and secure storage options. Understanding how to set up eSign in CMS will allow you to leverage these features effectively for your business needs.
-
Is airSlate SignNow cost-effective for small businesses?
Yes, airSlate SignNow provides a cost-effective solution for small businesses looking to implement eSigning. With flexible pricing plans tailored to different needs, you can find an option that fits your budget while still learning how to set up eSign in CMS for maximum efficiency.
-
Can I integrate airSlate SignNow with other applications?
Absolutely! airSlate SignNow offers robust integrations with various applications, enhancing your workflow. This feature is particularly useful when learning how to set up eSign in CMS, as it allows you to connect with your favorite tools and streamline your document processes.
-
What are the benefits of using airSlate SignNow for eSigning?
The benefits of using airSlate SignNow include increased efficiency, improved security, and enhanced user experience. By automating the signing process, you can save time and reduce errors. This is crucial for anyone looking to understand how to set up eSign in CMS effectively.
-
Is training available for setting up eSign in CMS with airSlate SignNow?
Yes, airSlate SignNow provides comprehensive resources and training to help users learn how to set up eSign in CMS. You can access tutorials, webinars, and customer support to ensure a smooth integration and maximize your usage of the platform.
-
What are good ways to learn to become the best digital marketer?
Hey Friends,I have been into SEO field from last two years recently working as an SEO Specialist with Squareboat Solutions Pvt Ltd. Gurgaon. Here I'm sharing an answer with my experience. I hope it’ll be helpful for you.In the 21st century, we also know our lives are moving more towards the digital world. In comparison with last years, the percentage of digitalization is increasing year by year.Nowadays we have all the solutions online be it booking travel tickets, shopping, ordering food, applying passport and what not. In the current scenario if your business is not online that means it’s not growing much.When we compare digital marketing with traditional marketing we will analyze it is much beneficial than the traditional one. Some of the points I'm mentioning below:-Cost of starting a business in much less as compared to that in traditional marketing.We are available 24/7 to our customers in digital marketing but in traditional one there is a fixed time on which we can open our shop, factory or any company for eg. 9–5.In Digital marketing we can focus on the international market but in offline marketing, we focus particular area only.Whether u are planning to do digital marketing for enhancing your business, for learning new skills, to start a new business or to increase salary by adding more in your skill card. For all the above things u first need to enhance your skills in digital marketing.There are certain qualities a digital marketer should possess to improve his/her skills. Below I'm mentioning the ways by which you can enhance your skills and add value to your resume.Attending the Digital marketing events: It is very important for a digital marketer to attend seminar and events on digital marketing so as to meet the people in this industry who are already doing great and also to know latest trends and updates those are taking place in this industry. For eg: recently Podcast came in the notice which still many people don’t know about.Learn from Digital Marketers and Entrepreneurs: For the growth of any startup and personal brand, Digital marketing is playing a very important role. So, for your growth it is important to stay connected with those people who are already doing great.Make utmost use of social media: It is very important to surround yourself with the like-minded people. Follow, read, like the content of digital marketers and then implement those practices.The internship should be the first step rather than searching for a job: In an internship, an individual have practical knowledge and digital marketing is all about implementation. So, prefer internship initially over job.Continuous Learning: It is very important to have a learning nature if u want to grow in the digital marketing industry as regularly there are new updates coming up which need to be adapted with time.
-
What do you think about AliDropShip? Is this a better option than Shopify?
I will try to give some advantages and disadvantages of using these both dropshipping solutions.The main difference between these two is AliDropship has been especially created for aliexoress dropshipping when Shopify alone is created for inventory stores. Shopify requires additional plugins like Oberlo to work as a dropshipping solution.I will show you a simple comparison here starting from pricing before I discuss the features of AliDropship and Shopify.Wordpress CMS ($3.95 monthly), AliDropship ($66.00 one-time cost)Shopify CMS ($29, $79 & $299 per month) depending on the plan, Oberlo (free, $29.90, $79.90)Wordpress and AliDropship are so much cheaper than using Shopify and Oberlo. Other than this, Shopify is slightly easier to use, but I would by no means say that Wordpress is difficult once you’ve spent a few weeks using it.However, I’ll briefly touch on the AliDropship features here:All in all, I’ve heard some really great things about the AliDropship Plugin, I personally use it and find it incredibly useful! I mean just look at the Success Stories relating to stores that use it: Dropshipping Success Stories From Real Entrepreneurs using AliDropshipThe plugin itself comes in two versions, AliDropship Original Plugin & AliDropship Woo Plugin, both of which integrate with the Wordpress CMS, but the AliDropship Woo plugin is specifically designed to only be integrated with Woo-commerce Wordpress themes.The AliDropship Original Plugin is only compatible with Built-In ThemesNow, you may not either be interested in creating the store yourself, or may not simply know much about Wordpress and the functions… And that’s ok!AliDropship provide a ‘Custom Dropshipping Store’ service, in which they will create you a fully-operational store, that you can then go ahead and market. For more information on this and the range of pre-made store packages they have available.Otherwise, lets get back to the AliDropship plugin!There are multiple features of both the AliDropship Original Plugin & AliDropship Woo Plugin that make it ideal to have, these include:Pricing - Other than the majority of other services, AliDropship is a one-time payment of $88, but I’ve featured a link [25% off discount] so you can get it for $66 instead. This includes lifetime support!Comparing this to other services such as Shopmaster, Shopify etc, they come with monthly fees that can cost $20+ per month. So your one-time investment of $66 in AliDropship isn't much!Import featureProducts can be instantly imported from AliExpress with the click of a button using the AliDropship extension (which is a free chrome extension that integrates with AliDropship), alongside product reviews, which means that you can easily import these to your website, helping build trust and further increase your conversion rate.Product variables such as Size, Colour and others are easily added with the click of a button thanks to the AliDropship plugin, making the process of adding products more streamlined.Automated Price MarkupAutomatically track and price your products in relation to your supplier's costings, Yes AliDropship will take care of this automatically, every 15 minutes! This means that relational markups can be achieved as soon as your suppliers make price changes.Image EditingYou have the ability to import images directly from AliExpress, but some of the images that you import may have logos and other issues; Therefore with Alidropship you can edit these images before uploading to your store.You can edit such elements as:Size: Select the preferred size for the image by choosing the option that suits your needs most.Effects: Adjust lightning (brightness, contrast, etc.) in Lightning tab and find the perfect effect for your image in Effects tab.Select: Copy, move and remove selected image areas.Brush: Choose color and size of brush to draw anything you want.Text: Type in text for the image, adjust its size, color and placement.Sticker: Select a sticker to add sales information about the product. There are two types of stickers available: ready-to-use and editable.Currency ConversionsYou can choose to price items differently based on their geographical location, especially useful when taking advantage of psychological pricing strategies ($0.99) which would not directly translate into the same price if someone from the UK were to purchase (£0.78).Shipping OptionsBespoke shipping options can be made based on the item, weight, size and geographical delivery destination.PaymentOffers Multiple payment gateways (Paypal, Paypal one-click pay, PayU, Payssion, PayUbiz, 2Checkout, Stripe, etc)Abandoned Cart:Can automate emails to visitors who abandon cart during the purchase process, potentially offering them a discount to convince them to come back and complete the transaction.The dashboard is incredibly insightful and shows:Abandoned carts – the total number of abandoned cartsEmails sent – the total number of emails sentRecovered carts – the total number of recovered carts. Abandoned cart becomes a recovered one if a customer visits the cart again using the link provided in abandoned cart email notification he receivedRecovered orders – the total number of recovered orders. An order is considered recovered in case a customer visits his cart again using the link in abandoned cart email notification and completes his purchaseRevenue – the total revenue of recovered orders.There have been accounts where sellers have increased conversions by 30% through using the Alidropship abandoned cart featureAutomated Ordering System (One-Click)— The plugin allows you to bulk-order, and automatically transfer and send all of the order details to the AliExpress supplier with the click of one button, yes that doesn't matter if there are 3 orders or 3000, it’s still one click.AliDropship 25% DiscountWell, if you’re interested in getting a 25% discount of AliDropship, here it is: Enjoy! AliDropship 25% Discount
-
How can we set up a CMS on LAMP in CentOS 7?
There are different content management systems (CMS) in the market, and here you can find the guides to install the CMS on Lamp in CentOS 7.Click here to learn more
-
Why do I have an account on Quora if I never signed up?
I’ve noticed that a lot of people have asked this question in various ways and, through research and experience, I’ve found out why.Quora API can find your profile details from your existing accounts like Google, Facebook and/or other places and automatically make you an account on Quora without you ever consenting to it or realizing it.When you finally ‘join’ Quora officially, you log in to an account that was probably made ages before you even actually joined.It is likely that you searched up something on a search engine that associated to Quora somehow and you logged in with one of your social media accounts, generally speaking, Facebook.Many of Quora’s website traffic is from people searching things on the internet and to find answers, looked in Quora.To disconnect social media accounts that have connected, you can go to Your profile picture > Settings from the drop down menu > Account from the side menu > and scroll down to see Connected Accounts. Disconnect all or some as desired and done! Those accounts now have no connection to Quora whatsoever.You can also completely delete your Quora account : Your profile picture > Settings > Privacy > Delete Account.
-
Drupal (CMS): How do I set up Tiles like Pinterest?
I haven't seen a Drupal module that does this specifically, but I know there are javascript libraries that make this possible. My favorite is Wookmark jQuery Plugin. I've implemented it one of my own sites here JamesMcB's Bay Area Outdoor Gems.To do this on Drupal, you'd basically do the followingCreate a view with the photos you want to displayChoose unformatted displayOverride the unformatted themeIntegrate in the wookmark codeYou'd definitely need to have javascript, html, & css experience to make this possible.I hope that helps!James
-
What's the easiest way to make money online?
I am an Online Marketer and here I am going to describe all the genuine way to earn online, and also mention online frauds to aware students and people who sometimes struck in these type of frauds.——————WARNING——————If you finding some shortcuts to earn well in short-term of the period, then sorry to say, by this tricks you can earn definitely but all your earning is depends on your efforts.Url Shorteners-Go to Google and search - “URL Shortener Paid Sites”Register on the website after reviewing the websiteChoose a YouTube Video, Website Blog and copy the URL.Short your URL and Share in social media and WhatsApp groupYour income depends on how many clicks you get.Bonus- Go to adult websites and copy the link of the video ✈ Shortner your URL ✈ create a fake id on social media ✈ share the short-links on fake id, you definitely get good clicks.Instagram-Instagram is the most used application If you don’t have patient, you can’t earn from Instagram. If you can wait for 1 year and work hard you can earn a better income.Choose a Niche(Category) where you are interested in.Create an Instagram PageUpload 5–6 Posts Daily with #hashtagIt is very hard to get 1st 1000 followers on Instagram but doesn’t be patient less.Follow more people of your categoryApproach pages to Shoot for Shoot(S4S) where you both promote each other page by uploading stories or post.Comment 15–20 comment daily on same category pages.After getting 10k followers people approach you to the paid shootout.You can also post copied content sometimes, but trying to post unique content.Nich Ideas- Funny, Cricket, Hollywood, Dancing, TikTok videos, Jokes etc.YouTube-I don’t think so, I have to need to be described this topic, you are already very well familiar with “How to make money on YouTube”.Sell Photo Online✘- Hardest way to earn money online, but if you are good at photography you can try.If you are a professional graphic designer then you can try.Content Writing-If you are a little bit good at writing, you can easily earn from your home.How To Start-Profile creation of diffrentn site and mention about your skills.Write some articles and blog and post it on Article Submission sites. (As people show your recent work)Started Writing on QuoraPeople will automatically approach you for work.Profile creation sites- Naukri . com, LinkedIn, Fiver, FreelancerArticle Submission Sites- SooperArticles, LinkedIn, TumblerYou have to be some knowledge of website designing to make money online in this way(Start Learning from YouTube)Affiliate Marketing ProgramAdsenseCPA MarketingA fresher can’t earn by this method, its hard to earn from Adsense for newbies, but you can start to learn from YouTube and create free websites on Blogger, Wix Sites, WordPress etc.Other Online Business Ideas-Domain Name TradeGraphics Designing(High Demand)T-shirt Design businessOnline Frauds-Paid SurveyDouble Paytm CashCardingDownload ApplicationsImage Source- “Google”If you want to waste your time then you can try these shits.If you want to Earn first you to put “L” before “Earn” means you have to Learn.Edit- Many people are put their affiliate link in the comment section, don’t click on these link, all are affiliates link, although i deleted many of the comments.
-
Which are the best and cheapest yearly hosting plans with free domains?
Here are the best web hosting providers. You can check this link for more details.Regardless of whether it's to promote your business or your "personal brand" (millennials), staking your place on the internet is pretty much essential at this point.And if you're just now getting started or prefer a super easy set up, one of the best ways to make your presence known online is to use a website builder. These programs will help you construct websites without manually coding anything.In other words, it's a tool that can help you build the website of your dreams without having to first learn HTML...
-
How can I set up Magneto CMS in an Amazon AWS server?
You have to follow these steps to Install Magento on AWS:Setup a Server on AmazonInstall pre-requisite tools on the server, needed to run MagentoSetup DatabaseInstall and configure Magento on AWSEasier Way to Install Magento on AWSUp and Running with AWS Magento HostingSetup a Server on AmazonAmazon Developer ConsoleGo to Amazon and setup an account. Now, navigate to AWS Management console. You will see the following screen:Select EC2. Don’t worry if you can’t see it. Search it in Find Services and you will get it. Click on it. Now you will see the following screen:Click on Launch Instance.Select a machine with default operating system (OS), such as Linux, Ubuntu, or Windows etc.You will see the following screen. Scroll down, and you will see:Select the Ubuntu server. Most developers tend to use Linux operating system to carry out their tasks, therefore I prefer Ubuntu. If you are a Windows user, and you want to select a Windows operating system, you are more welcome to do so. The configuration is almost identical.According to the official Magento 2 system requirements you need at least 2G of RAM. However, I consider and advise to have 4GB RAM. Just to be on safe side, if you want to debug or execute a block of code, you probably won’t want to exhaust your RAM . Therefore, you must:Select Type t2 mediumClick on Configure Instance Details. Now you will see:You can configure your machine (i.e. instance). Since, there is nothing much to do, proceed ahead with add storage.Now, the system will ask you to add storage. By default, the storage size is enough, but if you want to increase, then just increase the size.Once you complete the process, it time to click on Add Tags.For now, we don’t need any tags, therefore, click on configure security group button. This is important.Now, you can add rules about which people from across the globe will access your server. Do they have to follow a protocol to signNow to a server? For now, I am making my server accessible to all traffic. Later, we can put security rules. Navigate to Type and select All traffic. In the source, click anywhere. It should look like this:Click review and launch. Then you will have the opportunity to review your configuration again. Click Launch. You will see the following prompt.Here, instead of choosing an existing key pair, select a new key pair and give it a name.You might be wondering what is a key pair? In simple words, its a key which lets you connect to your server machine securely. It consists of a public key that AWS stores, and a private key file that you store. Together, they allow you to connect to your instance securely. For Windows AMIs, you must use the private key file to obtain the login password for your instance. For Linux AMIs, the private key file allows you to login to your instance with active SSH.Download the key pair and keep it secure, as without it, you won’t be able to access your server. Now click on launch instance.A new screen will open up.Click View InstanceIn status check, you can see that it’s initializing:Ignore the old server. You might not see the name of your server. Now, navigate to the empty space and you will notice a pencil write icon. Click on it and name your server. You must wait for a while and then refresh the screen. Check your system status:Now, you must connect to your server. Before, you do that make sure you have git installed, because we will use it to connect to our server. Now, select your new server:Click Connect.Now that you know about how to connect to your new server, we will opt the easy way. Remember the key pair you downloaded earlier? Navigate to that folder. Assuming, you have git installed, right click in empty space and select git bash here option. Now copy the line, I underline just below the example which starts with ssh -I …….And paste it in git bash:Press Enter. You will get a question: Are you sure you want to connect? Enter yes. Congrats, now you are on your server. But we must fulfill the requirement to make Magento work. Therefore, it is time to set up a PHP environment. Next, we will run a few commands on git to install the prerequisite tools.Install Pre Requisite Tools on Server to Run MagentoYou will have to execute the following code on the terminal to get the required tools for Magento installation on your server.
Trusted esignature solution— what our customers are saying


Get legally-binding signatures now!
Frequently asked questions
How do i add an electronic signature to a word document?
How to know if an electronic signature was actually signed?
How to sign a read only pdf?
Get more for How To Set Up eSign in CMS
- Sign Indiana Child Custody Agreement Template Now
- Sign Minnesota Divorce Settlement Agreement Template Easy
- How To Sign Arizona Affidavit of Death
- Sign Nevada Divorce Settlement Agreement Template Free
- Sign Mississippi Child Custody Agreement Template Free
- Sign New Jersey Child Custody Agreement Template Online
- Sign Kansas Affidavit of Heirship Free
- How To Sign Kentucky Affidavit of Heirship
Find out other How To Set Up eSign in CMS
- Application for temporary resident visa imm 5257 pdf 332 kb cic gc form
- Welkom nursing college application forms
- Aoa forms
- Tr1 form pdf
- Florida sellers disclosure form 2022
- Citizenship in the community worksheet form
- Irs form 4v
- Rccl retirement form
- Print dd 2813 form
- Vs form 16 4 aphis aphis usda
- Nj wbe affidavit form
- New jersey disability application form
- Boe 261 g 10910278 form
- Blank autopsy report pdf form
- Louisiana odometer disclosure statement 11042552 form
- Public defender request form
- Printable temporary license plate colorado form
- Ross correctional institution visitation form
- Texas liability insurance form
- Transformer preventive maintenance checklist excel