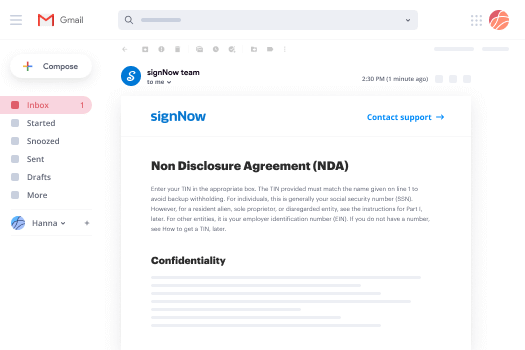
E-mail Sign Form Easy
Make the most out of your eSignature workflows with airSlate SignNow
Extensive suite of eSignature tools
Robust integration and API capabilities
Advanced security and compliance
Various collaboration tools
Enjoyable and stress-free signing experience
Extensive support
Keep your eSignature workflows on track
Our user reviews speak for themselves


Award-winning eSignature solution


Easy E-mail Signature Form
Creating an easy e-mail signature form is simple with airSlate SignNow. This platform provides an intuitive interface that lets you handle e-signatures effortlessly, ensuring your documents are signed promptly and effectively. Whether you are a small company or part of a mid-sized team, airSlate SignNow enables you to optimize your signing workflow without overspending.
Steps for an Easy E-mail Signature Form
- Launch your browser and go to the airSlate SignNow website.
- Set up a free trial account or log into your current account.
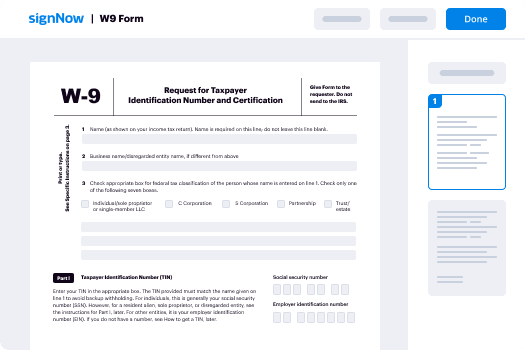
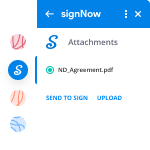
- Select a document that needs a signature and upload it to the platform.
- If you intend to use this document often, transform it into a reusable template.
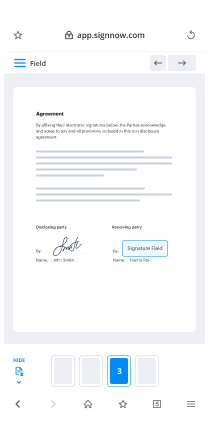
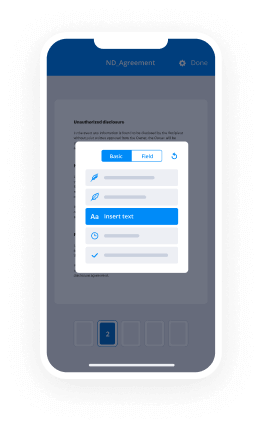
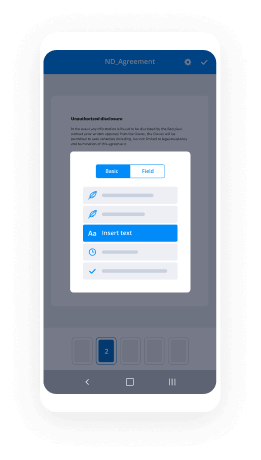
- Open your uploaded document to make necessary adjustments, such as adding fillable fields or inserting required details.
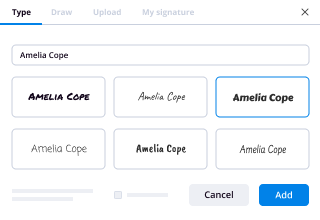
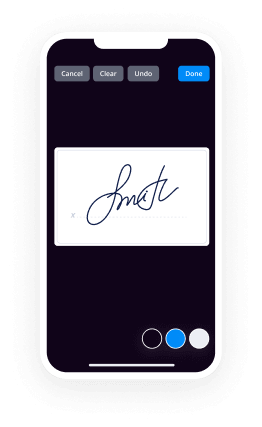
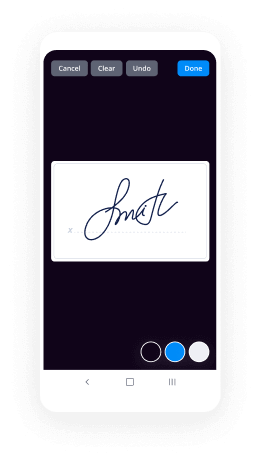
- Sign the document yourself and designate signature areas for other recipients.
- Click 'Continue' to set up and send the eSignature invitation.
To sum up, airSlate SignNow offers a great return on investment due to its extensive feature set and clear pricing model. With no concealed charges and constant support available, organizations can manage their signing procedures confidently.
Eager to make your document signing easier? Register for a free trial of airSlate SignNow today and discover the advantages for yourself!
How it works
Rate your experience
-
Best ROI. Our customers achieve an average 7x ROI within the first six months.
-
Scales with your use cases. From SMBs to mid-market, airSlate SignNow delivers results for businesses of all sizes.
-
Intuitive UI and API. Sign and send documents from your apps in minutes.
A smarter way to work: —how to industry sign banking integrate
How to electronically sign and complete a document online
Document management isn't an easy task. The only thing that makes working with documents simple in today's world, is a comprehensive workflow solution. Signing and editing documents, and filling out forms is a simple task for those who utilize eSignature services. Businesses that have found reliable solutions to functionality sign e mail form easy don't need to spend their valuable time and effort on routine and monotonous actions.
Use airSlate SignNow and functionality sign e mail form easy online hassle-free today:
- Create your airSlate SignNow profile or use your Google account to sign up.
- Upload a document.
- Work on it; sign it, edit it and add fillable fields to it.
- Select Done and export the sample: send it or save it to your device.
As you can see, there is nothing complicated about filling out and signing documents when you have the right tool. Our advanced editor is great for getting forms and contracts exactly how you want/need them. It has a user-friendly interface and full comprehensibility, giving you total control. Sign up right now and start enhancing your electronic signature workflows with convenient tools to functionality sign e mail form easy on-line.
How to electronically sign and complete forms in Google Chrome
Google Chrome can solve more problems than you can even imagine using powerful tools called 'extensions'. There are thousands you can easily add right to your browser called ‘add-ons’ and each has a unique ability to enhance your workflow. For example, functionality sign e mail form easy and edit docs with airSlate SignNow.
To add the airSlate SignNow extension for Google Chrome, follow the next steps:
- Go to Chrome Web Store, type in 'airSlate SignNow' and press enter. Then, hit the Add to Chrome button and wait a few seconds while it installs.
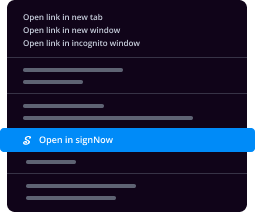
- Find a document that you need to sign, right click it and select airSlate SignNow.
- Edit and sign your document.
- Save your new file to your account, the cloud or your device.
Using this extension, you avoid wasting time and effort on monotonous assignments like saving the file and importing it to an eSignature solution’s catalogue. Everything is easily accessible, so you can easily and conveniently functionality sign e mail form easy.
How to electronically sign docs in Gmail
Gmail is probably the most popular mail service utilized by millions of people all across the world. Most likely, you and your clients also use it for personal and business communication. However, the question on a lot of people’s minds is: how can I functionality sign e mail form easy a document that was emailed to me in Gmail? Something amazing has happened that is changing the way business is done. airSlate SignNow and Google have created an impactful add on that lets you functionality sign e mail form easy, edit, set signing orders and much more without leaving your inbox.
Boost your workflow with a revolutionary Gmail add on from airSlate SignNow:
- Find the airSlate SignNow extension for Gmail from the Chrome Web Store and install it.
- Go to your inbox and open the email that contains the attachment that needs signing.
- Click the airSlate SignNow icon found in the right-hand toolbar.
- Work on your document; edit it, add fillable fields and even sign it yourself.
- Click Done and email the executed document to the respective parties.
With helpful extensions, manipulations to functionality sign e mail form easy various forms are easy. The less time you spend switching browser windows, opening several accounts and scrolling through your internal samples looking for a document is much more time and energy to you for other significant assignments.
How to safely sign documents using a mobile browser
Are you one of the business professionals who’ve decided to go 100% mobile in 2020? If yes, then you really need to make sure you have an effective solution for managing your document workflows from your phone, e.g., functionality sign e mail form easy, and edit forms in real time. airSlate SignNow has one of the most exciting tools for mobile users. A web-based application. functionality sign e mail form easy instantly from anywhere.
How to securely sign documents in a mobile browser
- Create an airSlate SignNow profile or log in using any web browser on your smartphone or tablet.
- Upload a document from the cloud or internal storage.
- Fill out and sign the sample.
- Tap Done.
- Do anything you need right from your account.
airSlate SignNow takes pride in protecting customer data. Be confident that anything you upload to your account is secured with industry-leading encryption. Automatic logging out will protect your account from unauthorised entry. functionality sign e mail form easy out of your phone or your friend’s mobile phone. Safety is crucial to our success and yours to mobile workflows.
How to electronically sign a PDF file with an iPhone or iPad
The iPhone and iPad are powerful gadgets that allow you to work not only from the office but from anywhere in the world. For example, you can finalize and sign documents or functionality sign e mail form easy directly on your phone or tablet at the office, at home or even on the beach. iOS offers native features like the Markup tool, though it’s limiting and doesn’t have any automation. Though the airSlate SignNow application for Apple is packed with everything you need for upgrading your document workflow. functionality sign e mail form easy, fill out and sign forms on your phone in minutes.
How to sign a PDF on an iPhone
- Go to the AppStore, find the airSlate SignNow app and download it.
- Open the application, log in or create a profile.
- Select + to upload a document from your device or import it from the cloud.
- Fill out the sample and create your electronic signature.
- Click Done to finish the editing and signing session.
When you have this application installed, you don't need to upload a file each time you get it for signing. Just open the document on your iPhone, click the Share icon and select the Sign with airSlate SignNow button. Your sample will be opened in the app. functionality sign e mail form easy anything. Additionally, making use of one service for all your document management demands, things are easier, better and cheaper Download the application right now!
How to digitally sign a PDF file on an Android
What’s the number one rule for handling document workflows in 2020? Avoid paper chaos. Get rid of the printers, scanners and bundlers curriers. All of it! Take a new approach and manage, functionality sign e mail form easy, and organize your records 100% paperless and 100% mobile. You only need three things; a phone/tablet, internet connection and the airSlate SignNow app for Android. Using the app, create, functionality sign e mail form easy and execute documents right from your smartphone or tablet.
How to sign a PDF on an Android
- In the Google Play Market, search for and install the airSlate SignNow application.
- Open the program and log into your account or make one if you don’t have one already.
- Upload a document from the cloud or your device.
- Click on the opened document and start working on it. Edit it, add fillable fields and signature fields.
- Once you’ve finished, click Done and send the document to the other parties involved or download it to the cloud or your device.
airSlate SignNow allows you to sign documents and manage tasks like functionality sign e mail form easy with ease. In addition, the security of your data is priority. File encryption and private servers can be used for implementing the most up-to-date functions in info compliance measures. Get the airSlate SignNow mobile experience and operate more proficiently.


FAQs
-
What is the E-mail Sign Form Easy feature in airSlate SignNow?
The E-mail Sign Form Easy feature in airSlate SignNow allows users to send documents directly via email for electronic signatures. This streamlined process simplifies the way you collect signatures from clients or partners, making it faster and more efficient. By using this feature, you can ensure that important documents are signed and returned promptly.
-
How can the E-mail Sign Form Easy improve my business workflow?
Using the E-mail Sign Form Easy feature can signNowly enhance your business workflow by reducing the time spent on document processing. It automates the signature collection process, allowing you to focus on other important tasks. With airSlate SignNow, you can track the status of your documents and receive notifications when they are signed.
-
Is airSlate SignNow affordable for small businesses wanting to use E-mail Sign Form Easy?
Yes, airSlate SignNow offers competitive pricing plans that cater to small businesses looking to implement E-mail Sign Form Easy. The cost-effective solution provides essential features without breaking the bank, making it accessible for businesses of all sizes. You can choose from various plans depending on your specific needs and budget.
-
What features are included with the E-mail Sign Form Easy in airSlate SignNow?
The E-mail Sign Form Easy feature includes customizable templates, real-time tracking, and the ability to store signed documents securely. Additionally, you can easily integrate it with other applications you already use, enhancing your overall document management process. These features ensure that you have everything you need to streamline your signing process.
-
Does airSlate SignNow support integrations with other software while using E-mail Sign Form Easy?
Absolutely! airSlate SignNow supports seamless integrations with various software solutions, making the E-mail Sign Form Easy even more powerful. You can connect it with CRM systems, cloud storage, and other tools to enhance your productivity and document management. This flexibility allows you to work within your existing ecosystem effortlessly.
-
Can I customize the E-mail Sign Form Easy templates in airSlate SignNow?
Yes, airSlate SignNow provides customizable templates for the E-mail Sign Form Easy feature, allowing you to tailor documents to suit your brand and specific requirements. You can add your logo, modify text, and set up fields for signatures and other inputs. This customization ensures that your documents reflect your business identity.
-
What kind of support does airSlate SignNow offer for E-mail Sign Form Easy users?
airSlate SignNow offers comprehensive support for users utilizing the E-mail Sign Form Easy feature. This includes access to a knowledge base, tutorials, and customer service representatives available to assist with any queries. Whether you need help setting up or troubleshooting, the support team is there to ensure a smooth experience.
-
What should I do if I lost my password to my Instagram Account?
What should I do if I lost my password to my Instagram account? Whether you’ve forgotten your Instagram password, or have had someone else change it without your permission, Instagram offers a pretty simple way to recover. And what we’re talking about here is recovering your account if you’ve totally forgotten your password. Changing your Instagram password is a little different—that’s when you know your current password, but just want to change it to a new one.Reset Your Password From The WebsiteFirst, head over to Instagram’s website, and then click the “Log In” link near the bottom of the page.On the next page, underneath the login fields, click the ...
-
What are some good ways to make more money on top of your annual income?
Here is what NOT to do. At least by my life experience...DO NOT start a business without a solid business plan. Think of everything! Every start up expense, operating expense, marketing expenses and how you will sell yourself to your customers. Overhead, employees, taxes... really get into the nitty gritty. Take your time with this plan before you commit to anything. I strongly believe one's chances for success are greatly improved by working inside the industry before going out on your own... you would have specific knowledge of challenging aspects to the industry or specific type of business. I vowed to myself that I'd never do it again... and learned twice that 20 hour workdays, sleeping on the floor of my shop, and constant investments in better equipment still wasn't enough to succeed. Determination is good, but can also hold you back and let you spend many valuable years of your life chasing a dream that you did not plan out properly.DO NOT fall behind on taxes. State and Federal Governments have unfettered access into your bank accounts... anything with your social security number attached. Anything with your name tied to it, via state business licenses, registrations, etc. They will come and deplete all your money (tenant deposits held in trust, employee wages, everything!) after signing their self-printed dummy judgments in administrative court. I'm talking about ALL departments of government. Labor and Industries (industrial insurance), Employment Security (unemployment insurance) and don't even get me started on the IRS. They want to sink small businesses that deal in cash and are steadfastly trying to build large business bases that do not deal with currency (hard cash). DO NOT loan money out privately unless you have an attorney in your pocket. It takes years of experience to gain the knowledge to protect yourself in real estate or hard money loans. If you do, always get security worth 2x to 3x or more street market value!! i.e. first deed of trust ONLY, or assign yourself as lienholder on title, or UCC filings, etc. I once lost my ass on a loan in second deed of trust position. When the borrower defaulted, I had to make up the first mortgage delinquencies to foreclose my note. Bad lesson in life. Foreclosed on the property and ended up losing it anyway due to a crooked bank who would rather collect on the mortgage insurance than rework the promissory note.DO NOT buy rental property, especially single family residential, unless you are certain you are connected well with laborers who can fix and manage it. You'll need back-up people to the primary people. Time and time again, the hours it took me to pay monthly water, sewer, trash and other bills common to Landlording; fixing broken "things", repair screens, replace doors and appliances, clean up after every tenant... and just generally manage the properties could have earned me drastically more income had I focused on other things that paid hourly. DO consider flipping property - I have made multitudes more $ with short term holdings that I bought for a song and flipped. There is so much to go into regarding flips that I can't elaborate here... however, good research must be done on the particular property first! (market value analysis, time-to-sale research, clear title). Buy it at the auction; not REO or listed for sale. Better yet, consider buying it in a pre-foreclosure situation by working with distressed people who are going to lose it regardless. Some hard money lenders coin it "Loan to Own". This is a dog-eat-dog world so best to consider hands-off approaches like ETF's if you don't have the backbone to be a bad-pass in real estate. Landlording is for bad-asses and those who learn the courts fast and learn to use the garnishment procedure to recover their money. Apartment buildings and large real estate ventures are a whole different story but being born rich helps to get a faster, bigger start in life. Buying a 20 or 30 unit apartment building with an on-site manager isn't easy to get into before you're 40 but if you bank cash and keep your credit intact you may be able to pull it off. Don't waste time with a duplex unless you can buy a couple on the same block. DO consider purchasing an established business that you can have someone else run... Like a franchise, or small retail like at an airport. Yes, most businesses take money to start - i.e. nothing ventured, nothing gained. It is much easier to buy a business and improve it, than starting from scratch. There are incredible tax write-offs (travel, vacation conferences, toilet paper, electronic gadgets, and use your imagination) to owning a side business. A friend of mine recently quit his primary job making a couple hundred G's a year only 8 or 9 months after buying a one-location small business. He hit a home run selling lunch!It is one thing to own a business... it is another to buy and sell them! Both the wealthiest person I personally know as my dear friend (retired at 47 and completely self-made), and the wealthiest person I've ever shook hands and held a conversation with (my employer's boss, $9+ Billion, started with 1 used car dealership) both buy private companies for a living (and buy them with other people's money!) They are venture capitalists of a sort... but buying established businesses (i.e. plastic sheet extruder or a medical device manufacturer) that already make money is less adventurous than say, investing in a new virtual-reality headset manufacturer. They seek out (usually, profitable) businesses that need to be sold for one reason or another... sometimes it's an owner retiring, or death, or other reasons... sometimes it's a convincing sales broker that can make $1M on one single business sale. As a new owner he sometimes trims budgets or employees, or capitalizes on strategic alliances between his other holdings. But usually he'll instill new management that owes no favors and operates purely for profit. They fine tune the company, ramp up profits, then they often resell these businesses for huge profits, or hold onto them as part of a portfolio.These ideas are just some personal experiences, observations, and food for thought. Good luck! Life is quite a trip and by far the best part is the lessons you will learn on your own journey.The best advise I can give you is to often travel to 95% of the rest of the world that is multitudes poorer than the population where your dental school is. Then you will know that you are already very wealthy.
-
Is there a sensible argument against speed cameras or speed traps that can't be countered with this:"If you drive faster than th
As someone that has successfully had two tickets from speed cameras dropped at court, I have some firsthand experience with the problems they have. I’m also waiting to argue for my third in a few weeks.The Background: My wife drives through one of these speed camera zones everyday to work, she knows about them, she goes slower than the limit on purpose, and yet we still got some tickets in the mail.The township my wife works in has a deal with a company (from another state) that installs the cameras for free, and splits revenue with the city. They are positioned along a few one way roads in the city, mostly where there are 4 lanes of traffic, all going the same direction. The particular camera she passes also sits about 15 ft off the roadway and points down the road a decent length in order to see all lanes and be able to read rear license plates. I estimate the total distance the camera is from its post to the “line” where it marks speed to be between 120 ft and 160 ft depending on what lane you drive in. There lies the problem with this setup. The radar at this angle, seeing that much of the roadway is detecting the speeds of all sorts of cars driving on the roadway. A car passing or changing lanes can severely throw off the reading on the speed of a single lane.Both tickets I have argued I was able to take the video and still clips that camera provided, use the length measurements of my wife’s car and landmarks on the road, and prove the speed of her vehicle to be less than the speed limit through mathematical calculation. While this isn’t rocket science to do, it does take some higher level math knowledge and some photoshop skills to fully demonstrate the system was incorrect. I cannot imagine how many others could have used this same strategy to prove innocence but were unable to for lack of knowledge and resources. Also, it’s a racket just to fight the ticket as you have to pay “court costs” just to fight the violation. IF you win, you get the cost refunded, but if you don’t, you’re left with the fine and you’ve paid the court cost as well.This third ticket I am going to contest soon will not require the same amount of work that the first two did, as this one claims my wife was doing nearly 25 miles over the speed limit. Just watching the video provided clearly shows that she was not doing 58 in a 35 mph zone. If these videos and images were being “verified” by actual police officers as the notice claims, this wouldn’t have made it passed the eye test. FWIW, I have calculated that my wife was only going ~31 in this last instance, but a car was passing her, and probably going slightly over the limit, but the system read her speed at NEARLY DOUBLE her actual speed.The whole system is unreliable, a money scheme for corporations offering these services to the cities, and not to mention unconstitutional on a few grounds.
-
In the Hong Kong SAR, why is the fax still regarded as a serious medium for official correspondence?
Because everything in Hong Kong still runs on paper, and if you email them a letter, they will just print it out.One nice thing about paper is that you run into fewer data security issues, since everything is on paper so you know where your data is.One other thing is that in a lot of transactions, it's important to have everything in a fixed document. For example, in a lot of legal work and work with the HK bureaucracy, I find that even when people communicate via e-mail, what people will do is to write the document as a attachment, and then use e-mail to send the document. E-mail is for conversations and not for document submission.Once you are in this mode, then it turns out that if you want to do something, you have to export the document as a PDF, attach it to an e-mail. and the person at the other end, unattaches the email, and prints it out. The other problem with e-mail documents, is that a lot of Hong Kong transactions require physical signatures, and it's easy to fax a form, sign the document, and then refax the resulting document.
-
How do I start working as a freelancer in digital marketing?
(Image Source : Google)It will be a long but useful. I will roughly answer this in my perspective. I will list out the scope that I found in this domain.Digital marketing is having 10X more opportunities than it sounds. It is not constrained to a particular job or a task, It is not as easy as it sounds. It takes a little time to master this profession. It needs intense enthusiasm and interest.Imagine how many new startups are emerging every day. Many industries, local businesses, Educational institutes,stores and many more are digitizing every day.They either try to get leads from the internet or represent their brand. some try to show their customers where they are and some try to send updates. But every one is not proficient in broadcasting their message to targeted audience. This makes them consult either Digital marketing agencies or Freelancers.Master the skills and help the customers to grow their brand. That makes one successful digital marketer. Find some work from freelancing sites like Up work and Fiverr. In the beginning of your career make a good relationship with the customers. 10 to 15 customers per month are enough to make a decent earning.1) Search Engine Optimization(SEO): Understand the basics of Search Engine. How it works and, How to rank a website/blog on the top of the search engine result page(SERP). Practice on your site first. Freelancing projects will somewhat like this on SEOIncrease back linksFind trending keywords and phrases for a nicheRanking the website/blog on the top of SERP(Search Engine Result Page )Create a SEO strategy for a siteFinding competitors keywordsFinding focused audienceIncrease domain authority, Page authority.Recovering the site from search engine penalties.This takes in-depth knowledge of search engine ranking. One should be up to date to search engine algorithm updates and trends.2)Social Media Marketing(SMM): Using social media to promote their business or brand. There is great demand for SMM nowadays. Freelance jobs will beCreating Ad campaigns in Facebook/Linkedin/Twitter.Generating leads by creating Fillup forms in social media.Increasing Brands fame and signNowTargeting people by Ad-campaignsIncreasing fan page/brand page likes.Creating various layouts of AdssignNowing targeted audience by Facebook AdsTargeting subscriber audience to like Fb PagesManaging Fb/Twitter pages and posting updates.It pretty simple when compared to other. To be successful in this domain one should understand #Hashtag trends, SMM tools.3) E-mail marketing: E-mail marketing brings extra traffic to your blog/website. Consistency and quality in the E-mails make audience to come back. E-mail marketing obtains ROI via Affiliate links. Freelancers can Bid projects likeE-mail marketing campaigns both Opt in & BulkWrite attractive scripts for E-mail marketingHosting clients E-mail campaigns.Landing E-mails in Primary Inbox without entering spam folderTeaching clients how to land E-mails in Primary InboxIncreasing traffic via E-mail.Sending weekly courses to the signed up audience.Knowledge of various E-mail marketing tools like Aweber and Converter kit is essential. Scheduling emails is a great time saver here.4) Website creation and Planning: Understanding difference between Website and Blog is essential. Solo Freelancers can create a solid Wordpress website in a couple of hours. Coding skills are good plus point for the freelancers.A brief knowledge of following points can make anyone successful freelancer.1. Understanding Domains and Sub-domains2. Different types of websites3. Knowledge of Hosting plans depending upon usage4. Website/Blog Security5. Website architecture6. Creating a landing page7. Important pages like 404 and thank you page.8. Creating a localhost website for prototype9. Knowledge of Website Blueprint.10. Knowledge of Plugins and Widgets.11. Site speed management12. Knowledge on Website themes.13. Understanding CMS(Content Management System)14. User Interface overview15. Knowledge of eCommerce Interface.WordPress fulfills most of the client's requirements and it has a share of 27 % in the total web. That shows the craze of WordPress platform in the Digital marketing domain. Coming to the freelance jobs clients ask forCreate a WordPress website/blogCreate an eCommerce site using WordPressCustomize blog using a new themeHandle blog with Premium tools and widgetsCreating a landing page for blogCreate a Bussiness website.Change the hosting from one host to anotherChange the domainMigrating from other platforms to WordpressCreating About us and Contact us pages5)Online Reputation Management: Some brands get a negative reputation on the Internet. Bad reputation makes the loss of new leads and existing customers. To regain the lost reputation clients pay for agencies and freelancer to regain it. Some sort of skills to get these leads areUnderstanding ORM scenarioUnderstanding the depth of damageRebranding and Customer interactionAnalyzing FeedbacksStrategy for RebrandingAttracting new customersMaking old customers bounce backThis works when the freelancers work as a team. Teams can handles this kind of works easily and effectively.6)eCommerce marketing: Selling a product in commerce sites seems simple. But it takes lots of research to compete with competitors.Writing an attractive description for the productMaintaining rating of the productMaintaining Reputation of the productGoogle product listing to appear on top of SERPOverview of sales of the productsKeyword trackingCompetitor keywords findingMaintaining consistent salesClients who don't like deal all these will approach a Digital marketer to promote his product. Clients generally ask forCreate an eCommerce storeAffiliate store which looks like an eCommerce storePromotion of their products.7) Search Engine Marketing: This is another type of paid marketing helps similar brands to appear on the top of SERP as ads. 50% of the users tend to click on the top results where ads are displayed. This is a great tactic to get leads in the same way they charge for the traffic income. I prefer SEO to SEM. Because SEO is a never ending process it is perennial. Ranks fall down and we should build them again to rank topThis is a brief list on the top of the visible iceberg called Digital Marketing, There is great scope for Digital Marketing in coming future.
-
What websites have the simplest, most effective signup processes? What are your top 5, and what did you like about them?
It's easy to conflate visual design from process. Where visual design (e.g, Dropbox hand-drawn images can be inviting or comforting, visual design does not define process. And although it's true process has an impact on visual design, sign up processes have little impact on visual design. (Although I put forth that use of Facebook, LinkedIn, Twitter, Klout, Google+, etc. OAUTH buttons can have a dramatically controlling or jarring impact on your visual design). As I read through and consider the reference signup processes offered in the comments to date, it appears that they are nearly the same. E-mail and password are, for most all sites, the minimum necessary inputs. Name is necessary for others. For those companies that have lived well enough to attract registration bots, hackers, spammers, or other nefarious agents, captcha and e-mail validation become a necessary component of the registration process. Until recently , using LinkedIn OAUTH for site registration was insufficient because LinkedIn did not release the registrant's e-mail address. They have changed this policy so a single click registration is now possible using LinkedIn. Of course this only works if your registrant is already logged into LinkedIn - otherwise pop-ups, username, and password with a redirect are required. Is that easier or better? To the degree that you avoid captchas and e-mail address verification steps, perhaps. But using LinkedIn for registration will almost certainly dissuade some meaningful percentage of people from registering and sharing with you all of their LinkedIn data. Furthermore, you may not want to share with LinkedIn that their subscriber is now registered with your service. Similar arguments and observations apply to Facebook, Twitter, and Google+.Perhaps breaking down the question to market and purpose are necessary.For example, if your company is mining Facebook data to build a new recruiting website, your registration process is dead simple. In fact, it's constrained to the Facebook OAUTH process. No other registration process would be useful or necessary. In this case, the question is 100% visual design. Similarly, if your site/service depends on access to a user's LinkedIn data, then too we are left with visual design.If however, your users need not share with you their FB or LI data, then you have some options - in fact, it could be argued too many options: e-mail and password, twitter, FB, LI, Klout, G+ just to name six. There are operational pro's and cons to each:OAUTH pro's: no captcha. no e-mail verification step.OAUTH con's: extra log-in step if browser is not already logged in. "Authorization step." User decision to share personal info. Your decision to inform OAUTH provider of your activity.e-mail/password pros: quick, easy, and everyone "knows this one"e-mail/password cons: insufficient to fend off nefarious actors -- which means introducing captchas, e-mail validation steps (there is also SMS validation but that requires discussion of telephone numbers, privacy, and market segments)If you get crazy, your registration page will start to look something like this one:Which brings us the the question of how to manage human error. I've oft debated with my product teams the merits and demerits of single-field entry for e-mail and password. Sure, having a single-field entry makes the visual design cleaner. And it saves on typing. But it's prone two two obvious errors:e-mail entry typos, and password entry typos.One can successfully argue that either error is recoverable. My contention is that password typos are infinitely more recoverable than e-mail typos. After all, "forgot my password" should be a staple of any site with a registration feature so if a user botches his or her password, that user will just have to suffer through discovering the inability to re-enter the site then go through a recover process.Of course, this completely fails when the e-mail is incorrectly entered. My son has an email account for form
@ .com. Notice there is no dot between first and last. That's an important dot. There is a military serviceman living in Georgia with the same first and last name as my son's who has . @ .com. That serviceman's payroll notifications come to my son's e-mail account. Why? Because when Mr. First Last serviceman set up his MilPay account he miss-typed his e-mail leaving out that oh so important dot. Now he's screwed. Every month or so he tried to reset his password since he cannot access his account and my son gets the reset password e-mails. It's an unbreakable do-loop. I've spoken with MilPay on the phone who can't do anything about unless Mr. First Last calls. And I've written to big co. domain only to be ignored for all time. So I fall heavily onto the side in favor of either the two-field e-mail address camp or the e-mail verification before proceeding camp. Imagine screwing up your e-mail when registering for 500px, uploading 100's of pics, then logging out never to be able to log in again. I tried it. It can be done. And you'd never receive the e-mail authentication message.Personally, I prefer the two-field password approach simply because of the number of times I've botched typing in a password and the asterisk masking of password entry convention prevents a visual check. (I love when sites give me a "show password" button!).So what we have is a continuum of tradeoffs between process simplicity and operational requirements laid over market needs.Net-net, "simple" and "effective" may be goals in contention, just as visual design and process. We all need to strive for the lowest friction (low dropout/incomplete rates) with high visual design while also meeting the "effective" constraints of our market and site's operational requirements. -
What products have the very best onboarding user experiences?
I see answers from 2012, 2013. So I want to contribute with something new.FullStoryFor the ones who don’t know about FullStory, according to description in their crunchbase company profile; the app that captures all your customer experience data in one powerful, easy-to-use platform. I strongly agree in easy-to-use part. They have a seamless onboarding experience.Let’s see how they do it:When you click on sign-up button on their web page, they take you down to pricing page, where they show their features for different plans. At the top of the page, they ask you to enter your work email address. They say you will have access to 14-day FullStory Pro Trial. Seems easy. Let’s give an e-mail.After e-mail confirmation step, they ask you to set your password. Or you can login with Google. Let’s skip to next step.They have 3 easy steps on registration. First one is about you. You need to enter your name and your field of work. I love the way they ask about personal information, good job.Second step is about your company. 3 form fields, no pain yet.Last step is where amazing happens. I guess, success in this step is the most important KPI of their onboarding process. Because of their business model you have to install the code snippet to actually start using FullStory. If you don’t install the code you don’t get their value proposition and won’t ever become a customer.Title here make the hard part fun. Cool. They come up with 3 different options, you can set up with GTM, copy the code and install on yourself or in case you are not an engineer you can send snippet as an e-mail to a teammate. Quite easy.
-
Is a Facebook like more valuable than an email signup?
This is kind of an apples to oranges question. They serve two different purposes in advertising. You really aren't looking to convert Likes to sales. Most are using it to build brand awareness and talk to your brand. Some use their Facebook community for customer service. Email signups are looked at more as people you've already sold to or looking to sell to. So if you're looking from a strictly bottom line sales perspective then email will get quicker results. The benefits of one like can take much longer to reflect in sales. And as mentioned before Facebook has made changes such as the recent Edgeranks and could do so again. Email isn't changing.All that being said, both are only worth as much as your content. To keep people subscribed to your emails you have to continue to send content they're interested in or they unsubscribe. Same with Likes, make a habit of boring content and you lose people. So your company could suck at emails but have great Facebook content and then your emails aren't worth anything. Opposite is also true. Also Facebook and email marketing don't make sense for every brand. In this day and age there are so many avenues to put out content you need a strategy that makes sense. If your market doesn't use Facebook much then a like is useless to you. Not every market uses email. I'd say email marketing to 65+ probably isn't very effective. Facebook might not be either. That is a growing demo on Facebook but you'd have to look at your product and see if either fits.Wow I sure rambled. Point is, it's not so cut and dry to me that an email is worth more than a Like. Do some research and decide for your brand.
-
What are the most important metrics to track and measure for SEO?
The #1 answer here should always be "Whatever drives your business." Basically, anything that creates revenue for your company... sales, leads, pageviews/traffic (if you're advertising based), etc.There are tons of diagnostic metrics associated with SEO... traffic, inbound links, rank, etc., but remember that these are not the actual goal of the effort. These should only be used as a comparison metric, usually within your own organization and usually just for yourself to help you gauge the progress of your work.Finally, be careful about "rank." It's a really dangerous dragon to chase. I've seen businesses go down the toilet, all while wailing, "But we ranked number one for this term that we thought was important!" Rank an tell you that you should up on a search for a given keyword, but little else. It can't tell you why you dropped from 2 to 5th overnight or why you jumped from the third page to the first over a week. It can't tell you if there was more competition or a change in the algo. It can't tell you if anybody gives a damn about that keyword besides you. Plus, it's not the same for everybody thanks to things like geography, search history, etc. Look at it occasionally to give you a good indication of one of the reasons why you're getting traffic from a given term at all, then walk away.Meanwhile, go back and focus on the money.Good luck.
Trusted esignature solution— what our customers are saying


Get legally-binding signatures now!
Frequently asked questions
How do i add an electronic signature to a word document?
How to sign digital documents on gogole drive?
How to sign up for e-service package vanguard?
Find out other E mail Sign Form Easy
- Cardiac physiology form
- 1 the eoq and extensions pdf download form
- Neh application cu final bw doc columbia form
- 1 lofa protocol summer the project will involve four visits to columbia form
- Apologies for long report form
- 09 lecture 16 std columbia form
- The department of homeland security intelligence enterprise form
- Mechanisms form
- Public opinion and senate confirmation of form
- Proof of an unaccomanied youthhomeless ccad form
- 5k race columbus state university form
- Higher educations adult part time student grant concord form
- Higher education adult parttime student grant program concord form
- Concord university veterans office va coordinator concord form
- Payroll certification calendar xlsx form
- Stipend request form concord university
- Funding request for faculty development recognition award form
- I position information date concord university
- Mathematics in motion concordia college form
- Concordia seminary st louis22nd annual theological symposium registration form