How To Print eSign Document
Make the most out of your eSignature workflows with airSlate SignNow
Extensive suite of eSignature tools
Robust integration and API capabilities
Advanced security and compliance
Various collaboration tools
Enjoyable and stress-free signing experience
Extensive support
Keep your eSignature workflows on track
Our user reviews speak for themselves


Award-winning eSignature solution


How to print eSignature document
In today’s digital age, understanding how to print an eSignature document is crucial for smooth business workflows. With airSlate SignNow, you can conveniently handle and print your electronically signed files. This guide will lead you through the process of printing your eSignature documents effectively, ensuring you can fulfill your business requirements with ease.
How to print eSignature document: Step-by-step guide
- Launch your web browser and go to the airSlate SignNow homepage.
- Create a complimentary trial account or sign in to your existing account.
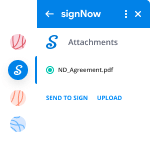
- Upload the document you want to eSign or distribute for signatures.
- If you intend to reuse the document, convert it into a template.
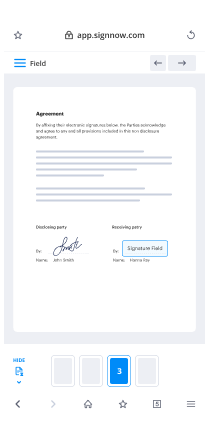
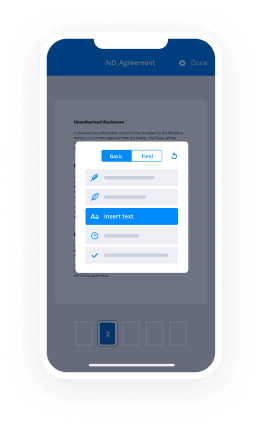
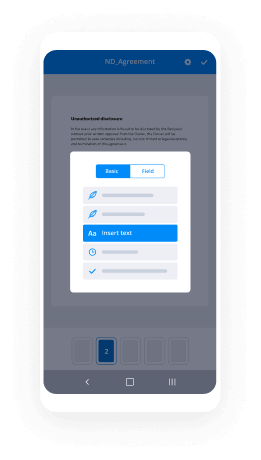
- Access your uploaded document and make necessary adjustments, such as adding fillable fields or inserting essential details.
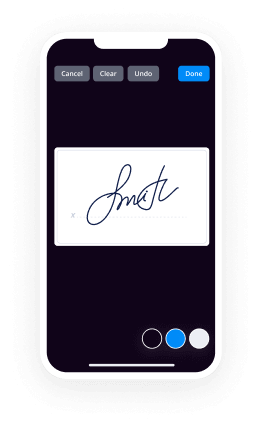
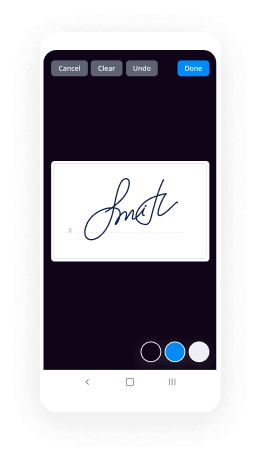
- Sign the document and include signature fields for the convenience of the recipients.
- Click 'Continue' to configure and send an eSignature invitation.
Learning how to print eSignature documents using airSlate SignNow not only simplifies your signing workflow but also improves your document management capabilities. The platform is crafted to provide a comprehensive set of features at an impressive return on investment, making it perfect for small to mid-sized enterprises.
Ready to streamline your document signing experience? Begin your free trial with airSlate SignNow today and explore the advantages of a user-friendly, affordable eSignature solution, complete with clear pricing and dedicated 24/7 support.
How it works
Rate your experience
-
Best ROI. Our customers achieve an average 7x ROI within the first six months.
-
Scales with your use cases. From SMBs to mid-market, airSlate SignNow delivers results for businesses of all sizes.
-
Intuitive UI and API. Sign and send documents from your apps in minutes.
A smarter way to work: —how to industry sign banking integrate
How to sign and fill out a document online
Document management isn't an easy task. The only thing that makes working with documents simple in today's world, is a comprehensive workflow solution. Signing and editing documents, and filling out forms is a simple task for those who utilize eSignature services. Businesses that have found reliable solutions to how to functionality e sign print document don't need to spend their valuable time and effort on routine and monotonous actions.
Use airSlate SignNow and how to functionality e sign print document online hassle-free today:
- Create your airSlate SignNow profile or use your Google account to sign up.
- Upload a document.
- Work on it; sign it, edit it and add fillable fields to it.
- Select Done and export the sample: send it or save it to your device.
As you can see, there is nothing complicated about filling out and signing documents when you have the right tool. Our advanced editor is great for getting forms and contracts exactly how you want/need them. It has a user-friendly interface and full comprehensibility, providing you with complete control. Sign up today and begin enhancing your eSign workflows with highly effective tools to how to functionality e sign print document on the web.
How to sign and complete documents in Google Chrome
Google Chrome can solve more problems than you can even imagine using powerful tools called 'extensions'. There are thousands you can easily add right to your browser called ‘add-ons’ and each has a unique ability to enhance your workflow. For example, how to functionality e sign print document and edit docs with airSlate SignNow.
To add the airSlate SignNow extension for Google Chrome, follow the next steps:
- Go to Chrome Web Store, type in 'airSlate SignNow' and press enter. Then, hit the Add to Chrome button and wait a few seconds while it installs.
- Find a document that you need to sign, right click it and select airSlate SignNow.
- Edit and sign your document.
- Save your new file to your account, the cloud or your device.
Using this extension, you prevent wasting time and effort on monotonous actions like saving the document and importing it to an electronic signature solution’s library. Everything is easily accessible, so you can quickly and conveniently how to functionality e sign print document.
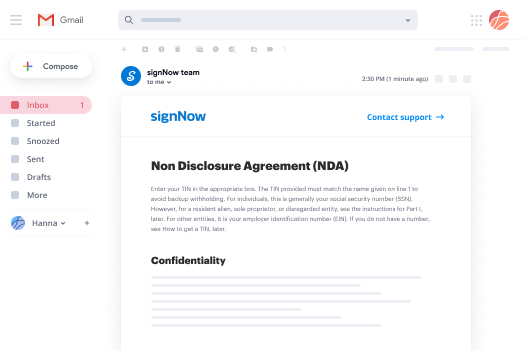
How to sign docs in Gmail
Gmail is probably the most popular mail service utilized by millions of people all across the world. Most likely, you and your clients also use it for personal and business communication. However, the question on a lot of people’s minds is: how can I how to functionality e sign print document a document that was emailed to me in Gmail? Something amazing has happened that is changing the way business is done. airSlate SignNow and Google have created an impactful add on that lets you how to functionality e sign print document, edit, set signing orders and much more without leaving your inbox.
Boost your workflow with a revolutionary Gmail add on from airSlate SignNow:
- Find the airSlate SignNow extension for Gmail from the Chrome Web Store and install it.
- Go to your inbox and open the email that contains the attachment that needs signing.
- Click the airSlate SignNow icon found in the right-hand toolbar.
- Work on your document; edit it, add fillable fields and even sign it yourself.
- Click Done and email the executed document to the respective parties.
With helpful extensions, manipulations to how to functionality e sign print document various forms are easy. The less time you spend switching browser windows, opening several accounts and scrolling through your internal data files seeking a document is more time and energy to you for other crucial tasks.
How to safely sign documents in a mobile browser
Are you one of the business professionals who’ve decided to go 100% mobile in 2020? If yes, then you really need to make sure you have an effective solution for managing your document workflows from your phone, e.g., how to functionality e sign print document, and edit forms in real time. airSlate SignNow has one of the most exciting tools for mobile users. A web-based application. how to functionality e sign print document instantly from anywhere.
How to securely sign documents in a mobile browser
- Create an airSlate SignNow profile or log in using any web browser on your smartphone or tablet.
- Upload a document from the cloud or internal storage.
- Fill out and sign the sample.
- Tap Done.
- Do anything you need right from your account.
airSlate SignNow takes pride in protecting customer data. Be confident that anything you upload to your account is secured with industry-leading encryption. Automatic logging out will shield your account from unwanted entry. how to functionality e sign print document from the mobile phone or your friend’s mobile phone. Security is vital to our success and yours to mobile workflows.
How to sign a PDF document on an iPhone or iPad
The iPhone and iPad are powerful gadgets that allow you to work not only from the office but from anywhere in the world. For example, you can finalize and sign documents or how to functionality e sign print document directly on your phone or tablet at the office, at home or even on the beach. iOS offers native features like the Markup tool, though it’s limiting and doesn’t have any automation. Though the airSlate SignNow application for Apple is packed with everything you need for upgrading your document workflow. how to functionality e sign print document, fill out and sign forms on your phone in minutes.
How to sign a PDF on an iPhone
- Go to the AppStore, find the airSlate SignNow app and download it.
- Open the application, log in or create a profile.
- Select + to upload a document from your device or import it from the cloud.
- Fill out the sample and create your electronic signature.
- Click Done to finish the editing and signing session.
When you have this application installed, you don't need to upload a file each time you get it for signing. Just open the document on your iPhone, click the Share icon and select the Sign with airSlate SignNow button. Your sample will be opened in the application. how to functionality e sign print document anything. Plus, utilizing one service for your document management requirements, everything is quicker, better and cheaper Download the application today!
How to sign a PDF file on an Android
What’s the number one rule for handling document workflows in 2020? Avoid paper chaos. Get rid of the printers, scanners and bundlers curriers. All of it! Take a new approach and manage, how to functionality e sign print document, and organize your records 100% paperless and 100% mobile. You only need three things; a phone/tablet, internet connection and the airSlate SignNow app for Android. Using the app, create, how to functionality e sign print document and execute documents right from your smartphone or tablet.
How to sign a PDF on an Android
- In the Google Play Market, search for and install the airSlate SignNow application.
- Open the program and log into your account or make one if you don’t have one already.
- Upload a document from the cloud or your device.
- Click on the opened document and start working on it. Edit it, add fillable fields and signature fields.
- Once you’ve finished, click Done and send the document to the other parties involved or download it to the cloud or your device.
airSlate SignNow allows you to sign documents and manage tasks like how to functionality e sign print document with ease. In addition, the security of your data is top priority. File encryption and private servers can be used as implementing the most up-to-date features in information compliance measures. Get the airSlate SignNow mobile experience and operate better.


FAQs
-
How To Print eSign Document with airSlate SignNow?
To print an eSigned document using airSlate SignNow, first, log into your account and navigate to the document you wish to print. Click on the 'Download' button, which allows you to save the document in PDF format. Once downloaded, you can easily print the eSign document directly from your device.
-
Is there a cost associated with printing eSign documents on airSlate SignNow?
Printing eSign documents through airSlate SignNow does not incur any additional charges beyond your subscription fees. The platform offers a cost-effective solution for businesses, allowing unlimited access to print and manage documents without hidden costs.
-
What features does airSlate SignNow offer for eSigning documents?
airSlate SignNow provides a range of features for eSigning documents, including customizable workflows, templates, and real-time tracking. These features enhance the ease of use and efficiency, making it simple to manage and print eSign documents as needed.
-
Can I integrate airSlate SignNow with other applications?
Yes, airSlate SignNow offers seamless integrations with numerous applications such as Google Drive, Salesforce, and Dropbox. This integration facilitates easy access to your documents, allowing users to print eSign documents directly from their preferred platforms.
-
What are the benefits of using airSlate SignNow for eSigning?
Using airSlate SignNow for eSigning provides numerous benefits, including enhanced security, compliance with legal standards, and improved workflow efficiency. Additionally, the ability to print eSign documents easily allows businesses to maintain physical copies for their records.
-
How do I ensure my eSign documents are secure with airSlate SignNow?
airSlate SignNow prioritizes the security of your eSign documents by employing advanced encryption and authentication methods. This ensures that your documents remain confidential and secure, even when printing them.
-
Can I print multiple eSign documents at once using airSlate SignNow?
Yes, airSlate SignNow allows users to download and print multiple eSign documents at once. By selecting the documents you wish to download, you can streamline the process and save time when printing eSign documents.
-
For a Tatkal passport, do I need an Annexure-E Affidavit? How do I prepare it? I have no special case like a name change.
Yes you need it only for tatkal not for normal You can download it from the official passport website. Go to home page select annexures. Click annexure E. Download it and fill your details. Take a printout sign it. It's ready in 5 minutes. It is a simple one page declaration.But for tatkal you will need a VC from a high ranking civil, police or military officer who know you personally. Which is very difficult to get because most of them refuse to give itVC is a declaration which is given on official letter of the officer that he knows the applicant personally and has no criminal case against him or her.Apply for tatkal passport after you get a VC. Else go for normal.
-
How can my client e-sign my term & conditions which is a page on my website?
signNow, EchoSign and many other signature capture SAAS companies have the ability to capture a signature for documents and store it. I think they both allow you to embed the document directly on a webpage so someone could sign. These would be legally binding signatures in the court of law, just as if they signed it in person.However,Why do you need something that advanced? Usually a term of service is something your lawyer might want you to have or your credit card processor might require but these can be achieved with a checkbox on your sign up form, that says “I accept the terms of service” and link the words “terms of service” to a page with the terms of service.Should be pretty simple good luck.
-
If school curriculums no longer teach cursive writing, how will kids be able to sign their name in the future?
Lots of great answers already, mostly focused around the current state of technology and the mistaken impression that signatures have to be in “cursive” to be valid.But there are two other issues with this question. First is that it’s based on a hypothetical situation that doesn’t exist and isn’t likely to in the near future. Over 70% of elementary teachers in a recent survey still taught cursive as part of their regular lessons, which makes this one of the most commonly taught topics in our schools. It’s not in the “Common Core” standards, the political hyperbole goes, but then again, those standards aim to address cognitive development rather than basic life skills.In addition, school boards being mostly elected officials and thus held to the sway of (often ill-informed) public opinion, the massive outcry over the imagined threat to our society from a nonexistent lack of teaching cursive is pushing more local and state ed departments to adopt or create standards in which cursive is a required skill. Yay, us!…because, you know, having something as a required skill means so much for mastery long-term (looking at you, Algebra II and Geometry)….In any event, I suspect we’ll continue seeing a resurgence in cursive teaching because politics is more important than logic in so many education policy discussions.But the second issue is, to me, the greater one. Replace cursive with driving with a stick shift or any other life skill, and you have a great conservative rant in general: “why aren’t the schools teaching ____”? What, the parents don’t have any responsibility to teach anything any more? I don’t know about your kids, but mine can drive a stick, change a tire, cook an egg, and write in cursive, and that’s absolutely out of any context with what they might or might not have learned in school.Parents, teach your dang kids. Not asking you to be the calculus teacher, by any means, but if your kid is missing a basic life skill, look in the mirror first before you visit a school board meeting. We can handle the cognitive development and speak all day long of fancy pedagogy topics, but if your kid can’t sign a document or flip a pancake, that ain’t our fault.
-
How do I apply for a PAN card?
HIGHLIGHTS * Permanent Account Number or PAN card is an identity proof in India * It is needed to open a bank account in the country * You can get one easily via a process that is completely online A Permanent Account Number or PAN Card is an important document in India. You’ll need it to file income tax returns, to make payments above Rs. 50,000, and even to open a bank account. A PAN card is a valid proof of identity in India and it can be issued to citizens of India (including minors), non-resident Indians (NRIs), and even foreign citizens. The procedure for application varies for these categories of people but if you are an Indian citizen and wondering how you can apply for PAN card online, we will give an answer in this guide. These steps are for individuals only, and not for other categories under which a PAN card can be issued, such as an association of persons, body of individuals, company, trust, limited liability partnership, firm, government, Hindu undivided family, artificial juridical person, or local authority. Documents required to apply for a PAN card online Indian citizens need three types of documents to apply for a PAN card. These are identity proof, an age proof, and a proof of date of birth. 1. Identity proof documents (one of):Elector's photo identity cardRation card having photograph of the applicantPassportDriving licenceArm's licenseAadhaar card issued by the Unique Identification Authority of IndiaPhoto identity card issued by the Central Government or State Government or a Public Sector UndertakingPensioner Card having photograph of the applicantCentral Government Health Scheme Card or Ex-servicemen Contributory Health Scheme photo card certificate of identity in original signed by a Member of Parliament or Member of Legislative Assembly or Municipal Councillor or a Gazetted Officer, as the case may beBank certificate in original on letterhead from the branch (along with name and stamp of the issuing officer) containing duly attested photograph and bank account number of the applicant 2. Address proof document (one of)copy of the following documents of not more than three months old electricity bill landline telephone or broadband connection bill water bill consumer gas connection card or book or piped gas bill bank account statement depository account statement credit card statement copy of post office passbook having address of the applicant passport,passport of the spouse voter ID card latest property tax assessment order driving licence domicile certificate issued by the GovernmentAadhaar card issued by the UIDAIallotment letter of accommodation issued by the Central Government or State Government of not more than three years old property registration document certificate of address signed by a Member of Parliament or Member of Legislative Assembly or Municipal Councillor or a Gazetted Officeremployer’s certificate in original 3. Proof of date of birth (one of):birth certificate issued by the Municipal Authority or any office authorised to issue Birth and Death Certificate by the Registrar of Birth and Deaths or the Indian Consulate as defined in clause (d) of subsection (1) of section 2 of the Citizenship Act, 1955 (57 of 1955)pension payment order marriage certificate issued by Registrar of Marriagesmatriculation certificate passport driving licence domicile certificate issued by the Government affidavit sworn before a magistrate stating the date of birth If you are looking to get a PAN card for any category other than the individual, the full list of valid documents for a PAN card is on the Income-tax department’s website [ https://www.incometaxindia.gov.in/Documents/documents-required-for-pan.pdf ]. How much does it cost to apply for a PAN card online For Indian citizens, applying for a new PAN card costs Rs. 116 (plus online payment charges or around Rs. 5). The fee is Rs. 1,020 for foreign citizens (with around Rs. 5 as online payment charges). How to apply for PAN Card online Follow these steps to apply for a PAN card online in India: 1. You can apply for a PAN card online either via NSDL [ https://www.onlineservices.nsdl.com/paam/endUserRegisterContact.html ] or UTITSL [ https://www.utiitsl.com/UTIITSL_SITE/pan/#six ] websites. Both have been authorised to issue PAN cards in India. For this tutorial, we will show you how to apply for a PAN card via the NSDL website [ https://www.onlineservices.nsdl.com/paam/endUserRegisterContact.html ]. 2. On the page linked in the previous step, you will see a form titled Online PAN application. Under Application Type select New PAN - Indian Citizen (Form 49A). If you’re a foreign national, select New PAN - Foreign Citizen (Form 49AA). 3. Select the category of PAN card you need. For most people, this will be Individual. 4. Now fill in your personal details such as name, date of birth, mobile number, etc., enter the captcha code and click Submit. 5. Now you have three choices — authenticate via Aadhaar to avoid sending any documents, scan documents and upload them via e-sign, or to physically submit documents. 6. We chose to authenticate via Aadhaar as all it needs is an OTP and payment. If you don’t want that option, the steps for the other two are similar except the part where you have to send documents. 7. Enter all details such as Aadhaar number (optional) as requested on screen, and click Next. 8. This step requires you to fill in your name, date of birth, address, etc. Do that, and click Next. 9. Now you will hit the banana skin that’s the AO code (Assessing Officer code). This looks complicated but is actually quite simple. Just select one of the four choices at the top — Indian Citizens, NRI and Foreign Citizens, Defence Employees, or Government Category. 10. Then under Choose AO Code, select your state and area of residence. Wait for a few seconds and you will see a full list of AO codes in the box below. Carefully scroll and look for the category that applies best to you. There are different categories for companies, non-salaried people, government servants, private sector employees, etc. If you don’t know which category you fall under, contact a chartered accountant to find out. Click on the correct AO code and it’ll be auto-filled in the form above. Click Next. 11. Select the documents you have submitted as proof of age and residence from the drop-down menu, fill in required details, and then click Submit. Now you will be redirected to the payment page and you can choose one of many common online payment methods. The fee for PAN card applications for Indian citizens is Rs. 115.90 inclusive of all taxes. A small fee is added to this as online payment charges so the total works out to around Rs. 120. Once you have paid, you will be asked to authenticate via Aadhar OTP, or submit documents via e-sign, or to physically send the documents to NSDL. You will also receive an email acknowledgement from NSDL about your application and your PAN card will be couriered to you once the application has been processed. Keep the acknowledgement number handy, we recommend that you either save it somewhere safe or print it.
-
How much does Zerodha charge for opening a demat+trading account?
Account Opening Charges: The account opening fee is Rs. 300 for an Equity Trading and DEMAT Account & Mutual Fund Account and Rs. 200 for a Commodity Account. You can choose both of them at same time by paying Rs 500.Annual Maintenance Charges: Rs 354 (Rs 300 + 18% GST)Transaction Charges:You can open your Demat/Mutual Fund Account with Zerodha online within half an hour following some easy steps mentioned below.You can start purchasing shares right after that. However to sell shares, you need to send POA signed form to them by post which will be available just after account opening. It will take 1 day post receiving the courier/speed post for them to activate shares selling facility in your account.All you need is scanned copy of:(i) Aadhaar Card No(ii) PAN Card No(iii) 1 cancelled Cheque (It should contain your name, IFSC Code, MICR No). Else you can you use latest Bank Account Statement.(iv) Your Signature on a piece of paper(v) To enable Futures and Options segment, either one of the following is to be kept ready:A copy of your latest 6 month Bank Statement or Passbook ORA Copy of your form 16 ORA copy of your Networth Certificate ORA copy of your last salary slip ORA copy of your latest ITR acknowledgementNow lets get started & open the Zerodha Account:1. Click here to go to the account opening page. Open an online trading and demat account with Zerodha and enjoy the lowest brokerage .2. After doing so, you need to fill up your details like Name, Mobile number (NOTE: Your Aadhaar should be linked to this mobile no if you want to open the account online. For offline, you can give any mobile no) and email id & then click on CONTINUE TO SIGNUP.3. Click on CONTINUE TO SIGNUP. Then, you will receive a mail on the e-mail id entered by you to reset your password.You will need to click on “Click here” to set your password. Choose a strong password with a combination of alphabets, numbers & symbols.4. Now after, That You need to Fill up your PAN details and Date of Birth, You need to check mark the box, for confirming PAN details.5. Then in Step 1, you will be asked to opt your Trading choices, If you are new to stock market you can simply choose Equity and Currency option (300 ₹ ) as I have done so. But, if you want to trade commodities as well then select that option too.6. Then, you will asked to pay the amount for opening a Trading account with Zerodha. Pay the amount from your preferred payment method (Card/ Netbanking/ Wallet).7. After payment, you will receive you will see Congratulations message displayed on screen. Below that you need to fill up more details as shown in below picture.First you will have to fill up Bank Details (Branch’s IFSC, Bank Account No)Then below that you will have to fill up Background Info (Mother’s first name, mother’s last name, marital status, occupation etc). After filling, you should tick all the 3 boxes below & click on CONTINUE.8. A new page will open where you will see the option of “Instant Account Opening with Aadhaar”. If you do not have a digilocker account, you need to create it first by clicking on the link mentioned there (shown in image below).A new page like this(image below) will open. There you will have to register by entering your mobile no & verifying OTP.Then you need to set your username & password.After that you need to link your Aadhaar by quoting Aadhaar no verifying with OTP (OTP will come in no registered with Aadhaar).Thats it your DigiLocker account will be created. Now you need to return to the previous tab where you were opening Zerodha Account.Tick both the boxes & then click on LINK YOUR DIGILOCKER WITH ZERODHA.9. A pop up will appear where you need to sign in to your DigiLocker account by entering username & password. (Do not forget to tick the box “I allow DigiLocker to share my documents with Zerodha….”)Select your Aadhaar Card from there.After that you need to again click on LINK YOUR DIGILOCKER WITH ZERODHA.10. A new screen will come displaying “Let’s finish the application”.Below that you have to again fill up some details like Marital status, Father’s first name, Father’s last name etc. You will again need to fill up Bank Account & Background Info although you had already filled up the same in previous pages.Tick the 3 boxes & click on CONTINUE.11. Next is IPV Verification over webcam/phone.You should write down your OTP shown on screen on a piece of paper or receive it on your smartphone by clicking on the link on the page(Step 1)Then hold the piece of paper/ mobile phone with the code infront of your mobile phone/ webcam. (As shown in image below).Click on Start IPV. Then click on Take Video. Then click on SAVE IPV.12. Now you will have the option to either Digitally sign the application with Aadhaar (mobile OTP) or else print & courier it. I will suggest you to select Aadhaar Option.13. Now you need to upload the scanned copy of the documents: Bank Account Proof, Signature, PAN (Note: Format of PAN scan should be jpg/jpeg ie it should be an image format. Rest all can be pdf format). Income Proof is optional & only required if you want to trade Futures & Options.14. Now is the time to eSign. If you had opened only Equity account, you will have to only eSign Equity. Click on eSign Equity.A popup will display. You can proceed with Google+ or through email where you will have to verify OTP sent to your registered mail.Then a popup will appear. You have to tick on the box (I agree to do eKYC…) & click proceed to eSign.You will be then redirected to NSDL website where you will have to enter your Aadhaar No & then verify OTP. (Do not forget to tick the box: I hereby…).Then you have to click Sign Now.The again the same NSDL website will re-appear. You will again have to enter Aadhaar No & verify OTP.15. You are almost done. Now you will have to download the Demat POA form, fill it up & send it to the address mentioned there.Thanks for your patience for going through my lengthy post.So go ahead and open your account at Zerodha
-
Why don’t people like to read the fine print before signing a document?
It’s frustrating to read through long documents, especially when you don’t fully understand what’s being said or when you are past the point of having the time to choose not to use a service. There are a great deal of situations where reading the fine print is just an education in how you might be screwed later, rather than a roadmap to deciding whether or not to proceed. Often, it can be much more comforting to just ignore the possible consequences of using a product in hopes that you never have an applicable problem.Although I’ve read the fine print on maybe 10% of the things I agree to and skimmed another 25%, reading the fine print has personally benefitted me maybe three times in my life. Two of those times it has been to read the funny joke that the lawyers put in the ToS as a reward for close readers. Once, it was so that I could opt out of forced arbitration if I ever had a problem with using my Nintendo Switch. And actually, that last time hasn’t benefitted me in any concrete way, because I still haven’t had cause to sue Nintendo yet. *dreamy sigh* Maybe some day.
-
What is the fastest way to get a PAN card?
Apply Pan Card online - I will teach you today how you can apply pan card online only just 106 rs only the application fee, no extra charges. The pan card you get at your doorstep only with in one week the physical card if all process go smoothly otherwise it will take 2 week max time, so you need to track on daily basis once you get the acknowledgement number and the e-pan card you will receive within 2-3 days onces the income tax officer verify your details or documents that you have provided.Step By Step Process Please Follow And Fill The Application Form For Applying Pan Card Online :Step 1: Go to the official website of NSDLStep 2: A page will open, under Application Type select New Pan- Indian Citizen (Form 49A). If you are a foreign national then select New PAN -Foreign Citizen(49AA)Step 3: Select the category of PAN card you need.Step 4: Fill in your personal details like name, date of birth, mobile number, etcStep 5: Enter the captcha code and click submit.Step 6: After clicking the submit button, a token number will be generated. You will be required to click on the link to continue with your PAN applicationStep 7: A new page will appear and it will show you three options: 1. Submit digitally through e-KYC and e- Sign (paperless) 2. Submit scanned image through e-Sign 3. Forward application documents physically.Step 8: The most common and preferred is scanned image through e-sign.Step 9: After selecting the option, enter your details such as Adhaar Card number, parents name, etc. click next.Step 10: This step requires you to fill in your name, date of birth, address etc. After filling all the details click Next.Step 11: In the next step, you will be required to enter your area code, AO (assessing officer) type, range code, and AO number. Click next.Find AO number for your area : Click HereNote - If in your family anyone have PAN already then you can search the PAN number in NSDL website then you will see the AO details of that PAN and it will be easy for you to fill AO details.Read further important steps !! Don’t Miss :)Thanks
-
What other forms besides PDF can you download I-797 forms?
PDF may be the dominant format for sharing print-perfect documents, but it's not ideal for filling out forms. The better solution is to convert PDF forms to HTML forms so the form can be viewed in any web browser and filled out on any device. The challenge a consumer faces is how to convert a PDF to HTML without losing the integrity of the original PDF. Although I don't intend to pitch my company on Quora, I do want to inform you that my company uniquely converts PDFs into HTML forms that can be filled out, saved to PDF (for printing and archiving), e-signed and electronically submitted. We are already working with a customer for a large number of immigration forms and can equally help anyone automate their forms.
Trusted esignature solution— what our customers are saying


Get legally-binding signatures now!
Frequently asked questions
How do i add an electronic signature to a word document?
How to esign i9?
Find out other How To Print eSign Document
- How to file an llc amendment with the hawaii department of form
- Filing partyiesfiling partyies attorney name attorney form
- Proof of service california form
- G plaintiff s g defendant s form 2dc38 motion g to g
- Declaration notice of motion certificate form
- Alaska legal form titles legal documentsus legal forms
- Hawaii minor name change minor name change form
- Nonrefundable filing fee 10 form
- In the office of the lieutenant governor form
- Petitioner shall answer the following questions fully and completely and submit this fact sheet with your form
- Upon consideration of the petition of form
- Form c rev
- About state of hawaii online name change system form
- Name change of parent and minor children lawhelporg form
- Fact sheet information regarding the father of minor child
- For themselves and for and on behalf of form
- Tex govt ch 8 flashcardsquizlet form
- Form d hawaiigov
- Name city state zip code telephone in the office of form
- The following is to be signed by the minor over the age of ten and returned with the petition for change of form