How To Install eSign in CMS
Contact Sales
Make the most out of your eSignature workflows with airSlate SignNow
Extensive suite of eSignature tools
Robust integration and API capabilities
Advanced security and compliance
Various collaboration tools
Enjoyable and stress-free signing experience
Extensive support
Keep your eSignature workflows on track
Our user reviews speak for themselves


Award-winning eSignature solution


Procedure for Installing eSign in CMS
In the current digital environment, understanding how to set up eSign in CMS is crucial for businesses aiming to optimize their document signing workflows. airSlate SignNow provides an intuitive platform that streamlines the eSignature process, making it a suitable option for organizations of any size. By adopting this solution, companies can boost productivity and enhance their operations, ensuring that signing documents is efficient and straightforward.
Steps to Install eSign in CMS
- Launch your web browser and go to the airSlate SignNow homepage.
- Create a new account by registering for a free trial, or log in if you already possess an account.
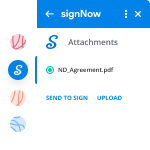
- Choose the document you wish to sign or send for signing by uploading it onto the platform.
- If you intend to use this document regularly, save it as a template for later access.
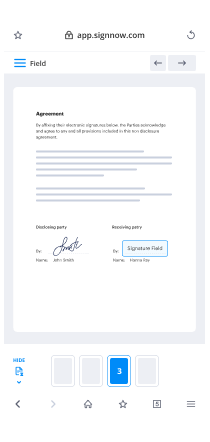
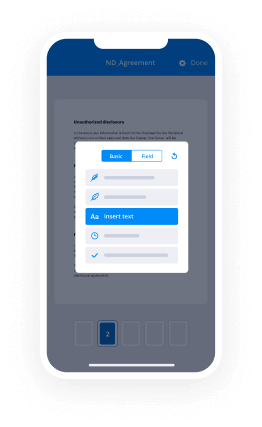
- Open your uploaded document and modify it by adding fillable fields or inserting essential details.
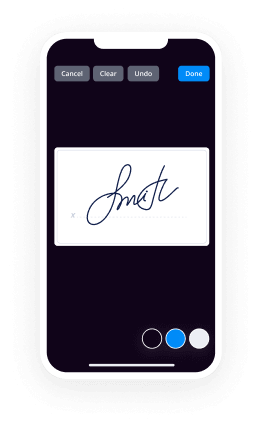
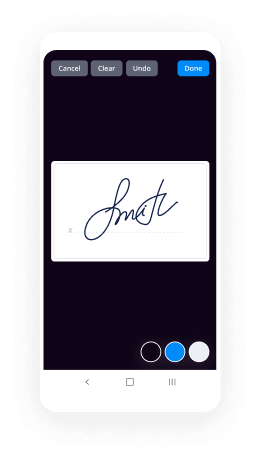
- Insert your signature and include signature fields for other signers as required.
- Hit 'Continue' to complete the setup and send an eSignature request to your signers.
By completing these steps, you can effortlessly set up eSign within your CMS and take advantage of what airSlate SignNow offers. This platform not only features a comprehensive toolset that maximizes return on investment but is also designed for smooth scalability, making it ideal for small to medium-sized enterprises.
Eager to improve your document signing procedure? Initiate your free trial with airSlate SignNow now and enjoy transparent pricing, outstanding customer support, and a seamless eSignature solution!
How it works
Rate your experience
-
Best ROI. Our customers achieve an average 7x ROI within the first six months.
-
Scales with your use cases. From SMBs to mid-market, airSlate SignNow delivers results for businesses of all sizes.
-
Intuitive UI and API. Sign and send documents from your apps in minutes.
A smarter way to work: —how to industry sign banking integrate
How to sign and complete a document online
Document management isn't an easy task. The only thing that makes working with documents simple in today's world, is a comprehensive workflow solution. Signing and editing documents, and filling out forms is a simple task for those who utilize eSignature services. Businesses that have found reliable solutions to how to integration e sign install cms don't need to spend their valuable time and effort on routine and monotonous actions.
Use airSlate SignNow and how to integration e sign install cms online hassle-free today:
- Create your airSlate SignNow profile or use your Google account to sign up.
- Upload a document.
- Work on it; sign it, edit it and add fillable fields to it.
- Select Done and export the sample: send it or save it to your device.
As you can see, there is nothing complicated about filling out and signing documents when you have the right tool. Our advanced editor is great for getting forms and contracts exactly how you want/need them. It has a user-friendly interface and full comprehensibility, offering you full control. Create an account today and begin enhancing your electronic signature workflows with convenient tools to how to integration e sign install cms on-line.
How to sign and complete forms in Google Chrome
Google Chrome can solve more problems than you can even imagine using powerful tools called 'extensions'. There are thousands you can easily add right to your browser called ‘add-ons’ and each has a unique ability to enhance your workflow. For example, how to integration e sign install cms and edit docs with airSlate SignNow.
To add the airSlate SignNow extension for Google Chrome, follow the next steps:
- Go to Chrome Web Store, type in 'airSlate SignNow' and press enter. Then, hit the Add to Chrome button and wait a few seconds while it installs.
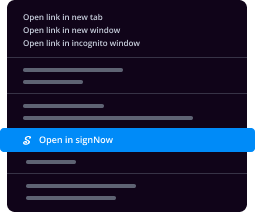
- Find a document that you need to sign, right click it and select airSlate SignNow.
- Edit and sign your document.
- Save your new file to your account, the cloud or your device.
By using this extension, you prevent wasting time on boring activities like saving the data file and importing it to a digital signature solution’s library. Everything is easily accessible, so you can easily and conveniently how to integration e sign install cms.
How to eSign documents in Gmail
Gmail is probably the most popular mail service utilized by millions of people all across the world. Most likely, you and your clients also use it for personal and business communication. However, the question on a lot of people’s minds is: how can I how to integration e sign install cms a document that was emailed to me in Gmail? Something amazing has happened that is changing the way business is done. airSlate SignNow and Google have created an impactful add on that lets you how to integration e sign install cms, edit, set signing orders and much more without leaving your inbox.
Boost your workflow with a revolutionary Gmail add on from airSlate SignNow:
- Find the airSlate SignNow extension for Gmail from the Chrome Web Store and install it.
- Go to your inbox and open the email that contains the attachment that needs signing.
- Click the airSlate SignNow icon found in the right-hand toolbar.
- Work on your document; edit it, add fillable fields and even sign it yourself.
- Click Done and email the executed document to the respective parties.
With helpful extensions, manipulations to how to integration e sign install cms various forms are easy. The less time you spend switching browser windows, opening several profiles and scrolling through your internal records seeking a document is much more time for you to you for other significant assignments.
How to safely sign documents using a mobile browser
Are you one of the business professionals who’ve decided to go 100% mobile in 2020? If yes, then you really need to make sure you have an effective solution for managing your document workflows from your phone, e.g., how to integration e sign install cms, and edit forms in real time. airSlate SignNow has one of the most exciting tools for mobile users. A web-based application. how to integration e sign install cms instantly from anywhere.
How to securely sign documents in a mobile browser
- Create an airSlate SignNow profile or log in using any web browser on your smartphone or tablet.
- Upload a document from the cloud or internal storage.
- Fill out and sign the sample.
- Tap Done.
- Do anything you need right from your account.
airSlate SignNow takes pride in protecting customer data. Be confident that anything you upload to your account is secured with industry-leading encryption. Auto logging out will protect your information from unauthorised access. how to integration e sign install cms out of your mobile phone or your friend’s mobile phone. Security is crucial to our success and yours to mobile workflows.
How to digitally sign a PDF file with an iPhone
The iPhone and iPad are powerful gadgets that allow you to work not only from the office but from anywhere in the world. For example, you can finalize and sign documents or how to integration e sign install cms directly on your phone or tablet at the office, at home or even on the beach. iOS offers native features like the Markup tool, though it’s limiting and doesn’t have any automation. Though the airSlate SignNow application for Apple is packed with everything you need for upgrading your document workflow. how to integration e sign install cms, fill out and sign forms on your phone in minutes.
How to sign a PDF on an iPhone
- Go to the AppStore, find the airSlate SignNow app and download it.
- Open the application, log in or create a profile.
- Select + to upload a document from your device or import it from the cloud.
- Fill out the sample and create your electronic signature.
- Click Done to finish the editing and signing session.
When you have this application installed, you don't need to upload a file each time you get it for signing. Just open the document on your iPhone, click the Share icon and select the Sign with airSlate SignNow button. Your doc will be opened in the app. how to integration e sign install cms anything. Plus, making use of one service for your document management demands, everything is quicker, better and cheaper Download the application right now!

How to eSign a PDF on an Android
What’s the number one rule for handling document workflows in 2020? Avoid paper chaos. Get rid of the printers, scanners and bundlers curriers. All of it! Take a new approach and manage, how to integration e sign install cms, and organize your records 100% paperless and 100% mobile. You only need three things; a phone/tablet, internet connection and the airSlate SignNow app for Android. Using the app, create, how to integration e sign install cms and execute documents right from your smartphone or tablet.
How to sign a PDF on an Android
- In the Google Play Market, search for and install the airSlate SignNow application.
- Open the program and log into your account or make one if you don’t have one already.
- Upload a document from the cloud or your device.
- Click on the opened document and start working on it. Edit it, add fillable fields and signature fields.
- Once you’ve finished, click Done and send the document to the other parties involved or download it to the cloud or your device.
airSlate SignNow allows you to sign documents and manage tasks like how to integration e sign install cms with ease. In addition, the security of your info is priority. File encryption and private web servers can be used for implementing the most recent capabilities in information compliance measures. Get the airSlate SignNow mobile experience and operate more proficiently.


FAQs
-
What is the process of How To Install eSign in CMS?
To learn How To Install eSign in CMS, start by accessing the admin panel of your CMS platform. Look for the plugins or integrations section, then search for airSlate SignNow and follow the installation instructions. This typically involves authorizing the integration and configuring settings to meet your business needs.
-
What features does airSlate SignNow offer for eSigning?
airSlate SignNow provides a variety of features that enhance the eSigning experience, including customizable templates, document tracking, and secure cloud storage. Understanding How To Install eSign in CMS allows you to integrate these features directly into your existing workflows, streamlining the document signing process.
-
Are there any costs associated with How To Install eSign in CMS?
While the integration process itself is straightforward and free, the cost of using airSlate SignNow depends on the subscription plan you choose. Pricing varies based on features and the number of users. Exploring these options will give you a better understanding of the overall investment required after learning How To Install eSign in CMS.
-
Can I integrate airSlate SignNow with other applications besides CMS?
Yes, airSlate SignNow supports integration with a wide range of applications beyond CMS platforms. After you master How To Install eSign in CMS, you can also connect it with tools like Google Drive, Dropbox, and popular CRM systems to enhance productivity and document management.
-
What are the benefits of using airSlate SignNow for eSigning?
Using airSlate SignNow for eSigning offers numerous benefits, including improved efficiency, reduced paper usage, and enhanced security for your documents. By learning How To Install eSign in CMS, you can easily leverage these advantages to streamline your business processes and ensure compliance.
-
Is there customer support available for installation issues?
Absolutely! airSlate SignNow offers robust customer support to assist with any questions or issues you might encounter while learning How To Install eSign in CMS. Their support team is available via chat, email, or phone to ensure a smooth installation and user experience.
-
What types of documents can I eSign using airSlate SignNow?
With airSlate SignNow, you can eSign a variety of document types, including contracts, agreements, and forms. Understanding How To Install eSign in CMS allows you to easily manage and send these documents for signature, making your workflow more efficient.
-
How can we install Fork CMS on ECS?
You can just install the Fork CMS on ECS easily by issuing the following command.# sudo composer create-project forkcms/forkcms Before that please install the prerequisites likeInstall PhpInstall GitInstall MariaDB or any other opensource DBInstall ComposerAfter installing the Fork CMS, Configure Database and Apache Server accordingly.I found an article which talks about Installing Fork CMS on ECS, For Details, Click Here.
-
How do I install Lavalite CMS in my system?
Lavalite is a content management system that is developed with a standardized collection of tools and packages that are used to build and maintain a sustainable web presence.Basically it is used for Laravel admin panel, we can setup a admin panel like CMS . It is easy to use and no need to develop more module from code most of modules can be designed using GUI mode.To install in your project.Some basic requirements.composerphpdatabaseBasic knowledge.phpdatabasecomposerComposer is a php package management system we can manage all packages and install other packages.using composer install lavalite and then you are ready to use it.Run this command to install .composer create-project LavaLite/cms --prefer-dist website Then after run this command to install and setup php artisan lavalite:install Now your installation and setup has complete.You are ready to use it.
-
How can I install Magento CMS?
Are you asking about installing on Localhost or cloud servers?Generally, you can install Magento on Localhost using Composer.You can use this command to install composercurl -sS https://getcomposer.org/installer | php Now you have to composer globally availablemv composer.phar /usr/local/bin/composer You can find rest of the steps on Magento’s official Docs: Install using ComposerIf you need to install it on cloud server then you can follow the guide here: https://www.cloudways.com/blog/h...This guide is for installing Magento on AWS EC2 instance. Installing on other cloud servers is not so different.
-
How do you install Wordpress org CMS?
WordPress is well-known for its ease of installation. Installing WordPress is a very simple process and takes less than five minutes to complete. Many web hosts now offer tools (e.g. Fantastico) to automatically install WordPress for you.Download the latest stable releaseWordPress is an open source software that is constantly being improved upon by members of the community. The development goes on in the background so that end users only get stable versions on live installs. The most recent, most stable version is always on the WordPress.org download page. You should always be running the most recent release to protect your site and never be afraid of updates!So head on over there and click the big blue button for the direct download of the zip file.Upload the filesUnzip the file, and use the FTP software to upload the files into your web host directory of your choice. If you want WordPress to be installed on the homepage of your site (which I recommend) it needs to go in the root folder.Create a database and userYou need to create your MySql database and username for the WordPress Installation. The easiest way to do this is usually through your host’s cPanel, or hosting control center.Login to your account and look for a link called MySql, Databases, or something similar.You will see a field to create a new database. Enter your database name, and click “Create Database”.Now that you have created your database for WordPress Installation, MySQL still needs a username. This username will have access to perform actions on the database.On the MySQL Databases page in your cPanel account, scroll down to MySQL Users section. Simply provide a username and password for your new user and click on the ‘Create a user’ button.This new user still does not have access to the database you created earlier for the WordPress Installation. For that you will need to add the user to the database and give them permissions to perform all actions.On the same MySQL Databases page in your cPanel account, scroll down to ‘Add User to a Database’ section. Select the database user you created from the dropdown menu next to user, then select database, and click on the add button.You will be now asked for the privileges you want to allow this user. Select all privileges and click on the Make changes button.Your MySQL database and user for WordPress Installation are now ready, and it is time to run the WordPress install.Run the install scriptSimply go to to the URL where you uploaded WordPress. If it is in the main domain, then enter your domain name in the browser window, like yoursite.com or yoursite.com.You will see the language selection page. You can choose a language here so that rest of the installation is displayed in your own language. You can also use English for now and then later change the language.Click on the continue button to proceed.You will now see some installation instructions. Basically WordPress will now tell you that it will need your database name, password, and mysql host information.Click on the ‘Let’s go’ button to continue.WordPress will now show you a form. You need to enter the name of the database you created earlier.Fill in the information and then click on submit button. WordPress will now connect to your database and will show you a success message.Click on ‘Run the Install’ button to continue.WordPress will now create tables in your database and then send you to the next step of the installation.Now you need to provide some information for WordPress to setup your site. This includes site title, username, password, and admin email address.If you do not want your website to be visible to search engines, then you can check the box next to search engine visibility. Later when you are ready you can change this from WordPress settings. If you are unsure about what to do, then simply leave it unchecked.Click on the Install WordPress button to continue. WordPress will setup your website and finish the installation.You will see a success message showing your username. You can now click on the Log in button to sign in to your WordPress site.I hope this WordPress installation tutorial helped you learn how to easily install WordPress.For More details and other WordPress tips and tricks please visit WP Patron
-
How can I install CMS (Publii, Higo, Jekyll, etc.) to generate static site files on Chrome OS?
You’re confusing things. None of the items you ask about are actual CMS, they are static site generators where you generate the content and then upload them to a server for review and display.Here’s one solution for how to install and run Hugo in a Chromebook: Running Hugo on Chromebook · Camping CoderBut as a general rule of thumb, newer Chromebooks have a Linux partition where you can install software if you’re comfortable doing so
-
Could you tell what I did wrong and how to install Drupal CMS + LiteCommerce 3 together?
Could you tell what I did wrong and how to install Drupal CMS + LiteCommerce 3 together?Have you selected "Ecommerce CMS" profile during installation? It is the third radio button shown by the Drupal installation wizard on one of the first installation steps.I have another question about "Environment check" - if it's failed on my hosting how it will affect on LiteCommerce 3 operation?It depends on what exactly requirement your server doesn't meet. It can result into a non-working function or into a broken web site.
-
Is it easy to install an e-commerce website with Magento CMS and improve it by extensions?
Magento provides excellent extensions for eCommerce stores. Best of them are listed below :-1. Magik Extra Fee Extension2. Magento Hide Price Extension3. Magento Quick View4. Magento Bulk Product Manager5. Magento Countdown Timer Extension6. Magento SEOSpace Extension7. Magento FaqMate Extension8. BlogMate: Magento Blog Extension9. Magento Festive Flavor10. Magento Checkout ProManagerPixelCrayons
-
How can I install Pagekit CMS on CentOS 7.4?
Pagekit CMS does not restrict its installation to any specific operating system (OS). You can use any operating system (OS) of your choice; however, the installation steps would vary according to the choice of operating system.In this tutorial, we will host my Pagekit CMS on an Alibaba Cloud Elastic Compute Service(ECS) instance with CentOS 7.4 installed on it.This tutorial is divided into 2 sub-tutorials.In the first part, we will add super user, setup firewalls, setup Apache Server, MariaDB Server, install PHP 7 and its various modules, and install various other necessary packages.In the second part, we will learn to configure your domain, creating virtual host, and installing Let's Encrypt SSL to our website. We will also be installing Pagekit CMS and configuring it.I have read an article about it before, click here to know more.
Trusted esignature solution— what our customers are saying


Get legally-binding signatures now!
Frequently asked questions
How do i add an electronic signature to a word document?
How to know if an electronic signature was actually signed?
How to get electronic signature capability?
Get more for How To Install eSign in CMS
Find out other How To Install eSign in CMS
- Cherished hopes form
- Michigan pistol ri 60 form
- App 006 form
- Nc financial affidavit form
- Lm 3 2010 2019 form
- Asw tracking log form
- Iacuc forum listserv application form
- Ldss 2221a form
- Form 400 lease
- What happens if my tobacco license expires in georgia form
- Fsc declared form
- Atc fsc registration form xlsx arkansas tobacco control atc ar
- Plum creek application form
- Hhs 5161 1 form
- Line item budget form
- Sf424 rev9 2003 fillable form
- Cdcr print phspdffillercom form
- Ocr discrimination complaint form
- Virginia motion form
- Form 5208d