Append Comment Title. Use eSignature Tools that Work Where You Do.
Award-winning eSignature solution


Improve your document workflow with airSlate SignNow
Agile eSignature workflows
Instant visibility into document status
Easy and fast integration set up
Append comment title on any device
Detailed Audit Trail
Strict safety requirements
See airSlate SignNow eSignatures in action


airSlate SignNow solutions for better efficiency
Our user reviews speak for themselves


Why choose airSlate SignNow
-
Free 7-day trial. Choose the plan you need and try it risk-free.
-
Honest pricing for full-featured plans. airSlate SignNow offers subscription plans with no overages or hidden fees at renewal.
-
Enterprise-grade security. airSlate SignNow helps you comply with global security standards.

Your step-by-step guide — append comment title
Append comment title. Get maximum benefit from the most reliable and safe eSignature solution. Enhance your digital transactions using airSlate SignNow. Automate workflows for everything from simple personnel records to complex agreements and marketing forms.
Understand how to Append comment title:
- Upload a series of files from your drive or cloud storing.
- Drag & drop advanced fillable fields (signature, text, date/time).
- Alter the fields sizing, by tapping it and selecting Adjust Size.
- Insert checkboxes and dropdowns, and radio button groups.
- Edit signers and request attachments.
- Append comment title.
- Include the formula the place you require the field to appear.
- Use comments and annotations for the signers anywhere on the page.
- Save all modifications by clicking DONE.
Connect people from outside and inside your business to electronically work on essential documents and Append comment title anytime and on any device using airSlate SignNow. You may keep track of every activity done to your templates, receive alerts an audit statement. Remain focused on your business and customer relationships while understanding that your data is accurate and protected.
How it works
airSlate SignNow features that users love


See exceptional results Append comment title. Use eSignature Tools that Work Where You Do.


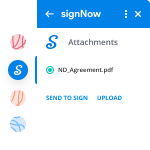
How to submit and sign a document online
Enjoy the easiest approach to append comment title. Prevent paper-based workflows and deal with PDF files from airSlate SignNow. Make ready and share your PDFs from your workplace or smoothly while on the go. No set up or more software necessary. All functions are available online, just go to signnow.com and create your own eSignature flow.
A brief instructions concerning how to append comment title in minutes
- Make an airSlate SignNow account (in the event you haven't signed up yet) or log in using your Google or Facebook.
- Simply click Upload and select one of the PDF files.
- Make use of the My Signature to insert your unique signature.
- Modify the sample in a powerful PDF with fillable fields.
- Complete your new form and click on Done.
Once finished, send an invite to sign to a number of recipients. Receive an enforceable agreement quickly applying any gadget. Explore much more tools to make significant PDFs; add more fillable fields append comment title and collaborate in teams. The eSignature solution gives a safe workflow and functions in accordance with SOC 2 Type II Certification. Ensure that all your information are protected so no one can edit them.


How to eSign a PDF in Google Chrome
Are you searching for a solution to append comment title straight from Chrome? The airSlate SignNow extension for Google is here now to help. Get a PDF template and right from the browser effortlessly open it with the editor. Put fillable fields for textual content and signature. eSign the PDF file and send out it securely based on GDPR, SOC 2 Type II Certification and more.
Employing this simple how-to guide listed below, boost up your eSignature workflow into Google and append comment title:
- Check out the Chrome web store and find the airSlate SignNow extension.
- Simply click Add to Chrome.
- Sign in to the account or create a new one.
- Add a PDF and click Open in airSlate SignNow.
- Change the document.
- Sign the PDF file utilizing the My Signature instrument.
- Just click Done to save the edits.
- Ask other individuals to sign by clicking on Invite to Sign and deciding on their email addresses/names.
Create a signature that's built in to the workflow to append comment title and receive PDFs eSigned within minutes. Leave behind the piles of paperwork sitting on your desk and start saving time and money for more important tasks. Selecting the airSlate SignNow Google extension is a great convenient decision with plenty of benefits.


How to sign an attachment in Gmail
If you're like most, you're used to downloading the attachments you receive, printing them out and after that signing them, right? Fine, we have now very good news for you. Putting your signature on PDFs with your inbox just became a lot easier. The airSlate SignNow add-on for Gmail allows you to append comment title without leaving your inbox. Do all you need; insert fillable fields and send signing links in a couple of clicks.
The best way to append comment title in Gmail:
- Find airSlate SignNow for Gmail within the from the G Suite Marketplace and then click Install.
- Log in to your airSlate SignNow account or make a new one.
- Open your message with the PDF file you want to eSign.
- Click on Upload if you want to save the PDF file to the airSlate SignNow profile.
- Click Open document to open the editor.
- eSign the PDF file taking advantage of My Signature.
- Send out a signing request to the other participants with the Send to Sign tool.
- Enter their email address and press OK.
As a result, the other customers will receive message letting them know to sign the PDF. No need to download the attachment over and over again, just append comment title in a couple of clicks. This add-one is suitable for users who like focusing on more essential things as an alternative to burning time for nothing. Boost your day-to-day compulsory labour with the award-winning eSignature solution.


How to eSign a PDF on the go with no mobile app
For many solutions, getting deals done on the go means setting up an application on your phone. We're very happy to say at airSlate SignNow we've created singing on the go faster and simpler by eliminating the demand for an app. To eSign, open your browser (any mobile browser) and get immediate access to airSlate SignNow and its highly-effective eSignature tools. Change docs, append comment title and more. No set up or additional software necessary. Handle your deal from any place.
Check out our easy recommendations that teach you the best way to append comment title.
- Open up your internet browser and go to signnow.com.
- Log in or register a new profile.
- Add or open up the PDF file you want to modify.
- Add fillable fields for textual content, eSignature and date/time.
- Draw, type or upload your signature.
- Click on Save and Close.
- Just click Invite to Sign and enter in a recipient's email if you want other people to eSign the PDF.
Working on documents with mobile is no different than with a computer: make a reusable template, append comment title and manage the flow as you would normally. In a few clicks, get an enforceable commitment that you can download to your device and send out to other people. Yet, if you really want an application, download the airSlate SignNow mobile app. It's comfortable, quick and has an intuitive design. Experience effortless eSignature workflows from your office, in a taxi or on an airplane.


How to sign a PDF utilizing an iPad
iOS is certainly a well-known operating system packed with native tools. It lets you eSign and edit PDFs using Preview without having additional application. Even so, as wonderful as Apple's option is, it doesn't provide any automation. Enhance your iPhone's abilities by using the airSlate SignNow application. Make use of your iPhone or iPad to append comment title and a lot more. Bring in eSignature automation to your mobile workflow.
Putting your signature by using an iPhone has never ever been so easy:
- Get the airSlate SignNow iPhone app in the AppStore and install it.
- Create a new account or log in along with your Facebook or Google.
- Simply click Plus and add the PDF you need to sign.
- Click on the PDF file where you need to insert your signature.
- Discover other features: put in fillable fields or append comment title.
- Utilize the Save option to make the changes.
- Send out your PDF files via mail or using a singing link.
Take a professional-looking PDFs from your airSlate SignNow app. Get the best from your efforts and work from anywhere; in your own home, the workplace, on a bus or plane, as well as at the beach. Handle a full record workflow effortlessly: generate reusable templates, append comment title and work on PDF files with partners. Turn your device into a powerful organization tool for executing deals.


How to eSign a PDF file using an Android
For Android users to manage documents using their mobile, they have to find and install extra software program. The Play Market is large and plump with alternatives, so choosing an excellent app isn't a challenge in case you have a chance to browse through numerous apps. To save lots of time as well as protect against disappointment, we advise airSlate SignNow for Android. Save and edit documents, make signing roles, as well as append comment title.
The 9 easy steps to amplifying your mobile workflow:
- Open up the app.
- Log in with your Facebook or Google profiles or create a new if you haven't authorized yet.
- Select + to upload a new record with your camera, internal or cloud storages.
- Tap just about anywhere in your PDF and insert your eSignature.
- Click on OK to agree and eSign.
- Try out a lot more enhancing functions; put images, append comment title, create a reusable template, and so on.
- Simply click Save to make modifications once you complete.
- Download the PDF or share it via mail.
- Make use of the Invite to sign tool in order to set & send a signing order to recipients.
Change the mundane and routine into easy and smooth together with the airSlate SignNow application for Android. Sign and send templates for signature from any place you're connected to the internet. Build professional-looking PDFs and append comment title with a few clicks. Put together a perfect eSignature process with just your smartphone and improve your overall productivity.
Get legally-binding signatures now!
FAQs
-
How do I change the title of a WordPress comment?
First thing you need to do is install and activate the Custom Comment Form Title plugin. After activating the plugin, go to Settings » Custom Comment Form Title. On this page you can change the default comment form title. Change it to something more interesting. -
How do I change leave comments in WordPress?
Log in to your WordPress dashboard. Open the "Appearance" section on the left side of the WordPress dashboard and then click "Editor." Click the "Comments" link in the right side of the page to edit the file "comments.php." Press "Ctrl" and "F" to open your Web browser's "Find" dialog. -
How do I change Comment settings in WordPress?
WordPress.com You can enable/disable comments on future posts in your Discussion settings under My Site(s) \u2192 Manage \u2192 Settings. Next, click on the Discussion tab. Under \u201cDefault article settings,\u201d toggle on/off the option to \u201cAllow people to post comments on new articles.\u201d And you're done! -
How do I delete comments on WordPress?
Delete All WordPress Comments To delete all the comments from your site, click on Comments from the left sidebar of your admin panel. Next select all the comments, choose Move to Trash option from the Bulk Actions dropdown box, and click on Apply. This will delete all the existing comments from your site. -
How do I enable comments on WordPress?
WordPress.com You can enable/disable comments on a post you've already published by going into your post's More Options. 2. Open More Options and check/uncheck \u201cAllow Comments.\u201d Click on the \u201cUpdate\u201d button and you're done! -
How do I comment on a WordPress blog?
Enable or Disable Comments on a Single Post in WordPress In the post edit area for the article click on Screen Options and then check the Discussion. Scroll down and you will see Discussion metabox. Uncheck the boxes to disable comments and trackbacks, or check them to enable comments and trackbacks. -
How do I remove comments from my WordPress blog?
From your WordPress admin dashboard, navigate to the WP Bulk Delete -> Delete Comments section. Check the filters that you want to use. If you use the free version, you can filter the comments based on their status and publication date. Then, click Delete Comments. -
How do I get comments on my blog?
Get visitors to subscribe. Many readers won't comment the first time they visit your blog. ... Emphasize email over RSS. ... Publish less often. ... Email your unopens. ... Ask for links. ... Revive the archives. ... Write with more passion. ... Assault the norm. -
How do I add a comment to a WordPress field?
Adding Custom Comment Fields in WordPress Click on the Comment Fields tab. The plugin offers four options to add to your comment fields. These include select box, radio input, checkbox, and the traditional text input. Click and drag the option you want into the box on the right. -
How do I style comments in WordPress?
To enable threaded comments, go to your WordPress admin (Settings » Discussion). Look at the section where it says other comment settings, and check the box for enable threaded (nested) comments. The default CSS classes generated by WordPress for the reply link are reply and comment-reply-link .
What active users are saying — append comment title


Related searches to Append comment title. Use eSignature Tools that Work Where You Do.
Frequently asked questions
How do I insert an electronic signature into a Word document?
How can I get my PDF ready to sign?
How can I make an eSigned document expire?
The ins and outs of eSignature


Find out other append comment title
- Empowering your workflows with Artificial intelligence ...
- Empowering your workflows with Artificial intelligence ...
- Empowering your workflows with Artificial intelligence ...
- Empowering your workflows with Artificial intelligence ...
- Empowering your workflows with Artificial intelligence ...
- Empowering your workflows with Artificial intelligence ...
- Empowering your workflows with Artificial intelligence ...
- Empowering your workflows with Artificial intelligence ...
- Empowering your workflows with Artificial intelligence ...
- Empowering your workflows with Artificial intelligence ...
- Empowering your workflows with Artificial intelligence ...
- Empowering your workflows with Artificial intelligence ...
- Empowering your workflows with Artificial intelligence ...
- Empowering your workflows with Artificial intelligence ...
- Empowering your workflows with Artificial intelligence ...
- Empowering your workflows with Artificial intelligence ...
- Empowering your workflows with Artificial intelligence ...
- Empowering your workflows with Artificial intelligence ...
- Empowering your workflows with Artificial intelligence ...
- Empowering your workflows with Artificial intelligence ...