Arrange Initial with airSlate SignNow
Award-winning eSignature solution


Get the robust eSignature capabilities you need from the solution you trust
Choose the pro platform created for pros
Set up eSignature API with ease
Work better together
Arrange initial, in minutes
Cut the closing time
Keep important information safe
See airSlate SignNow eSignatures in action


airSlate SignNow solutions for better efficiency
Our user reviews speak for themselves


Why choose airSlate SignNow
-
Free 7-day trial. Choose the plan you need and try it risk-free.
-
Honest pricing for full-featured plans. airSlate SignNow offers subscription plans with no overages or hidden fees at renewal.
-
Enterprise-grade security. airSlate SignNow helps you comply with global security standards.

Your step-by-step guide — arrange initial
Employing airSlate SignNow’s eSignature any business can enhance signature workflows and eSign in real-time, giving a better experience to consumers and staff members. arrange initial in a few simple actions. Our mobile apps make work on the move possible, even while off the internet! eSign documents from anywhere in the world and make trades in no time.
Keep to the stepwise instruction to arrange initial:
- Log in to your airSlate SignNow profile.
- Locate your document within your folders or upload a new one.
- Open the document and make edits using the Tools menu.
- Drag & drop fillable areas, add text and eSign it.
- List several signees by emails and set up the signing order.
- Specify which recipients will receive an completed copy.
- Use Advanced Options to limit access to the record add an expiration date.
- Click on Save and Close when done.
Additionally, there are more innovative functions available to arrange initial. Add users to your collaborative workspace, browse teams, and monitor teamwork. Millions of users across the US and Europe agree that a solution that brings everything together in a single cohesive enviroment, is exactly what organizations need to keep workflows functioning effortlessly. The airSlate SignNow REST API enables you to embed eSignatures into your app, website, CRM or cloud. Check out airSlate SignNow and get quicker, easier and overall more efficient eSignature workflows!
How it works
airSlate SignNow features that users love


See exceptional results arrange initial with airSlate SignNow
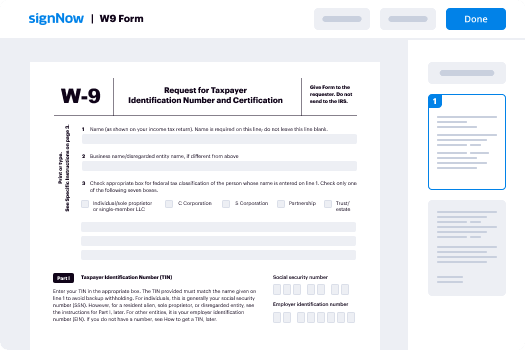
How to complete and sign a PDF online
Try out the fastest way to arrange initial. Avoid paper-based workflows and manage documents right from airSlate SignNow. Complete and share your forms from the office or seamlessly work on-the-go. No installation or additional software required. All features are available online, just go to signnow.com and create your own eSignature flow.
A brief guide on how to arrange initial in minutes
- Create an airSlate SignNow account (if you haven’t registered yet) or log in using your Google or Facebook.
- Click Upload and select one of your documents.
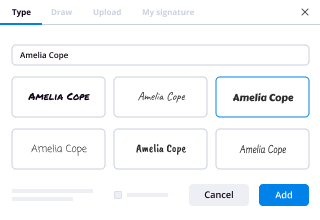
- Use the My Signature tool to create your unique signature.
- Turn the document into a dynamic PDF with fillable fields.
- Fill out your new form and click Done.
Once finished, send an invite to sign to multiple recipients. Get an enforceable contract in minutes using any device. Explore more features for making professional PDFs; add fillable fields arrange initial and collaborate in teams. The eSignature solution supplies a reliable process and functions in accordance with SOC 2 Type II Certification. Be sure that all of your data are protected and therefore no one can change them.

How to eSign a PDF in Google Chrome
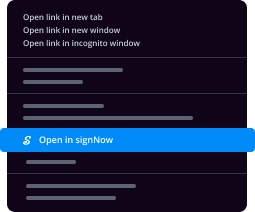
Are you looking for a solution to arrange initial directly from Chrome? The airSlate SignNow extension for Google is here to help. Find a document and right from your browser easily open it in the editor. Add fillable fields for text and signature. Sign the PDF and share it safely according to GDPR, SOC 2 Type II Certification and more.
Using this brief how-to guide below, expand your eSignature workflow into Google and arrange initial:
- Go to the Chrome web store and find the airSlate SignNow extension.
- Click Add to Chrome.
- Log in to your account or register a new one.
- Upload a document and click Open in airSlate SignNow.
- Modify the document.
- Sign the PDF using the My Signature tool.
- Click Done to save your edits.
- Invite other participants to sign by clicking Invite to Sign and selecting their emails/names.
Create a signature that’s built in to your workflow to arrange initial and get PDFs eSigned in minutes. Say goodbye to the piles of papers sitting on your workplace and begin saving time and money for extra important activities. Selecting the airSlate SignNow Google extension is a great convenient option with plenty of benefits.
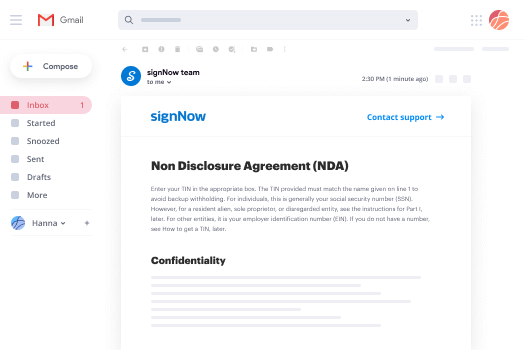

How to eSign an attachment in Gmail
If you’re like most, you’re used to downloading the attachments you get, printing them out and then signing them, right? Well, we have good news for you. Signing documents in your inbox just got a lot easier. The airSlate SignNow add-on for Gmail allows you to arrange initial without leaving your mailbox. Do everything you need; add fillable fields and send signing requests in clicks.
How to arrange initial in Gmail:
- Find airSlate SignNow for Gmail in the G Suite Marketplace and click Install.
- Log in to your airSlate SignNow account or create a new one.
- Open up your email with the PDF you need to sign.
- Click Upload to save the document to your airSlate SignNow account.
- Click Open document to open the editor.
- Sign the PDF using My Signature.
- Send a signing request to the other participants with the Send to Sign button.
- Enter their email and press OK.
As a result, the other participants will receive notifications telling them to sign the document. No need to download the PDF file over and over again, just arrange initial in clicks. This add-one is suitable for those who like focusing on more valuable aims as an alternative to burning time for nothing. Increase your day-to-day routine with the award-winning eSignature solution.
How to sign a PDF template on the go without an app
For many products, getting deals done on the go means installing an app on your phone. We’re happy to say at airSlate SignNow we’ve made singing on the go faster and easier by eliminating the need for a mobile app. To eSign, open your browser (any mobile browser) and get direct access to airSlate SignNow and all its powerful eSignature tools. Edit docs, arrange initial and more. No installation or additional software required. Close your deal from anywhere.
Take a look at our step-by-step instructions that teach you how to arrange initial.
- Open your browser and go to signnow.com.
- Log in or register a new account.
- Upload or open the document you want to edit.
- Add fillable fields for text, signature and date.
- Draw, type or upload your signature.
- Click Save and Close.
- Click Invite to Sign and enter a recipient’s email if you need others to sign the PDF.
Working on mobile is no different than on a desktop: create a reusable template, arrange initial and manage the flow as you would normally. In a couple of clicks, get an enforceable contract that you can download to your device and send to others. Yet, if you want an application, download the airSlate SignNow mobile app. It’s secure, fast and has an incredible design. Experience effortless eSignature workflows from the office, in a taxi or on a plane.
How to sign a PDF employing an iPhone
iOS is a very popular operating system packed with native tools. It allows you to sign and edit PDFs using Preview without any additional software. However, as great as Apple’s solution is, it doesn't provide any automation. Enhance your iPhone’s capabilities by taking advantage of the airSlate SignNow app. Utilize your iPhone or iPad to arrange initial and more. Introduce eSignature automation to your mobile workflow.
Signing on an iPhone has never been easier:
- Find the airSlate SignNow app in the AppStore and install it.
- Create a new account or log in with your Facebook or Google.
- Click Plus and upload the PDF file you want to sign.
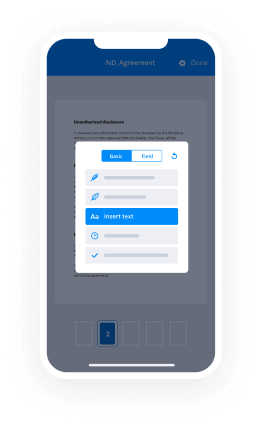
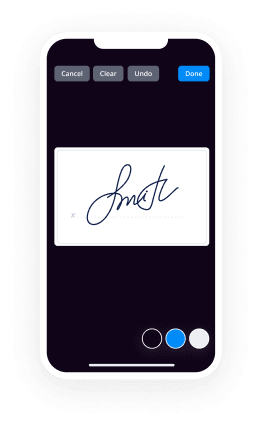
- Tap on the document where you want to insert your signature.
- Explore other features: add fillable fields or arrange initial.
- Use the Save button to apply the changes.
- Share your documents via email or a singing link.
Make a professional PDFs right from your airSlate SignNow app. Get the most out of your time and work from anywhere; at home, in the office, on a bus or plane, and even at the beach. Manage an entire record workflow easily: make reusable templates, arrange initial and work on PDF files with partners. Transform your device right into a effective business for closing deals.
How to eSign a PDF using an Android
For Android users to manage documents from their phone, they have to install additional software. The Play Market is vast and plump with options, so finding a good application isn’t too hard if you have time to browse through hundreds of apps. To save time and prevent frustration, we suggest airSlate SignNow for Android. Store and edit documents, create signing roles, and even arrange initial.
The 9 simple steps to optimizing your mobile workflow:
- Open the app.
- Log in using your Facebook or Google accounts or register if you haven’t authorized already.
- Click on + to add a new document using your camera, internal or cloud storages.
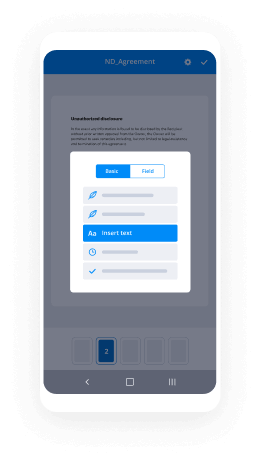
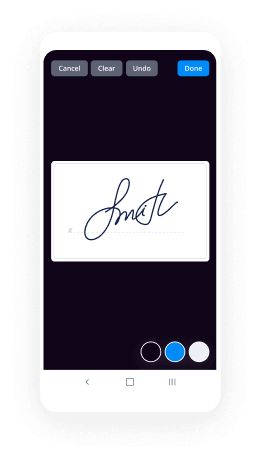
- Tap anywhere on your PDF and insert your eSignature.
- Click OK to confirm and sign.
- Try more editing features; add images, arrange initial, create a reusable template, etc.
- Click Save to apply changes once you finish.
- Download the PDF or share it via email.
- Use the Invite to sign function if you want to set & send a signing order to recipients.
Turn the mundane and routine into easy and smooth with the airSlate SignNow app for Android. Sign and send documents for signature from any place you’re connected to the internet. Build good-looking PDFs and arrange initial with couple of clicks. Created a perfect eSignature workflow with only your smartphone and improve your general productivity.
Get legally-binding signatures now!
FAQs
-
Do you use first or last initial for monogram?
As indicated earlier, monograms for one person, whether they're married or not, use the first letters of their first, middle and last name. If you are following the traditional initial order, the last name initial will be the largest and in the center, with the first and middle name on the left and right. -
What is the correct way to write initials?
Just like with men and women, monograms for children follow the same order of first, last and middle initial, with the last name initial being larger than the other two. However, just as with adults, if the font size of the initials are to be the same, then the order is as such: first, middle and last. -
What is a monogram letter?
A monogram is a motif made by overlapping or combining two or more letters or other graphemes to form one symbol. Monograms are often made by combining the initials of an individual or a company, used as recognizable symbols or logos. -
Do you monogram with first or last name initial?
Traditional Monogram For an individual, the first name initial is followed by the last and middle. The last name initial (center) is larger than those on the side. -
What are the letters in a monogram called?
A personal monogram often comprises three initials (first, last and middle name's). Traditionally a 3-initial monogram follows this order: first name initial, last name initial and finally middle name initial. This is because the center initial in a monogram is often the largest thus it often goes to your family name. -
How do you write initials for engraving?
Initials are 2 or 3 letters of a person's name that are in chronological order; first name, followed by middle name, and then ending with the last name. A monogram are those same 2 or 3 letters, with the exception that you reverse the middle and last name. -
How do you use initial in a sentence?
Examples of initial in a Sentence Adjective you've resolved my initial complaint, but now I have a new question Noun President Franklin D. Roosevelt's middle initial stood for \u201cDelano.\u201d She put her initials on each page of the contract. The initials F.D.R. -
How do you write initials with middle names?
If you have multiple middle names, start your monogram with your first name initial. Follow this with your middle name initials, and end with your last name initial. All of the initials should appear at the same size. -
How do you do a wedding monogram?
A married, or joint, monogram features the initial of the wife's first name on the left, the initial of the husband's first name on the right, and the initial of the couple's married surname slightly larger in the middle (for my fiancé, David Kirk, and I, our future married monogram is LKD). -
Should Monogram be first or last name?
\u201cA woman's monogram typically follows the format of first, middle, and last initials. A married woman's monogram traditionally reads first initial, maiden name initial, and married surname initial. -
In what order do monogram initials go?
If all the letters are the same size (also known as block), initials are ordered like your name: first, middle and last. If the monogram features a larger center initial, the ordering is always first name, last name, and middle name. -
How do you write your initials?
If all the letters are the same size (also known as block), initials are ordered like your name: first, middle and last. If the monogram features a larger center initial, the ordering is always first name, last name, and middle name. -
What is the proper way to do initials?
If all the letters are the same size (also known as block), initials are ordered like your name: first, middle and last. If the monogram features a larger center initial, the ordering is always first name, last name, and middle name. -
How do you engrave initials?
Please keep in mind that Monograms, by their very nature and tradition, are used only to engrave 3 initials. Monograms feature the Last Name Initial as a centered larger letter, with the first name initial on the left and the middle name initial on the right, smaller than the centered last name initial.
What active users are saying — arrange initial


Related searches to arrange initial with airSlate airSlate SignNow

OBS 555 - Bidsync.com form
recently in the free-software series I showed you OBS studio which is a free and open source screen recorder for Windows Mac and Linux in the comments of that video many of you asked for me to do a tutorial in this beginners guide I will show you how to setup and use OBS studio coming up next on tech gumbo to get OBS studio onto your computer go to the website which is OBS project comm there'll be a link in the description of this video you'll see on this page that you have options for Windows 7 plus Mac OS 10 point 10 plus and Linux the Windows and Mac downloads are standard installer packages if you select the Linux link it will open up a new page with the install directions once you have OBS installed open up the program since this is a beginner's guide I'll go at a slower pace and keep this simple to get you started with using OBS studio this is now my preferred screen capture program so I'll also go over the settings that I use to record my screen now that you have OBS opened if this is your first time using this software the screen capture area within this window should be black first you will need to set up a source so go down to the sources box select the plus sign you will have several choices I'll go over the two that are used most often if you plan to record your screen with the file save your computer so you can edit them later on select display capture I already have a display capture setup so this one is automatically named display capture 2 you can rename it if you want make sure that makes source visible is checked then select ok click on the display button to select the monitor you would like to record if you have a single monitor you should only have one option here if you've run a multiple monitor setup select your monitor if you want your mouse cursor to be captured when OBS records make sure that capture cursor is checked when done select okay let's go back to the sources box and select the plus sign again if you plan to record the video games that you play select Game Capture just like before you can change the name and make sure make source visible is checked select ok you can just leave everything here on the defaults and select ok again if you want to change the source settings select the source then select the Settings icon here you can change the display to delete a source select it then select the minus sign it'll ask you if you're sure you want to remove display capture to select yes and now it's gone the up/down arrows change the priority of the sources make sure the source you currently want to use is at the top of the list in addition to recording your display OBS also records your desktop audio from games websites or any other software on your computer it can also record the audio from your microphone so let's head over to the mixer section for desktop audio click the Settings icon to the right of the volume bar select properties from the drop down menu make sure that default is selected then hit OK just below desktop audio there's a separate listing for microphone select the Settings icon then properties here you can choose the microphone that you want to use once you have it selected select ok let's take a quick look at the rest of the user interface to the left of sources his scenes which will allow you to use more than one source while recording this is a little bit more advanced for a beginners tutorial so we'll skip over this one to the right of the mixer is scene transitions if you're not using scenes there's no need to worry about this one and to the right of the scene transitions is controls for doing a live stream you would select start streaming start recording is for a standard screen capture right now it says stop recording because I'm currently using it to record my screen once you become more comfortable with OBS you may want to try out studio mode for live streaming simply it allows you to make changes while you're streaming like adding and resizing images and adding text below studio mode is settings and exit exit is self-explanatory let's go into settings and I will show you which ones that I use for my recordings in each category I'll point out a few of the key settings first we'll take a look at the general settings where you have several languages that you can choose from and give a choice among three themes which will change the way that OBS looks I personally prefer the dark theme if you're streaming and you want to save a copy of your live stream to your desktop you would check automatically record rent streaming if your computer is not that powerful it may be best to leave this unchecked in the stream category streaming services is the most common stream type you can choose from different services including twitch YouTube and many others for server you can leave it on auto or manually change it to a location closer to you which in my case would be Dallas Texas and the stream key section is where you'd paste the key from the service you're using in output we'll look at the simple mode the streaming and recording settings here will work for most of you if you are streaming you may want to increase the video bitrate to 3,000 or 3,500 just don't make it so high that people have difficulty streaming your broadcast if you are recording recording paths where you want your files to be saved set the recording quality to high recording format to mp4 and encoder to Hardware here at the bottom you'll see a warning for mp4 listed just ignore it I've never had an issue using that format with OBS next is audio you shouldn't need to make any changes here I use a sample bit rate of 48 has explained earlier the desktop audio records your computer sounds - on default and you can also choose your microphone here in video there are key points to go over in this setting I can't show you the drop-down menus while recording is active but for the base resolution it would be best to set your base resolution to the size of your display your options will vary for output resolution 1920 by 1080 is preferred if you're on a lower powered system you may want to change this to 1280 by 720 downscale filter bi-linear is the lowest if I were able to open this drop-down menu there are two other options so use one of the other two if your system can handle it and the frames per second values will also depend on your hardware use 60 fps if you can otherwise try reducing to 30fps the hotkeys section is where you can assign keyboard shortcuts I only use a few in this recording I use f12 to start and escape to stop and for the last settings category which is advanced for most of you the default settings should work just fine I've never changed them and so far I've had no issues thanks for watching hopefully this beginner's tutorial helped you out with learning how to use OBS studio give this video a thumbs up if it was useful for you if you are new to this channel make sure to click the subscribe button and bail notification icon so you miss out on the latest videos from our beginner's guide series and other tech related stuff from tech gumbo
Show moreFrequently asked questions
What is the definition of an electronic signature according to the ESIGN Act?
How do I eSign a Word document?
What counts as an electronic signature?
Get more for arrange initial with airSlate SignNow
- Print electronically sign General Contractor Services Proposal
- Prove electronically signing Professional Job Application Record
- Endorse digi-sign Vehicle Service Order
- Authorize signature service Birthday Gift Certificate
- Anneal mark Architect Agreement Template
- Justify esign Repurchase Agreement
- Try initial Leader Training Application Template for Summer Camp
- Add Deposit Agreement email signature
- Send Plumbing Proposal Template signatory
- Fax Christmas Party Invitation initials
- Seal Patient Medical History byline
- Password Business Proposal Template UK esigning
- Pass Partnership Agreement Amendment digisign
- Renew Divorce Settlement Agreement signature service
- Test Maintenance Work Order countersign
- Require Joint Custody Agreement Template sign
- Comment attester signature block
- Boost corroborator esign
- Compel viewer digi-sign
- Void Demolition Contract Template template digital signature
- Adopt Incentive Agreement template electronically signed
- Vouch Interior Design Quote template byline
- Establish AbleNet University Cert template esign
- Clear Mobile Application Development Agreement Template template signature block
- Complete Basketball League Registration Event template signature service
- Force General Power of Attorney Template template signature
- Permit Go To Market Strategy template email signature
- Customize Business Purchase Agreement template signatory