Boost Signature Block Template with airSlate SignNow
Award-winning eSignature solution


Do more on the web with a globally-trusted eSignature platform
Remarkable signing experience
Reliable reports and analytics
Mobile eSigning in person and remotely
Industry rules and compliance
Boost signature block template, quicker than ever before
Useful eSignature add-ons
See airSlate SignNow eSignatures in action


airSlate SignNow solutions for better efficiency
Our user reviews speak for themselves


Why choose airSlate SignNow
-
Free 7-day trial. Choose the plan you need and try it risk-free.
-
Honest pricing for full-featured plans. airSlate SignNow offers subscription plans with no overages or hidden fees at renewal.
-
Enterprise-grade security. airSlate SignNow helps you comply with global security standards.

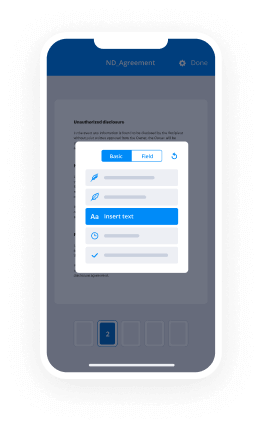
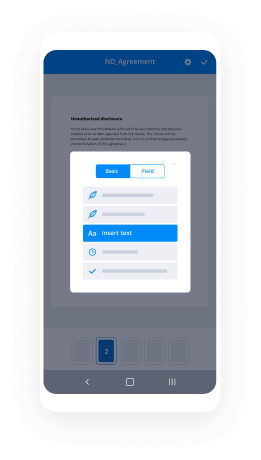
Your step-by-step guide — boost signature block template
Leveraging airSlate SignNow’s electronic signature any business can accelerate signature workflows and eSign in real-time, providing a better experience to customers and staff members. boost signature block template in a few simple steps. Our mobile-first apps make operating on the go feasible, even while off the internet! eSign documents from any place worldwide and close up deals quicker.
Keep to the walk-through guideline to boost signature block template:
- Sign in to your airSlate SignNow account.
- Locate your needed form within your folders or import a new one.
- Open up the document and make edits using the Tools menu.
- Drag & drop fillable boxes, type textual content and eSign it.
- Include several signees using their emails configure the signing sequence.
- Choose which users will get an executed version.
- Use Advanced Options to limit access to the record and set an expiry date.
- Press Save and Close when finished.
Additionally, there are more advanced tools open to boost signature block template. List users to your collaborative work enviroment, view teams, and keep track of teamwork. Millions of people all over the US and Europe concur that a system that brings people together in a single holistic digital location, is the thing that businesses need to keep workflows performing easily. The airSlate SignNow REST API enables you to embed eSignatures into your app, website, CRM or cloud storage. Try out airSlate SignNow and enjoy quicker, smoother and overall more productive eSignature workflows!
How it works
airSlate SignNow features that users love


See exceptional results boost signature block template with airSlate SignNow

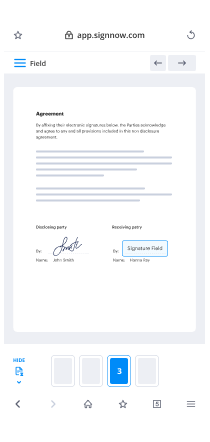
How to complete and sign a PDF online
Try out the fastest way to boost signature block template. Avoid paper-based workflows and manage documents right from airSlate SignNow. Complete and share your forms from the office or seamlessly work on-the-go. No installation or additional software required. All features are available online, just go to signnow.com and create your own eSignature flow.
A brief guide on how to boost signature block template in minutes
- Create an airSlate SignNow account (if you haven’t registered yet) or log in using your Google or Facebook.
- Click Upload and select one of your documents.
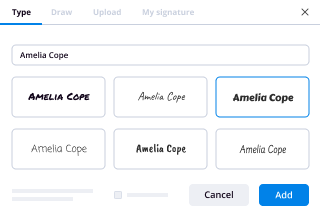
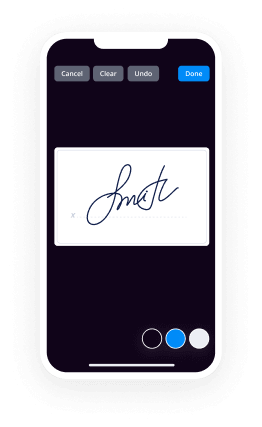
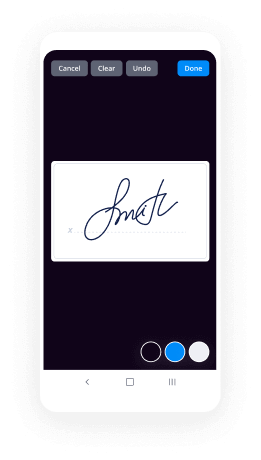
- Use the My Signature tool to create your unique signature.
- Turn the document into a dynamic PDF with fillable fields.
- Fill out your new form and click Done.
Once finished, send an invite to sign to multiple recipients. Get an enforceable contract in minutes using any device. Explore more features for making professional PDFs; add fillable fields boost signature block template and collaborate in teams. The eSignature solution gives a secure process and functions based on SOC 2 Type II Certification. Make sure that all your data are guarded so no person can take them.
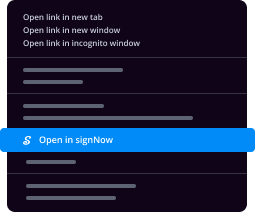
How to eSign a PDF file in Google Chrome
Are you looking for a solution to boost signature block template directly from Chrome? The airSlate SignNow extension for Google is here to help. Find a document and right from your browser easily open it in the editor. Add fillable fields for text and signature. Sign the PDF and share it safely according to GDPR, SOC 2 Type II Certification and more.
Using this brief how-to guide below, expand your eSignature workflow into Google and boost signature block template:
- Go to the Chrome web store and find the airSlate SignNow extension.
- Click Add to Chrome.
- Log in to your account or register a new one.
- Upload a document and click Open in airSlate SignNow.
- Modify the document.
- Sign the PDF using the My Signature tool.
- Click Done to save your edits.
- Invite other participants to sign by clicking Invite to Sign and selecting their emails/names.
Create a signature that’s built in to your workflow to boost signature block template and get PDFs eSigned in minutes. Say goodbye to the piles of papers on your desk and start saving money and time for extra important tasks. Choosing the airSlate SignNow Google extension is a great practical choice with plenty of benefits.
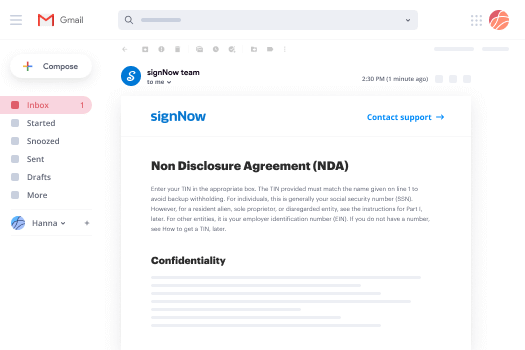
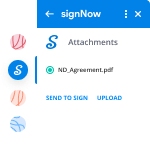

How to eSign an attachment in Gmail
If you’re like most, you’re used to downloading the attachments you get, printing them out and then signing them, right? Well, we have good news for you. Signing documents in your inbox just got a lot easier. The airSlate SignNow add-on for Gmail allows you to boost signature block template without leaving your mailbox. Do everything you need; add fillable fields and send signing requests in clicks.
How to boost signature block template in Gmail:
- Find airSlate SignNow for Gmail in the G Suite Marketplace and click Install.
- Log in to your airSlate SignNow account or create a new one.
- Open up your email with the PDF you need to sign.
- Click Upload to save the document to your airSlate SignNow account.
- Click Open document to open the editor.
- Sign the PDF using My Signature.
- Send a signing request to the other participants with the Send to Sign button.
- Enter their email and press OK.
As a result, the other participants will receive notifications telling them to sign the document. No need to download the PDF file over and over again, just boost signature block template in clicks. This add-one is suitable for those who like concentrating on more important tasks instead of burning time for absolutely nothing. Enhance your daily monotonous tasks with the award-winning eSignature solution.
How to eSign a PDF file on the go with no application
For many products, getting deals done on the go means installing an app on your phone. We’re happy to say at airSlate SignNow we’ve made singing on the go faster and easier by eliminating the need for a mobile app. To eSign, open your browser (any mobile browser) and get direct access to airSlate SignNow and all its powerful eSignature tools. Edit docs, boost signature block template and more. No installation or additional software required. Close your deal from anywhere.
Take a look at our step-by-step instructions that teach you how to boost signature block template.
- Open your browser and go to signnow.com.
- Log in or register a new account.
- Upload or open the document you want to edit.
- Add fillable fields for text, signature and date.
- Draw, type or upload your signature.
- Click Save and Close.
- Click Invite to Sign and enter a recipient’s email if you need others to sign the PDF.
Working on mobile is no different than on a desktop: create a reusable template, boost signature block template and manage the flow as you would normally. In a couple of clicks, get an enforceable contract that you can download to your device and send to others. Yet, if you truly want an application, download the airSlate SignNow app. It’s comfortable, fast and has an excellent layout. Take advantage of in seamless eSignature workflows from the business office, in a taxi or on a plane.
How to sign a PDF employing an iPhone
iOS is a very popular operating system packed with native tools. It allows you to sign and edit PDFs using Preview without any additional software. However, as great as Apple’s solution is, it doesn't provide any automation. Enhance your iPhone’s capabilities by taking advantage of the airSlate SignNow app. Utilize your iPhone or iPad to boost signature block template and more. Introduce eSignature automation to your mobile workflow.
Signing on an iPhone has never been easier:
- Find the airSlate SignNow app in the AppStore and install it.
- Create a new account or log in with your Facebook or Google.
- Click Plus and upload the PDF file you want to sign.
- Tap on the document where you want to insert your signature.
- Explore other features: add fillable fields or boost signature block template.
- Use the Save button to apply the changes.
- Share your documents via email or a singing link.
Make a professional PDFs right from your airSlate SignNow app. Get the most out of your time and work from anywhere; at home, in the office, on a bus or plane, and even at the beach. Manage an entire record workflow effortlessly: generate reusable templates, boost signature block template and work on PDFs with business partners. Transform your device into a effective company instrument for executing offers.
How to eSign a PDF file Android
For Android users to manage documents from their phone, they have to install additional software. The Play Market is vast and plump with options, so finding a good application isn’t too hard if you have time to browse through hundreds of apps. To save time and prevent frustration, we suggest airSlate SignNow for Android. Store and edit documents, create signing roles, and even boost signature block template.
The 9 simple steps to optimizing your mobile workflow:
- Open the app.
- Log in using your Facebook or Google accounts or register if you haven’t authorized already.
- Click on + to add a new document using your camera, internal or cloud storages.
- Tap anywhere on your PDF and insert your eSignature.
- Click OK to confirm and sign.
- Try more editing features; add images, boost signature block template, create a reusable template, etc.
- Click Save to apply changes once you finish.
- Download the PDF or share it via email.
- Use the Invite to sign function if you want to set & send a signing order to recipients.
Turn the mundane and routine into easy and smooth with the airSlate SignNow app for Android. Sign and send documents for signature from any place you’re connected to the internet. Generate professional PDFs and boost signature block template with a few clicks. Put together a flawless eSignature workflow with only your smartphone and enhance your overall efficiency.
Get legally-binding signatures now!
FAQs
-
How do I create a signature block?
Open Gmail. In the upper-right corner of the Mail window, click the Gear icon and then click Settings. On the General page, scroll down to the Signature section and enter your signature in the box. If desired, use the options above the box to format your text and add links and images. -
What does a signature block contain?
A signature block is the text surrounding a signature, that gives that signature context and provides additional information. Signature blocks often contain the name of the party, the names and titles of people (either entities or human beings) signing on behalf of that party, and contact information for that party. -
What should I include in my email signature?
Name, title and company. Your name tells the reader who sent the email. ... Contact information. Your contact information should include your business website. ... Social links. ... Logo (optional). ... Photo (optional). ... Responsive design. ... Legal requirements. -
What is by in signature?
The \u201cBy\u201d in front of the signature line indicates that the person executing the contract is signing on the corporation's behalf. -
How do I create a professional email signature?
Emphasize your name, affiliation, and secondary contact information. Keep colors simple and consistent. Use design hierarchy. Include a call-to-action (and update it regularly). Include clickable icons linking to your social profiles. Make links trackable. Use space dividers. -
How do I create a Gmail signature?
Click the gear icon in Gmail and choose \u201cSettings\u201d Scroll to the \u201cSignature\u201d field. Replace the existing signature with a new signature. type the text you want or paste a signature from a signature generator like WiseStamp. You can create a rich signature with your photo, social icons etc. -
How can I improve my signature?
Find A Font You Like. The first step is deciding what kind of style you want. ... Practice Only The Capital Letters. Now that you have a font you like, focus on the first letter of both your first and last names to practice. ... Write Your New Signature Over And Over. -
How can I make my signature?
Suggested clip How to design your own amazing signature - YouTubeYouTubeStart of suggested clipEnd of suggested clip How to design your own amazing signature - YouTube -
How a signature should be?
Know when it feels right. Your signature should be easy to write and reproduce. It should feel good coming off of your hand, and it should be simple enough that you can dash it off in a matter of seconds. Your signature should suit your purpose and personality. ... Your signature should be identifiable. -
Who has the best signature?
John Hancock, former president of United States Congress, has arguably one of the most famous signatures around. -
Do celebrities sign their own autographs?
As a rule - no. In fact, most \u201csports autographs\u201d look nothing at all like the person's genuine signature on a contract or check. Nor is this \u201cnew\u201d. ... Most \u201ccelebrities\u201d use either rubber stamps or autopen for \u201cautographs\u201d by the way, and those who \u201csign\u201d use a few simple strokes rather than real signatures. -
Can you just change your signature?
Yes, you may change your signature whenever you want to but it should match your official documents such as passport, driving licence, bank accounts etc so that you will not have a problem proving that you are indeed who you say you are. -
What is the procedure to change the signature?
Procedure to change signatures: In such a case, any person who wishes to change his signature in official documents shall draft an affidavit which must be affixed with both the old and the new signatures. -
Can a person maintain two signatures?
The design of a signature is not the binding principal, the binding principal thus the legality of the signature is that it is from the person singing it. No Mather how many different signatures you use, they're equally legal. -
How do I make my signature consistent?
Every time you need to sign something make a point of trying to do your new signature. Write your name over and over again on a notepad. ... Eventually your signature will become second nature.
What active users are saying — boost signature block template


Related searches to boost signature block template with airSlate airSlate SignNow

Boost signature block template
hello everyone this is Ian Schaefer here with UDA Technologies and we are just about to dive into some of those key profitability features in the construction suite desktop software now today we're going to be working on one of our AWS cloud hosted servers we're going to focus on the construction suite features that allow you guys to make more money in less time with a lot of the projects that you guys are setting up or going to contract with now we we have a lot of attendees in today I think we're actually a little higher than we normally are today so we're going to take just a couple of minutes to make sure that everybody gets in can see the screen can hear us can we can walk through all that basically we're gonna take a couple of minutes to make sure that everybody can find their seat and then we'll be ready to get started shortly so again in the meantime what I'd like you guys to do those of you who have already made it in take a look at the GoToWebinar panel you should find an area on there marked questions and while we are getting everybody in and settled I'd like it if you guys would take a moment to open up that questions panel and tell us a little bit about yourselves your company what kind of construction you guys do but most importantly I'd love it if you guys could share with me what you hope to get out of our webinar today and we'll be getting started again and maybe two or three minutes so just take this time to go find that I'll also have my colleagues Sydney answering questions for the webinar today possibly Holly as well and I have my colleague Jordan with me today in the webinar as one of our product specialists and we'll be kind of bouncing questions back and forth as well so I want to make sure that you guys are able to throw your questions into so that we can cover those as well again area mark questions on the GoToWebinar panel pull it open for me tell us a little bit about what you guys want to see and we'll be starting in probably two or three minutes all right thanks for your patience everyone looks like we are ready to get started and it actually looks interestingly enough like we have a very wide range of attendees today we've got some residential builders some commercial builders looks like we've got a couple of government contractors in today new construction repair remodeling renovation good makes good links so happy to go over a lot of these estimating features with you guys today once again to kind of recap my name is Ian Shaffer I'm one of the scene product specialist sierra UDA technologies I also have with me my colleague Jordan Davis one of our best product specialists here at the company as well and today we're gonna be taking a look at construction sweet can coincidentally on the AWS cloud but we'll be taking a look at construction sweet and focusing primarily today on some of the estimating features to help us all make more money so that means that a lot of these features that we're focusing on today are going to kind of revolve around markups and margins tracking change orders getting documents put together and reports and contracts all of this critical information for setting ourselves up for success on projects and we're going to start with one of the estimates that we have in the construction suite system now real quick little snippet of background on this as well UDA technologies is a company of course we've been around for about 20 years now getting close to 20 years I believe and at the moment we are happily sitting with about 500,000 users maybe a little bit more at this point all across the world where we're covering I think almost 80 countries now over 75 countries and I've actually had the opportunity to set up some of our servers in very interesting locations for some of the people who are looking for cloud services we've got some of them set up a lot of course in the United States and Canada covering a lot of our clients here we've also got some set up in Australia some out as far as Frankfurt Germany and several places in between we've actually come online with one in Mumbai as well so ultimately this feature set that we're looking at today is no longer just a desktop software now some of these estimating features are going to be available to you wherever you go now of course this means that when you guys go on vacation maybe you won't spend as much time away from the job but you don't have to of course you guys can enjoy your time and today what we're looking at it's just kind of fine-tuning some of those dollar amounts that you guys may want to be looking at while you're out and about and so again with this AWS server with construction suite here in the cloud we'll be able to take a look at just that I'm also very happy with the results that we've gotten from this as well construction suite has been available for most of us now for 12 years I believe I think the first version came out in 2006 late 2006 and so construction suite has has gone an excellent evolution not revolution evolution and it has led to a lot of the things that were going to take a look at today we've refined this process we've repeated it through a lot of feedback from some of you our users especially the guys who have been around for 10 plus years we've taken the time to kind of refine some of the feature sets touch up some of the templates that we're working with and again today's we're focusing through it will actually be vent taking a look primarily at an estimating at an estimate that was built on the residential estimating template the residential master and I'll go ahead and pull that up for us now because again all the big dollars are going to be coming from this guy and from how we organize this information now again for those of you who just need a quick little pointer on how to get here from the construction suite system whenever you open up a job any job will have a section here up called project details where you'll most of you will see a link to create a new estimate on the first pass you'll also notice over on the right-hand side there's a quick link for a new estimate here and over on the left hand side and navigation panel you'll find an estimating section which has all of our estimate templates that are available you'll also find on the estimating tab all of your own custom estimate templates that you want to create so if you are creating your own estimates where you want to model an estimate off of one of the ones that we provide with a little person personalization or customization this is the perfect place to go take a look under the estimating tab and you'll find an estimate templates section that shows all of the different templates available with brief little descriptions and some of them also have a great little preview now within any of these estimates of course you can get to them easily either from the project details by clicking on view primary estimate or just click on the name of your estimate here and it'll pop open for you and in construction suite 9 some of the newer versions of construction suite the on cost estimating system will open up for you and provide all the financials on any of these jobs even if you're just building it as you go what we're looking at right now is the project totals page for one of these estimates the O'Connor residents this is one of our custom homes this is a brand new house there's nothing on the lot right now so as we're going through and taking the some of the information for this house right now we're looking at primarily raw costs so if we go into the planning category for example the design services section is going to show us how much money we're spending with our I guess this would be the design company or the architects that dollar amount this $5,000 is how much we're paying for this area and this is why the total cost in the total cost column over here is going to show that it costs us five thousand dollars to do this we don't have any markups applied to it right now but it's going to come to a total price to our customer at five thousand dollars for this individual line now of course we're in the in the industry because well for starters I know most of you guys are exceptional at building homes or remodeling or building office spaces or whatever it does most of you are excellent creators and this is where we can help you not only with the getting into the creation process part but with also making a little bit of money while we're at it now the very first place to take a look at this is when you're putting in these line items there's an option here to apply a line item markup to some of these costs now the idea with the line item markup of course is you've got a raw cost you want to add a little bit of a markup to it to come up with a total price for your customer now if you're gonna do this line by line the easy option is to go up to the View menu go to show/hide columns and scroll down in the list until you find the line item markup and dollar markup sections check these two boxes and click OK and you'll have the two columns available for you to input those line item markups or dollar markups at this point all we need to do is just click into the cell and it actually pops up the form where we can start to put the dollar amounts in now when that form pops up it's going to give you two primary options for how those numbers are going to be get entered into the system the the first is going to be a percentage now as we're going through and we're working with the line item markups themselves the percentage markup that we apply is going to be generally just a blanket on the overall cost for the line itself so if you wanted to increase this by let's say twenty percent you could apply a twenty percent markup a line-item markup a percentage markup and it will include that here give you the extra 20% here it is a percent of costs it's a markup so 20 percent of $5000 is gonna be a thousand dollars it would show a thousand dollar line item markup here giving you a new total price of six thousand dollars now alternatively we may want to work with a dollar markup instead and it might be the same dollar markup maybe we put in a thousand dollars on top or for some of these areas maybe we'll put in individual line items as well let's open up one here so there's the percentage markup of course for a fixed dollar amount this is this line item that we're looking at right now is just under two thousand dollars who if we wanted to make it an easy two thousand or an even two thousand dollars rather we could just put in a hundred and sixty dollar markup click okay oh I see it looks like in this case I selected all of the line items but that's okay but it just rounds it out to announce it out to a nice two thousand dollars now there's a couple of options on how you put these numbers together now as I mentioned earlier total cost is traditionally the cost that you pay the markup then traditionally gets added in to come up with a total price to the client but it looks like in this case the markup is actually getting included as part of the total cost which is an easy way to do things like track labor burden perhaps or material waste or subcontractor fees or anything else that might be included as part of these costs if you ever find that this is going to be a necessity for you you can always help organize the numbers a little bit better make it a little bit more intuitive by doing something like taking the total cost column and dragging it over so that it shows up after the markups and this way it just kind of follows a natural flow quantity times cost plus markup gives you total cost total cost in this case maybe plus taxes or something like that might give us a total price this makes a lot of sense for some of our Canadian users some of the people up and I've worked with a lot of clients up in the northwest I think you were talking about somebody in Portland the other day too required to do the math this way to come up with those final dollar amounts for us here in Alabama however we're going to change this around we're going to set the total cost to be our raw cost plus markup saz a prophet and the easy way to do that is to click back into the cell and oh no too advanced and from the Advanced section there's a place under taxes to choose how you want your taxes and markups calculated I'm gonna switch this to be taxed then markup and this will effectively give us a quantity time to class plus tax to give us a total cost total cost plus our markup amounts gives us a total price and so you'll see that the total cost is going to go through and recalculate after a moment as we work you'll also notice as you're going through and applying your markup amounts in here that if you're trying to get an individual line item markup into a section like the interest here if you click into just this one section it'll ask you how you would like to apply your markups for just this one line item just one ayah now in this case if we wanted to put in a markup for just the one item we can easily apply a dollar amount in here again if we're trying to round it out maybe we put it in as $2,400 to give us a flat $15,000 here for interest and there it is if you clicking to the top item in any given subcategory the first item in the subcategory the first prompt is actually do you want to apply this to everything in that subcategory so instead of doing them one by one if you're applying a markup percentage perhaps to everything in a subcategory the quick and easy way is to just make the change in the first line this is what happened up above when I was putting in the dollar amounts there if we try to put in a percentage markup here it'll do the same thing just as you're working through this keep in mind that this setting that we're changing right now applies to all line items in the sub category even interest where we've already put in a dollar amount this will replace it so if we click yes now and continue on it'll it'll allow us to replace whatever is in that space with a new value maybe it's a 20% markup or something along these lines and so now you'll see that these all become 20% it calculates for us the dollar markup that would be the resulting 20% of whatever the cost was to give us our new toe price to the customer again so we've got some easy options in this case to apply an individual line item markup or percentages for everything within a subcategory and you'll also catch that if you are putting in those percentages or dollar amounts as you go you'll notice for under fixed dollar amount that there's an option here to apply a markup per unit as well this is extremely handy if you're doing something like a hundred the quantity of a hundred and you wanted to do two or three or five dollars per unit in this case that's handy again because you're not working you're working on dollar amount markups but it's not a fixed dollar amount so it fluctuates based on the quantity that that's required you know I wanted to jump in at this point a lot of the tools you've shown so far or a lot of the options you've shown so far are really effective to speed up your process of it if you know for a fact that you want to go ahead and apply a blanket twenty percent markup to this construction financing subcategory well you can do that instead of having to enter twenty insert a twenty enter over and over again I'll tell you even though some of my clients that I've worked with have asked well we want to apply a blanket markup to all of our materials is there a way to do that and so I'm going to ask you is there a way to do that yeah and that's a great question Jordan as well because the answer to that is absolutely yes now what you guys will notice as we're looking through the estimate itself there's a classification column on the Left this particular estimate that I'm working on is what we refer to as a standard estimate every line has its own individual cost and you choose what classification applies to that cost here on the planning category which is the one that we're working on right now most of this are most of this would be classified as other costs but as you start to dive into sections like foundation or framing or windows and doors you'll notice that we start to break up into things like labor or materials and if you're working with some of the cost books you may remember that a lot of the cost book items are also broken down by D classifications as well material cost labor costs and so on now an easy way to catch all of these by classification is to actually come back up to the estimating section and click the set classification markups button here this covers you in this case Jordan using this option or using this feature you can actually go through and predefined how much you want to apply as a markup percentage to each individual classification type no matter how it gets in there which means again if we're going to go through and use a full markup for all materials let's say it's a 10% material markup to cover the cost of waste we just want to put in that markup to make sure that we're covered maybe a labor burden we're gonna use in here as well we'll put that in is like a 60% or 70% or something along those lines subcontractor fees let's say 20% for the guy who forgot to do his insurance that should cover us on that I hope and and so on through as we click click ok now it's going to go through and apply those percentages throughout the entire estimate everything that has the classification gets these markups or percentages as long as the link is unbroken and we'll talk about that in just a moment but it just kind of goes through and pre defines all these markups now again if we're going through RS means cost books or your own custom cost books for that matter and you find a material item that you need to apply into the estimate itself you insert the item it it gets inserted as a material item here cost comes through it automatically gets that line-item markup that you've said is the classification markup that's all done ahead of time so that information would become available in pre-populated in here based on that classification and all of it gets preloaded you don't have to remember all the bits and pieces and it's all taken care of now I mentioned the linking because you'll notice that when we go into and try to assign a line item markup actually let's do it for the second item as you go through and you you click the option it's going to alert you that the item that we're trying to change is currently linked to the mat the material classification it's it's value is being populated by the material classification and if we decide to change this individual line it's going to break that link it's going to sever the connection so we can say yes at this point we can put in a unique material markup or a sorry a unique markup for this one individual line or at this point we can actually cancel because I want to maintain that connection now you'll also catch when you go back to the classification markup section there's a couple of buttons down here at the bottom to reconnect everything either all items or specific classification you can choose your account classification here and then click link I items with that classification or you can click link items within a selected area this might just be a section of the categories or subcategories or what-have-you so as you work through this you'll be able to put together a lot of this information and reconnect everything just in case something got broken or something got separated once upon a time if somebody did go in and start customizing a lot of your markups and you just wanted to do a blanket reset use these options down at the bottom under your classification markups and they'll keep you covered in this case now I did see one of the questions actually come through regarding sales tax and if that works in a similar way and kind of yes kind of know as you're looking through this you'll notice that there's also a taxes tab up here at the top taxes for the United States are typically broken into a materials tax and a service tax these are tax rates that would apply to various different things we don't predefined these tax rates or try to pre connect them to anything coming out of cost books or classifications because again with the materials tax type depending on your region in the United States the materials might apply to will it will typically apply to materials sometimes material the material tax has already included those so maybe tax included is going to come up instead sometimes material tax applies sometimes material the material type here for taxes also shows up on subcontractor fees if they're applying materials sometimes it shows up on equipment service fees typically show up on labor sometimes other sometimes material if there's a delivery involved and because this happens a lot we don't try to predefined that so instead there's a tax drop down menu as well that you can get to from the View menu that allows you to preload that or there should be a setting in the cost book that does it as well now these are all inline markups as you're going through and figuring out a lot of this information you'll find that you can can apply it an individual line item markup or you can set classification markups and all of this information comes together to give you a total price that your customer is going to pay per line so you'll always be able to see this and if we step back to the project totals page you'll find these total prices here and again as you're looking through this information it kind of tells the story of how much you need to make in order to cover all of your costs and build in your profits when you generate reports all of that information comes up as well and it really works to your benefit to keep all of this information together this has been some great tools that you've shown off so far in I want to follow up with another common question that I've heard from my clients in the past and our clients it's a slightly interesting question I'm sure you're going to dig into it a bit and really talk about some of the meaning programmed into it but a common way that I've heard this asked is what if I want to markup everything in my estimate I just want to put a I just want to mark up everything I want to make sure that I take the cost that I have and I'm making sure that we're really putting markups across the board into the contract total yeah and I can I see what you're building towards in this case because of course some of us do work with classification markups we put in the markups we might do 20% or 50% or whatever it is for everything to get the same markups across the board that's a possibility but there's a better way and in this case that better way is found at the bottom of the estimate on the project totals page in the company overhead margin category now the company overhead margin categories is designed to provide exactly what you've asked for the company over in the head margin covers a percentage markup or margin for your overhead expenses it gives you a percentage for your profit margin it can keep you covered for your contingency you've even got a couple of extra sections in here so that you can build in other things maybe maybe you'd like to have the insurance show up down here at the bottom instead of being built into where I have it in the planning category so if you want to rearrange this information you've got these options available to you here and they're great options because in this case all you need to do is apply a percentage in this column for this particular section and it'll do that calculation for you in this case it's 10% to cover our company overhead expenses or whatever it is what I would refer to typically is everything below the line and when you're looking at the project totals basically what we're looking at is here's the line everything above the line is going to be what your accountant might refer to as your cost of goods sold traditionally this is all of the raw costs when you start talking about gross profit it's everything from the company overhead margin down so the below-the-line section company overhead margin is gonna be your operating expenses it's gonna be your target numbers for profit it's gonna cover your your salaried employees and your in your time Jordan for you know if you're running a construction company your stuff will be in there maybe it includes the fleet of trucks that the company owns all of that gets built into the overhead and you'll figure out what that percentage needs to be and apply it in the company overhead in margin section here now I don't know about you Jordan but I have the question coming up all the time of what percentages should we use as much as I would love to be able to point out exactly what those numbers are it's gonna differ based on your area based on the numbers that you guys are gonna be going to be able to sell at but my rough rule of thumb or rough guide has always been about a 20% margin for most new construction companies and somewhere between 35 and 40 for most like remodeling of renovation companies most of these numbers by the way have come from our partnerships with organizations like remodelers advantage who push or heavily recommend that you go that you shoot for target a 30 to 35 percent margin on all of your jobs companies like NAHB might recommend something for new home builders like again 15 to 20 percent I find a lot of commercial projects time too have like especially big commercial projects tend to have slightly smaller margins because everything is just on a bigger much more expensive scale so the cost of materials is much much higher you might have like a seven or eight million dollar hotel that takes twice as long as one of these jobs but doesn't require as much of your internal time so you don't have as much of an overhead expense for it so again it changes it varies depending on the type of work that you guys do but this is a great place to go in there and put it in and it's also a great place to go in and kind of manipulate the numbers a little bit as well so you can always come into this section and put them in now Jordan you actually I was going over to talk to you I think it was yesterday and you were on the phone talking with somebody about the difference between markup and margin could you recap that for everybody because you'll notice in this case in the company overhead in margin section there is an option to switch between the two there's a percent margin and a percent of costs and I think based on your discussion you were just talking about where that percentage comes into play like what is this ten percent of yeah it's a really great question I find that people start asking things like well there's a lot of the same use of the word margin on this page what does it mean what about markup right how did these things come into play really these two options here between percent margin and percent of costs you're really telling the system or the estimate where it's going to apply this percentage to you and you were building towards that somewhat looking here at the percent margin option this percentage is actually applied as part of the project totals so what we're telling construction suite in simplified terms here is that we want the total price for company overhead percentage to be 10 percent of our project total no matter what that project total is and so yeah there's a group here yeah here's the one that he's talking about and and that's exactly right you guys I've had this discussion with a lot of people too over the years and I'm glad to hear that the people are still asking about it and calling in about it my rough rule of thumb though is when you looking at these numbers of course at the top of the company overhead margin sheet or on the project totals page this little section it gives you the number that it's calculating off of if you're using percent of costs which is generally used for cost plus projects now a cost plus project is I mean again these are the contracts that you're signing with your customers if you're doing entering into a cost plus project you'll give them a rough idea on how much it's going to cost but when you're charging them it costs what it costs plus your percentage and and the percent of costs gives you exactly that now for those of us working on fixed fee contracts which I find to be an overwhelming majority the fixed fee contracts tend to give you the option to set aside a portion of that contract amount and that percentage that we were looking at for the percent margin is exactly that now again your your accountant is going to know exactly what this means because when you're talking to your accountant if they say that you are it that you've got a 30% gross profit that means 70% of the money that you guys are bringing in for revenue goes to the cost of the job the other 30% goes to your company in this case we're running as if we had an 20% gross profit which means that this 445 number represents 80 percent of the contract and these numbers add up to 20 percent of the contract and that's why they have a 10 and a 10 for your percentages and they go from there now a couple of quick points on this I've seen a couple of people mentioned this already some companies do apply an inline markup a dollar markup up above and then further compound that with the markups from the company overhead in margin again is a rough idea or I've mentioned this a few times so far I like the idea of using the the line item markups to cover things like labor burden you can say in the estimate that you charge that you pay 25 dollars an hour for one of your field staff that 25 dollars an hour is the number that he makes that's what you caught him on his jackets as 25 dollars an hour from there of course we take out the taxes and everything like that but it doesn't cover the cost of its uniform or his insurance or his workman's comp or training expenses or ongoing education all of that would get built in as that margin and if you figure out your margin percentage you can put his hourly rate add in your margin and that gives you a closer to true cost which might be something like $40 an hour for this guy so it's an easy way to put that in overhead in margin the company overhead margin category sheet does calculate on the total price which means that the mark-up is going to be factored in if you're using line item markups in addition to the company overhead margin it does calculate that into it you'll also notice that the margin percentage or when we're calculating with a percent margin if you add in some additional dollar amounts down in the company overhead margin section this 10% for example will go up if we apply an additional 5% here for the contingency because it has to maintain 10 percent of the overall contract value so it's important that we keep these things in mind as we're putting in these numbers you always want to make sure that you have the right set again 10% of the contract value right now which is almost six hundred thousand dollars would be almost sixty thousand dollars if we change this to percent percent of costs now it's just ten percent of the four hundred and forty five thousand dollars so now it's forty four or five hundred percent margin will always be higher my rough rule of thumb is ten percent margin is 11 point one repeating percent of costs 20 percent margin is 25 percent of costs and so on what is it 50 percent margin is just doubling the cost of the job literally 100 percent of cost so again as you're working with those numbers trying to feel the right fit adjust them see what you come up with now along these lines we did encounter somebody working with a company overhead margin the other day trying to put in a discount item as well now this is fine you can absolutely put in negative dollar amounts in here I recommend using the second line though for any of these sub categories the second line is actually designed to be a fixed dollar amount so where you've got a percent of percent margin or a percent of costs for your alert first line the second line is always open to put in a dollar amount in the same cell so if we wanted to offer a $5,000 right here let's make it a negative $5,000 so the system knows it's a credit you can do this that $5,000 becomes a credit it lowers the overall contract amount and everything like that you can even come into and rename this discounts if you'd like discounts and maybe this is issuing a discount for the design fee or something along those lines these are easy options that you can apply in there as well just keep in mind that it doesn't matter where you put these items if they're in the company overhead margin category sheet at all factors on itself it builds on itself so all of this information is going to come together and as you're providing this detail for your customers of course there's a number of different ways that it's going to show now the best part about this is in construction suite in the estimates once you come up with your numbers whatever it is that you need to see the reports section allows you to pull all of this detail out of the estimate and put it into something presentable some of you like talking about spreadsheets I'm a numbers guy I love spreadsheets I have never had success giving a spreadsheet to somebody who doesn't do spreadsheets and talking them through it yeah we'll get there eventually but it's a much easier pitch if we provide them something that's you know good on the the important details and light on all of the supporting information so along those lines we give you the proposal wizard now from this proposal wizard you can take all of these markup numbers that we put together so far and make them presentable you know your customers you know you're tall you're talking to and along those lines you'll be able to go through the proposal wizard and customize the information in a number of different ways to provide them exactly what they need so as we go through and take a look again this is for a custom home so we're going to use one of the residential templates in this case as we move through the various different options one of the first pages who will be presenting to and what's the address information for the house you can apply these things here just click into the cell if you need to add somebody else and you can under the next screen you have six different residential templates to choose from if you need to customize the templates there's the Edit template option under each of these but more importantly they give you a rough idea on these layouts and then you can label them according to the type of job that you're doing or using for this presentation so you could set up six different styles of presentation depending on who you're working with from here as you go on to the next screen again scope of work special conditions if you included them in the project creation process they'll show up here if you need to add them now you can check the box type in the information that you'd like to include and press on you'll also notice some of the additional details here like do we include options as a separate section if you're using options in the estimate absolutely have it same for allowances you can include the markups and allowances as well although I never do and then from here it's just going to give you an overall job amount as well pulled from the estimate dollar amount here there's also a space for dimensions if you guys didn't catch that dimensions webinar the other day I highly recommend you go back to YouTube and go find it it was spectacular of course I helped to host it so of course I would say so but biases aside it describes some of the benefit of using these dimensions and in this case they're great talking points so I'll include those as well and here is where we get to the real meat of the proposal itself this is where we get to select how much information shows up on the proposal and how that information breaks up now again there's a lot of options a lot of checkbox is available to us here and as you go through and select the right sections or the right options here the system will remember those selections so that they can give you the same results every time if that's what you want otherwise you can come into and customize them as you go now for markups the inline markups are going to show as part of the price you have the option here to put that in as part of the price so make sure that you check the box if you're using sales tax as well again all three of these should be checked here's how much it costs us plus the tax that we have to spend plus whatever markups in line that we're going to apply these are the line-item markup and that gives us a total cost now there's a section of top to include the company overhead margin as well by default I believe it selects as a separate line item this is not my favorite I actually prefer to use the option to prorate in to set the into the categories to take this overhead and margin dollar figure this one hundred and forty one thousand dollars and spread it proportionally across everything else in the estimate I prefer this because then we don't have to have that difficult discussion with the customer where we have to try to justify that our work is worth what we charge it is we've been in business for a long time so we know that it is and rather than trying to get them in this mindset of I could go out and buy all the parts and pieces and destroy my home all on my own we'll just go ahead and factor this into the cost and make sure that we're presenting them something a little bit more readily palatable I'll say now of course you'll have some other options down here as well including notes if you've got them we can also include subtotals or we can check the box to hide subtotals in here I want my subtotals included but I don't want to show the individual subcategory costs so I'll use that we don't need line items or anything like that so again this is my perfect set so we'll click Next again and finish where it will generate the proposal for us and from here we can do those last little touch-ups like adding the letterhead or logos or whatever we want to include and then we can send it on from there insert letterhead perfect Eagle Rock construction I'm sure every single one of you has seen this before yes i sample letterhead but it gets the job done again it shows you where all of this information comes in there's our dimensions there's a total brace price again here's some of the notes for some of the various different sections and again some of the total costs and everything like that now once again brief reminders we're looking at the estimate summary if you wanted to compare we can expand the category totals and see here what the total value for each of these categories would be as we're looking at the proposal you'll notice that there are differences between these numbers and that's a direct result of prorating the company overhead and margin framing for example in this case is 25 thousand dollars more well that makes sense eighty thousand dollars plus a 25 percent origin is gonna be about that as you go down exterior windows and doors you'll notice the same some sections aren't going to be as impacted because again I didn't select to include my markups with my allowances this may fit well for some of you others may want to change this a little bit too before you provide the information so again this is a quick and easy way to put the dollar amounts together for the proposals build those markups in to the proposal itself to send out and then from here you could generate contracts for this information as well those by the way it can all be emailed out directly all you have to do is go to the page layout screen and you'll actually find the email as attachment button this will send it out as a PDF so if you ever need to do that you've got the PDF option from the file menu you can export as a PDF again or a word document you'll also be able to go from the file menu and save it to construction online as well if you like and you'll be able to put together some of the additional detail from there now I think one of the last things that we were talking about in the final bullet point that I want to make sure that we cover with you guys today is changes to these contracts now of course we've all dealt with change orders god knows how many times some of us don't get hit very hard others i've seen companies who run sometimes as many as two or three hundred change orders on a project about this size it all heavily depends on your customer and from what I can tell the contract is only good up until you show up at the job site to break ground at that point the change orders could start at any moment and change orders in construction suite are available to provide a lot of the detail of the breakdown for your customers so they can see what they're getting into the owner of our company when he was running a construction company he loved to talk about the little things and and it could be something simple like you know he's working on a kitchen and the owner comes in and looks around to the kitchen and almost everything is done in the kitchen you know the countertops are in there the the sink is installed and they're standing there where they plan on cutting up all the vegetables or hooking up the mixer and the outlet is a little bit further away than they thought it would be and so they said to our owner Michael well I mean since you guys are still here can I get you to just move the outlet over you know three or four feet that'll be great that's that's easy enough to do right without thinking about what that might include no of course we know what goes on behind the wall we know that the sheetrock is there but behind that you've got you know studs and two by fours and whatever holding the wall together so moving at three or four feet could actually be an expensive job and that's always how he would prevent it he'd say you know I'm happy to put together the information for a change order to do that I'll send it over to you shortly and we'll make sure that it's the right decision that you really want to do this so anyone at that point we'd come back to the estimate and construction suite take a look at the project totals page and start figuring out where these pieces are going to impact now of course if we're moving an outlet might be a relatively simple thing but part of that is going to be cutting out the existing one now along those lines if we're going to be moving if we're gonna be cutting out the outlet we're probably going to be going into the insulation and drywall so we're gonna have to cut a new hole we're gonna have to replace the old hole so maybe we've got drywall materials and maybe a little bit of labor that goes into this so let's just say here we're gonna start our change order with drywall and I'm just gonna right click and select add change order now this will be changed order number one I know wildly unrealistic that we got this far and are only now hitting our first change order but so it goes so we'll put in change order one the name of this is gonna be moving outlet and we're gonna move it let's just say five feet for argument sake right or whatever it might be obviously the description that you apply here is going to show up on things like change or contracts or the proposal that you send over to the customer so again try to keep it Bulgaria tea low no matter how much it takes you off content for your customer hi on the next page all of these change orders are going to start off pending unless you're working again a cost-plus project if it is cost-plus i still recommend putting together the change orders it's a scope change even if the change order costs nothing I still recommend putting together the change order contract just to have it written that the scope of the project did change maybe the customer originally wanted some neutral tone for the paint in their walls and then they came in one day in a mood where they wanted everything painted hot pink get that documented get that signed and that way you guys don't have to worry about the fallout later when they see it and change their mind or maybe there's another change order to come back and change it back but ultimately all of this documentation is going to take place here and as you go through you can build the content on this page so from here we know that drywall materials are going to be part of the change order but we don't want to convert the subcategory this is part of the contract so we're just gonna leave this box unchecked that way it will create a new subcategory that looks exactly the same we're also going to hit the plus sign out to the left of this because we're going to add in another section this is for electrical under electrical there's going to be a new segment to labor there's probably going to be some electrical materials as well let's see if we have some additional options in there electrical systems well let's just go with miscellaneous for wiring for now what else do we have I'm sure there's other things in here as well but we'll just go for this for now so we've got drywall materials labor wiring we'll go next and this will actually start to put together some of our subcategories now the drywall materials I'm just gonna keep this one simple we're gonna go with a lump sum and we're gonna say that to have the guy come out and cut the whole patch up the old hole do whatever it is that he's gonna do it's just gonna cost $50 for the visit right now it's got a 10% markup on it for materials I'm gonna actually change this to a 25% markup that's what I like to apply for my change orders so I want to make sure that that gets included as well now over on the right now that we have the change were in place you'll actually find a new change orders subsection here in the estimate summary this is important because this acts as a hyperlink to the next section of the change order so we've got drywall material set up now if we go over to moving the outlet for the labor we're gonna have to do a fair amount of work in this case now I'm still gonna set it as a lump sum but maybe our electrician has flat $200 cost just to move the outlet because he's got a turn-off Arius things and you know ground it out move the wiring and everything like that whatever it is this is his flat rate so we can apply that in there as well click on move outlet again this will take us to after labor there should be miscellaneous again materials let's just say for argument's sake that this is going to be another hundred dollars and there we go and so now we have a four hundred dollar change where now it's important to note at this case that I'm looking at the line item markup every time because this is how to apply the markups for your change workers change orders in construction suite estimates require that you put in a line item markup or create an additional sub section typically at the end of your estimate to track markups or sometimes builders fees or whatever you like to call them for your estimates so for your change orders rather so again if you're working these you have those two options I highly recommend using the line-item markups because that way you're factoring all of your your change order markups into the process it's here on the page while you're entering the numbers no chance to forget so if that's part of your process or part of your workflow then you're accounting for everything as you go now of course once you do this you put the change order together next comes the proposal so in this case we can go to file save the estimate this will commit any of the change order information that we've put in there so far and now we can go to the reports tab under customer reports you'll find change order documents the change order documents section includes things like an itemized proposal for the first change order moving the outlet in the kitchen here's a brief outline for what it includes here's the description that we applied and here's the information that's going to show up in the the proposal itself if you want the table you can check the boxes here to get the table if you just want the dollar amount then you don't have to include the table itself otherwise okay we'll generate this again all of the information is going to be available for you here with a somewhat simplified breakdown as you're going through and taking a look and again they're very customizable templates so if you need to go into and insert a letterhead obviously that's an easy option I don't have a dedicated customer for this project so again we'll go into the document wizard in this case to make sure that we've selected somebody or better yet since this is the second or third time that I've done this since it happened more than once now might be a great time to go back to the project and construction suite and finish setting the content for the job since I haven't done that yet we'll just go ahead and select Jack get him into the contract get everything set up and once again from here we can send it out as an email attachment upload it to construction online printed export as a PDF whatever you need to do all the information is going to be here one thing that I do heavily recommend though is when you're looking at any of the contracts and can struction sweet you'll find that blue text sometimes means Auto populating fields like here you can see the little pop-up there to represent it sometimes it means just something that you need to pay attention to like does this change order impact the schedule is it going to take longer to do or is this a quick and easy one if it does have a schedule impact again in impact again in this case we've got the additional time of however many days one day will be added to the project completion do the show and so forth if you look down at the bottom there's some options for you to come in and apply things like a signature line like you might in the proposals or something like that although the change order contract is generally where you'll want to see that this is just an easy way to kind of propose it to them and then once again email it print it ship it off however you want to work with it the question has come up a couple of times for AWS users anybody who's working with a cloud hosted system if we do choose to print from here it'll actually pick up all the printers that I have connected to my local computer so from here this print option would give us you know a PDF creator it'll give us the email office printers that we have here I think we've got an HP and a canon and Xerox and honestly last time I checked it seemed like we had one of everything but as you go through and you work with all these different different options and everything like that even from a cloud hosted environment you'll still be able to get all this information together and use it from wherever you need it and put the information together the details together to get those change orders out or for some of you using constructional online you can also take this proposal upload it to construction online under the estimating tab you can view change orders and from here you can also upload an individual change order to construction online as well just select the one that you'd like to upload and select the button down here to upload to construction online and it'll take this this detail that you've put together with the change order name the description the total cost for your customer all of that gets uploaded to construction online as well where your customer could then go into their client portal and approve it there or even better still you can pull it up while you're talking to them pull it up on the app the construction online app approve on their behalf and it will request a signature for them so you can just hand it off to them they can sign on the dotted box sign on the Box provided and that's their way of approving the change order with you there so again all of this information is easily or readily made available to your customers as you guys are working through it and with all of this documentation and the detail in the depth you'll never have to worry about not making money now it's just a question of how much do you want now that and again that's topic for another time but for now I think we've covered most of these questions we are gonna pause for a couple of moments so that I can just do a quick recap I see a couple of green flags in here for questions that I think Sydney wanted us to cover I'll make sure that they were but again if you guys are kind of working through any additional questions or anything else comes up please by all means go ahead and send those questions in to us we'll make sure that we feel filled those questions as we go there looks like there's some that are actually a little bit more company specific as well which is great we're happy to provide any additional insight or guidance that we may have having worked with in some of our cases tens of thousands of construction companies so we've seen a lot of what works we're happy to share this for most of you though if it is company specific just give us a call or reach out to us via email for those of you using construction suite already you can find our contact information in the help menu under contact information surprisingly enough and all the information that you need to reach us by phone or email or fax or whatever you guys want to use it's all gonna be available for you right here so reach out to us and we're happy to answer those questions for now though we're gonna polish for a couple of minutes for those of you who are happy with what we've worked on so far at this point we'll let you go you guys can go and have the rest of your afternoon don't forget to join us though next week on Thursday as we dive into the next in this series of construction suite profitability webinars I believe next week we're focusing on time so making sure that your team shows up to the right place at the right time so scheduling is going to be a big piece to dues calendar activities and things like this there's they're going to be huge and if I don't talk to you guys before then I want to thank you again for joining us this afternoon for our estimating profitability webinar and hopefully we'll talk to you soon but until then guys have a great weekend and take care so I didn't notice one important question from somebody that came through a little bit earlier in the webinar that I unfortunately seem to have blown by the question about how markups show up in various different reports and that's a great question because we actually chop it up depending on the style of report that you're looking at and where you're putting the information for example if you're looking at the reports tab in the estimate and you open up the vendor reports most of these vendor reports will not by default include markups of any kind purchase orders subcontractor contracts materialists most of these are tracking your raw costs so it'll be either the extended cost your quantity times unit cost or the total cost which is again traditionally quantity times cost plus tax those are the numbers that show up on most of these now the RFQ is a little different request for quote is designed to go out and get their numbers to put into your estimates so of course for the RFQ most of the information is actually going to be left blank so that they can fill in the blanks themselves no sense in sending them to the dollar amount that you're willing to pay to see if they'll do it let them say how much they can do it for and then you guys can figure out who's providing the best prices now some of the other reports again most of the customer reports and proposals do by default include markups because again these are forward facing things we want to make sure that the customers seeing the total price for the project management reports again we're looking at maybe a 50/50 split so some of these like the project totals reports and the over budget reports and the remaining balance reports do by default include markups because a lot of those are things like for remaining balance I believe this one's going to be estimate versus invoiced and so you want to make sure that you're comparing the invoice to your customer against the total they're gonna pay think of this one it's being kind of similar to the AIA G 702 and G 7 on three forms which also by the way include the markups in inline unless you choose to separate the company overhead margin so if you're using QuickBooks and you're going through the QuickBooks integration app for pay does also include line-item markups and company overhead margin assuming that you select it when it goes I think this is a good segue and another question came up towards the end of the regular webinar they were asking about the application for payments module and how change orders come into play on that potentially yeah also a great question and ultimately its it's got a couple of possibilities and this is one of those interesting ones that I usually change how I describe it depending on the company that I'm working with for a number of reasons the design of the form G 703 the application for payment of the schedule of values or whatever you like to call it the design of the form the intent is that change orders get factored into the existing line-item where they apply like in this case right now we're looking at electrical miscellaneous if we had a contract amount for electrical miscellaneous and change order to electrical miscellaneous they get combined for the application for payment this is how G 703 was designed the scheduled value is supposed to show the total overall for that section but then again it's also designed with the CSI codes in mind I think now we're on we're supposed to be on a 50 but it's been changed a few times since 2004 so now it's like a 57 division structure or whatever it is but that's that was the original intent for those of you who do want to keep them separated it can be done just make sure that you create an additional change orders category down at the bottom and that way when you're sending it over to QuickBooks QuickBooks knows that this is a completely separate section when it gets added to the app for payment the app for payment will put it into its separate section as well now granted again little off-topic here but if you are working with QuickBooks I highly recommend numbering your categories using a two digit number system planning would become oh one planning foundation would become oh two foundation or OTO three if you do demolition demolition might be oh two and so on so change orders might be division 99 or 99 space change wars with the idea there being that QuickBooks is going to try to alphabetize everything in this case we're trying to force QuickBooks to put them all in numerical order instead which it will do and that way we can control how the information shows up which I love so again great questions in that case for the afro pay and we will continue going in this case few more questions I believe here's a detailed one I use a double allocation for overhead expense one percentage for labor plus burden and another for everything else can this be done can the program accommodate yes this this would be what I would consider to be a pretty classic example of needing to use the classification markup instead of the company overhead and margin you can figure it out but if you've got different markups for different sections line item or classification based markups are the way to go instead of using the global markup which doesn't care what the different classifications are sections our next question would you use one of the other overhead margin lines to add for the labor again it's not the company overhead margin doesn't care about the classifications it's not giving you a breakdown it's literally a blind overall markup for the for the for the section in there so great questions and again in this case what I would recommend doing is just finding those things and applying them as inline markups based on a classification instead of trying to have it done elsewhere that way you can also automate it as you go which saves you a ton of time putting together proposals later as well alright and I think that's all that we had flagged for today if I've missed any questions I apologize but if you do have anything else that you'd like to bring up to us by all means give us a call as we mentioned you can always reach us here in the office just open up the help menu and you'll find all of our contact information available here with all the phone numbers to reach us at I recommend using the 800 numbers here if if applicable the other numbers are will also take you into our office as well some of them might call through Skype service or we've got a number of other phone services as well but if you have the option the 800 number is always gonna be best so give us a call and shoot us an email whatever you guys would like to do to reach out about this and we're happy to talk otherwise once again everybody thank you so much for joining us today it's been a pleasure talking to you guys about making money some of our favorite topics and hopefully we'll talk to you again real soon until then everyone have a wonderful afternoon and weekend take care
Show moreFrequently asked questions
How do I create and add an electronic signature in iWork?
How can I put on an electronic signature on a document?
How do I sign something in a PDF?
Get more for boost signature block template with airSlate SignNow
- Esign PAP
- Prove electronically signed Parking Ticket
- Endorse digisign Medical Power of Attorney
- Authorize electronically sign Sports Event Sponsorship Proposal Template
- Anneal mark Basic Employment Application
- Justify esign Peer Review Report
- Try countersign Cleaning Quote
- Add Subordination Agreement electronic signature
- Send Motion Graphics Design Contract Template signed electronically
- Fax MBA Recommendation Letter electronically sign
- Seal Personnel Daily Report electronically signing
- Password Form W2 mark
- Pass Financial Affidavit signed
- Renew Free Commercial Lease Agreement autograph
- Test Sales Receipt digital sign
- Require Asset Purchase Agreement Template initial
- Print customer eSignature
- Champion client eSign
- Call for creditor initials
- Void Tolling Agreement template countersign
- Adopt Proprietary Information Agreement template sign
- Vouch Attendance Certificate template electronically signing
- Establish Spa Gift Certificate template eSign
- Clear Recruitment Proposal Template template eSignature
- Complete Church Event Promotion Request template autograph
- Force Mobile Marketing Proposal Template template digisign
- Permit Professional Resume template electronic signature
- Customize Affidavit of Heirship template signed electronically