Build Up Digi-sign Order with airSlate SignNow
Award-winning eSignature solution


Do more online with a globally-trusted eSignature platform
Outstanding signing experience
Robust reports and analytics
Mobile eSigning in person and remotely
Industry polices and conformity
Build up digi sign order, faster than ever before
Handy eSignature add-ons
See airSlate SignNow eSignatures in action


airSlate SignNow solutions for better efficiency
Our user reviews speak for themselves


Why choose airSlate SignNow
-
Free 7-day trial. Choose the plan you need and try it risk-free.
-
Honest pricing for full-featured plans. airSlate SignNow offers subscription plans with no overages or hidden fees at renewal.
-
Enterprise-grade security. airSlate SignNow helps you comply with global security standards.

Your step-by-step guide — build up digi sign order
Adopting airSlate SignNow’s eSignature any business can speed up signature workflows and eSign in real-time, giving an improved experience to consumers and staff members. build up digi-sign order in a few simple steps. Our mobile apps make work on the go possible, even while off the internet! Sign signNows from anywhere in the world and make tasks in no time.
Keep to the step-by-step guideline to build up digi-sign order:
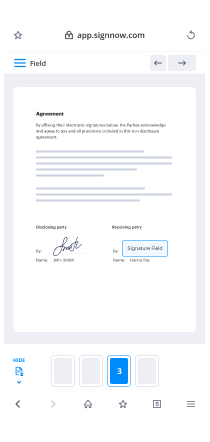
- Log on to your airSlate SignNow account.
- Find your needed form within your folders or import a new one.
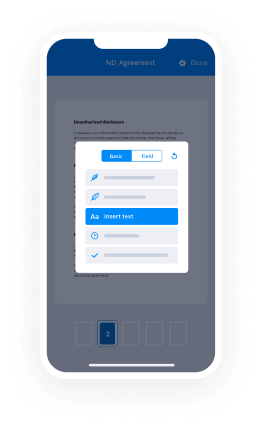
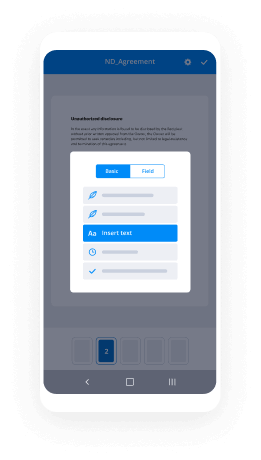
- Open up the record adjust using the Tools list.
- Drop fillable fields, type text and eSign it.
- List several signees using their emails and set the signing sequence.
- Specify which recipients will get an completed version.
- Use Advanced Options to limit access to the document and set an expiry date.
- Press Save and Close when finished.
Furthermore, there are more advanced functions accessible to build up digi-sign order. List users to your common digital workplace, view teams, and monitor teamwork. Numerous people all over the US and Europe recognize that a solution that brings people together in a single cohesive work area, is exactly what organizations need to keep workflows functioning easily. The airSlate SignNow REST API allows you to embed eSignatures into your app, internet site, CRM or cloud storage. Try out airSlate SignNow and enjoy quicker, easier and overall more effective eSignature workflows!
How it works
airSlate SignNow features that users love


See exceptional results build up digi-sign order with airSlate SignNow

How to submit and sign a PDF online
Try out the fastest way to build up digi-sign order. Avoid paper-based workflows and manage documents right from airSlate SignNow. Complete and share your forms from the office or seamlessly work on-the-go. No installation or additional software required. All features are available online, just go to signnow.com and create your own eSignature flow.
A brief guide on how to build up digi-sign order in minutes
- Create an airSlate SignNow account (if you haven’t registered yet) or log in using your Google or Facebook.
- Click Upload and select one of your documents.
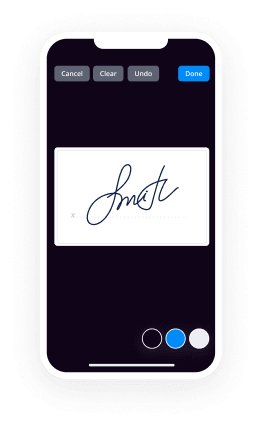
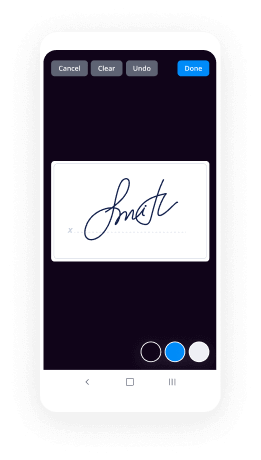
- Use the My Signature tool to create your unique signature.
- Turn the document into a dynamic PDF with fillable fields.
- Fill out your new form and click Done.
Once finished, send an invite to sign to multiple recipients. Get an enforceable contract in minutes using any device. Explore more features for making professional PDFs; add fillable fields build up digi-sign order and collaborate in teams. The eSignature solution gives a secure workflow and operates based on SOC 2 Type II Certification. Ensure that all of your information are protected and therefore no one can change them.
How to eSign a PDF in Google Chrome
Are you looking for a solution to build up digi-sign order directly from Chrome? The airSlate SignNow extension for Google is here to help. Find a document and right from your browser easily open it in the editor. Add fillable fields for text and signature. Sign the PDF and share it safely according to GDPR, SOC 2 Type II Certification and more.
Using this brief how-to guide below, expand your eSignature workflow into Google and build up digi-sign order:
- Go to the Chrome web store and find the airSlate SignNow extension.
- Click Add to Chrome.
- Log in to your account or register a new one.
- Upload a document and click Open in airSlate SignNow.
- Modify the document.
- Sign the PDF using the My Signature tool.
- Click Done to save your edits.
- Invite other participants to sign by clicking Invite to Sign and selecting their emails/names.
Create a signature that’s built in to your workflow to build up digi-sign order and get PDFs eSigned in minutes. Say goodbye to the piles of papers on your desk and start saving money and time for more important activities. Choosing the airSlate SignNow Google extension is an awesome convenient option with plenty of benefits.

How to eSign an attachment in Gmail
If you’re like most, you’re used to downloading the attachments you get, printing them out and then signing them, right? Well, we have good news for you. Signing documents in your inbox just got a lot easier. The airSlate SignNow add-on for Gmail allows you to build up digi-sign order without leaving your mailbox. Do everything you need; add fillable fields and send signing requests in clicks.
How to build up digi-sign order in Gmail:
- Find airSlate SignNow for Gmail in the G Suite Marketplace and click Install.
- Log in to your airSlate SignNow account or create a new one.
- Open up your email with the PDF you need to sign.
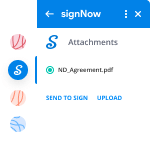
- Click Upload to save the document to your airSlate SignNow account.
- Click Open document to open the editor.
- Sign the PDF using My Signature.
- Send a signing request to the other participants with the Send to Sign button.
- Enter their email and press OK.
As a result, the other participants will receive notifications telling them to sign the document. No need to download the PDF file over and over again, just build up digi-sign order in clicks. This add-one is suitable for those who like focusing on more significant goals rather than wasting time for nothing. Enhance your day-to-day routine with the award-winning eSignature solution.
How to sign a PDF template on the go without an app
For many products, getting deals done on the go means installing an app on your phone. We’re happy to say at airSlate SignNow we’ve made singing on the go faster and easier by eliminating the need for a mobile app. To eSign, open your browser (any mobile browser) and get direct access to airSlate SignNow and all its powerful eSignature tools. Edit docs, build up digi-sign order and more. No installation or additional software required. Close your deal from anywhere.
Take a look at our step-by-step instructions that teach you how to build up digi-sign order.
- Open your browser and go to signnow.com.
- Log in or register a new account.
- Upload or open the document you want to edit.
- Add fillable fields for text, signature and date.
- Draw, type or upload your signature.
- Click Save and Close.
- Click Invite to Sign and enter a recipient’s email if you need others to sign the PDF.
Working on mobile is no different than on a desktop: create a reusable template, build up digi-sign order and manage the flow as you would normally. In a couple of clicks, get an enforceable contract that you can download to your device and send to others. Yet, if you want a software, download the airSlate SignNow app. It’s secure, fast and has a great design. Take advantage of in smooth eSignature workflows from the office, in a taxi or on a plane.
How to sign a PDF file employing an iPhone
iOS is a very popular operating system packed with native tools. It allows you to sign and edit PDFs using Preview without any additional software. However, as great as Apple’s solution is, it doesn't provide any automation. Enhance your iPhone’s capabilities by taking advantage of the airSlate SignNow app. Utilize your iPhone or iPad to build up digi-sign order and more. Introduce eSignature automation to your mobile workflow.
Signing on an iPhone has never been easier:
- Find the airSlate SignNow app in the AppStore and install it.
- Create a new account or log in with your Facebook or Google.
- Click Plus and upload the PDF file you want to sign.
- Tap on the document where you want to insert your signature.
- Explore other features: add fillable fields or build up digi-sign order.
- Use the Save button to apply the changes.
- Share your documents via email or a singing link.
Make a professional PDFs right from your airSlate SignNow app. Get the most out of your time and work from anywhere; at home, in the office, on a bus or plane, and even at the beach. Manage an entire record workflow effortlessly: create reusable templates, build up digi-sign order and work on PDFs with business partners. Turn your device right into a powerful business for closing deals.
How to eSign a PDF using an Android
For Android users to manage documents from their phone, they have to install additional software. The Play Market is vast and plump with options, so finding a good application isn’t too hard if you have time to browse through hundreds of apps. To save time and prevent frustration, we suggest airSlate SignNow for Android. Store and edit documents, create signing roles, and even build up digi-sign order.
The 9 simple steps to optimizing your mobile workflow:
- Open the app.
- Log in using your Facebook or Google accounts or register if you haven’t authorized already.
- Click on + to add a new document using your camera, internal or cloud storages.
- Tap anywhere on your PDF and insert your eSignature.
- Click OK to confirm and sign.
- Try more editing features; add images, build up digi-sign order, create a reusable template, etc.
- Click Save to apply changes once you finish.
- Download the PDF or share it via email.
- Use the Invite to sign function if you want to set & send a signing order to recipients.
Turn the mundane and routine into easy and smooth with the airSlate SignNow app for Android. Sign and send documents for signature from any place you’re connected to the internet. Generate professional-looking PDFs and build up digi-sign order with a few clicks. Assembled a flawless eSignature workflow using only your smartphone and improve your general productivity.
Get legally-binding signatures now!
FAQs
-
What is Digi sign?
DIGsignNow is a public service for electronic signatures along with the time stamp attached to each document or electronic transaction supported by authenticity of personal data or customer entities that are registered and verified through KYC processes both online and offline and also with anti-denial functions. -
How many types of digital signature are there?
There are basically 3 types of Digital Signature Certificates Class-1, Class-2 & Class-3 each having different level of security. All the authorized signatories of company under MCA21 require Class-2 Digital Signature Certificate. -
What is Class 2 and Class 3 digital signature?
Class 2 Digital Signature Certificates are generally used for filing documents Income Tax, Registrar of Companies and VAT, whereas Class 3 Digital Signature Certificates are needed for e-tendering, which is a procurement process that is conducted online. -
How do you use DigsignNow?
Suggested clip Learning How To Use DigsignNow - YouTubeYouTubeStart of suggested clipEnd of suggested clip Learning How To Use DigsignNow - YouTube -
Can you sign a PDF file?
Sign a PDF. To sign a PDF document or form, you can type, draw, or insert an image of your handwritten signature. You can also add text, such as your name, company, title, or the date. When you save the document, the signature and text become part of the PDF. -
How can I electronically sign a PDF for free?
Sign in to your airSlate SignNow account on your desktop or use one of our online signature apps. Click \u201csign a document now\u201d to upload the document. Drag and drop your online signature. Send it to your signer. The document is automatically saved for your records. -
How can I create a digital signature for free?
Create an airSlate SignNow account. It only takes a few seconds. Upload your document to your account. ... Select who needs to sign your document. ... Prepare the document for signature. ... Sign the document or send it out for signature. -
How do I do an electronic signature in Word?
To add a digital signature, open your Microsoft Word document and click where you'd like to add your signature line. From the Word ribbon, select the Insert tab and then click Signature Line in the Text group. A Signature Setup pop-up box appears. Enter your information in the text fields and click OK. -
How do I insert a handwritten signature in Word?
Sign your name on a white, unlined piece of airSlate SignNow. Scan the signature and save it as a bmp, . ... Start Word. Go to the Insert tab and select Pictures. Navigate to the signature file and select Insert. Select the image and activate the Picture Tools tab. -
How do I create an electronic signature online?
Suggested clip How to Create Electronic and Digital Signature and Sign PDF and ...YouTubeStart of suggested clipEnd of suggested clip How to Create Electronic and Digital Signature and Sign PDF and ... -
How do I set up an electronic signature?
All you have to do is open your document, click "Tools," then click "Fill & Sign." Click the "Sign" button in the toolbar and you'll be prompted to type, draw or use an image of your signature. -
How do I create a digital signature in Word?
To add a digital signature, open your Microsoft Word document and click where you'd like to add your signature line. From the Word ribbon, select the Insert tab and then click Signature Line in the Text group. A Signature Setup pop-up box appears. Enter your information in the text fields and click OK. -
How do I create a digital signature?
Click the link. ... Agree to electronic signing. ... Click each tag and follow the instructions to add your digital signature. Verify your identity and follow the instructions to add your digital signature. -
How do I create a digital signature in PDF?
Open the PDF file in airSlate SignNow Reader. Click on Fill & Sign in the Tools pane on the right. Click Sign, and then select Add Signature. A popup will open, giving you three options\u2014Type, Draw, and Image. Once you're done, click the Apply button. Drag, resize and position the signature inside your PDF file. -
How do I electronically sign a document in Word?
Suggested clip How to Add A Signature in a Word Document - YouTubeYouTubeStart of suggested clipEnd of suggested clip How to Add A Signature in a Word Document - YouTube
What active users are saying — build up digi sign order


Related searches to build up digi-sign order with airSlate airSlate SignNow

Build up digi sign order
if you're an existing serif crafts artists user then this video will show you how to access all images to create your own digits using the digits included in software hi I'm Michele Jackson Wagner from MGM design studios I create digital craft collections and I want to show you how easy it is to access all the images and this will work for any of your crafty down lured CD ROMs or your own images anything that's a JPEG or a PNG you'll be able to make a digit from have to say at this point that this is for existing users of the craft artists software only as sadly the software is no longer available to purchase but if you do have the software and I've always wanted to make your own digits and never quite sure how to do it then we're going to explore that together so let's go and have a look at the computer once you've launched the craft artists software from the start up screen that you want to pick in a blank project scrap page 12 by 12 click OK and then just ignore of all your kits in the browser just close the browser down so we don't know had a collection at this point because we're actually gonna create one and what we do is we go up to the top toolbar here where it says tools and in that drop-down you're selecting didja kit creator so click that and then we get the creator up here which obviously is empty at the moment because we need to add to it so what we need to do is go down to this bottom corner here where it says import click import and add files and that will take us to the files on our computer so wherever you're going to wherever you've saved your downloads to or your kits to this is where this is where they'll be so we're going to use fall into autumn and this is a this is my collection and it's a 5 folder collection so that it's across 5 folders and what we need to do is find the embellishments so they're all labels I'm going to click this one open here and these are all some of the embellishments which are in the collection you click the first image and then while you hold the shift key down go down to the bottom image and click that one and it will select all of them all in one go and then click often what happen is that imports all the bitmaps and you're going to see them pop up in your screen here and you'll also see them in your tool box down the side here which is where you use them from so I know that there's some more embellishments to bring in so again import add files and we'll go back to the folders and the other embellishments are in here so we click the first one scroll down shift key click the last one it brings them all in in one go and they'll drop in at the bottom of the list so you'll see them in here the ones I've just added and if you go down this box here you'll see them there now at this point when you're making digits I suggest that you save your kits all the way through so every time you do a section serve it although it takes a bit more time it just saves frustration later on so you click Save digi kits at the bottom here and the first thing that's going to happen is this box is going to pop up now once we remedied this it won't pop up every time and it says there aren't any layouts and this is the this is what you see in your preview pane of your dizzy kit browser so it says add layouts now which we can't because we don't have any so we'll click no you can serve it and it would just have a blank preview pane for now and then you can add it later on or you can do it right now so we'll just click cancel and I'm going to click done down the bottom as did you click it creator box that's really hard to say the Digi kit creator box so we click done down here now all my collections come with a cover some it depending on who you download from away you get them the might not at this point you could create a cover you could just do a temporary cover and then change it later on so you could just bring on elements just so to remind you what's in the collection if you go away and come back to it but because I've got a cover in my collection I'll show you how to add that so you go to the photos tab which is going to be empty because this is where we add our own photographs and we click Add at the bottom again we're going to go back to the downloaded I have and in this one it says kick cover so here's the kick cover here I just click it and open it and that's in my Photos tab I'm going to drag it on to my page here it comes in an 8 by 8 but we need to make it 12 by 12 so we go over here to transform and then in this corner here is your the width and the height and you just need to link this little chin here so if you can just see on this side there's the little chain here and if you click that it will link the two boxes so it will just keep it the same aspect ratio and put 12 in the width click enter and it's made it 12 by 12 then while you down here just go to a line and center it on the page like that so that's the the layout that will be your preview in your digital so we got back to tools and back to digi kit creator and that takes us back to where we were so all your stuff still in there that we've added already and we're going to go to layouts this time and then down the bottom here where we imported before it now says add so if you click Add it will generate the layouts in your project that you've got on screen at the moment so that's the one that we've got on screen at the moment and click OK and that's added that in we've now got a cover because your first layout will always be the cover of your collection so if you make your own cover when you click Add you just make sure that the one you've created is selected first and then it will be the cover for your collection now you can go ahead and save your digits or so did you kick down the bottom that's going to take you to your computer now your digits are in your browser are kept here in my digi kit so if I just open that you'll see them all in there if you save your collection to there it will automatically be in the craft artists software but if you want to save on an external drive or serve it somewhere else just find some relatives I could send it to my external hard drive or I can serve it in pick my pictures is wherever you want to serve it really and then I'll show you how to add the browser later so I'm going to keep it in the autumn kit section so I know where it is and then give your collection in them so we'll just call this demo and click Save and it's going to it's going to process it can take a while it depends how much informations in there the bar just goes on just be patient and wait for it eventually it just disappears off the screen and then you can continue adding to your collection so that's done now if we go back we'll see there's embellishments now I know that I've got digi stamps and I've got sentiments in this collection which I'm going to add to the embellishment section so again import down the bottom here and add files and then we'll look for those other folders so in here we've got sentiments click the first one down to the bottom click the last one holding the shift key open that will bring all the sentiments in you'll see that they've all gone in here import again add files go back digi stamps click the first one click the last one holding the shift key down open and that's going to import those bitmaps as well after it's done this one I'm going to show you how you then save your digi kit again without having laws of different versions of the same kit so we'll click Save digi kit here and you'll see it's in the folder that we served in - you see it there so you'll recognize that as the as an image that you normally have in your digi-key I just click that to put the name in here and click Save it's going to tell me this already exists do I want to replace it I do because I've added to it so I've changed the kit so just click yes and once again the little progress bar I'll go over and it'll save all the new things in as well as the things that we'd already got in the collection so again this can take a little bit of time it depends how much information it's processing and once that green bars gotten all the way to the end the Box disappears and then you can move on to the next section so the next section of the is the pair facility of backgrounds and materials so you click the background' section here on this side again travel down to import and just exactly the same we're just looking for those paper files now so go back to the collection um they were there so I'm going to pick up the coordinating papers here again you click the first image go down to the bottom hold the shift key click the last and open and then while we're doing that folder let's just drop down to the material section here this is just how I work because and I don't forget bit import add files and exactly the same again and what will happen is it will generate the materials 8 by 8 and the backgrounds are make generated at twelve by twelve so it automatically does it for you which is really cool so whatever collection you download you know that the papers will be the right size so let's go and find the other papers in the collection so there's a few here click open and again do the same with the materials import add files and that's that one and then I just know I know that in this collection there's one more set of papers or add files go back so it's really easy to just build up your the kitchen self all the works done for you by the software just takes a little bit of time gathering and then lastly we'll do these into materials once all your backgrounds materials are in place you see them all there go down save EDG kit again click on it save it yes and then like the progress go through once again once the green bow is gone all the way to the end and we can move on to the next section the next section I'm going to do is going to do the letters we're going to come back to the frames in a second because as if there's a little bit more work that you need to do to the friends but we're going to go to the letters so if the collection you are converting has alphabets in it then this is how you do it so I'll click import and add files again and this time we go and find the alphabet which is here and there's only uppercase in this collection but if it was upper and lowercase I'll show you how you assign your letters so this works a little bit differently you get a keyboard up here because each of these images has to be assigned a character basically to make it work on the keyboard so if I add upper and lower case then I will design the air and then obviously if it was a lowercase a it will be that one you've got all your punctuation along here and your numbers and then different symbols if they're in your collection as well quickest way to do it you click the letter which is going to assign it you can go down to the bottom and click OK but then the more time effective way to do it is to just print the press your Enter key so I'm literally going across each letter clicking it and then pressing the enter key on my keyboard it's as simple as that so I've got all the way through your alphabet to assign your letters like this and then this will work at the bottom of the letter box so you'll be able to write full words and just insert them okay it so they're all in there and that's all done so now we're going to go on to the frames so we open up the frame tab and if we go down to the bottom weight normally says import it says create frame this time and this is because it generates into an intelligent digital frame it says add files so we just go to the collection and add the files now even though these frames have been made to work with they're all PNG so they do have the centers cut out when they get generated within the educator little bits get missed in the frame I'll show you what I mean in a second so once the friends are all in there we're going to click done down the bottom here and I'm going to just add a page to my workspace like this and we're going to bring on a frame I'm going to show you what I mean about missing bits so we're going to start with this one here and I'm going to zoom right in so you can see what I'm talking about so to test it we want to add the photograph to it so we go to the photos tab on the left and click add and just find a couple of photographs that we can test our frames with click open drag you photograph on it's going to drop in so it's already working as intelligent for him as it would normally do in the software and what I'm going to do now just to make it obvious what I'm talking about is I'm just going to draw a colored box behind I'm gonna put it behind the frame so let's just fill this in with a bright color and we send this all the way back and if we zoom in to the corner so you see it's framed absolutely fine around here but when you come down to this little section here look you can see the bright green behind the image so this is a hole in your frame so it hasn't quite generated it properly and also around the edge of the leaf is a little bit sketchy here and there's a few gaps here but it's easy to remedy it just a couple of extra steps so I'm going to zoom out now you can see what I'm doing on the screen and what we do is we're just going to get rid of that green box we'll click on the frame and at the bottom of the frame it will say select cropped item so you click that and that's your photograph and just delete it out the way so we're back to the empty frame we're going to go back to the ship tool at the top here and we're going to select the rectangle and with the left mouse key pressed down we just draw out the rectangular shape and we want it to be of it sort of not we wanted to be over the edge of the frame from the inside obviously not all over the frame on the outside and then make sure that all this is taken in as well down to the bottom of the frame here so you can adjust it now wherever this line is is where your photograph will go to in the frame so you don't want it too far away because obviously you lose more of the edge of your photograph when it's friend so once you've done that we go over to the layers tab here so we open up the layers tab and then in layer one which is what we're working on do the drop down there and you'll see your friend in this list do the drop down again and this is how your frame is made up this poly curve here is what makes the hole in the middle and we need to replace it with the rectangle we've just drawn so click on the quick rectangle hold your left mouse key down and drag that rectangle down and sit it between the frame image and the poly curve and I know it looks weird on the screen but do not panic so you're sitting that quick rectangle between the picture of the frame and the poly curve click on the red poly curve click on the red image and then literally click the delete button on your keyboard so you've got rid of the poly curve there and all you need to do is just move that on your page and that's going to adjust it back to look normal and I'll show you the difference it's made when we insert the photograph here and we zoom in you'll now see that those gaps around the pumpkin are actually your photograph so it's a nice clean image within your photograph you've got no fuzzy edges ok so we're assuming out next step get rid of befores graphs when we frame click your frame we need to open up the frame tab on this side and we need to drag the frame holding the left mouse key down to the frame tab and drop it and you'll find it in the bottom of your own tab tab now this is the original image and you just need to delete that we need to remove it from there because that's the one that wasn't right this is the corrected one okay so you've got to remember to replace them otherwise you're going to confuse yourself so I'm just to really quickly do it again with us with this simple rectangle shape and then I'll show you how to do other shapes as well so that frames on I know that there's bits missing on this one so I won't go through that whole process again you pick up the shape tool here you draw your rectangle out so it's within the frame here yep we go over to the layers tab on the right and open up the frame pick up the rectangle hold it with your left mouse bring it down drop it between picture and Polly curve so the picture of the frame and the red Polly curve click on the red Polly curve delete and then on the screen just move that friend to make it look normal again and that one's done though so again in the friends tab on the Left just drag and drop your frame that's now at the bottom and remove the original one so you'll see that they're circular friends in here as well or even of all this works for all walls as well so if we zoom in it's exactly the same principle we go to the shape tool at the top but this time in the drop-down menu you pick the quick ellipse click on it and draw yourself a circle and if it's not quite circular don't worry about it so I'm going to go and just pull these modules out on the corners until it's inside the frame area just push that one up so it's not too far down so that's inside the friend area there just click select to deactivate your shape tool again we're going over to the right to the layers open up the frame section pick up that quick ellipse drag it down between the frame picture and the red poly curve click the red poly curve delete it maybe friends a lot normal and then drag and drop you frame to the frame tab and delete the original one and then very quickly there's a heart shape one here and that just works exactly the same way because you can go to your shape tool and find a heart and you'll always find a shape that will work for whatever frame you're working on even the odd shape friend you'll be able to find a ship and then you can manipulate it as you need to so I need to pull out the corners a little bit more and I need to pull up the height to make sure it's within within the friend area so make sure it's down here within that framed area it doesn't have to be perfectly in the middle just as long as it's it's outside of the inside of the frame and inside of the outside of a friend that's very confusing Michelle okay we'll click select a deactivate shape tool a months again open your frame on this side grab the quick heart drawing bring it down to above the poly curve click the polygon delete it and now we've got your frame sorted so you would just drag that across that's in the bottom and delete the original and you've got do that for all the friends that you're adding to your collection now we can go back to the toolbar did you get creator and if we go down each section each section that we want that we've got images for is full frames are done materials done letters are done and you've got your kit cover so you'd serve your did your kit click it save yes and then just wait for that progress bar to go across once it's gone all the way to the end that's your digi kit actually saved and done and I'm going to assure you if you haven't saved it into the My Documents section on your computer which means it's automatically gone into your browser I'll show you how you get to it so all we do is we click done to close the digital and we actually close the Kraft artist program and I don't want to save the project because that layout is in my kit now so I don't need the layout so we click now and then you'll see wherever we've saved it to on your computer go and find it so you see it here so this is now a pack file this now works with the Kraft artist software and if you double click it it will ask you do you want to move the imported digitate file and if you say yes it will actually take away from where I've kept it and if I say no it'll leave it there but it will also transfer it to the software so I'm going to say no because this is a way you can keep things on your external hard drives and so you've got backup so you never lose your kits click now and you say and it says it's imported successfully as quick as that click ok it's going to launch the software again so if I just show you with a blank project where it is whoops no like that and if we look in our work did you get browser the demo kit is there I'm going to click it and you'll see all the images are there ready to go you add your did you get you click done and then you can just craft away to your heart's content so that is the quickest easiest way to convert your images any downloads you've got that you want to use in your craft artists software the quickest way to do it is to create your own digits with the digit creator so it's that easy to convert your images into a digit within the craft artists software and once again I have to say unfortunately you need to be an existing user of the software as it's no longer available to purchase but hopefully the existing users that have now watch this video you'll be able to go away and create digits to your heart's content digital craft collections are a really cost effective way of crafting it's just an endless resource and you never run out to be favorite paper or embellishment and it's always there to hand whenever you want to craft and with so many prints were mediums out there from t-shirt printing bags Cotton's canvases acetates even shrink plastic the possibilities are truly endless if you'd like any of my craft collections please visit my EXCI shop which is mjm design studios and the link will be in the description below and while you're there please subscribe and click the bell for videos coming up thanks very much for stopping by and watching this video I hope it's been helpful and I hope you enjoy creating your digi kits and until soon happy crafting [Music]
Show moreFrequently asked questions
What is needed for an electronic signature?
How do I send a document that people can eSign?
What makes an electronic signature legally binding?
Get more for build up digi-sign order with airSlate SignNow
- Real mark
- Prove electronically signed Architecture Firm Proposal Template
- Endorse digisign Landscaping Proposal Template
- Authorize electronically sign appeal
- Anneal mark Studio Rental Agreement
- Justify esign Customer Case Study Proposal Template
- Try countersign Separation Agreement Template
- Add Assignment Agreement initial
- Send Website Quote Template signature
- Fax Letter of Intent for Promotion email signature
- Seal Music Press Release digital signature
- Password Construction Equipment Lease Proposal Template electronically signed
- Pass Licensing Agreement byline
- Renew Web Design Contract esign
- Test Boy Scout Camp Physical Form signature block
- Require Subscription Agreement Template signature service
- Comment proof digi-sign
- Boost cosigner signed
- Call for successor mark
- Void Amendment to LLC Operating Agreement template electronically sign
- Adopt Support Agreement template countersignature
- Vouch Free Raffle Ticket template digital signature
- Establish Alabama Bill of Sale template signed
- Clear Limousine Service Contract Template template digi-sign
- Complete Pet Health Record template esign
- Force Design Invoice Template template digital sign
- Permit Income Verification Letter template initial
- Customize Photo Licensing Agreement template signature