Digisign Landlord Verification Form Made Easy
Award-winning eSignature solution


Get the powerful eSignature capabilities you need from the solution you trust
Select the pro service designed for professionals
Set up eSignature API quickly
Work better together
Digisign landlord verification form, within a few minutes
Reduce your closing time
Keep important data safe
See airSlate SignNow eSignatures in action


airSlate SignNow solutions for better efficiency
Our user reviews speak for themselves


Why choose airSlate SignNow
-
Free 7-day trial. Choose the plan you need and try it risk-free.
-
Honest pricing for full-featured plans. airSlate SignNow offers subscription plans with no overages or hidden fees at renewal.
-
Enterprise-grade security. airSlate SignNow helps you comply with global security standards.

Your step-by-step guide — digisign landlord verification form
Using airSlate SignNow’s electronic signature any organization can enhance signature workflows and sign online in real-time, supplying an improved experience to clients and staff members. Use digsignNow Landlord Verification Form in a couple of easy steps. Our mobile apps make work on the run achievable, even while off the internet! eSign documents from anywhere in the world and close up deals faster.
Take a step-by-step instruction for using digsignNow Landlord Verification Form:
- Log in to your airSlate SignNow profile.
- Locate your record within your folders or upload a new one.
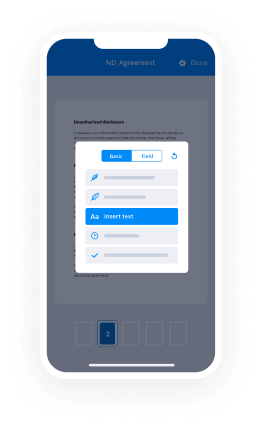
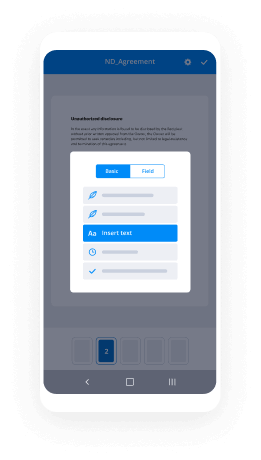
- Access the template adjust using the Tools list.
- Place fillable fields, add textual content and sign it.
- List numerous signees using their emails and set the signing order.
- Indicate which recipients will get an completed copy.
- Use Advanced Options to reduce access to the record add an expiration date.
- Click on Save and Close when finished.
In addition, there are more enhanced features available for digsignNow Landlord Verification Form. List users to your collaborative workspace, browse teams, and keep track of teamwork. Numerous consumers all over the US and Europe agree that a solution that brings everything together in a single unified work area, is what businesses need to keep workflows working easily. The airSlate SignNow REST API allows you to integrate eSignatures into your application, website, CRM or cloud storage. Check out airSlate SignNow and get quicker, smoother and overall more effective eSignature workflows!
How it works
airSlate SignNow features that users love


See exceptional results digisign Landlord Verification Form made easy

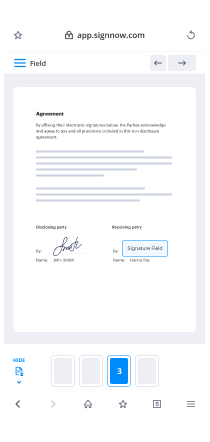
How to fill in and sign a document online
Try out the fastest way to digisign Landlord Verification Form. Avoid paper-based workflows and manage documents right from airSlate SignNow. Complete and share your forms from the office or seamlessly work on-the-go. No installation or additional software required. All features are available online, just go to signnow.com and create your own eSignature flow.
A brief guide on how to digisign Landlord Verification Form in minutes
- Create an airSlate SignNow account (if you haven’t registered yet) or log in using your Google or Facebook.
- Click Upload and select one of your documents.
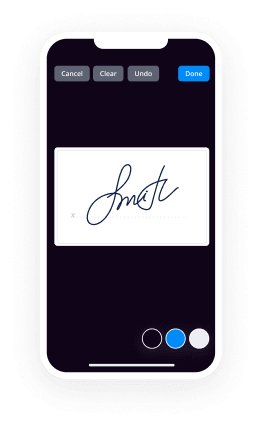
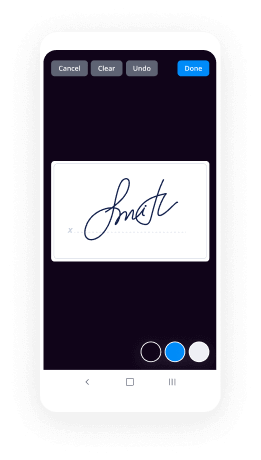
- Use the My Signature tool to create your unique signature.
- Turn the document into a dynamic PDF with fillable fields.
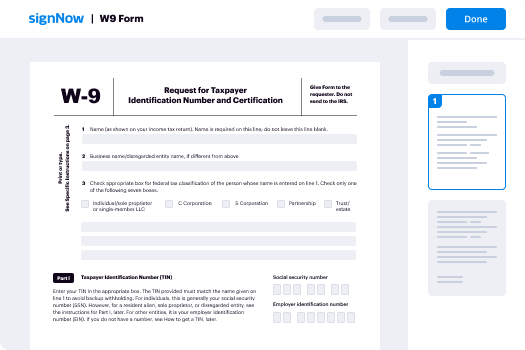
- Fill out your new form and click Done.
Once finished, send an invite to sign to multiple recipients. Get an enforceable contract in minutes using any device. Explore more features for making professional PDFs; add fillable fields digisign Landlord Verification Form and collaborate in teams. The eSignature solution supplies a protected workflow and runs in accordance with SOC 2 Type II Certification. Make sure that your information are protected so no person can change them.
How to eSign a PDF in Google Chrome
Are you looking for a solution to digisign Landlord Verification Form directly from Chrome? The airSlate SignNow extension for Google is here to help. Find a document and right from your browser easily open it in the editor. Add fillable fields for text and signature. Sign the PDF and share it safely according to GDPR, SOC 2 Type II Certification and more.
Using this brief how-to guide below, expand your eSignature workflow into Google and digisign Landlord Verification Form:
- Go to the Chrome web store and find the airSlate SignNow extension.
- Click Add to Chrome.
- Log in to your account or register a new one.
- Upload a document and click Open in airSlate SignNow.
- Modify the document.
- Sign the PDF using the My Signature tool.
- Click Done to save your edits.
- Invite other participants to sign by clicking Invite to Sign and selecting their emails/names.
Create a signature that’s built in to your workflow to digisign Landlord Verification Form and get PDFs eSigned in minutes. Say goodbye to the piles of papers sitting on your workplace and begin saving money and time for additional essential duties. Selecting the airSlate SignNow Google extension is an awesome convenient option with lots of advantages.
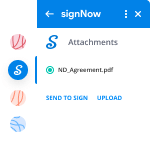

How to sign an attachment in Gmail
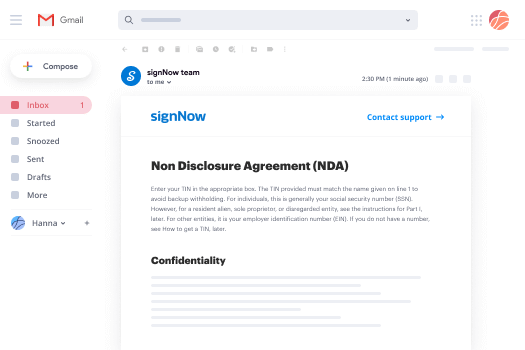
If you’re like most, you’re used to downloading the attachments you get, printing them out and then signing them, right? Well, we have good news for you. Signing documents in your inbox just got a lot easier. The airSlate SignNow add-on for Gmail allows you to digisign Landlord Verification Form without leaving your mailbox. Do everything you need; add fillable fields and send signing requests in clicks.
How to digisign Landlord Verification Form in Gmail:
- Find airSlate SignNow for Gmail in the G Suite Marketplace and click Install.
- Log in to your airSlate SignNow account or create a new one.
- Open up your email with the PDF you need to sign.
- Click Upload to save the document to your airSlate SignNow account.
- Click Open document to open the editor.
- Sign the PDF using My Signature.
- Send a signing request to the other participants with the Send to Sign button.
- Enter their email and press OK.
As a result, the other participants will receive notifications telling them to sign the document. No need to download the PDF file over and over again, just digisign Landlord Verification Form in clicks. This add-one is suitable for those who choose working on more significant tasks instead of wasting time for nothing. Enhance your daily compulsory labour with the award-winning eSignature service.
How to sign a PDF file on the go with no app
For many products, getting deals done on the go means installing an app on your phone. We’re happy to say at airSlate SignNow we’ve made singing on the go faster and easier by eliminating the need for a mobile app. To eSign, open your browser (any mobile browser) and get direct access to airSlate SignNow and all its powerful eSignature tools. Edit docs, digisign Landlord Verification Form and more. No installation or additional software required. Close your deal from anywhere.
Take a look at our step-by-step instructions that teach you how to digisign Landlord Verification Form.
- Open your browser and go to signnow.com.
- Log in or register a new account.
- Upload or open the document you want to edit.
- Add fillable fields for text, signature and date.
- Draw, type or upload your signature.
- Click Save and Close.
- Click Invite to Sign and enter a recipient’s email if you need others to sign the PDF.
Working on mobile is no different than on a desktop: create a reusable template, digisign Landlord Verification Form and manage the flow as you would normally. In a couple of clicks, get an enforceable contract that you can download to your device and send to others. Yet, if you really want a software, download the airSlate SignNow app. It’s secure, fast and has a great layout. Enjoy seamless eSignature workflows from your workplace, in a taxi or on an airplane.
How to sign a PDF file using an iPad
iOS is a very popular operating system packed with native tools. It allows you to sign and edit PDFs using Preview without any additional software. However, as great as Apple’s solution is, it doesn't provide any automation. Enhance your iPhone’s capabilities by taking advantage of the airSlate SignNow app. Utilize your iPhone or iPad to digisign Landlord Verification Form and more. Introduce eSignature automation to your mobile workflow.
Signing on an iPhone has never been easier:
- Find the airSlate SignNow app in the AppStore and install it.
- Create a new account or log in with your Facebook or Google.
- Click Plus and upload the PDF file you want to sign.
- Tap on the document where you want to insert your signature.
- Explore other features: add fillable fields or digisign Landlord Verification Form.
- Use the Save button to apply the changes.
- Share your documents via email or a singing link.
Make a professional PDFs right from your airSlate SignNow app. Get the most out of your time and work from anywhere; at home, in the office, on a bus or plane, and even at the beach. Manage an entire record workflow seamlessly: make reusable templates, digisign Landlord Verification Form and work on PDF files with business partners. Turn your device into a powerful business instrument for executing deals.
How to sign a PDF file using an Android
For Android users to manage documents from their phone, they have to install additional software. The Play Market is vast and plump with options, so finding a good application isn’t too hard if you have time to browse through hundreds of apps. To save time and prevent frustration, we suggest airSlate SignNow for Android. Store and edit documents, create signing roles, and even digisign Landlord Verification Form.
The 9 simple steps to optimizing your mobile workflow:
- Open the app.
- Log in using your Facebook or Google accounts or register if you haven’t authorized already.
- Click on + to add a new document using your camera, internal or cloud storages.
- Tap anywhere on your PDF and insert your eSignature.
- Click OK to confirm and sign.
- Try more editing features; add images, digisign Landlord Verification Form, create a reusable template, etc.
- Click Save to apply changes once you finish.
- Download the PDF or share it via email.
- Use the Invite to sign function if you want to set & send a signing order to recipients.
Turn the mundane and routine into easy and smooth with the airSlate SignNow app for Android. Sign and send documents for signature from any place you’re connected to the internet. Build professional-looking PDFs and digisign Landlord Verification Form with just a few clicks. Put together a perfect eSignature workflow using only your smartphone and improve your overall productivity.
Get legally-binding signatures now!
FAQs
-
What is a landlord verification form?
The landlord verification form is a document used by a landlord when verifying the previous rental information of an applicant for tenancy. The requesting landlord must send the form to the applicant's current or past landlord in order to obtain all details related to the tenancy of the individual. -
How can I fake my rental history?
Pretend to be looking for an apartment. ... Listen to the Responses. ... Check Social Media. ... Check Tax Records. -
How long does rental verification take?
Typically, most applications take 48-72 hours for a decision, but there are instances where it may take more. We should note, the management company has up to seven days to make a decision \u2013 if they don't make one in the time allotted, the application is considered rejected by default. -
How do you write a proof of residency letter to a landlord?
Start the proof of residency letter from landlord by indicating your purpose. ... Next, include the complete address of the property where the tenants reside. State how long your tenants have lived in your property. ... Include the amount they pay each month for the rent. -
How do I write a letter to tenant?
Begin the letter with the date on which you mail or deliver the letter in person. Include your name, address and phone number, followed by the tenant's name and address. You can also insert a subject line that summarizes the reason for the letter to vacate. Start with a salutation, followed by your tenant's name.
What active users are saying — digisign landlord verification form


Digisign landlord verification form
alright guys so this is the sky form and zip form tutorial video number two if you've not watched number one yet you definitely want to watch that so that you'll understand what's going on here in number two alright so we number one we created templates we showed you how to do that and now in this one we're going to go over and create a transaction alright here's a list of my transactions I want to create a new one cycle right here and click new and is this a new listing is it a new purchase offer is it a new lease or a new lease listing ok so that I represent the seller or do I represent the buyer to represent the tenant did I represent the landlord or do I need a quick sign something and that's only usable if you pay for that service within zip form so it's not available in the free version and you really don't need it anyway because you can sign through sky slope alright so a new purchase or offer and this is a residential and by the way I'm going to name this my fictional clients are Bob and Bonnie Bell oops so Belle Bob and Bonnie right there and then it's a residential select the template this is where we select the template we already made and I want to select the buyer template so all of that is going to come into my my new client folder so I hit save and and it'll come here to where I can start entering MLS information and all of that and I'm not there yet so I'd really don't need to do any of this so really I wish it would default to documents but you can just come up here in select documents and it will show you excuse me the five docs that we created in our template and you can see your the end Bob and bunny Belle's file right now and this is all stuff for them so now this cover sheet is as I produced it in the template so you still see all of this information but now I want to go and start entering in buyer information because this is for one specific buyer or pair of buyers and so I want this information to to autofill into other documents within this client's transactions so right here I'm gonna click Bob and you see Bob's already in there these are what you call learning fields which it's the same and the other cover sheet that we did in the template so if you ever typed something in there before it's still going to be in there that's why this is kind of easy for me to do right here and I just did one let's see amid rivers I don't see it in there but mid rivers Mall Drive in st. Peters and when I click that it's gonna automatically search for that and see how it verifies that address that pops in there as well I'm not going to worry about phone number and then I'm going to put the email address what I'm putting here is an email that kind of an obscure one that I don't use anymore because we're going to send DocuSign documents over to that email address here in just a few minutes okay so there's Bob and then we're gonna click another B and I see Bonnie's in there already and then her street address is the same thing it's one mid-river small drive and notice that didn't verify it automatically so I just backspace hit drive again and there it is and then it pops up okay and an email address I'm going to use the same email address and one of the beauties of the sky slope integration is that unlike dot loop which I used before with Keller Williams you had to have a separate email address for each signer with a sky slope you can use the same email address and they'll get separate emails address to them at that particular email address okay nobody no buyer three no seller information at this point there's all my selling broker information and I pretty much just leave everything the same now if I knew that there was a different title company I could put that in right here if I already knew their lender information I could go ahead and put that in as well and that could not auto populate as well but for right now all I really need is their name and really just their email address but I put address in there anyway okay so we're going to save that so we come up here actually I think it auto saves yeah it auto saves so if I just click back I'm out of that and then if you look here and my buyers agency agreements down at the bottom where the signers are there are already populated in everything has gone in there okay and so we are actually wanting to set this up to send it over for signatures so I'm going to put right here Bob Bob and Bonnie Bell and beginning today and let's just give it six months one two three four five six that's August on the 13th and and then this I leave like this and I really there's there's nothing else excuse me that I need to fill in other than I'd say I believe that's it okay so that's really it for this one and I'm gonna drop the signatures in later we'll show you how to do that in DocuSign okay so that's all I need to do for their buyer's agency agreement I'm not even gonna worry about residential sale contract right now because I'm not there yet I'm not an inspection notice yet but I will be sending them to wire fraud advisory so the first two things I'll send them is their buyers exclusive agency and that wire fraud advisory those two things need signatures I'm also going to send them a couple of other Docs but those won't need signatures and we'll do those together as well okay so these are really all set up ready to go now I can just jump back over to sky slope and I can look in working documents and I have three choices here personal Docs which I've got a folder set up for each individual client these are all signed documents that are waiting to be used on a listing or when we make an offer unfiled docks and I'll explain that to you here in a couple of minutes and I keep a full Missouri State Doc's which I uploaded all of these myself just so I would have everything that it possibly can available I've got 11 pages of them and so then there are office Docs and these are kind of like employment things w9s or there's no there's your wire fraud advisory if you need to go and grab it it's in there and then referral forms and that kind of things they're just office docs and then zip form plus and this is where we want to be so three tabs zip form plus is where we're doing all of our work okay so you see BA a bell Bob and Bonnie are already in there and here are their documents so we want to send Bob and Bonnie an exclusive agency contract to sign and then we also want to send them the wire fried wire fraud advisory to sign so those two are clicked and then I'm gonna click didja sign right here takes just a moment to populate those up in and it's going to ask if I want to choose one of these addresses and I don't at this point I'm not that far along so no property and so they're right here and if I want to change the order in which they see them because these are all going to go in one document basically they'll be strung together in one signing document and you'll be able to split them back up later which I prefer to do rather than send one email for buyer's agency and another one for fraud advisory which would be easier for me because I don't have to split them up I'd much rather make it easier on the client and they get one email and it's two places to sign and then they send it back and I split it up it's kind of the way I prefer to do it okay so then I click Next and then who needs to sign first I'm not signing at all on this I my signatures not needed the broker signature is needed and then both purchasers both buyers are going to be needed and it says who signs first these people and then you could add if there was somebody that doesn't sign until these people sign that then you put them here okay but for our purposes here really it doesn't matter what order they sign in I do want to add the broker because the broker has to sign the buyers agency agreement so I click on new recipients and then name and again these are all learning fields so if I typed it in there before it's in so there's a net and then I select her role is broker and she needs to sign as well so hit save so they'll all get it at the same time right here but this is this is a test document or a test signing I don't want a net to get this okay so I take her off of that and I'm only sending it to Bob and Bonnie and those will be the only signatures required so then I click Next and it lets me prepare the documents so I'm in buyers exclusive agency contract I really just need to go all the way to the bottom and put in signatures so this is Bob so I click signature here and then when I click here again it will insert it so you want to move this up a little bit so the first time I did this I would put the name right on the line and that actually makes it end up below the line so you move it way up in here like this okay there's Bob's signature and then a date signed and there's Bob's date signed right there okay and then I need Bonnie so there's Bonnie signature and Bonnie's hope I didn't click that bonnie and then click over here for Bonnie's signature okay and this is kind of annoying that this stays here like this and be careful that wherever you click your mouse is going to add another one so I always just click one more and then click X and that gets it rid of it gets rid of that extra box and just leaves a nice clean look like this and that's what I just to kind of see how it looks before I send it off okay and then down here on the wiring fraud advisory I need signatures from both of them on this as well and so we're going right here and the last one I did was bonny so I just gonna put that right there that was her date and then her signature is going right there yeah it's okay for that box to overlap the line above it you just want her name to be up here in the middle all right and then another signature here would be for Bob click the drop-down there's Bob and then I need a date for Bob as well and that's right there perfect okay and again if you click out of that it adds another one just click the X and it's gone and then we look good okay so I scroll back up just make sure everything looks the way I want it to and obviously if I was having a net sign this I would enter a signature box for her as well but we don't need that now so I'm gonna click send and my subject I recommend putting the last name in the subject line because when this pops back up on your phone or your Apple watch or wherever and it says documents all signed and you've got more than one transaction out there you want to know immediately by just looking at the subject line who signed and I'll know that the bells sign there's but maybe the Smiths are still out there okay documents decide and then I usually put some information here explanation of documents and things like that so you can add whatever you want to there we'll just put blah blah blah and then send for signatures whoo-hoo that was easy your doc was sent successfully okay I'm gonna click done and then we'll go look at those in the email all right we're going to go over to the gmail account and as you see Bob Bell this one's for him and Bonnie bill this one's for you I sent it to my gmail account but this would be Bob and Bonnie's Gmail okay and so I click on Bob and it says Tim Brinke sent you a document the sign reviewing sign of course I would have my information for them right here as well review and sign and they click the signature they want agree and then they can either scroll down or if they see the start button they click that and it's going to take them right to the signature that's needed they click in there that one's done it's gonna take them to the next one they click on that one ready to return or to submit they submit and woohoo they're done so I'm going to close out of that and then let's look at Bonnie's review and sign she selects a letter she wants her signature to look like start takes her down to the first one clicks that takes her to the second one she signs and see how they had their signatures ended up that's pretty much the way I wanted them to look so that placement looks pretty good so submit and they're done now they could download them if they wanted you to look at them and so we're done there and and this gives them a confirmation saying congratulations you successfully signed your document and then in my email I will get a I will get one as well that tells me that all signed Belle so I know right off the bat that Belle signed so that's what I'm talking about right there
Show more