eSign Patient Intake Form Made Easy
Award-winning eSignature solution


Get the powerful eSignature features you need from the solution you trust
Select the pro service designed for professionals
Configure eSignature API with ease
Collaborate better together
Esign patient intake form, within minutes
Reduce your closing time
Keep important data safe
See airSlate SignNow eSignatures in action


airSlate SignNow solutions for better efficiency
Our user reviews speak for themselves


Why choose airSlate SignNow
-
Free 7-day trial. Choose the plan you need and try it risk-free.
-
Honest pricing for full-featured plans. airSlate SignNow offers subscription plans with no overages or hidden fees at renewal.
-
Enterprise-grade security. airSlate SignNow helps you comply with global security standards.

Your step-by-step guide — esign patient intake form
Leveraging airSlate SignNow’s electronic signature any organization can enhance signature workflows and eSign in real-time, providing a greater experience to clients and staff members. Use esign Patient Intake Form in a few simple actions. Our mobile-first apps make working on the run achievable, even while off the internet! Sign documents from anywhere in the world and close up tasks quicker.
Keep to the walk-through guideline for using esign Patient Intake Form:
- Sign in to your airSlate SignNow account.
- Find your record within your folders or import a new one.
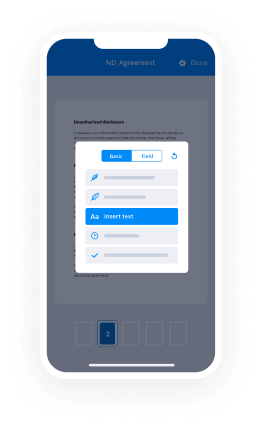
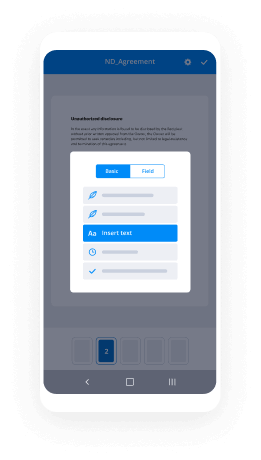
- Open up the document and edit content using the Tools menu.
- Drop fillable fields, add textual content and sign it.
- Add numerous signers via emails configure the signing order.
- Specify which recipients can get an signed doc.
- Use Advanced Options to reduce access to the record and set an expiration date.
- Click on Save and Close when completed.
Furthermore, there are more advanced features open for esign Patient Intake Form. Include users to your common digital workplace, browse teams, and monitor collaboration. Numerous customers all over the US and Europe agree that a solution that brings everything together in one cohesive enviroment, is exactly what enterprises need to keep workflows working smoothly. The airSlate SignNow REST API allows you to integrate eSignatures into your app, internet site, CRM or cloud. Check out airSlate SignNow and enjoy quicker, easier and overall more efficient eSignature workflows!
How it works
airSlate SignNow features that users love


See exceptional results esign Patient Intake Form made easy

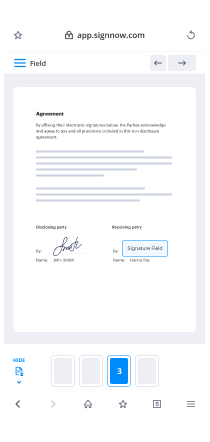
How to fill out and eSign a PDF online
Try out the fastest way to esign Patient Intake Form. Avoid paper-based workflows and manage documents right from airSlate SignNow. Complete and share your forms from the office or seamlessly work on-the-go. No installation or additional software required. All features are available online, just go to signnow.com and create your own eSignature flow.
A brief guide on how to esign Patient Intake Form in minutes
- Create an airSlate SignNow account (if you haven’t registered yet) or log in using your Google or Facebook.
- Click Upload and select one of your documents.
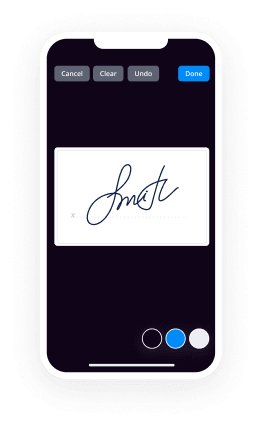
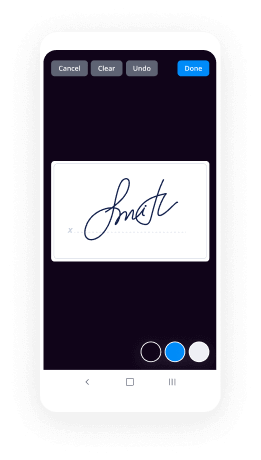
- Use the My Signature tool to create your unique signature.
- Turn the document into a dynamic PDF with fillable fields.
- Fill out your new form and click Done.
Once finished, send an invite to sign to multiple recipients. Get an enforceable contract in minutes using any device. Explore more features for making professional PDFs; add fillable fields esign Patient Intake Form and collaborate in teams. The eSignature solution supplies a protected workflow and operates based on SOC 2 Type II Certification. Make sure that your records are protected and therefore no one can edit them.
How to eSign a PDF template in Google Chrome
Are you looking for a solution to esign Patient Intake Form directly from Chrome? The airSlate SignNow extension for Google is here to help. Find a document and right from your browser easily open it in the editor. Add fillable fields for text and signature. Sign the PDF and share it safely according to GDPR, SOC 2 Type II Certification and more.
Using this brief how-to guide below, expand your eSignature workflow into Google and esign Patient Intake Form:
- Go to the Chrome web store and find the airSlate SignNow extension.
- Click Add to Chrome.
- Log in to your account or register a new one.
- Upload a document and click Open in airSlate SignNow.
- Modify the document.
- Sign the PDF using the My Signature tool.
- Click Done to save your edits.
- Invite other participants to sign by clicking Invite to Sign and selecting their emails/names.
Create a signature that’s built in to your workflow to esign Patient Intake Form and get PDFs eSigned in minutes. Say goodbye to the piles of papers sitting on your workplace and begin saving money and time for more important duties. Selecting the airSlate SignNow Google extension is a great handy choice with a lot of benefits.
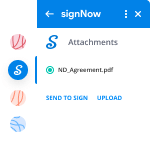

How to eSign an attachment in Gmail
If you’re like most, you’re used to downloading the attachments you get, printing them out and then signing them, right? Well, we have good news for you. Signing documents in your inbox just got a lot easier. The airSlate SignNow add-on for Gmail allows you to esign Patient Intake Form without leaving your mailbox. Do everything you need; add fillable fields and send signing requests in clicks.
How to esign Patient Intake Form in Gmail:
- Find airSlate SignNow for Gmail in the G Suite Marketplace and click Install.
- Log in to your airSlate SignNow account or create a new one.
- Open up your email with the PDF you need to sign.
- Click Upload to save the document to your airSlate SignNow account.
- Click Open document to open the editor.
- Sign the PDF using My Signature.
- Send a signing request to the other participants with the Send to Sign button.
- Enter their email and press OK.
As a result, the other participants will receive notifications telling them to sign the document. No need to download the PDF file over and over again, just esign Patient Intake Form in clicks. This add-one is suitable for those who choose working on more valuable tasks rather than burning up time for nothing. Boost your daily routine with the award-winning eSignature platform.
How to sign a PDF template on the go without an mobile app
For many products, getting deals done on the go means installing an app on your phone. We’re happy to say at airSlate SignNow we’ve made singing on the go faster and easier by eliminating the need for a mobile app. To eSign, open your browser (any mobile browser) and get direct access to airSlate SignNow and all its powerful eSignature tools. Edit docs, esign Patient Intake Form and more. No installation or additional software required. Close your deal from anywhere.
Take a look at our step-by-step instructions that teach you how to esign Patient Intake Form.
- Open your browser and go to signnow.com.
- Log in or register a new account.
- Upload or open the document you want to edit.
- Add fillable fields for text, signature and date.
- Draw, type or upload your signature.
- Click Save and Close.
- Click Invite to Sign and enter a recipient’s email if you need others to sign the PDF.
Working on mobile is no different than on a desktop: create a reusable template, esign Patient Intake Form and manage the flow as you would normally. In a couple of clicks, get an enforceable contract that you can download to your device and send to others. Yet, if you really want an application, download the airSlate SignNow mobile app. It’s comfortable, quick and has an incredible layout. Try out seamless eSignature workflows from the workplace, in a taxi or on a plane.
How to sign a PDF utilizing an iPhone
iOS is a very popular operating system packed with native tools. It allows you to sign and edit PDFs using Preview without any additional software. However, as great as Apple’s solution is, it doesn't provide any automation. Enhance your iPhone’s capabilities by taking advantage of the airSlate SignNow app. Utilize your iPhone or iPad to esign Patient Intake Form and more. Introduce eSignature automation to your mobile workflow.
Signing on an iPhone has never been easier:
- Find the airSlate SignNow app in the AppStore and install it.
- Create a new account or log in with your Facebook or Google.
- Click Plus and upload the PDF file you want to sign.
- Tap on the document where you want to insert your signature.
- Explore other features: add fillable fields or esign Patient Intake Form.
- Use the Save button to apply the changes.
- Share your documents via email or a singing link.
Make a professional PDFs right from your airSlate SignNow app. Get the most out of your time and work from anywhere; at home, in the office, on a bus or plane, and even at the beach. Manage an entire record workflow seamlessly: build reusable templates, esign Patient Intake Form and work on PDFs with partners. Transform your device into a powerful enterprise for closing contracts.
How to eSign a PDF taking advantage of an Android
For Android users to manage documents from their phone, they have to install additional software. The Play Market is vast and plump with options, so finding a good application isn’t too hard if you have time to browse through hundreds of apps. To save time and prevent frustration, we suggest airSlate SignNow for Android. Store and edit documents, create signing roles, and even esign Patient Intake Form.
The 9 simple steps to optimizing your mobile workflow:
- Open the app.
- Log in using your Facebook or Google accounts or register if you haven’t authorized already.
- Click on + to add a new document using your camera, internal or cloud storages.
- Tap anywhere on your PDF and insert your eSignature.
- Click OK to confirm and sign.
- Try more editing features; add images, esign Patient Intake Form, create a reusable template, etc.
- Click Save to apply changes once you finish.
- Download the PDF or share it via email.
- Use the Invite to sign function if you want to set & send a signing order to recipients.
Turn the mundane and routine into easy and smooth with the airSlate SignNow app for Android. Sign and send documents for signature from any place you’re connected to the internet. Build professional-looking PDFs and esign Patient Intake Form with a few clicks. Put together a faultless eSignature process with only your mobile phone and improve your general productiveness.
Get legally-binding signatures now!
FAQs
-
What is patient intake form?
A patient intake form is a document that collects important information about a patient's medical history and current health status prior to their appointment. It typically includes personal details, medical history, current medications, and any allergies or health concerns. airSlate SignNow is an electronic signature solution that streamlines document workflows, increasing productivity while impressing customers and maximizing ROI. Users can access high-volume eSignature features and tools for secure, customizable document management, making it easy to collaborate with clients, partners, and employees. With airSlate SignNow, businesses can save time and money while maintaining compliance, all with a user-friendly platform that scales with their needs. -
What does intake mean in medical terms?
airSlate SignNow is an efficient electronic signature solution that simplifies document workflows for busy managers and employees. With high-volume eSignature features, businesses can improve productivity and impress customers by quickly sending and eSigning documents. By cutting down on paper waste and saving money, airSlate SignNow maximizes ROI and helps small/medium businesses thrive in a competitive market. Trust airSlate SignNow to provide customizable, user-friendly solutions that make signing documents a breeze. -
How do I create an online intake form?
To create an online intake form easily, airSlate SignNow offers high-volume eSignature features that increase productivity in document workflows. With airSlate SignNow, businesses can impress customers and save money while maximizing ROI. As a trusted electronic signature solution, airSlate SignNow provides customizable workflows that are perfect for small/medium businesses, managers, and employees accountable for documents. Get started with airSlate SignNow today and streamline your intake process. -
What does intake form mean?
airSlate SignNow is an electronic signature solution that revolutionizes the way businesses sign and send their documents. With its high-volume eSignature features, users can increase productivity and save money while maximizing ROI. Impress customers with customizable workflows that get documents signed fast and efficiently. Whether you are a small business owner, manager, or employee accountable for documents, airSlate SignNow has got you covered. Join airSlate SignNow and experience the future of digital signing! -
How do you create an intake form?
Creating an intake form with airSlate SignNow is simple and efficient. As an electronic signature solution, airSlate SignNow offers high-volume eSignature features that increase productivity and streamline document workflows. With airSlate SignNow, small and medium-sized businesses can impress customers, save money, maximize ROI, and move fast with everything they need to send and eSign their documents. airSlate SignNow is the ultimate tool for managers and employees accountable for documents, providing a personalized and customizable eSignature solution tailored to meet their needs. -
How do you make an intake form?
To create an intake form, start by identifying the required information and formatting the fields to match. By using airSlate SignNow, businesses can streamline their document workflows and boost productivity. airSlate SignNow's high-volume eSignature features enable users to impress customers with a swift, paperless process and save money while maximizing ROI. Whether you're a citizen with your own SMB or a manager looking to streamline document management for your employees, airSlate SignNow offers a customizable, user-friendly solution to meet your needs. -
What is a client intake form?
A client intake form is a document that companies use to gather information about a new client or customer. It typically includes personal information, contact information, and details about the services or products that the company will provide. airSlate SignNow is the perfect solution for businesses looking to streamline their document workflows, impress their customers, and save money while maximizing ROI. With our high-volume eSignature features, users can sign and send documents in seconds, cutting down on turnaround times and increasing overall productivity. Plus, our customizable workflows make it easy to tailor the signing process to meet the specific needs of your organization. Whether you're a small business owner or a manager responsible for important documents, airSlate SignNow is the perfect choice for businesses of any size. -
Why are intake forms important?
Intake forms are important because they help to collect all necessary client information in advance to make the whole process more efficient and streamlined. airSlate SignNow is an electronic signature solution that supports high-volume eSignature features, which enables businesses to put their workflows on steroids and impress clients with their professionalism. With airSlate SignNow, users can increase productivity by saving time, sign documents remotely, impress customers with fast and secure agreements while saving money to maximize their ROI. -
Why is intake important?
Intake is important because it ensures that the necessary nutrients are getting into our bodies, which helps with our overall health and wellbeing. airSlate SignNow is the ideal electronic signature solution for small and medium-sized businesses. With high-volume eSignature features, users can increase productivity by automating document workflows, impress customers with professional and secure document signing experiences, and save money while maximizing return on investment. With airSlate SignNow, you can confidently send and sign documents with ease.
What active users are saying — esign patient intake form


Esign patient intake form
all right everybody so here's the video I've been getting a lot of requests to show people how you can send out a Google form as an intake how the patient fill it out and then have all that data mired up migrated over to a PDF form that you can customize with your own logo and your own signature whatever you want to do so it's really cool technology let's get right to it then okay also as a side note if you want more tips and tricks I do have a Facebook group that's called G suite for health care providers so feel free to join that in my youtube channel with the same title feel free to check them out and we'll be slowly adding videos of how to optimize your G suite so here we go so here obviously you guys know in your gmail account if you press up here you're gonna come here and then you go to your Google Drive and I'm already in my google drive now and I've created a form the way that we do that is by coming to this say new go to more and add a form okay once we're in our form I hope I already have it open over here let's just come over here so here's my form I've created already just a few things so that you can kind of see what I'm doing you can see up here this is section 1 of 1 of 3 I have separated it into a patient history portion with just a few questions as an example a section that's for consent and a and a section that's for HIPAA I like to do this because I can send out a single form and I'm going to show you away from this single form that you can create even the output can be three separate PDFs one for each of these for the history the consent and the HIPAA form so pretty cool stuff so I'm gonna show you how to do that right now Oh on another a couple other quick things to create another section you click here and it allows you to add a section of course adding questions here once you've added a question you can choose which you know kind you want it can be a short answer which is what you'd have to do for a name right dropdowns checkboxes checkboxes would be nice for medical history they can just check the canoe that they've had and whatnot anyway so there's that perfect the other thing that I would recommend is here pushing on the required button so that if the patient misses anything when they go to submit their form it tells them that they've missed something and they need to go back and fill it out and that way you make sure that you get all the data that you were hoping to get right so first we're gonna come to these three buttons here we're gonna come to add-ons and in add-ons we're gonna look for something called form publisher a lot of you folks already know about this but here it is right here form publisher you're gonna add that which I've already done and what's gonna pop up then is this little puzzle piece we're gonna click on that puzzle piece we're gonna say yes we want to get started with form publisher it's gonna start thinking and it's gonna pull all of the data all of the questions that I have put into this form and it's gonna create a template for me so you'll see that in just a second here it's thinking it's thinking and there it goes it pops up here's what it will be titled I can either choose a template that's already existing or I can edit this one that it's automatically created which is what I want to do so I'm gonna come through here we're gonna edit it I'm gonna say that for this first page I want this just to be the patient history one so I'm gonna rename it patient history right in here this is the template title the template title is intake forms I don't really necessarily want that to show up on my sheet what I want it to show up as is patient history so I'm gonna change that this just comes automatic so I'm gonna delete all that stuff up here I can put a logo which I've done on other things just add a logo you know come up through here insert an image easy-peasy up here we have a timestamp that's generated automatically increment means number right so if I've done five of these it's going to give me an increment we'll say five we don't really care about that so I'm going to delete it and then so on this first page we just want patient history down here I have this stuff and that's gonna be in the consent form in the HIPAA form so I'm going to delete it and maybe I want these things space so I can see them nice right and maybe I don't necessarily want it to say this on my final form so I'm just gonna say name date of birth that can that can stay like that medications with dosages that's the prompt I have for the patient but I wanted to just say medications so as you can see just so that you understand I should have I should have explained this here at first everything that you see in these little arrows in these little flex marks that is the data that's pulled from these answers so when my patient fills in first name last name that's what's gonna pop up right here anything outside of that is just what this is that's the question right that like right here last name first name and that's just standard or that's just set by by foreign publisher so but I can change all that stuff and that's fine and it'll still the only thing that really matters is that these the between these Fletch marks is where all my data gets migrated over to and so we have date of birth date of birth medications past medical history okay I like that what makes my pain worse maybe I'll change this to you aggravating factors okay perfect so we've got that done let's go back here and finish this process we're gonna go to next excellent okay so it's gonna generate files and it's also going to send it somewhere I don't necessarily want it sent to it's gonna create a folder and I don't want it to go to this folder that it's created I want it to go to somewhere where I can keep track of it so I'm gonna actually send it on over to specifically my intakes folder that I've created previously so that's the one that we want perfect and then this does the title of the the template title which I really don't want I let's say it started going into my intakes let's just go last name first name and that needs to match exactly the the Fletch marks here right so that it knows right so you just you can essentially copy and paste this if you want and put it over here so that it this is what it gives the when you look at the file name in your in your folder that's what it will pop up as and then I might if I really wanted to I could just say you know intake you know or I could put the template title here their name the template or whatever I want to do there if I want other things I can have it user I can up here for the file that's generated I could have it put today's date I can put a taunt timestamp when the file was created all sorts of things like that so there's some neat options down there and then in this case I said yeah I want a PDF file other if you don't click this it's just going to create essentially a Word document a Google Doc so then we go to next this is where it gets sent to which email address if I want to I can remove it and have it not be sent any to any email address it just goes directly into my D suite I like to send it to myself just so that I can see when somebody has filled out the form all right there is an option here for approval workflow I haven't played around too much with that I'm going to probably review that in another video but then we push next and then we're essentially done okay so from here I can go ahead and try the form if I want what it's going to do is pull up this form well I would have to do another one right here that's what the that's what comes to the patient you can see they can fill this out they push next it says oh no butts required so we're gonna fill in the name here last name Hoffman first name Nate date of birth yes indeed I was born yesterday ibuprofen ibuprofen great that's what I'm taking for low back pain and I get pain was sitting because I have disco genic injury perfect over here and let's say I put in here that I want you to type your name first and last so that it's considered legally binding great I'm great and I submit that so for right now I'm on my on my template I've only wanted to spit out this stuff because I want it on something separate right I want my three sections on three separate PDFs so we're going to come over here to intakes and see what happens and great it's already populated the Google Doc there it is so it pops up just like that in a second here if I come back here you'll see that's actually popped up as a PDF as well so there we go now we got it we want to show that we can add those other portions to this so we're going to go back to for publisher we're gonna go to an additional template once that pops up again just thinking yeah we want to get started thinking thinking thinking perfect we want to connect an intake form excellent let's actually change this one it's connected but really this is for the consent form so we'll chin change that one consent form and we arcs we have all this stuff already set but we have to almost restart the whole process for this form okay now here's the deal when I send this out I always send the original form that I've created for my patient then what that will do is it'll populate this other form automatically and then from there create a separate PDF but the only thing you have to worry about again the only thing you have to worry about sending this out and everything else is automated will take care of itself so we come here we create another Google Doc all right there we go again we don't necessarily want that name and everything so we're gonna change this we want a consent let's just keep it as that consent form again all this goes away because we don't want it previously here we got this information already we don't want that and then we don't want the HIPAA portion we just want this part right and so it has the verbage and then it has essentially right here we're asking the patient between these Flesch marks that's where the patients names pops up because that's what they answer in the consent form we don't want the increment so we're going to delete that we're going to come back to our consent form we're going to go next and we're going to change again we want this is all part of our intakes so we want this to go to our intakes so that's where we're gonna go and then we don't necessarily want this template title I mean we can but again we can go we can delete this and let's go last name first name and there you have it okay and I do want it sent to me as a PDF we're gonna push next perfect again we can make all those changes here great and that should finish it up great I can push try form but if I push try form what it's going to do is just do this one what I want to go back again is do the original one to show you how it all works so I'm gonna come here let's actually come to know let's do that one we'll preview it and here I can again put it in it Hoffman Nate date of birth again yesterday let's go tylenol low back pain sitting hurts next great H Nate all low battery can I make it there you go age Nate perfect okay so I submit it and I'm gonna come back to my in takes these I'm going to delete these really quick so that you can see so this should pull up for different intakes right two for two for my consent one's gonna be a PDF one's going to be a doc right so two for the consent and then two for the patient history because those are the ones that I've built out so far perfect there it is so what's which one is this one the patient history great so you see there's the new information saying tylenol and so the data now is probably slowly working through the other form that I've created and that too should pop up any minute now and there you go there's the first one and it says consent on there great and there's where I typed my name voila there you have it folks that's how you do it so as you can see pretty cool pretty simple stuff obviously it doesn't look all polished like you can make it my super bill for example I'll throw that up as an example later on because I actually use it to do my documentation with I use the same thing the foreign publisher and I'll show you how I've been able to automate both the note and then also a super bill just pops out along with it so anyway I look forward to putting together a bunch of these videos my brothers in Excel guru and so he'll probably pop on here and there and show you some things that he can do with this excel anyway good luck happy googling
Show moreFrequently asked questions
How do I eSign a document before sending it?
How can I get others to sign a PDF file?
How can I add multiple signatures in several places in a PDF?
Get more for esign Patient Intake Form made easy
- Print signature service Speaker Agreement Template – BaseCRM Version
- Prove email signature Job Application for Teachers
- Endorse eSign Professional Employee Record
- Authorize digital sign Parking Ticket
- Anneal signatory Debt Settlement Agreement Template
- Justify eSignature Copyright Assignment Agreement
- Try digisign Basic Employment Application
- Add Liquidating Trust Agreement initial
- Send Freelance Graphic Design Proposal Template signature
- Fax Summer Camp Certificate email signature
- Seal Lease Termination Letter digital signature
- Password Real Estate Purchase Agreement electronically signed
- Pass Food Service Contract Template byline
- Renew Lease Amendment esign
- Test Alumni Chapter Annual Report signature block
- Require 1099-MISC Form signature service
- Send spectator eSign
- Accredit petitioner initials
- Compel guest signatory
- Void Rental Receipt Template template electronically sign
- Adopt patent template countersignature
- Vouch Business Travel Itinerary template digital signature
- Establish Business Quote template signed
- Clear Consignment Agreement Template template digi-sign
- Complete Training Record template esign
- Force Freelance Recruiter Agreement Template template digital sign
- Permit Basketball Camp Registration template initial
- Customize Auto Repair Contract Template template signature