Instruct Default Field with airSlate SignNow
Award-winning eSignature solution


Do more online with a globally-trusted eSignature platform
Standout signing experience
Reliable reporting and analytics
Mobile eSigning in person and remotely
Industry rules and conformity
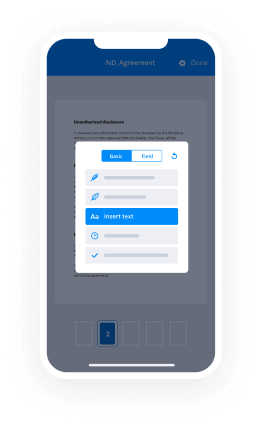
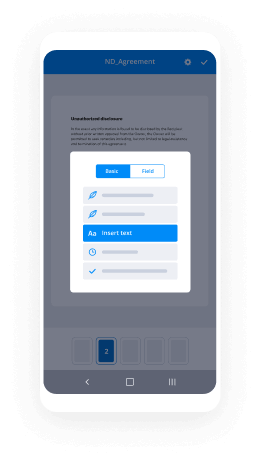
Instruct default field, quicker than ever
Handy eSignature add-ons
See airSlate SignNow eSignatures in action


airSlate SignNow solutions for better efficiency
Our user reviews speak for themselves


Why choose airSlate SignNow
-
Free 7-day trial. Choose the plan you need and try it risk-free.
-
Honest pricing for full-featured plans. airSlate SignNow offers subscription plans with no overages or hidden fees at renewal.
-
Enterprise-grade security. airSlate SignNow helps you comply with global security standards.

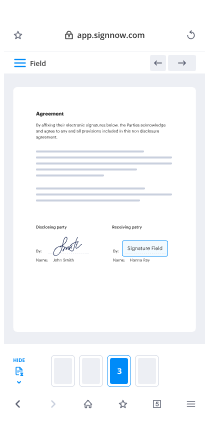
Your step-by-step guide — instruct default field
Using airSlate SignNow’s eSignature any business can increase signature workflows and sign online in real-time, supplying an improved experience to clients and workers. instruct default field in a few simple actions. Our handheld mobile apps make work on the go possible, even while offline! eSign contracts from anywhere in the world and make tasks quicker.
Take a step-by-step guide to instruct default field:
- Log on to your airSlate SignNow account.
- Find your needed form within your folders or upload a new one.
- the record adjust using the Tools list.
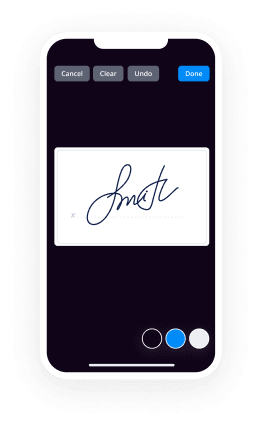
- Place fillable fields, add text and sign it.
- Add several signees using their emails configure the signing sequence.
- Choose which recipients will get an signed copy.
- Use Advanced Options to restrict access to the template and set up an expiration date.
- Click Save and Close when done.
Additionally, there are more innovative tools available to instruct default field. List users to your common work enviroment, view teams, and monitor cooperation. Numerous customers all over the US and Europe agree that a solution that brings people together in one unified enviroment, is what enterprises need to keep workflows working easily. The airSlate SignNow REST API enables you to integrate eSignatures into your application, internet site, CRM or cloud. Try out airSlate SignNow and get faster, easier and overall more efficient eSignature workflows!
How it works
airSlate SignNow features that users love


See exceptional results instruct default field with airSlate SignNow
How to complete and eSign a document online
Try out the fastest way to instruct default field. Avoid paper-based workflows and manage documents right from airSlate SignNow. Complete and share your forms from the office or seamlessly work on-the-go. No installation or additional software required. All features are available online, just go to signnow.com and create your own eSignature flow.
A brief guide on how to instruct default field in minutes
- Create an airSlate SignNow account (if you haven’t registered yet) or log in using your Google or Facebook.
- Click Upload and select one of your documents.
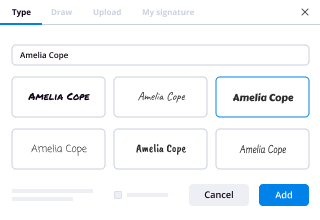
- Use the My Signature tool to create your unique signature.
- Turn the document into a dynamic PDF with fillable fields.
- Fill out your new form and click Done.
Once finished, send an invite to sign to multiple recipients. Get an enforceable contract in minutes using any device. Explore more features for making professional PDFs; add fillable fields instruct default field and collaborate in teams. The eSignature solution gives a secure process and operates according to SOC 2 Type II Certification. Be sure that all your data are protected so no one can take them.

How to eSign a PDF file in Google Chrome
Are you looking for a solution to instruct default field directly from Chrome? The airSlate SignNow extension for Google is here to help. Find a document and right from your browser easily open it in the editor. Add fillable fields for text and signature. Sign the PDF and share it safely according to GDPR, SOC 2 Type II Certification and more.
Using this brief how-to guide below, expand your eSignature workflow into Google and instruct default field:
- Go to the Chrome web store and find the airSlate SignNow extension.
- Click Add to Chrome.
- Log in to your account or register a new one.
- Upload a document and click Open in airSlate SignNow.
- Modify the document.
- Sign the PDF using the My Signature tool.
- Click Done to save your edits.
- Invite other participants to sign by clicking Invite to Sign and selecting their emails/names.
Create a signature that’s built in to your workflow to instruct default field and get PDFs eSigned in minutes. Say goodbye to the piles of papers on your desk and start saving money and time for additional crucial duties. Choosing the airSlate SignNow Google extension is a great convenient choice with many different advantages.
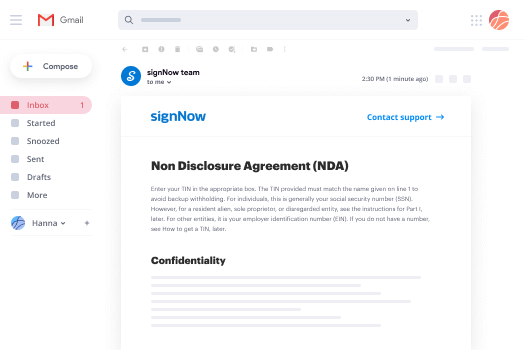
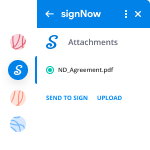

How to sign an attachment in Gmail
If you’re like most, you’re used to downloading the attachments you get, printing them out and then signing them, right? Well, we have good news for you. Signing documents in your inbox just got a lot easier. The airSlate SignNow add-on for Gmail allows you to instruct default field without leaving your mailbox. Do everything you need; add fillable fields and send signing requests in clicks.
How to instruct default field in Gmail:
- Find airSlate SignNow for Gmail in the G Suite Marketplace and click Install.
- Log in to your airSlate SignNow account or create a new one.
- Open up your email with the PDF you need to sign.
- Click Upload to save the document to your airSlate SignNow account.
- Click Open document to open the editor.
- Sign the PDF using My Signature.
- Send a signing request to the other participants with the Send to Sign button.
- Enter their email and press OK.
As a result, the other participants will receive notifications telling them to sign the document. No need to download the PDF file over and over again, just instruct default field in clicks. This add-one is suitable for those who like concentrating on more important goals as an alternative to burning up time for nothing. Enhance your daily monotonous tasks with the award-winning eSignature application.
How to sign a PDF file on the go without an application
For many products, getting deals done on the go means installing an app on your phone. We’re happy to say at airSlate SignNow we’ve made singing on the go faster and easier by eliminating the need for a mobile app. To eSign, open your browser (any mobile browser) and get direct access to airSlate SignNow and all its powerful eSignature tools. Edit docs, instruct default field and more. No installation or additional software required. Close your deal from anywhere.
Take a look at our step-by-step instructions that teach you how to instruct default field.
- Open your browser and go to signnow.com.
- Log in or register a new account.
- Upload or open the document you want to edit.
- Add fillable fields for text, signature and date.
- Draw, type or upload your signature.
- Click Save and Close.
- Click Invite to Sign and enter a recipient’s email if you need others to sign the PDF.
Working on mobile is no different than on a desktop: create a reusable template, instruct default field and manage the flow as you would normally. In a couple of clicks, get an enforceable contract that you can download to your device and send to others. Yet, if you want a software, download the airSlate SignNow mobile app. It’s secure, fast and has an incredible design. Take advantage of in seamless eSignature workflows from your office, in a taxi or on an airplane.
How to sign a PDF having an iPad
iOS is a very popular operating system packed with native tools. It allows you to sign and edit PDFs using Preview without any additional software. However, as great as Apple’s solution is, it doesn't provide any automation. Enhance your iPhone’s capabilities by taking advantage of the airSlate SignNow app. Utilize your iPhone or iPad to instruct default field and more. Introduce eSignature automation to your mobile workflow.
Signing on an iPhone has never been easier:
- Find the airSlate SignNow app in the AppStore and install it.
- Create a new account or log in with your Facebook or Google.
- Click Plus and upload the PDF file you want to sign.
- Tap on the document where you want to insert your signature.
- Explore other features: add fillable fields or instruct default field.
- Use the Save button to apply the changes.
- Share your documents via email or a singing link.
Make a professional PDFs right from your airSlate SignNow app. Get the most out of your time and work from anywhere; at home, in the office, on a bus or plane, and even at the beach. Manage an entire record workflow effortlessly: generate reusable templates, instruct default field and work on documents with partners. Transform your device right into a powerful business instrument for closing offers.
How to sign a PDF Android
For Android users to manage documents from their phone, they have to install additional software. The Play Market is vast and plump with options, so finding a good application isn’t too hard if you have time to browse through hundreds of apps. To save time and prevent frustration, we suggest airSlate SignNow for Android. Store and edit documents, create signing roles, and even instruct default field.
The 9 simple steps to optimizing your mobile workflow:
- Open the app.
- Log in using your Facebook or Google accounts or register if you haven’t authorized already.
- Click on + to add a new document using your camera, internal or cloud storages.
- Tap anywhere on your PDF and insert your eSignature.
- Click OK to confirm and sign.
- Try more editing features; add images, instruct default field, create a reusable template, etc.
- Click Save to apply changes once you finish.
- Download the PDF or share it via email.
- Use the Invite to sign function if you want to set & send a signing order to recipients.
Turn the mundane and routine into easy and smooth with the airSlate SignNow app for Android. Sign and send documents for signature from any place you’re connected to the internet. Generate professional-looking PDFs and instruct default field with just a few clicks. Assembled a perfect eSignature process with only your smartphone and increase your total efficiency.
Get legally-binding signatures now!
FAQs
-
How do I set a default field in access?
In the Navigation Pane, right-click the table that you want to change, and then click Design View. Select the field that you want to change. On the General tab, type a value in the Default Value property box. ... Save your changes. -
How do you rename a field in access?
To rename a field in a table in Access, open the table containing the field to rename in design view. Click into the \u201cField Name\u201d column of the field that you want to rename and type a new name. Click the \u201cSave\u201d button in the Quick Access toolbar to save your structural modifications. -
How do I change a column heading in access?
In the Navigation Pane, double-click the table in which you want to rename the field. The table is opened in Datasheet view. Right-click the column heading for the field that you want to rename, and then click Rename Field on the shortcut menu. Type the new name for the field and then press ENTER. -
How do I set the default value in access property?
In the Navigation Pane, right-click the form that you want to change, and then click Design View. Right-click the control that you want to change, and then click Properties or press F4. Click the All tab in the property sheet, locate the Default Value property, and then enter your default value. -
What is a default value in access?
The Default Value is the value that a new record starts out with. You can change it if you want, but Access will create new records with this value. You can set the Default Value to a static value. For example, if most of your customers are from New York, you could set the Default Value for a State field to �NY�. -
What is a default value in a database?
Default values, in the context of databases, are preset values defined for a column type. Default values are used when many records hold similar data. -
What do you mean by default value explain with the help of an example?
In computer technology, a default (noun, pronounced dee-FAWLT ) is a predesigned value or setting that is used by a computer program when a value or setting is not specified by the program user. ... The program is said to default when it uses a default value or setting. -
Why is it beneficial to set a default value for a field?
A default value makes it a lot easier to insert new rows into a table - all columns with a default value do not need to be explicitly specified and provided with a value in the INSERT statement, if that default value is OK (like getdate() for a "LastChangeOn" date column). -
What is the purpose of default value Field property?
Typically, you add a default value to your table fields. You add the value by opening the table in Design view and then entering a value in the Default Value property for the field. If you set a default value for a table field, Access applies your value to any controls that you base on that field. -
What is the default value of column for which no default value is defined?
For date and time types other than TIMESTAMP, the default is the appropriate \u201czero\u201d value for the type. For the first TIMESTAMP column in a table, the default value is the current date and time. ... For string types other than ENUM, the default value is the empty string. -
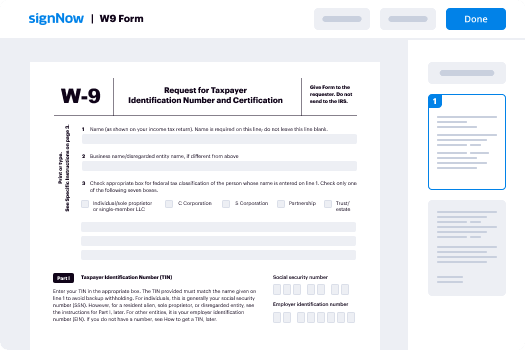
How do I show fillable fields in a PDF?
Open the PDF with airSlate SignNow Reader. Click a field that contains data you can't see normally and select all text (Command+A will work after you click in the field) Cut the data out of the field by pressing Command+X or go to the Edit menu and then Cut. Click in another field to highlight that field. -
How do you convert a PDF to a fillable form?
Step 1: Load the PDF File. Open your pre-existing PDF form in PDFelement, or you can choose to open an existing form template. ... Step 2: Recognize Form Fields Automatically. ... Step 3: Fill and Save the Form. -
Why isn't my PDF fillable?
Make sure that the security settings allow form filling. (See File > Properties > Security.) ... Sometimes form creators forget to convert their PDFs to interactive forms, or they intentionally design a form you can only fill in by hand. If you can't type in the form fields, then the fields are probably not interactive. -
Why do lines disappear in PDF?
Thin lines may disappear at different zoom levels. The thin line display issue can occur with PDF files created from any vendor. ... If you print a hard copy of the same PDF file, then the lines will appear correctly because the resolution of the printed page is higher than that of the display monitor. -
Why are my PDF forms not showing filled in form fields unless I click on them?
Open the PDF with airSlate SignNow Reader. Click a field that contains data you can't see normally and select all text (Command+A will work after you click in the field) ... Repeat for each field. Go to the File menu and Save As to save the file as a PDF that will show the information in the form fields.
What active users are saying — instruct default field


Related searches to instruct default field with airSlate airSlate SignNow

Instruct default field
hey everybody my name is Thomas and welcome to this 35 minute iPad tutorial for beginners and seniors today we're gonna be discussing a lot about your iPad we're gonna first teach you about what the different buttons on the iPad do then we're gonna set up your iPad and we're gonna discuss a lot of the different apps and functionalities on your iPad so that you can get started and not be completely confused right out of the box keep in mind this tutorial is pretty long but we give useful information throughout the entire tutorial so I recommend you know you find yourself someplace a comfy you know maybe you grab something to drink and sit down with your iPad and follow this tutorial and one more thing I want to point out before we get started is I sometimes talk kind of fast so if you want to just slow down the video then hit the gear icon at the bottom of your screen and hit playback speed and you can adjust how fast the video plays also if you can't hear me for some reason you can also turn on your captions by hitting the CC button at the bottom of your screen anyways let's get started okay so before you do anything I definitely recommend staking a case and a screen protector on your iPad there's a link to a good case and a good screen protector and they're pretty cheap in the description below and now let's start discussing the buttons so this button on the bottom of your iPad the one I'm about to press right now this is the home button and then you press this you just turn on your iPad screen the next button is on the top of the iPad it's the power button and next to the power button also on the top of the iPad is the headphone jack for listening your music and on the side of the iPad here we have our volume buttons on the bottom of the device you'll see the lightning charging port and to charge your device just plug this end of the lightning cable that came with your iPad into that port plug the other end into the adapter that came with your iPad and unflinching charge alright enough of those buttons will set up your iPad so just press the power button then you'll see this hello screen and you'll press the home button you'll select your language which mine is English right at the top and you'll select your country or your region a United States for me and now you're gonna set up manually just hit the button on the bottom set up manually and you're gonna choose a Wi-Fi network you can theoretically set it up with a computer but nobody does that anymore so just select your Wi-Fi network - Otis so I'm just gonna tap on it type in your password and tap join now I just wait for it to load and connect your network and it might take a little while to activate your iPads they just wait for that now you'll see this data and privacy screen so just tap continue the blue button and now you'll get to the touch ID screen or you gonna tap continue and this is gonna help you set up your fingerprint recognition so place your finger on the home button don't click it everybody clicks it's not how it works you're gonna want to place your finger and lift your finger repeatedly to fill in the little red fingerprint glyph on your device so I'm just gonna keep on doing that and it will slowly fill in the little glyph and wait for it all right now I'm done so I'm gonna tap continue and it says adjust your grip and I'm just gonna stick the edges of my finger and like that front of my finger on the fingerprint sensor just so I can get a feel of all the edges of my finger and once that's complete you'll continue and now you'll get a screen that will tell you to create a password and you have the by default the option is six digits but if you tap passcode options you can create a custom passcode with letters and numbers a custom numeric code or a four-digit passcode but for security I like to have the six digit passcode and to be very secure I'm just typing in one two three four five six this passcode can be easily guessed well who's gonna type it and I just use it anyway and I'll type in one two three four five six honestly this is a pretty secure passcode if I was running the CIA or something I'd either use this basket or I'd use password one two three anyway absent data so I'm going to not transfer the absent data and now I'm going to set up my Apple ID if you already have one just Sign In but if you don't then tap forgot password or don't have an Apple ID and here you're going to click don't have an Apple ID and they'll ask you for some of your info like your name and your birthday so I'm just gonna type in my name and my totally accurate birthday 1994 yes when I was born and I will tap on next and email address you can either give them your email or you just get a free iCloud email address by tapping don't have an email I'm just gonna do that for this demo and now you're gonna tap get an iCloud email address and you'll type in what you want so I'm just gonna do t $2.00 demo at icloud.com and when I'm done with him next and hit create email address and now it's gonna want my password now keep in mind there's gotta be like 8 digits it's gotta contain an upper case character and a lower case character and a number so you don't want to write this down because chances are you're gonna forget it once you finish typing in you're painstakingly long passcode and written it down then you're just gonna hit the next button and they're gonna want your phone number and they'll want to verify with like a text or a call I'll hit the text message because I'm gonna do it on my cell phone I'll give them my number and now this all typed in I'll hit next and they will send me a text message verification code which is on my cell phone right here and I'm just gonna give them my verification code so now I'm gonna type in the numbers 2 1 9 4 9 3 and I'm gonna agree to the terms and conditions you know nobody really reads what's in there but you gotta click agree if you want to use the device so now it's gonna try to activate so now that it's finally done I'll get this Express setting screen and I'm just gonna tap continue unless you want to have custom settings and now I'll give this keep your iPad up-to-date I'll tap continue one more time and register my click hello hello anybody in there oh it's it's loading nevermind okay it might load when you tap continue it's not that it dislikes your finger it's just got a load now you get the Apple pay screen and you're gonna tap set up later in settings because nobody really wants to set that up and you'll get iCloud keychain and you'll tap continue and next you'll get Siri and I just gotta listen and do what it tells me to do hey Siri hey Siri sent a message I don't know how to respond to that okay sorry my computer Siri is trying to listen to me when I say hey Siri but yeah you're just gonna say hey Siri and say what it tells you to say and it will finally set up so as you can see I'm finally complete and hear others tap continue and I'm not gonna send Apple my Siri audio recording so I'm just gonna tap not now and screen time I don't care I'm just gonna set up later in settings and app analytics I can share with Apple developers but it doesn't really matter what you click an appearance there's either light mode or dark mode it depends on bursal and preference I like blah I like the light mode personally and they'll tap continue now you're gonna tap continue a bunch of times because these are just telling you how to use things and we'll go over those welcome to ipad get started and now your ipad is pretty much all set up now that the ipad set up i'm just gonna tell you how to do a couple things press the power button to access the lock screen which just looks like this if you slide to the left you can open up the today view which just shows some widgets like the news the weather stuff like that your calendar and if you slide to the right it will open up the camera and I can take a bad picture myself hello Andy get back to hit the home button and it'll take you here and unlock your device use the fingerprint that you registered to press the home button and it will unlock the device so now that you're on the home screen of your device that you have these little boxes they're just app icons when you open them opens up a little program and below them all you have this little thing called it your doc which is just easy easy access to specific apps and if you want to see more app icons you can just swipe and there's a bunch of different apps pre-installed and you can install more from the app store slide to the left and you'll open up the to today view which we already talked about and if you slide it down from the top right corner your device you'll open up the control center which gives you access to functions like your brightness your volume silent mode airplane mode things like that there's a there's just a lot of general system settings and system functions you can access through here and to tap out you just tap out and the next function of the device we're going to look at is the Notification Center which to get there you swipe down from the middle of the device like near the camera and you're going to want to swipe down all the way to the home button and it will open up the screen that looks like the lock screen and it has all your notifications currently I have no notifications what if I get a text or something I'll get a notification they click out of here just click the home button and it will take you back to the home screen some other functions you might be interested in is you can just turn the device sideways to achieve a landscape view just like this has some sensors in it so it will just automatically detect when you turn the device and you don't have to press any button to change the landscape view so copy and pasting is also a pretty essential function of the device so when you have some text you want to copy then you can just double tap on it and you will tap copy and pasting that's pretty much the same thing double tap in any text box and tap the paste button to paste what you had copied to your clipboard the next essential function is how to shut down just hold down the power button and you'll slide this little bar to shut down and there's a myth going around that you need to shut down your device when you're not using it it was completely false it doesn't really affect the battery life that much they turned your device back on just hold down the power button until you see the Apple logo then you might need to wait a minute or two and eventually your device will boot up okay the next thing you want to do is on once your iPad turned on open up settings and you want to make sure that two functions are turned on so scroll down and tap on messages and make sure the iMessage is turned on it looks like mine and FaceTime should also be turned on like mine and if you want to set a wallpaper you know it could be kind of fun just tap wallpaper and you'll tap choose a new wallpaper and you can either choose something from your photos or choose one of Apple's premade wallpapers by tap they're scrolling to find it and tapping I'm just uses earth wallpaper and you'll see a cancel button to either cancel or a set button to set your wallpaper and you can either set it on your lock screen your home screen or both I'm gonna set it as both and now as you can see if I shut off my device and turn it back on here it's that on my lock screen and my home screen alright now it's getting to the fun stuff well more useful than fun so you already have your iCloud email and you can use that but if you have another email than open settings and you're gonna want to scroll down to the C passwords and accounts and then under accounts you can tap Add Account right so you see accounts in under that add account and you'll tap your email provider mine would be Google since I have a gmail account and you can add your email just tap continue and then you're gonna sign into email right here now once you're signed in you'll get this little screen and just make sure that mail is switched on will be green and you'll just tap save to add the account alright now that we've got your email added we're gonna go to the home screen and we can open up the mail app which looks like a blue icon with a letter and you'll see no message selected so basically this means that you don't have an email that you're viewing so just have the little back button in the top left corner and you can select one of your emails to view them and you can also if you have multiple inboxes tap mailboxes and you can see all of your different emails I'm just gonna tap on iCloud because that's the email I want to see right now and it takes me back to my inbox and here I can do a few things so when I tap on an email it lets me view it and I can just have an email to view it and if I want to either delete the email just tap the little trash can icon and if I want to reply or forward the email then in the bottom right of your screen there is this little reply button and here I can reply or I can forward the email or there's a host of other options and if I want to reply others tap reply and I'll tie in my message and I'll tap the little blue send button in the top right corner of that tab but what if you want to send the emails pretty easy in the top right corner your screen there's a little blue button that is the compose a new message button and you'll type in who you want to email it to I'll just type in random letters and you'll type in the subject line I'll just type in random stuff and the body of the email and if you have multiple accounts on one device you can just tap on the from and here you can just tap which email you want to send the email from and then you can send by hitting the blue arrow button in the top right corner alright so those are pretty much the basics of sending email on your iPad so let's go to the home screen again now we're gonna discuss how to send a text so you're gonna send a text with the messages app which is the green icon with the text bubble just tap it open it and you'll see the screens as messages and it just has a little blue button and you can tap that to send somebody a message just type in their phone number or their email address I'll just send myself a text message on my phone and once you typed in the number tap return and you'll see a little field on the bottom of your device that says iMessage at tapping right now this is already typed the message you want to send and once you're ready to send it press the blue send button so the message you sent will be blue and then I'm just gonna send myself a text so you can see when you do receive a text message it will appear on the left side of your screen and it will be gray so I just got a text and I can reply by either sending a text message or I can hold down on their message and leave a like or a love or a haha little notification and the third thing I could do is if I tap this little camera icon that's to the left of the message field then I can actually send them a picture so I'm just gonna take a picture right quick and I can tap the blue button to send that photo a few more things to note about texting in the top of your screen you'll see the person you're texting and in the left column of your screen you'll see all your different messages that you can search through and tap on one of them to see the messages between you and that's person I now let's discuss FaceTime so it's basically a Skype calling it's like a free video or audio call that works over the internet and to open FaceTime it's just a little green camera icon you'll tap on it and you'll get this one screen right here and just tap the plus + button and you'll type in who you want to call other to call myself and when the numbers typed in you'll just tap on audio or video to make audio or video call I'm making a video call and you'll get this little face time calling screen and here you have a couple options you have the end button which is the little red button next to it you have a button to swap between your back and your front phone camera and next to that you have a button to mute to your microphone so they can't hear you so in the event that your friend doesn't answer you get this little FaceTime unavailable screen here you can either call them back you can send them a message or reply or you can just cancel with X that's what I'm gonna do all right so we discussed how to call and text people but how do you remember what their names and numbers are so we're just gonna add contacts for them so that your device remembers for you you'll tap little contacts app it's a little grey one with a person in it and here you'll see all your contacts when you tap on one you'll see their info like their phone number their name and to create a contact you'll just tap the little plus button in the top left of your screen and you can enter you know their name you can add a photo for them and you can type in their information and when you're done you'll just have the blue done button on the top of your screen the next thing we're gonna discuss is how to use the camera so you just have the camera icon on your home screen it's just the camera and you'll open up the camera and here there's a bunch of options so I'm just looking at the back camera and the first option I see is right above the white button it's a little camera button with a swap and it will swap between the front and the back camera and now you can just tap the white button to take a photo or a selfie in my case and under the white button you can access your photos and you can just slide through them to see the different photos and in the case that you want to send the photo just tap the screen and there's a little share button at the top it looks like a square with a arrow coming out of it sorry bad filming and here you'll select refills you want to send and who you want to send to if you don't want to do that you want to delete a photo you'll just tap the trashcan and tap delete the photo and if you want to get back you'll tap the little back button in the top left corner and that takes you to the camera below that you'll see all of these little text things that say Panos square photo and they just switch between the different camera modes so you can take a video of panorama etc and the final thing I want to show you is this little lightning bolt which you can tap on it and you can trigger flash so if you take a selfie it has flash one more tip if you accidentally delete a photo it's no big deal open the Photos app which is this little flower icon and you'll scroll down and tap recently deleted and those are all your deleted photos and you can just tap on one and tap on recover and it will recover it back to your photo library the next thing we're gonna discuss is how to download apps so it's pretty easy just tap the blue aid which is an app store icon on your home screen and when you first open you get a couple pop outs just tap continue when you see this one and you can tap allow if you want to give them your location I usually do for a custom app promotions and now you're in this today tab it's basically it has a bunch of little tiles which advertise different games and apps and you can tap on one of them here I'm just gonna tap on this one and as you can see will open up a little tile and give me more information about the app now if I want to get the app I can just hit this little get button didn't mean to do that just tap the little blue get button and if you want to get out of this screen just tap outside the little tile and a little exit now we're gonna look at the Search tab which is in the bottom right corner this is basically how you search for a specific app in the App Store or like for example you can type in in the top YouTube and it will search for the YouTube app if I type in YouTube and hit Search here's YouTube top so if I want to get more info about it I'll just tap on it and as you can see I have all these app screenshots which I can tap on to expand and see how the app looks and I can tap Done to click out of that I see all the app reviews on the bottom of the screen and if I want to download the app I'll just scroll to the top of the screen and tap the blue get button and if you've never downloaded an app on this device before you may see this pop up to sign in with your Apple ID I'll just tap use existing Apple ID and remember we created one when we set up the device so now I can type in my email and my password and sign in and remember when I said you'd probably forget your password well I forgot mine and you get this pop-up verification failed try again if you forget your passcode and you have to type it back in all right I'm gonna be retyping my password right now and once it's finished I'll just tap ok and it will sign me in now it will pop up to review as some iTunes terms and others tap review and is it going to want me to of course accept their terms and conditions once it loads up you'll just tap a little button next to agree to terms and conditions it'll turn green and you'll go to the next screen and here they want you to give them either payment information or you can just tap none if you don't want to give a credit card and your billing address so they can bill you for when you buy a paid app or something like that once it's typed in just go to the next screen you'll see Apple ID completed and you'll tap continue again and you'll tap get one more time and it will prompt you to install the app and it may prompt you for your password one more time once you type in your password like this on this screen for the first time it will generally only require a fingerprint after to install app so it's much easier so here you can sign in and it will install the app now as you can see I have this little installing bar right up here and it has a little square in it if I tap it it will cancel the install if I go to my home screen here I can see that YouTube is installing and once it finishes installing this little loading bar on you we'll close up here let's just wait a couple more seconds for it and it looks like it's closing and I can just open YouTube and enjoy the app so now that we've shown you how to install your own apps let's show you how to use some of the system apps the first one we're gonna showcase is the news app which is this little white icon with a pink n inside it you can open it and I'll say welcome to Apple news when you first open it and you're going to just wait for it to load a little bit and you'll tap the continue button and it will ask for your location to get local news so I'm just gonna allow and now you'll give this pop-up just close out of it it's just a little add and here you have all of the latest news articles let's just tap on a news article and here I have the article which I can scroll through to read and if I want to I can it make the text actually bigger by clicking on the top is a little AAA and if I here started I actually click that let me click it one more time and as you can see if there's a big a and a small a to make the text bigger or smaller and I can just click out to close it and read my article to send the article somebody I'll tap a little arrow inside of a square share button and I can send it to somebody via text email or whatever and to get out of the screen I can just tap a little back button at the top left of my screen and here I'm back now I can always just scroll up the top of the screen and slide down if I want to refresh my articles and if I want to add my own news station that I like I can tap this little button in the top left corner and in the search bar I'll type in what news station I like for example BBC News I'll type in BBC and I've tapped the little plus button and now BBC's are gonna appear in my feed and to get out of the screen you're gonna tap the little cancel button and you'll tap anywhere other than the left column and it will close it all right so next we're gonna show you how to use Safari to browse the web but now Safari is like a little blue compass icon and it's just your internet browser so it's pretty simple you know it has all the standard bits of a browser here your favorites and you can just tap google and it will open up Google for you and you can just type something in Google and the search for it let's just type in iPad and you're just gonna show me all the iPads and you know I can navigate it just like I would on Google normally in the top I can type in a URL for example if I want to go to a specific site like apple.com then I'll type Apple comm and hit go it'll take me to Apple now there's a few options I have here i can send the website to somebody with a little share button and i can text it or email or however i want to send it i can also add a website as a bookmark by tapping the share button tapping add bookmark and here it will ask me for them details and i'll just add the bookmark now now if i want to reload the page i'll just tap a little reload button next to the URL and if i want to open up a new tab all tough little plus button it'll open up a new tab and i can always tap the little X on the tab to close it if I want to check all of my tabs I can press this little button in the top right corner and here I can see my tabs and open up a new or a private tab and it will just open up the tab in the top left I can tap the little book icon to see my bookmarks my reading list which is like saved things and my search history right here and if you're reading an article one cool thing you can always do is you can tap a little AAA icon in the top left next to the URL and here you can tap your reader view and it will just close out all of the advertisements and just give you the article like a normal text article and I can tap it again and change the font size I can just by tapping these little a buttons I can change the color of the webpage the font etc and it's just a pretty nice feature to have so the next thing we're gonna show you how to use is the calendar app so the icon where the calendar is just whatever the date is today so 29,029 and i can just tap on it to open it when I first opened it I'll get this what's new screen and I can allow my location if I want to and here I'll see throughout the day what events I have planned and I can also tap on the top on different dates and I can scroll through those little dates and tap on different days to see what's planned and I can also tap on the day the month or the week the month the year and I can see whatever events I have planned through those time periods so I'm gonna go to the month and I can hold down on a date to add a new event so I'm just gonna type in an example event you can add a location if you want you can set whether it's all day or during those specific dates and multiple dates for example and you can also add notes and stuff and once you have everything done you'll just tap add and here is my new event on my calendar now to view it I can just tap on it and it will tell me the event and of course I can delete the event or edit and I'm just gonna delete it and boom it's gone that's pretty much all you need to know about the calendar it's just like a basic calendar and you know it works it does what it's supposed to the next app we're going to discuss is the Maps app which just looks like a little map and you can tap on it and of course it gives you the same what's new screen and it will ask for your location which I would definitely give them and that will zoom in on where you live and I'm just gonna scroll out I don't need anybody snooping on me and here I can like a zoom in on different places and I can you know scroll around the map and it will show me any basically anywhere in the world and in the top left corner there's a search bar so I can type in let's see if I want to go to McDonald's I'll type in McDonald's and I can tap on a McDonald's and it will give me details I can get directions it will tell me the hours and I can get lots of info about that McDonald's I can also click the little share button if I want to share the McDonald's with somebody by like you know emailing them the link to view where the address is or something and if I click the X button twice it will just get me out of these tabs and it will bring me back to this little search bar now one thing is cool if I want to find restaurants I can just tap restaurants I don't have to be sure which kind of restaurants I want it will just like show me some of the higher rated restaurants in my area another cool function if you hit the I button and top right corner your screen so you can change the map type you have a standard a transit and a satellite map and you can just easily change between those three map types the next thing when to discuss is the stocks app which literally just looks like a little stock graph you can tap on it of course you get the same welcome screen you get when you open any of your apps for the first time just tap continue here we have the economic news in the top right corner and we can tap on a stock to view more info about it and more news about it and we can hold our finger down on the little stock chart to see where the graph is on certain times and we can also change you know the duration of the graph and if you want to search for a specific company tap the search button type in for example Qualcomm and here I have Qualcomm and I can tap on it to view the info of that stock and if you want to save it to your favorites just have add to watchlist and now when you close out of your screen and you scroll down there you have it for easy access to that stock now we're gonna show you how to get the weather now the iPad doesn't have a built in weather app so we're gonna download one for free from the App Store I'm just gonna open up the Search tab and I'm gonna search for whether and as you can see there's several apps most of them say get which means they're free but if they have a little price then you'll have to pay for it so I'm just gonna use my touch ID to download The Weather Channel and wait for it to install all right now I'm on my home screen and I can easily open up the Weather Channel and I'll wait for to load and it's gonna want me to do some little setup for the app and I'll just tap I understand and now I'll give it my location and a lot of the send me notifications in case there's weather alert now here's gonna tell me the temperature where I live and here I can have a little chart of the temperatures throughout the day and if I scroll I can get you know a couple more days and the weather throughout those days and I'm just gonna go back and if I want to see the temperature for example throughout the week then I'll just tap daily and the chart updates now I can also tap daily in the bottom and it will just give me an overview of the weather over a couple days and if you're more what geek than tapper radar and it will give you like the weather radar view and you can just tap this little back button and it will load the weather radar throughout a certain period of time now I'm gonna go back to the normal weather view and if I want to see the weather in a certain city I'll tap the city in the top and I can just type in a new city for example New York and I can tap on New York and it will give me all of the weather details for New York next we're going to discuss reminders so to open up reminders just open the little checklists icon this is reminders and will open up your reminders app just click upgrade later and here you can make a new reminder just by tapping right under where it says reminders you'll type in what you want to be reminded about and you can either set when you want to be reminded by tapping the little clock icon and here you'll set like what day or you can tap custom and set a custom date and a time when you want to be reminded of that specific thing and when you're done you can just tap this little check right next to your reminder to mark it as complete all right now we can discuss how to use the notes app which just looks like a notepad you're gonna open it and you're gonna tap continue and here you can just add a new note by a tabbing little write button in the top right of your screen and you can just tap on the blank space and you can enter a title for your note and once you've done that hit return and you can enter text for your note I'm just going to enter some random text and you can add checkboxes by tapping a little check mark and adding checkboxes you can also add a picture by tapping the camera icon and taking a picture and adding it to your note and you can also add a little drawing by tapping a little pen icon and just drawing whatever you want with your finger so you can also just tap this little share icon to send your note to somebody and tap a little back button to see all your notes that you've added in the past you can search through them and stuff like that so now let's discuss how to use a clock app so the clock app just looks like a clock and when you tap on it you'll be greeted with the world clock screen which just shows you what time it is in different parts of the world if you're gonna see a certain part of the world tap the little plus button and in the top right corner of your screen and you can add a city and I'm just gonna add this random city in Kazakhstan and if I tap it it will tell me what time it is in that city in Kazakhstan right here and the next screen I can open up is the alarm screen so if I want to have an alarm clock or something I'll tap the plus button I'll set the time I want my alarm to a fad and I can click save now will give me my alarm and if I want to turn it off I'll just hit the little green check so it turns not green the next screen is the stopwatch which is basically a typical stopwatch you know you start it gives you the clock you can set a lap and you can stop and reset the stopwatch the final screen is pretty useful as a timer you just set how many hours and minutes and seconds you want the timer to be and you hit start and it will give you a timer now even if you shut your device off you'll still see the timer right here on the lock screen and you can easily unlock your device at any time to end the timer by tapping and done all right guys so just to quickly let you know basically everything we've covered in this video can be done with series now series apples AI powered voice assistant and she works by pressing and holding the home button and talking to her hi Siri hello and you could tell her something like set a timer for 10 seconds your timer is set for 10 seconds no set a timer cancel the timer I stopped the timer and she does a whole host of other things you've got to tell her what to do and she looks alright guys I really do hope you learn more about your iPad from this video and you're starting to feel comfortable using your iPad if you did learn some stuff from this video then let me know by hitting the subscribe button down below and I definitely hope to see you in some of my future i phone and iPad tutorials if you have any questions at all just let me know in the comments down below and I hope you have a fantastic day and enjoy your new iPad bye
Show moreFrequently asked questions
How do I add an electronic signature to a PDF in Google Chrome?
How do I electronically sign PDFs
How do you sign a PDF attachment in an email?
Get more for instruct default field with airSlate SignNow
- Print electronically sign Business Model Canvas
- Prove electronically signed Pet Addendum to Lease
- Endorse digisign Editor Contract Template
- Authorize electronically sign Day Care Contract Template
- Anneal mark Alumni Chapter Annual Report
- Justify esign General Release of Liability Form
- Try countersign Loan Consent Agreement
- Add Indemnity Agreement mark
- Send Residential Roofing Contract Template signed
- Fax Community Service Letter of Recommendation digi-sign
- Seal Patient Progress Report digital sign
- Password 1040EZ Form initial
- Pass Leave of Absence Agreement signature
- Renew Land Contract Form countersignature
- Test Rental Deposit Receipt digital signature
- Require Joint Marketing Agreement Template electronically signed
- Print inheritor electronically sign
- Champion tenant signed electronically
- Call for trustee electronic signature
- Void Manufacturing and Supply Agreement template eSignature
- Adopt Registration Rights Agreement template autograph
- Vouch Carnival Ticket template digital sign
- Establish Golf Gift Certificate template signed electronically
- Clear Training Course Proposal Template template electronically sign
- Complete Video Production Order template countersignature
- Force Purchase Order Template template electronically signing
- Permit Application For Employment template mark
- Customize IOU template signed