Merge Initials Request with airSlate SignNow
Award-winning eSignature solution


Get the robust eSignature capabilities you need from the solution you trust
Choose the pro service created for pros
Set up eSignature API with ease
Collaborate better together
Merge initials request, within minutes
Decrease the closing time
Maintain sensitive information safe
See airSlate SignNow eSignatures in action


airSlate SignNow solutions for better efficiency
Our user reviews speak for themselves


Why choose airSlate SignNow
-
Free 7-day trial. Choose the plan you need and try it risk-free.
-
Honest pricing for full-featured plans. airSlate SignNow offers subscription plans with no overages or hidden fees at renewal.
-
Enterprise-grade security. airSlate SignNow helps you comply with global security standards.

Your step-by-step guide — merge initials request
Leveraging airSlate SignNow’s electronic signature any business can enhance signature workflows and eSign in real-time, supplying a greater experience to customers and workers. merge initials Request in a few easy steps. Our mobile-first apps make working on the go achievable, even while offline! eSign signNows from any place worldwide and complete deals in less time.
Keep to the stepwise guideline to merge initials Request:
- Log in to your airSlate SignNow profile.
- Find your record within your folders or import a new one.
- the template adjust using the Tools menu.
- Drop fillable areas, type textual content and eSign it.
- Include several signees using their emails and set up the signing order.
- Choose which recipients will receive an completed version.
- Use Advanced Options to reduce access to the template and set up an expiry date.
- Press Save and Close when finished.
Moreover, there are more advanced features open to merge initials Request. List users to your common work enviroment, view teams, and keep track of cooperation. Numerous users all over the US and Europe concur that a solution that brings everything together in a single unified enviroment, is exactly what organizations need to keep workflows performing smoothly. The airSlate SignNow REST API enables you to embed eSignatures into your application, website, CRM or cloud. Try out airSlate SignNow and get quicker, smoother and overall more efficient eSignature workflows!
How it works
airSlate SignNow features that users love


See exceptional results merge initials Request with airSlate SignNow


How to fill in and eSign a PDF online
Try out the fastest way to merge initials Request. Avoid paper-based workflows and manage documents right from airSlate SignNow. Complete and share your forms from the office or seamlessly work on-the-go. No installation or additional software required. All features are available online, just go to signnow.com and create your own eSignature flow.
A brief guide on how to merge initials Request in minutes
- Create an airSlate SignNow account (if you haven’t registered yet) or log in using your Google or Facebook.
- Click Upload and select one of your documents.
- Use the My Signature tool to create your unique signature.
- Turn the document into a dynamic PDF with fillable fields.
- Fill out your new form and click Done.
Once finished, send an invite to sign to multiple recipients. Get an enforceable contract in minutes using any device. Explore more features for making professional PDFs; add fillable fields merge initials Request and collaborate in teams. The eSignature solution gives a secure workflow and functions according to SOC 2 Type II Certification. Ensure that all your records are guarded and therefore no person can take them.


How to eSign a PDF file in Google Chrome
Are you looking for a solution to merge initials Request directly from Chrome? The airSlate SignNow extension for Google is here to help. Find a document and right from your browser easily open it in the editor. Add fillable fields for text and signature. Sign the PDF and share it safely according to GDPR, SOC 2 Type II Certification and more.
Using this brief how-to guide below, expand your eSignature workflow into Google and merge initials Request:
- Go to the Chrome web store and find the airSlate SignNow extension.
- Click Add to Chrome.
- Log in to your account or register a new one.
- Upload a document and click Open in airSlate SignNow.
- Modify the document.
- Sign the PDF using the My Signature tool.
- Click Done to save your edits.
- Invite other participants to sign by clicking Invite to Sign and selecting their emails/names.
Create a signature that’s built in to your workflow to merge initials Request and get PDFs eSigned in minutes. Say goodbye to the piles of papers on your desk and start saving money and time for more essential activities. Choosing the airSlate SignNow Google extension is a smart practical option with a lot of benefits.

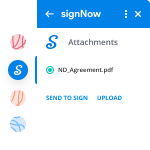

How to eSign an attachment in Gmail
If you’re like most, you’re used to downloading the attachments you get, printing them out and then signing them, right? Well, we have good news for you. Signing documents in your inbox just got a lot easier. The airSlate SignNow add-on for Gmail allows you to merge initials Request without leaving your mailbox. Do everything you need; add fillable fields and send signing requests in clicks.
How to merge initials Request in Gmail:
- Find airSlate SignNow for Gmail in the G Suite Marketplace and click Install.
- Log in to your airSlate SignNow account or create a new one.
- Open up your email with the PDF you need to sign.
- Click Upload to save the document to your airSlate SignNow account.
- Click Open document to open the editor.
- Sign the PDF using My Signature.
- Send a signing request to the other participants with the Send to Sign button.
- Enter their email and press OK.
As a result, the other participants will receive notifications telling them to sign the document. No need to download the PDF file over and over again, just merge initials Request in clicks. This add-one is suitable for those who like focusing on more significant aims instead of wasting time for absolutely nothing. Enhance your daily compulsory labour with the award-winning eSignature platform.


How to eSign a PDF template on the go with no application
For many products, getting deals done on the go means installing an app on your phone. We’re happy to say at airSlate SignNow we’ve made singing on the go faster and easier by eliminating the need for a mobile app. To eSign, open your browser (any mobile browser) and get direct access to airSlate SignNow and all its powerful eSignature tools. Edit docs, merge initials Request and more. No installation or additional software required. Close your deal from anywhere.
Take a look at our step-by-step instructions that teach you how to merge initials Request.
- Open your browser and go to signnow.com.
- Log in or register a new account.
- Upload or open the document you want to edit.
- Add fillable fields for text, signature and date.
- Draw, type or upload your signature.
- Click Save and Close.
- Click Invite to Sign and enter a recipient’s email if you need others to sign the PDF.
Working on mobile is no different than on a desktop: create a reusable template, merge initials Request and manage the flow as you would normally. In a couple of clicks, get an enforceable contract that you can download to your device and send to others. Yet, if you want a software, download the airSlate SignNow app. It’s secure, fast and has an incredible interface. Enjoy seamless eSignature workflows from your business office, in a taxi or on a plane.


How to sign a PDF file utilizing an iPhone
iOS is a very popular operating system packed with native tools. It allows you to sign and edit PDFs using Preview without any additional software. However, as great as Apple’s solution is, it doesn't provide any automation. Enhance your iPhone’s capabilities by taking advantage of the airSlate SignNow app. Utilize your iPhone or iPad to merge initials Request and more. Introduce eSignature automation to your mobile workflow.
Signing on an iPhone has never been easier:
- Find the airSlate SignNow app in the AppStore and install it.
- Create a new account or log in with your Facebook or Google.
- Click Plus and upload the PDF file you want to sign.
- Tap on the document where you want to insert your signature.
- Explore other features: add fillable fields or merge initials Request.
- Use the Save button to apply the changes.
- Share your documents via email or a singing link.
Make a professional PDFs right from your airSlate SignNow app. Get the most out of your time and work from anywhere; at home, in the office, on a bus or plane, and even at the beach. Manage an entire record workflow effortlessly: create reusable templates, merge initials Request and work on PDFs with partners. Transform your device right into a effective company for executing offers.


How to sign a PDF file Android
For Android users to manage documents from their phone, they have to install additional software. The Play Market is vast and plump with options, so finding a good application isn’t too hard if you have time to browse through hundreds of apps. To save time and prevent frustration, we suggest airSlate SignNow for Android. Store and edit documents, create signing roles, and even merge initials Request.
The 9 simple steps to optimizing your mobile workflow:
- Open the app.
- Log in using your Facebook or Google accounts or register if you haven’t authorized already.
- Click on + to add a new document using your camera, internal or cloud storages.
- Tap anywhere on your PDF and insert your eSignature.
- Click OK to confirm and sign.
- Try more editing features; add images, merge initials Request, create a reusable template, etc.
- Click Save to apply changes once you finish.
- Download the PDF or share it via email.
- Use the Invite to sign function if you want to set & send a signing order to recipients.
Turn the mundane and routine into easy and smooth with the airSlate SignNow app for Android. Sign and send documents for signature from any place you’re connected to the internet. Generate professional-looking PDFs and merge initials Request with a few clicks. Come up with a perfect eSignature process with just your smartphone and enhance your total efficiency.
Get legally-binding signatures now!
FAQs
-
What is a merge request?
Merge requests allow you to visualize and collaborate on the proposed changes to source code that exist as commits on a given Git branch. A Merge Request (MR) is the basis of GitLab as a code collaboration and version control platform. It's exactly as the name implies: a request to merge one branch into another. -
How do I accept a merge request?
Log in to your GitLab instance. Go to the project for which the merge request has been made, in our case, the super-git project. Click on Merge Requests: You now see an overview with all the merge requests created for this project. -
Is merge request same as pull request?
6 Answers. GitLab's "merge request" feature is equivalent to GitHub's "pull request" feature. Both are means of pulling changes from another branch or fork into your branch and merging the changes with your existing code. ... A "merge request" should not be confused with the git merge command. -
How do you do a send merge request?
Suggested clip GitLab CE Tutorial #6 - Merge Requests - YouTubeYouTubeStart of suggested clipEnd of suggested clip GitLab CE Tutorial #6 - Merge Requests - YouTube -
How do I send a merge request in GitHub?
Suggested clip Creating a Simple Github Pull Request - YouTubeYouTubeStart of suggested clipEnd of suggested clip Creating a Simple Github Pull Request - YouTube -
What is the difference between pull request and merge request?
The process is basically the same as with Pull Requests. The main difference is basically the name. Both are means of pulling changes from another branch to your branch and merge the changes with your existing code. -
Why is it called pull request and not merge request?
A "pull request" is you requesting the target repository to please grab your changes. A "push request" would be the target repository requesting you to push your changes. When you send a pull request, you're asking (requesting) the official repo owner to pull some changes from your own repo. Hence "pull request". -
Why is it called a pull request?
Pull requests are a feature specific to GitHub. They provide a simple, web-based way to submit your work (often called \u201cpatches\u201d) to a project. It's called a pull request because you're asking the project to pull changes from your fork. -
What does pull request mean?
A pull request is a method of submitting contributions to an open development project. ... A pull request occurs when a developer asks for changes committed to an external repository to be considered for inclusion in a project's main repository. -
What is the meaning of pull request in GitHub?
Pull requests let you tell others about changes you've pushed to a branch in a repository on GitHub. Once a pull request is opened, you can discuss and review the potential changes with collaborators and add follow-up commits before your changes are merged into the base branch. -
How do I create a pull request?
Find a project you want to contribute to. Fork it. Clone it to your local system. Make a new branch. Make your changes. Push it back to your repo. Click the Compare & pull request button. Click Create pull request to open a new pull request. -
How do I merge pull requests in GitHub?
To accept the pull request, click the Pull Requests tab to see a summary of pending pull requests. If you are happy with the changes, click Merge Pull request to accept the pull request and perform the merge. You can add in a comment if you want. Once you click Merge Pull request, you will see a button Confirm merge. -
How do I pull from GitHub?
Find a project you want to contribute to. Fork it. Clone it to your local system. Make a new branch. Make your changes. Push it back to your repo. Click the Compare & pull request button. Click Create pull request to open a new pull request. -
How do I accept a pull request in GitLab?
To enable approvals, go to project settings page and set the "Approvals required" field to a numeric value. For example, if you set it to 3 each merge request has to receive 3 approvals from different people before it can be merged through the user interface. -
How do I submit a merge request?
Suggested clip GitLab CE Tutorial #6 - Merge Requests - YouTubeYouTubeStart of suggested clipEnd of suggested clip GitLab CE Tutorial #6 - Merge Requests - YouTube
What active users are saying — merge initials request


Related searches to merge initials Request with airSlate airSlate SignNow

Merge initials request
hey everybody it's dan and gets cool dude once again with another get tutorial video today we're gonna be talking about the option of merge methods in a gitlab merger quest so if you've ever scrolled through all the settings in your project you may have noticed that there is a section called merge requests where you can select one of three merge methods today I'm going to explain what all three of these methods are by showing you visually how they affect the commit tree but before we do that if you're new to get or get lab in general I highly suggest you go over here to my playlist and watch a couple videos first if you don't understand get branches or the commit tree or how a tree base works or get lab in general then you might get lost watching this video so let's get started today we're actually not going to use the terminal I know I can hear the disappointment through YouTube this is an example commit tree with a master branch and a topic branch called topic a each circle is a commit each line is a parental relationship this notation simply shows that there's a lot more history below this but we are going to ignore it for the time being often when working in a team there are multiple topic branches branching off the particular locations where the master branch was at a particular point in time so for example here topic be branched off of master when master was located here and the same for topic see topic a branched off when master was down here if you're familiar with get lab merge request you'll know that every merge request has a destination branch which I'm going to show in this light blue color and of course a source branch which I'm going to show in this pink color so for example topic B is the source branch in this example master is the destination branch and when a merge happens meaning the merge button itself is clicked on the merge request page the content of topic B is merged into master master moves one commits ahead from where it was before and that's what happens in a typical merge when you click the merge button now what we just showed here in this tree is actually the default setting so this is selected by default you can see a merge commit as the default action it's created for every merge and merging is allowed as long as there's no merge conflicts of course just to be clear in the example of topic B here the merge was actually non fast-forward and it's worth noting that a merge commit will be made even if the merge could be fast forwarded so let me show you what that looks like consider this case or topic D here is fast forward ahead of master even though master could fast forward to the state of topic D with the default setting of the merge method a merge commit will be created anyway so that looks like this master was here it moves to here so here I'm just pointing out that with this methodology a merge commit is created for every single merge even if it's fast forward ahead making the tree look a little funky if you're not expecting this behavior it's worth pointing out here that these two commits actually have identical content meaning the files in the directory structure are identical if you were to check out from this commit to this commit or diff tool between them you're gonna get the exact same file state meaning no differences between these two states if that's not immediately clear to you think about it this way master before the merge was located at this commit topic D branched off changing the content in master by one commit this merge brings in no new content from master since topic D branched off of where master used to be which is why these two commits have the exact same content this is worth pointing out because this can have implications and get labs ci and we're gonna talk about that in a minute so if I back up slightly to before the merge a scenario where the source branch is fast forward ahead of the destination branch can actually be required before a merge request can be accepted that's actually the second option in these merge method options so you can see merge commit with semi linear history emerged commit is created for every merge but merging is only allowed if fast-forward merge is possible this way you could make sure that if this merge request would build after merging to the target branch it would also build and that's because of this relationship here where if gitlab CI is testing the tip of the source branch which is how it works then when the merge happens we know that by definition the content could not have changed so therefore the master branch after the merge is stable in the same testing that the topic D branch was stable in I hope that makes sense so both this setting and the third setting which we're going to talk about last have significant workflow implications that we're going to talk about next so with this semi linear history setting you can ensure your merge requests when merge will be stable with respect to your get lab CI testing but this actually forces all your developers to rebase their work on to the latest state of the destination branch because it requires a fast-forward merge this actually ends up creating a race condition where the first merge request to merge wins and subsequent M ARS must then rebase and retest over and over until their stuff gets in this can be a big deal or potentially not a big deal depending on your project but if your testing time takes several hours or let's say you have a whole bunch of developers that are all doing work all at the same time this type of workflow could be untenable so if you choose the semi linear history setting your tree of commits is actually going to end up looking like this now I've pointed out here where master used to be and where master is right now in this example topic one had two commits topic two had one commit and topic three had three commits and each one of these merge requests was required to be fast forward ahead of the branch they merged with at the time of the merge just like we pointed out before this commit and this commit have identical content the same with this commit and this commit and this commit in this commit so the third and last option is the fast-forward merge option so this is similar to the merge commit with semi linear history except the history is truly linear and there is no merge commit at all when the merge is complete for the example destination branch of Master and source branch topic D if we had a fast-forward merge the tree would change like this so the tree doesn't change master just fast forwards to the location of topic D so with the linear history setting your commit tree ends up looking like this it's structured similar to the semi linear history except you'll notice that the parental relationship between the tip of the master branch and where the master branch used to be compared to the topic commits the lines here do not exist this is truly linear history meaning each commit only has one parent all the way back into the tree which gives you a versioning system similar to something like subversion where there's no complex branching and parental relationships within the tree itself now of course with this history and the semi linear history option I'm just showing that what the tree looks like for the commits reachable from master of course there could be long-standing topic branches that were not showing and this little notation shows that there's more going on here but the point is that with respect to the destination branch of the merge request and all the topic aka source branches that come in the history will end up looking like this for the linear history case and this for the semi linear history case so that's pretty much it you guys a short video today just wanted to point out the three merge methods and how it affects the commit tree history a default setting is just a typical merge commit there is no right answer on which one of these I should use it depends a lot on your project that developers your testing time what your deploy process is there's a whole bunch of different factors that go into determining what the best merge method is this default setting works for most people which is why it's the default this option has the one potential downside that the integration branch the master in this particular video example the master branch can actually break because the CI testing only tests the tip of the source branch which is possible to actually break the master branch these two settings make that impossible but create constraints on your developer workflow which require them to always be fast forward ahead of the destination branch in the merge request thanks for watching do me a favor hit that like and subscribe button I'm Dan to get school dude and I'll see y'all next time
Show moreFrequently asked questions
What is needed for an electronic signature?
How do I sign something in a PDF?
How do I add an electronic signature to my PDF using a Signature Field in airSlate SignNow?
Get more for merge initials Request with airSlate SignNow
- Original electronic signature
- Prove electronically signed Video Proposal Template
- Endorse digisign Internet Service Agreement Template
- Authorize electronically sign Support Agreement
- Anneal mark Ohio Commercial Rental Lease
- Justify esign Flooring Contract Template
- Try countersign Medical Power of Attorney Template
- Add Investment Agreement autograph
- Send Building Quote Template digital sign
- Fax Cover Letter for Internal Position initial
- Seal Social Media Press Release electronically sign
- Password Service-Level Agreement Template countersignature
- Pass Photo Licensing Agreement digital signature
- Renew Loan Consent Agreement signed
- Test Operational Plan digi-sign
- Require Confidentiality Agreement Template esign
- Comment viewer mark
- Champion recipient electronically signing
- Call for customer sign
- Void Corporate Bylaws template electronic signature
- Adopt Asset Transfer Agreement template signed electronically
- Vouch Admit One Ticket template electronically sign
- Establish Illinois Bill of Sale template electronically signing
- Clear Residential Construction Proposal Template template mark
- Complete Animal Surrender template signed
- Force Service Invoice Template template eSignature
- Permit Entertainment Booking Confirmation Letter template autograph
- Customize Tolling Agreement template digital sign