Merge Letter Signature with airSlate SignNow
Award-winning eSignature solution


Improve your document workflow with airSlate SignNow
Agile eSignature workflows
Fast visibility into document status
Easy and fast integration set up
Merge letter signature on any device
Advanced Audit Trail
Strict security standards
See airSlate SignNow eSignatures in action


airSlate SignNow solutions for better efficiency
Our user reviews speak for themselves


Why choose airSlate SignNow
-
Free 7-day trial. Choose the plan you need and try it risk-free.
-
Honest pricing for full-featured plans. airSlate SignNow offers subscription plans with no overages or hidden fees at renewal.
-
Enterprise-grade security. airSlate SignNow helps you comply with global security standards.

Your step-by-step guide — merge letter signature
Using airSlate SignNow’s eSignature any business can speed up signature workflows and eSign in real-time, delivering a better experience to customers and employees. merge letter signature in a few simple steps. Our mobile-first apps make working on the go possible, even while offline! Sign documents from anywhere in the world and close deals faster.
Follow the step-by-step guide to merge letter signature:
- Log in to your airSlate SignNow account.
- Locate your document in your folders or upload a new one.
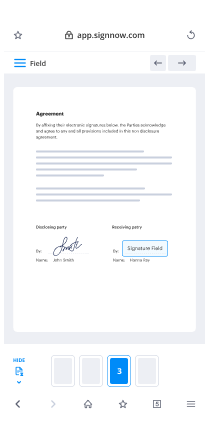
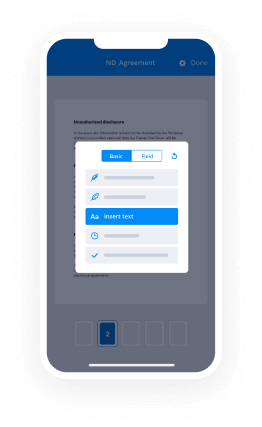
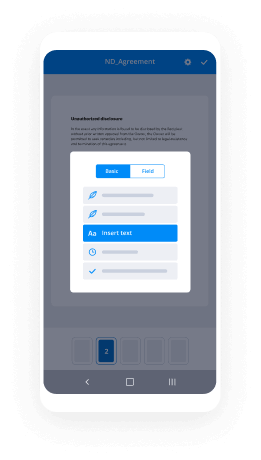
- Open the document and make edits using the Tools menu.
- Drag & drop fillable fields, add text and sign it.
- Add multiple signers using their emails and set the signing order.
- Specify which recipients will get an executed copy.
- Use Advanced Options to limit access to the record and set an expiration date.
- Click Save and Close when completed.
In addition, there are more advanced features available to merge letter signature. Add users to your shared workspace, view teams, and track collaboration. Millions of users across the US and Europe agree that a system that brings people together in one cohesive enviroment, is the thing that enterprises need to keep workflows functioning smoothly. The airSlate SignNow REST API allows you to integrate eSignatures into your application, internet site, CRM or cloud storage. Check out airSlate SignNow and get faster, smoother and overall more effective eSignature workflows!
How it works
airSlate SignNow features that users love


See exceptional results merge letter signature with airSlate SignNow
How to submit and eSign a document online
Try out the fastest way to merge letter signature. Avoid paper-based workflows and manage documents right from airSlate SignNow. Complete and share your forms from the office or seamlessly work on-the-go. No installation or additional software required. All features are available online, just go to signnow.com and create your own eSignature flow.
A brief guide on how to merge letter signature in minutes
- Create an airSlate SignNow account (if you haven’t registered yet) or log in using your Google or Facebook.
- Click Upload and select one of your documents.
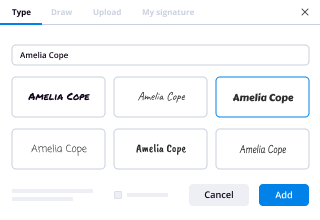
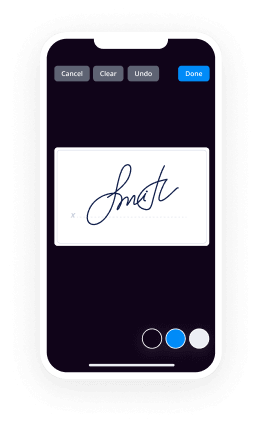
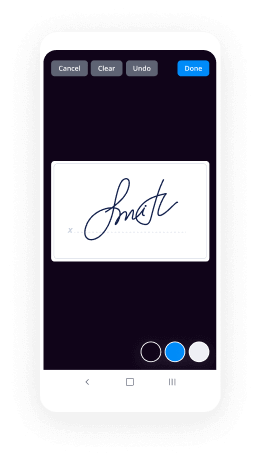
- Use the My Signature tool to create your unique signature.
- Turn the document into a dynamic PDF with fillable fields.
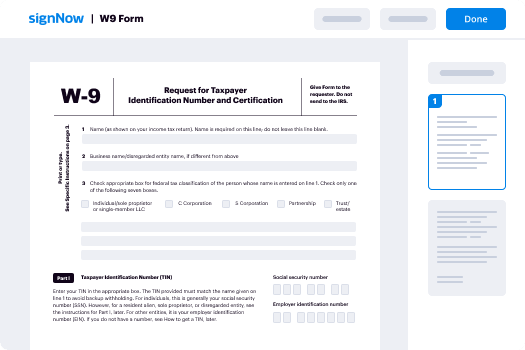
- Fill out your new form and click Done.
Once finished, send an invite to sign to multiple recipients. Get an enforceable contract in minutes using any device. Explore more features for making professional PDFs; add fillable fields merge letter signature and collaborate in teams. The eSignature solution gives a secure process and works based on SOC 2 Type II Certification. Make sure that all your records are guarded so no person can change them.
How to eSign a PDF in Google Chrome
Are you looking for a solution to merge letter signature directly from Chrome? The airSlate SignNow extension for Google is here to help. Find a document and right from your browser easily open it in the editor. Add fillable fields for text and signature. Sign the PDF and share it safely according to GDPR, SOC 2 Type II Certification and more.
Using this brief how-to guide below, expand your eSignature workflow into Google and merge letter signature:
- Go to the Chrome web store and find the airSlate SignNow extension.
- Click Add to Chrome.
- Log in to your account or register a new one.
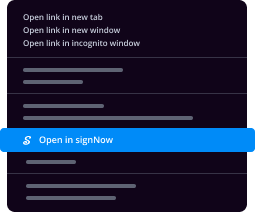
- Upload a document and click Open in airSlate SignNow.
- Modify the document.
- Sign the PDF using the My Signature tool.
- Click Done to save your edits.
- Invite other participants to sign by clicking Invite to Sign and selecting their emails/names.
Create a signature that’s built in to your workflow to merge letter signature and get PDFs eSigned in minutes. Say goodbye to the piles of papers on your desk and start saving money and time for extra essential duties. Picking out the airSlate SignNow Google extension is a great handy option with many different advantages.
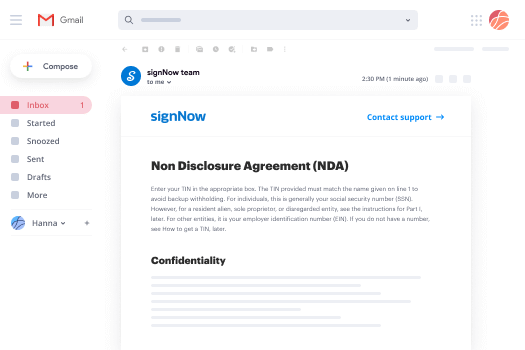

How to sign an attachment in Gmail
If you’re like most, you’re used to downloading the attachments you get, printing them out and then signing them, right? Well, we have good news for you. Signing documents in your inbox just got a lot easier. The airSlate SignNow add-on for Gmail allows you to merge letter signature without leaving your mailbox. Do everything you need; add fillable fields and send signing requests in clicks.
How to merge letter signature in Gmail:
- Find airSlate SignNow for Gmail in the G Suite Marketplace and click Install.
- Log in to your airSlate SignNow account or create a new one.
- Open up your email with the PDF you need to sign.
- Click Upload to save the document to your airSlate SignNow account.
- Click Open document to open the editor.
- Sign the PDF using My Signature.
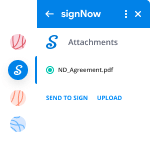
- Send a signing request to the other participants with the Send to Sign button.
- Enter their email and press OK.
As a result, the other participants will receive notifications telling them to sign the document. No need to download the PDF file over and over again, just merge letter signature in clicks. This add-one is suitable for those who like concentrating on more important things instead of burning up time for nothing. Boost your day-to-day routine with the award-winning eSignature application.

How to eSign a PDF file on the go with no app
For many products, getting deals done on the go means installing an app on your phone. We’re happy to say at airSlate SignNow we’ve made singing on the go faster and easier by eliminating the need for a mobile app. To eSign, open your browser (any mobile browser) and get direct access to airSlate SignNow and all its powerful eSignature tools. Edit docs, merge letter signature and more. No installation or additional software required. Close your deal from anywhere.
Take a look at our step-by-step instructions that teach you how to merge letter signature.
- Open your browser and go to signnow.com.
- Log in or register a new account.
- Upload or open the document you want to edit.
- Add fillable fields for text, signature and date.
- Draw, type or upload your signature.
- Click Save and Close.
- Click Invite to Sign and enter a recipient’s email if you need others to sign the PDF.
Working on mobile is no different than on a desktop: create a reusable template, merge letter signature and manage the flow as you would normally. In a couple of clicks, get an enforceable contract that you can download to your device and send to others. Yet, if you truly want an application, download the airSlate SignNow app. It’s comfortable, quick and has an intuitive layout. Try out smooth eSignature workflows from the workplace, in a taxi or on an airplane.
How to sign a PDF file having an iPad
iOS is a very popular operating system packed with native tools. It allows you to sign and edit PDFs using Preview without any additional software. However, as great as Apple’s solution is, it doesn't provide any automation. Enhance your iPhone’s capabilities by taking advantage of the airSlate SignNow app. Utilize your iPhone or iPad to merge letter signature and more. Introduce eSignature automation to your mobile workflow.
Signing on an iPhone has never been easier:
- Find the airSlate SignNow app in the AppStore and install it.
- Create a new account or log in with your Facebook or Google.
- Click Plus and upload the PDF file you want to sign.
- Tap on the document where you want to insert your signature.
- Explore other features: add fillable fields or merge letter signature.
- Use the Save button to apply the changes.
- Share your documents via email or a singing link.
Make a professional PDFs right from your airSlate SignNow app. Get the most out of your time and work from anywhere; at home, in the office, on a bus or plane, and even at the beach. Manage an entire record workflow effortlessly: make reusable templates, merge letter signature and work on documents with partners. Turn your device into a powerful organization instrument for executing deals.
How to eSign a PDF file using an Android
For Android users to manage documents from their phone, they have to install additional software. The Play Market is vast and plump with options, so finding a good application isn’t too hard if you have time to browse through hundreds of apps. To save time and prevent frustration, we suggest airSlate SignNow for Android. Store and edit documents, create signing roles, and even merge letter signature.
The 9 simple steps to optimizing your mobile workflow:
- Open the app.
- Log in using your Facebook or Google accounts or register if you haven’t authorized already.
- Click on + to add a new document using your camera, internal or cloud storages.
- Tap anywhere on your PDF and insert your eSignature.
- Click OK to confirm and sign.
- Try more editing features; add images, merge letter signature, create a reusable template, etc.
- Click Save to apply changes once you finish.
- Download the PDF or share it via email.
- Use the Invite to sign function if you want to set & send a signing order to recipients.
Turn the mundane and routine into easy and smooth with the airSlate SignNow app for Android. Sign and send documents for signature from any place you’re connected to the internet. Generate professional PDFs and merge letter signature with a few clicks. Come up with a flawless eSignature process with only your mobile phone and enhance your overall productivity.
Get legally-binding signatures now!
FAQs
-
How do I merge labels?
Go to Mailings > Start Mail Merge > Labels. In the Label Options dialog box, choose your label supplier in the Label vendors list. In the Product number list, choose the product number on your package of labels. ... Choose OK. ... Go to File > Save to save your document. -
How do I combine my signatures in Word?
Have the Word doc opened, of course. Click Insert > Signature Line > Microsoft Office Signature Line. On the pop-up, type in the signer's name and title, so they know where to sign. -
How do you write a letter of merge?
In a blank Microsoft Word document, click on the Mailings tab, and in the Start Mail Merge group, click Start Mail Merge . Click Step-by-Step Mail Merge Wizard . Select your document type. ... Select the starting document. ... Select recipients. ... Write the letter and add custom fields.
What active users are saying — merge letter signature


Related searches to merge letter signature with airSlate SignNow

Merge letter signature
welcome to carefree int TV today we will be talking about mail merge mail merge is a feature that we use to create personalized letters and pre addressed envelopes or mailing tables to mass mailing from a form of letter that or a standard template or a word processing document in simple words if you have supposed more like 2000 people you want to send one newsletter to or maybe some letter or you want to create mailing labels for more like numerous people say hundred or thousand addresses that you need to create there is a simple way to do that in Microsoft Word using the mail merge feature all you had to do is just create an excel sheet with the list of contacts with your addresses and you can create a letter in the word and you can personalize each letter with the contact from the excel sheet we will see that in a minute how we do that let's open would you go to me link and start mail merge there are different forms that you can create neck letters email messages and wallops labels or directories that a tree me or will do see that one by one but initially we'll start with the mail merge wizard which is a simple way of creating that on the right hand side corner you will see the mail merge task menu you've um here you can specify what kind of document you want to create is it a letter or it's an email message or personal email full all the contacts that you will be selecting from your Excel sheets or maybe a different database database and Mallove's mailing labels directory directing will be a single document that contains a list of addresses or or whatever you specify in your Essen sheet so let's create a simple letter this is my step 1 I go to sad document now you can use a current document maybe even just type in some stuff you can use this as a document just a plain document and you can type in anything you can start from the templates which are readily available to schools select the template we are doing the letter so let's go to letter and I'm just picking up the first one randomly let's say ok or you can just start with the existing document so let's say you have already created the document you can just open that document and go to the mailing and you can start milling the merge wizard I go to my next step where I'll be selecting my recipients um you can use existing list if you have created any even just browse through or even maybe if you have an excel sheet or a CSV document where you have all the contact list of the people who you want to send this letter to you can pick that up here or you can select the Outlook contacts you can it will directly connect to your Outlook contacts list and you can pick up any one so I can go with the might has contacts or my contacts then oh the ones which I have in here I just say ok so it will pick up all the four contacts that are there in my Outlook or you can just create a new list right here so you can type the name first name nothing that's by default you can customize these columns let's say you don't want title you don't want address line 2 and you don't want their home phone number let's say they are all from the same country so you don't want country even in the address list and on zip code room and if you want to add something you can simply add and type in the name of the field and that will be added in this list let's say I have first name last name company name the city the work phone number and the email address so I can type in some names and you can create multiple lines let's say okay and you can save this list on with the name let's say my contacts so now my contacts dot MVP database has two names and you can shuffle them around for example if you want first name to appear first you can move it by just dragging and dropping it here and you can customize the layout suppose you want to block phone number before the email address you can do that and if you want to sort this list or you can do that too based on the first name last name and in so you can pick up what is the criteria of sorting them you can filter on some addresses in order to send the emails let's say you are picking it up all of that and we go next here we can customize our ledger let's say I don't want the recipient name on the senders address here I will just delete the spot and let's say after my name I want the address block where it's the recipients like let's say name and then their company name and they're all sitting if you want you're gonna add more to it from here you can pick it up and I'm good with it so just say ok now I can delete this part and let's say I want my greeting line here say dear Stephanie comma you can change it with Colin or leave it like comma or you can pick and store Stephanie or if you want to type in your own personalized message you can do that I'm good with defaults you can change this letter you can customize it as for the content of your own letter that you are planning to just design you can get rid of this and let's say thanks I can delete this part and this goes as carefree I once I'm done with this I can go to preview the letters and this is how my little would look to my different recipients so my first recipients of second recipient was Stephanie and the first one wants to know if you want to modify any a particular recipients letter you can do that from here as well and on if you want to add more recipients to it you can simply add it the recipient list right here just go to database say add it and you can add more names to it to say new entry so if we just create another roofie filled row for you you can create more entries in here say okay once you're done and then you can just go with a complete didn't merge here you get the option of either print or you can edit them so you can edit the individual documents you can drink them or maybe even to send the evening messages let's say we pick the send the email messages to the email address that I specified in my contact list and if you want to send it to just one or two recipients you can specify that say I just wanted to present to one recipient I can say that if you wanted to send to the first ten recipients you can do that or if you want to send it to all you can pick all option and if you want to just send it to the one which you are picking in here so you can pick up the current record let's say all and say okay so this one doesn't have a something I'm you care I didn't add one subject but you can definitely do that and say hence anywhere now this will send an email to all the recipients that were in my contacts list I had to so it sent email to two of them okay let's go to my outlook and see if this is recede so it is received a tutorial at carefree ID dot C and here is the letter now besides this you can also go without the mail merge wizard so you can start the mail merge you can pick up the letter you can pick up this recipients just type in a new list or use the existing list let's try the D use the existing list all before that let's create a list I have my exit open let's say I have me company name and city and in the address so I can randomly type Latino John here free okay city one low and let's say email John Q 380 dots a let's say click on turn three okay and say hey take city under the hood which are in here let's say I'm just copying the same thing again goal it dragging you go to the right hand side bottom corner then you see class just drag it and then you copy the entry look and let's say I cannot see okay so now I have five contacts in here I can save this let's say on my desktop and I named it as company contacts let's say say no I can go to the existing list select different lists go to my desktop and see company contacts and say ok so this will bring in my sheet with all the contacts I just created you can shuffle around and just say ok so I have five recipients I call the day you can go from here like next or maybe you can just pick up the address block greetings the babies saw in the mail merge visit you can pick them up from up top here and in the end you can just save finish and send email numbers and the emails to all the recipients or if you want to add it into your documents you can say ok and it will show you all the letters so this one is shown on the same page would be Anita third one is and fourth one and this one so it's going to give you the list of all letters you can do to retype customize that today you want to and in the end you go to make and place the mail merge document so you just say send emails or if you want to print in segments and so on besides that you can also do the email messages you can also do the envelopes the address messages on the envelopes you can do mailing labels or you can just create a file with all the addresses from a border from your excel sheet so this summarizes our mail merge today and in the next series we will be talking about transition from windows 7 to Windows 8 and some really cool features of Windows which are generally are not very much famous stay tuned for our next tutorial next week and have a good day
Show moreFrequently asked questions
How do I eSign in MS Word?
How can I add an electronic signature to a document?
How can I set and save an electronic signature?
Get more for merge letter signature with airSlate SignNow
- Edit eSign Income Verification Letter
- Edit eSign Pregnancy Verification
- Edit eSign Entertainment Booking Confirmation Letter
- Edit eSign Vacation Bible School Registration Confirmation Letter
- Edit eSign Gala Reservation Confirmation Letter
- Edit eSign Honeymoon Reservation Record
- Edit eSign Landscape Transforming Appointment Record
- Edit eSign Resignation Confirmation Letter
- Edit eSign Landlord Verification Form
- Edit eSign Daily Safety Inspection Report
- Edit eSign Surat Kebenaran Perjalanan Ke Tempat Kerja
- Edit eSign Video Release Consent Letter
- Edit eSign Profit and Loss Statement
- Edit eSign Corporate Resolution Form
- Edit eSign Multi Sectional Resume
- Edit eSign Application For Employment
- Edit eSign Basic Employment Resume
- Edit eSign Restaurant Application
- Edit eSign Truck Driver Application
- Edit eSign Time Off Request
- Edit eSign Professional Resume
- Edit eSign Basic Employment Application
- Edit eSign Medical Return to Work Form
- Edit eSign Employee Resume
- Edit eSign Candidate Resume
- Edit eSign Functional Application
- Edit eSign Employee Termination Checklist
- Edit eSign Simple Resume