Move Validated Field with airSlate SignNow
Award-winning eSignature solution


Get the powerful eSignature capabilities you need from the company you trust
Select the pro service made for pros
Set up eSignature API with ease
Collaborate better together
Move validated field, within minutes
Cut the closing time
Maintain important data safe
See airSlate SignNow eSignatures in action


airSlate SignNow solutions for better efficiency
Our user reviews speak for themselves


Why choose airSlate SignNow
-
Free 7-day trial. Choose the plan you need and try it risk-free.
-
Honest pricing for full-featured plans. airSlate SignNow offers subscription plans with no overages or hidden fees at renewal.
-
Enterprise-grade security. airSlate SignNow helps you comply with global security standards.

Your step-by-step guide — move validated field
Using airSlate SignNow’s eSignature any business can enhance signature workflows and eSign in real-time, supplying an improved experience to customers and workers. move validated field in a few simple steps. Our handheld mobile apps make operating on the run achievable, even while offline! eSign documents from anywhere in the world and close up tasks quicker.
Follow the step-by-step guide to move validated field:
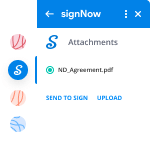
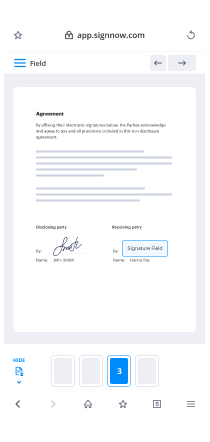
- Log on to your airSlate SignNow account.
- Locate your record in your folders or import a new one.
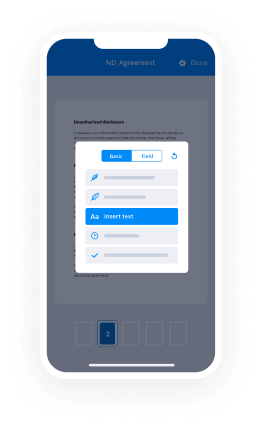
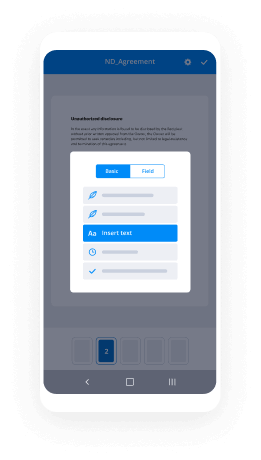
- Access the record and edit content using the Tools list.
- Drag & drop fillable fields, add textual content and eSign it.
- List several signers using their emails and set the signing sequence.
- Specify which users will receive an signed copy.
- Use Advanced Options to reduce access to the record and set an expiration date.
- Tap Save and Close when completed.
Furthermore, there are more innovative tools accessible to move validated field. List users to your shared work enviroment, view teams, and track collaboration. Millions of customers across the US and Europe recognize that a system that brings people together in one holistic digital location, is what businesses need to keep workflows working smoothly. The airSlate SignNow REST API allows you to integrate eSignatures into your app, internet site, CRM or cloud storage. Check out airSlate SignNow and get quicker, easier and overall more efficient eSignature workflows!
How it works
airSlate SignNow features that users love


See exceptional results move validated field with airSlate SignNow

How to fill out and eSign a document online
Try out the fastest way to move validated field. Avoid paper-based workflows and manage documents right from airSlate SignNow. Complete and share your forms from the office or seamlessly work on-the-go. No installation or additional software required. All features are available online, just go to signnow.com and create your own eSignature flow.
A brief guide on how to move validated field in minutes
- Create an airSlate SignNow account (if you haven’t registered yet) or log in using your Google or Facebook.
- Click Upload and select one of your documents.
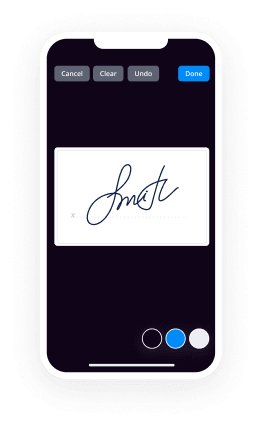
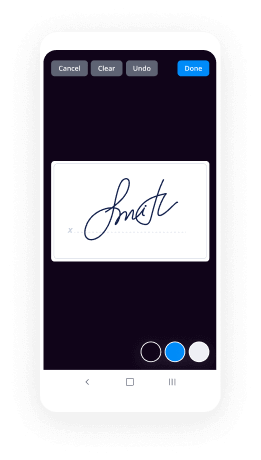
- Use the My Signature tool to create your unique signature.
- Turn the document into a dynamic PDF with fillable fields.
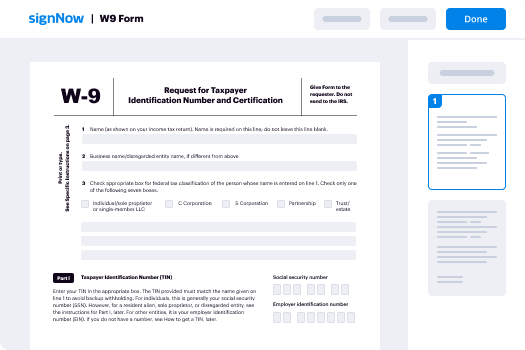
- Fill out your new form and click Done.
Once finished, send an invite to sign to multiple recipients. Get an enforceable contract in minutes using any device. Explore more features for making professional PDFs; add fillable fields move validated field and collaborate in teams. The eSignature solution gives a secure workflow and works in accordance with SOC 2 Type II Certification. Make sure that all of your data are guarded and therefore no one can take them.
How to eSign a PDF file in Google Chrome
Are you looking for a solution to move validated field directly from Chrome? The airSlate SignNow extension for Google is here to help. Find a document and right from your browser easily open it in the editor. Add fillable fields for text and signature. Sign the PDF and share it safely according to GDPR, SOC 2 Type II Certification and more.
Using this brief how-to guide below, expand your eSignature workflow into Google and move validated field:
- Go to the Chrome web store and find the airSlate SignNow extension.
- Click Add to Chrome.
- Log in to your account or register a new one.
- Upload a document and click Open in airSlate SignNow.
- Modify the document.
- Sign the PDF using the My Signature tool.
- Click Done to save your edits.
- Invite other participants to sign by clicking Invite to Sign and selecting their emails/names.
Create a signature that’s built in to your workflow to move validated field and get PDFs eSigned in minutes. Say goodbye to the piles of papers on your desk and start saving money and time for additional important tasks. Choosing the airSlate SignNow Google extension is an awesome handy decision with a lot of advantages.
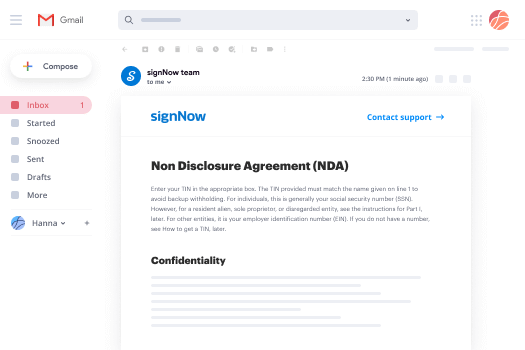

How to sign an attachment in Gmail
If you’re like most, you’re used to downloading the attachments you get, printing them out and then signing them, right? Well, we have good news for you. Signing documents in your inbox just got a lot easier. The airSlate SignNow add-on for Gmail allows you to move validated field without leaving your mailbox. Do everything you need; add fillable fields and send signing requests in clicks.
How to move validated field in Gmail:
- Find airSlate SignNow for Gmail in the G Suite Marketplace and click Install.
- Log in to your airSlate SignNow account or create a new one.
- Open up your email with the PDF you need to sign.
- Click Upload to save the document to your airSlate SignNow account.
- Click Open document to open the editor.
- Sign the PDF using My Signature.
- Send a signing request to the other participants with the Send to Sign button.
- Enter their email and press OK.
As a result, the other participants will receive notifications telling them to sign the document. No need to download the PDF file over and over again, just move validated field in clicks. This add-one is suitable for those who like focusing on more significant things instead of burning time for practically nothing. Enhance your day-to-day monotonous tasks with the award-winning eSignature application.
How to eSign a PDF template on the go without an application
For many products, getting deals done on the go means installing an app on your phone. We’re happy to say at airSlate SignNow we’ve made singing on the go faster and easier by eliminating the need for a mobile app. To eSign, open your browser (any mobile browser) and get direct access to airSlate SignNow and all its powerful eSignature tools. Edit docs, move validated field and more. No installation or additional software required. Close your deal from anywhere.
Take a look at our step-by-step instructions that teach you how to move validated field.
- Open your browser and go to signnow.com.
- Log in or register a new account.
- Upload or open the document you want to edit.
- Add fillable fields for text, signature and date.
- Draw, type or upload your signature.
- Click Save and Close.
- Click Invite to Sign and enter a recipient’s email if you need others to sign the PDF.
Working on mobile is no different than on a desktop: create a reusable template, move validated field and manage the flow as you would normally. In a couple of clicks, get an enforceable contract that you can download to your device and send to others. Yet, if you want a software, download the airSlate SignNow mobile app. It’s comfortable, fast and has an incredible interface. Take advantage of in smooth eSignature workflows from your office, in a taxi or on an airplane.
How to sign a PDF utilizing an iPad
iOS is a very popular operating system packed with native tools. It allows you to sign and edit PDFs using Preview without any additional software. However, as great as Apple’s solution is, it doesn't provide any automation. Enhance your iPhone’s capabilities by taking advantage of the airSlate SignNow app. Utilize your iPhone or iPad to move validated field and more. Introduce eSignature automation to your mobile workflow.
Signing on an iPhone has never been easier:
- Find the airSlate SignNow app in the AppStore and install it.
- Create a new account or log in with your Facebook or Google.
- Click Plus and upload the PDF file you want to sign.
- Tap on the document where you want to insert your signature.
- Explore other features: add fillable fields or move validated field.
- Use the Save button to apply the changes.
- Share your documents via email or a singing link.
Make a professional PDFs right from your airSlate SignNow app. Get the most out of your time and work from anywhere; at home, in the office, on a bus or plane, and even at the beach. Manage an entire record workflow effortlessly: build reusable templates, move validated field and work on PDF files with partners. Transform your device right into a highly effective organization for closing offers.
How to sign a PDF Android
For Android users to manage documents from their phone, they have to install additional software. The Play Market is vast and plump with options, so finding a good application isn’t too hard if you have time to browse through hundreds of apps. To save time and prevent frustration, we suggest airSlate SignNow for Android. Store and edit documents, create signing roles, and even move validated field.
The 9 simple steps to optimizing your mobile workflow:
- Open the app.
- Log in using your Facebook or Google accounts or register if you haven’t authorized already.
- Click on + to add a new document using your camera, internal or cloud storages.
- Tap anywhere on your PDF and insert your eSignature.
- Click OK to confirm and sign.
- Try more editing features; add images, move validated field, create a reusable template, etc.
- Click Save to apply changes once you finish.
- Download the PDF or share it via email.
- Use the Invite to sign function if you want to set & send a signing order to recipients.
Turn the mundane and routine into easy and smooth with the airSlate SignNow app for Android. Sign and send documents for signature from any place you’re connected to the internet. Generate professional-looking PDFs and move validated field with couple of clicks. Come up with a flawless eSignature workflow using only your mobile phone and enhance your general efficiency.
Get legally-binding signatures now!
What active users are saying — move validated field


Related searches to move validated field with airSlate airSlate SignNow

Move validated field
in this tutorial we're going to learn how to validate form input when a form is posted to our server and how to re-render the page with error messages when there are errors as a recap for how we handle form submissions let's open up our editor and go to routes slash index dot J's we have defined a post request handler for sign up path using this user dot sign up handler so let's open up that handler by going to controller slash user dot J's if we look at the sign up post handler we see that we create a new user object without validating the input we receive from the form reg body email and reg body password fields are used directly to create the user and save to the database we're going to change that and validate these input fields first before saving the data and for that we're going to define a validator function for our form input so let's get started by installing the validator package by typing npm install the validator we are also going to use a package called lodash so let's add that as well and by - - save and press Enter let's commit our package that JSON just in case we made any changes so I'm going to type get comments packaged of JSON and package block JSON okay now let's go back to our editor and in the root directory my app let's create a new folder called validators and save that and we're going to create a new file called sign up jas here let's fight let's validator equals require validator and I'm going to create a local function cons validates create user fields option this is going to receive an errors object that is empty and we will populate it as we find errors in each form input field and we're going to receive the form input fields with the req parameter which is the request object so let's like if validator is email break body email here this mark stands for not so if this input is not an email then we will populate the errors object with the key email with a message please use a valid email so we're going to go over each input field like this with an if statement the next one for us is if not validator is ASCII we're requiring that we want the password to be made out of ASCII characters and we're going to pass the password with recta body that password if this doesn't hold true then we're going to populate the areas object with the password key to be passport please try another one we also want to enforce a password length so let's type if not validator is length break body Passport here we pass a length range object with minimum of 8 characters and max of 25 that again we're going to populate the errors or the password key please ensure that your password has a minimum of 8 characters now we're done with this function because the airless object was passed into this function it will be modified in place so we do not need to return the errors object now other than this basic string validation we need to make sure that there isn't an existing user with the same email as the address provided in this email form field for that we need to query the database so let's define a wrapper function exports validate user function tears rank type return models user find one where email is req body email and then we are going to value u if u is not equal to then we're going to populate the email key of the errors object email is already used please log in or reset your password now I need to introduce you a new concept on program execution when we define the body for validate user where we query the database this is an asynchronous piece of code so it will execute sometime in the future and we will get the results also sometime in the future and this first portion we defined the validate create user fields function is a synchronous piece of code which means each of these statements will execute sequentially now in order to validate the form fields we need both this function which is synchronous and this function which is a synchronous and we need to mix the two together for that we need to use a concept called promise and make the entire body a synchronous we're going to cover promises in the future in more detail but for the time being what you should know as a recap is that this piece of code is a synchronous and this piece is synchronous and in order to make use of both in a single function we need to define a promise which wraps the entire code in an asynchronous body so for that let's type return new promise function resolve reject and we're going to create the promise body let's cut this piece paste it here and indented inside the promise and let's make a call to validate create user fields there's rec and they will return the errors variable in resolve errors and let's not forget to include the models variable so let's go to the top and type less equals require dot dot slash models now let's save this file now let's go back to a controller slash user J s and import validate user so let's type cost validates user equals require dot validators slash sign up now let's go down to the sign up Handler and declare a new variable let errors equals an empty object and we're going to call return validate user errors and we're going to pass the req object that contains the input fields to be validated so let's move on and type then errors which is going to be the result we get from validate user and we're going to check whether the errors variable is populated with any values so let's type if not is empty errors which means the era's object has some values we're going to call a new method rerender signup and we will re render the form just as we will render the form for the first time using the show sign up enter except we're going to display the error messages that we have populated during the validate user call so let's add the errors variable here errors and we're also going to pass the usual req rest and next objects now this case covers the case where we have errors on the form and we will handle this successful case here as well so let's try it else and inside the else body let's cut and paste rest of the code and let's indent it so this means if there is an error we're going to e render the form and if not we're going to save the data to the database there is one more thing we forgot this is empty function is a call that's been provided by the lodash library we just installed so we need to type Const is empty cause require lodash now is a good time to define our rerender sign-up function it's going to be identical to show sign up with a few differences so let's copy and paste show sign up and we're going to make this a local function so let's buy a Const pre-render sign up now even though rerender sign up looks like a request handlers such as show sign up it's actually just a function call so we're free to modify its function signature with the order of parameters being passed normally in expressjs the request handlers have a particular order in their parameters in particular the request response and next objects are passed in that order so rerender sign up is called from the sign up handler at this point and we can pass the errors object as its first parameter and we're then going to pass that to the errors key so that errors can be displayed on the form when the page is rear-ended we also have another field called form data and form data is a name that we made up in particular for when there are errors on a form when we rerender that page we use form data to pass back all the input fields that have been modified by the user so that let's say when there are errors the user does not have to re-enter the same information to the other form fields again and again on each time the form is re-rendered so we saved the user time by passing back the data that's been entered already in a previous submission so in order to pass the data back to form data key we are going to use rec that's body if you recall if we go down to the signup handler when the form is submitted to us we have all the form input fields available to us in record body objects with the keys corresponding to the input names such as email and password so by passing back recta body after the submission we are effectively passing back all the input fields that have been submitted to us on the form submission so we're passing ragtop body back in form of the key form data now if you recall show signup is using user slash signup view and we're using the same view in rerender signup as well so we're going to modify the signup view to cater for both cases of the showing the form for the first time and also rerender in the form with errors and existing form information so let's go ahead and open up views slash user slash signup that bug to modify it and to use form data and errors fields now let's take a look at the first input field with the name email we can pass back existing values on an input field using the value property so here for the value property we're going to type form data that email we could potentially populate the value property of the password field as well but we're not going to do that as password is a sensitive field so let's add error message information now and let's create a new line under the first input and let's like if errors and there's that email which is the name for the input field we're going to type P that's small dot text danger these are classes from bootstrap and we're going to finally display the error message errors that email if you recall we create these messages in the validator function let's do the same for the password field so I'm going to create a new line under the password input field and let's type if errors and then errors dot password P dot small of the text danger there's the password now let's save our file and we should be ready to try what we've done so far now let's go back to our browser window and go to the slash signup browser and I'm going to type user at email we know that we have a user already with this email address so let's see what happens when we include that and for the password I'm going to type full character password which should also trigger around there so if I click on sign up I took it the form re-rendered with the right error messages notice how the validator has both detected that the email is already in use we've done this with the database query and the password length was also detected to be not valid that's checking all the changes we made it add validators we've added a new directory validators and we've implemented error and link and form validation for sign-up route
Show moreFrequently asked questions
How do I add an electronic signature to a PDF in Google Chrome?
How do I use my saved electronic signature on more PDFs?
How can I electronically sign a read-only PDF that is not editable?
Get more for move validated field with airSlate SignNow
- Print electronically sign Camp Counselor Cover Letter
- Prove electronically signed Stock Purchase Agreement
- Endorse digisign Mobile Marketing Proposal Template
- Authorize electronically sign Residential Lease Agreement Template
- Anneal mark Home Inventory
- Justify esign Chicago Rental Lease Agreement
- Try countersign Dog Walking Contract Template
- Add Asset Purchase Agreement signed electronically
- Send Receipt Book Template electronically sign
- Fax Letter to Manager for Promotion countersignature
- Seal Nonprofit Press Release mark
- Password Sales Quote Template signed
- Pass Boat Bill of Sale digi-sign
- Renew Vehicle Service Contract digital sign
- Test Payment Receipt initial
- Require Founders’ Agreement Template signature
- Comment petitioner autograph
- Champion guest eSignature
- Call for boarder eSign
- Void Affidavit of Title template sign
- Adopt Tax Sharing Agreement template electronically signing
- Vouch Drink Ticket template mark
- Establish Christmas Gift Certificate template eSignature
- Clear Architecture Firm Proposal Template template autograph
- Complete Website Design Inquiry template digital sign
- Force Meeting Minutes Template template electronic signature
- Permit Daily Safety Inspection Report template signed electronically
- Customize Employment Verification Letter template electronically sign