Pass Signed Electronically Request with airSlate SignNow
Award-winning eSignature solution


Improve your document workflow with airSlate SignNow
Agile eSignature workflows
Instant visibility into document status
Easy and fast integration set up
Pass signed electronically request on any device
Detailed Audit Trail
Rigorous protection requirements
See airSlate SignNow eSignatures in action


airSlate SignNow solutions for better efficiency
Our user reviews speak for themselves


Why choose airSlate SignNow
-
Free 7-day trial. Choose the plan you need and try it risk-free.
-
Honest pricing for full-featured plans. airSlate SignNow offers subscription plans with no overages or hidden fees at renewal.
-
Enterprise-grade security. airSlate SignNow helps you comply with global security standards.

Your step-by-step guide — pass signed electronically request
Employing airSlate SignNow’s electronic signature any organization can speed up signature workflows and sign online in real-time, giving a better experience to customers and employees. pass signed electronically Request in a couple of simple actions. Our mobile-first apps make work on the move achievable, even while off the internet! Sign documents from any place in the world and close up tasks in less time.
Take a walk-through instruction to pass signed electronically Request:
- Sign in to your airSlate SignNow account.
- Find your needed form within your folders or upload a new one.
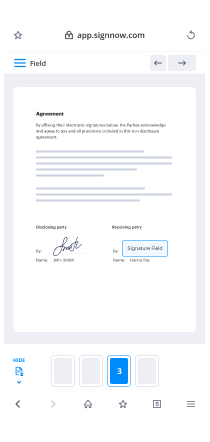
- Access the record and make edits using the Tools menu.
- Place fillable areas, add textual content and sign it.
- Add numerous signees using their emails and set the signing sequence.
- Indicate which individuals will receive an signed version.
- Use Advanced Options to limit access to the document add an expiry date.
- Click Save and Close when done.
Furthermore, there are more extended tools accessible to pass signed electronically Request. Include users to your common workspace, view teams, and track cooperation. Numerous people across the US and Europe agree that a system that brings everything together in a single unified digital location, is the thing that companies need to keep workflows working smoothly. The airSlate SignNow REST API allows you to integrate eSignatures into your app, internet site, CRM or cloud. Try out airSlate SignNow and get quicker, smoother and overall more effective eSignature workflows!
How it works
airSlate SignNow features that users love


See exceptional results pass signed electronically Request with airSlate SignNow

How to fill out and sign a PDF online
Try out the fastest way to pass signed electronically Request. Avoid paper-based workflows and manage documents right from airSlate SignNow. Complete and share your forms from the office or seamlessly work on-the-go. No installation or additional software required. All features are available online, just go to signnow.com and create your own eSignature flow.
A brief guide on how to pass signed electronically Request in minutes
- Create an airSlate SignNow account (if you haven’t registered yet) or log in using your Google or Facebook.
- Click Upload and select one of your documents.
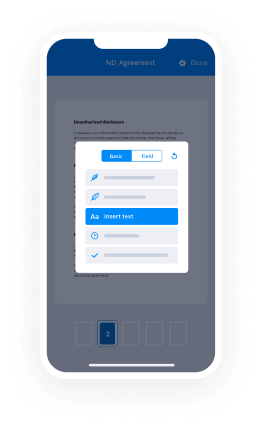
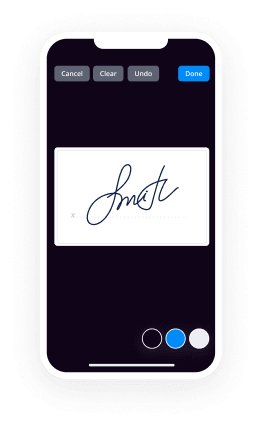
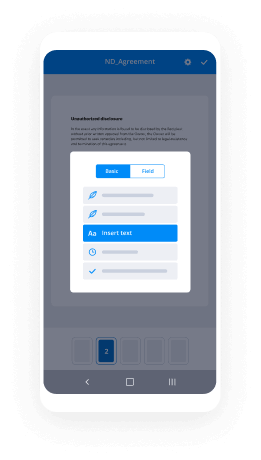
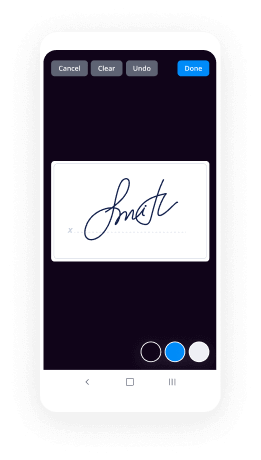
- Use the My Signature tool to create your unique signature.
- Turn the document into a dynamic PDF with fillable fields.
- Fill out your new form and click Done.
Once finished, send an invite to sign to multiple recipients. Get an enforceable contract in minutes using any device. Explore more features for making professional PDFs; add fillable fields pass signed electronically Request and collaborate in teams. The eSignature solution gives a secure workflow and functions based on SOC 2 Type II Certification. Be sure that all of your information are protected so no one can edit them.
How to eSign a PDF template in Google Chrome
Are you looking for a solution to pass signed electronically Request directly from Chrome? The airSlate SignNow extension for Google is here to help. Find a document and right from your browser easily open it in the editor. Add fillable fields for text and signature. Sign the PDF and share it safely according to GDPR, SOC 2 Type II Certification and more.
Using this brief how-to guide below, expand your eSignature workflow into Google and pass signed electronically Request:
- Go to the Chrome web store and find the airSlate SignNow extension.
- Click Add to Chrome.
- Log in to your account or register a new one.
- Upload a document and click Open in airSlate SignNow.
- Modify the document.
- Sign the PDF using the My Signature tool.
- Click Done to save your edits.
- Invite other participants to sign by clicking Invite to Sign and selecting their emails/names.
Create a signature that’s built in to your workflow to pass signed electronically Request and get PDFs eSigned in minutes. Say goodbye to the piles of papers on your desk and start saving money and time for more crucial duties. Choosing the airSlate SignNow Google extension is an awesome convenient option with lots of benefits.

How to eSign an attachment in Gmail
If you’re like most, you’re used to downloading the attachments you get, printing them out and then signing them, right? Well, we have good news for you. Signing documents in your inbox just got a lot easier. The airSlate SignNow add-on for Gmail allows you to pass signed electronically Request without leaving your mailbox. Do everything you need; add fillable fields and send signing requests in clicks.
How to pass signed electronically Request in Gmail:
- Find airSlate SignNow for Gmail in the G Suite Marketplace and click Install.
- Log in to your airSlate SignNow account or create a new one.
- Open up your email with the PDF you need to sign.
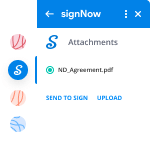
- Click Upload to save the document to your airSlate SignNow account.
- Click Open document to open the editor.
- Sign the PDF using My Signature.
- Send a signing request to the other participants with the Send to Sign button.
- Enter their email and press OK.
As a result, the other participants will receive notifications telling them to sign the document. No need to download the PDF file over and over again, just pass signed electronically Request in clicks. This add-one is suitable for those who like focusing on more significant aims as an alternative to burning up time for nothing. Increase your daily compulsory labour with the award-winning eSignature solution.
How to sign a PDF file on the go without an mobile app
For many products, getting deals done on the go means installing an app on your phone. We’re happy to say at airSlate SignNow we’ve made singing on the go faster and easier by eliminating the need for a mobile app. To eSign, open your browser (any mobile browser) and get direct access to airSlate SignNow and all its powerful eSignature tools. Edit docs, pass signed electronically Request and more. No installation or additional software required. Close your deal from anywhere.
Take a look at our step-by-step instructions that teach you how to pass signed electronically Request.
- Open your browser and go to signnow.com.
- Log in or register a new account.
- Upload or open the document you want to edit.
- Add fillable fields for text, signature and date.
- Draw, type or upload your signature.
- Click Save and Close.
- Click Invite to Sign and enter a recipient’s email if you need others to sign the PDF.
Working on mobile is no different than on a desktop: create a reusable template, pass signed electronically Request and manage the flow as you would normally. In a couple of clicks, get an enforceable contract that you can download to your device and send to others. Yet, if you want a software, download the airSlate SignNow app. It’s secure, quick and has an intuitive layout. Try out easy eSignature workflows from your workplace, in a taxi or on a plane.
How to sign a PDF using an iPhone
iOS is a very popular operating system packed with native tools. It allows you to sign and edit PDFs using Preview without any additional software. However, as great as Apple’s solution is, it doesn't provide any automation. Enhance your iPhone’s capabilities by taking advantage of the airSlate SignNow app. Utilize your iPhone or iPad to pass signed electronically Request and more. Introduce eSignature automation to your mobile workflow.
Signing on an iPhone has never been easier:
- Find the airSlate SignNow app in the AppStore and install it.
- Create a new account or log in with your Facebook or Google.
- Click Plus and upload the PDF file you want to sign.
- Tap on the document where you want to insert your signature.
- Explore other features: add fillable fields or pass signed electronically Request.
- Use the Save button to apply the changes.
- Share your documents via email or a singing link.
Make a professional PDFs right from your airSlate SignNow app. Get the most out of your time and work from anywhere; at home, in the office, on a bus or plane, and even at the beach. Manage an entire record workflow effortlessly: build reusable templates, pass signed electronically Request and work on documents with partners. Turn your device into a effective business instrument for closing contracts.
How to sign a PDF taking advantage of an Android
For Android users to manage documents from their phone, they have to install additional software. The Play Market is vast and plump with options, so finding a good application isn’t too hard if you have time to browse through hundreds of apps. To save time and prevent frustration, we suggest airSlate SignNow for Android. Store and edit documents, create signing roles, and even pass signed electronically Request.
The 9 simple steps to optimizing your mobile workflow:
- Open the app.
- Log in using your Facebook or Google accounts or register if you haven’t authorized already.
- Click on + to add a new document using your camera, internal or cloud storages.
- Tap anywhere on your PDF and insert your eSignature.
- Click OK to confirm and sign.
- Try more editing features; add images, pass signed electronically Request, create a reusable template, etc.
- Click Save to apply changes once you finish.
- Download the PDF or share it via email.
- Use the Invite to sign function if you want to set & send a signing order to recipients.
Turn the mundane and routine into easy and smooth with the airSlate SignNow app for Android. Sign and send documents for signature from any place you’re connected to the internet. Generate professional-looking PDFs and pass signed electronically Request with a few clicks. Created a perfect eSignature process using only your smartphone and increase your total productiveness.
Get legally-binding signatures now!
FAQs
-
How do you sign something electronically?
Android: Use airSlate SignNow Fill & Sign It can also capture pictures of airSlate SignNow documents with your camera so you can sign them electronically. After installing the app, you can open PDF documents in the app and tap the signature button to sign them. -
Will airSlate SignNow hold up in court?
In summary, electronic signatures are binding and will hold up in court so long as they can be authenticated. One way to ensure the authentication process is to use an electronic signature company such as airSlate SignNow, since courts have already ruled a signature using airSlate SignNow is presumptively valid.
What active users are saying — pass signed electronically request


Related searches to pass signed electronically Request with airSlate airSlate SignNow

Pass signed electronically order
hello and welcome to the online tutorial for the quality performance assessment and support system or Q pass I'm bill Tullock I'm an NCQA employee and I was the operations lead on the team that put the Q pass system together today we're gonna walk you through the process of enrolling and signing up for one of our programs but first I want to talk a little bit about the sign-in page you see before you we've got a lot of new resources for you to choose from including of course the sign-in option a place to learn about our programs including PCMH a questionnaire for new customers to find out if they're eligible for the PCMH program and also if they're ready to begin the transformation process a price calculator to determine likely fees a way to contact NCQA with questions and a link to the educational resources on our website but since we're talking about enrollment and signing up here we're going to start with the sign-in page but assignment ik you pass click the sign in an enroll button here that will bring you to the sign in page notice that your NCQA account is your email address and cq8 is move to old one user ID system which means if you've bought a publication from us sign up for one of our courses or asked a question to the my NCQA org system you actually already have an account in queue pass using your email address and password if you don't remember your password click I forgot my password and you'll see this page where you can enter your email prove you're not a robot through the CAPTCHA system and then it will help you reset your password at that point if you're not sure if you have an account or if you know you don't have one click create one here the first thing you'll be asked to do is put in your email address and I want to show you that if I put in an email address as I already have that has an account associated with it the system will alert me to that so it won't let me recreate an account with the same address I'll just click here to reset my password if necessary or I can just go back and sign it I'm actually going to show you how the sign-in works now by putting in my email address I've already saved my password so it pops up and click sign-in to enter the system now I want to show you what happens if you do have an existing NCQA account you will have to register for the first time that you enter into the Q pass system so notice here I'm going to log in with another account and it tells me as you notice that I already have an account but I do have to register so I go to create one here my account appears I put my password in I then put all the information that it asks for I'll use the NCQA address and I will register it in the system notice it automatically logs me in and it brings me to the License Agreement the first time you log into the Cubase system you'll see the License Agreement like most websites you'll have to scroll through it and actually accept the License Agreement but what's new for the Cubase system is that once you accept the License Agreement you won't have to again unless we update it under our old system because user IDs were not tied to email we had you accept the License Agreement every time you signed in this is a modification and improvement we think to this new system when you log in for the first time to my organizations page notice it tells you you don't have any organization yet if I had organizations and if I had organizations with current evaluations they would appear on the my evaluations tab but for right now I don't have any organizations so I'm going to create one by clicking on this link when you're creating a new organization you're going to put the name of the organization in this search box first if the organization exists the system will find a match and if you're the contact for the match you'll be able to claim it otherwise it'll tell you that your organization does not match any results and you'll be able to create a new organization so I'm going to highlight the name of my organization and I'm going to copy it down here I'm also gonna make that the same organization display name you could also do a different display name if you have a DBA assistant situation going on I'm going to put in the organization address again using the NCQA address a five digit zip code is required and a tax ID number is required but this does not do any kind of verification if you're a hersa grantee you should also put in your h code for your organization and then click done so once you've created your organization you'll come to something called the organization dashboard and you can see the name of my organization is up in the header as well as being here where I can edit information about my site the only options I have at this point are to enroll in programs managed people in roles go back to the educational resources page that we already looked at or to get help I'm going to show you how to add users to your organization notice that the individual that's signed in the organization is automatically listed as an organization administrator an organization administrator can add users to a site can enroll in programs can add evidence to programs can basically do everything you can also create people on a contributor role which will allow them to add data and upload evidence to a program but wouldn't let them change the organization information or add or delete new users I want to show you though how to add a new person if you are an organist rater the first thing you do is is search for an email address to see does this person already have an NCQA account in this case yes that person does this could be for instance one of our consultants or consultant you're working with and you want to add them to the organization so just add new person and you'll see that they automatically are created as a contributor I can as an organization administrator change their rights so I can make them an organ administrator and update their role and you'll see that person is now also an organization administrator you can have more than one but you always must have one or an administrator once you've added a user to your account for your organization you can then make that person a contact so go back up to edit your organization details if you scroll to the bottom notice we set up the original user as the primary contact by default but we can also set a secondary contact or change the primary contact to do that that person must already be in your list of users and it brings up that person immediately and again if this is my consultant I can set them as the contact you do have to submit for approval which means NCQA has to approve the change before will be updated in our system but that normally takes about one business day so of course the most important thing you want to do is enroll your organization in some programs so first click on the enroll my organisation button and you'll see that we only have one option right now which is the patient-centered medical home but before we enroll I want to show you something notice it has a question up here how to enroll a site into a program if you click on this button the instructions will expand it you'll be able to follow those through to actually enroll in a program rather than creating a very complex user guide we thought this was an easier and more direct way to provide instructions for users if you don't need them click the button again and they'll go away during the role sites in a program pick the program in which you'd like to enroll the sites and click on the button the first thing you'll get is a page that gives you the distinction between single site organization and multi site organization this is informational only and if you do have more than three practice sites we'll ask you a series of questions during enrollment to determine if you get single site or multi site pricing once you're finished reading this just click begin enrollment the enrollment process is step by step and you can follow along at the top to see where you are in this in the process to move to the next step click Next to move to the previous step and correct something click back notice I can't click next right now because I haven't actually done the step that I need to on this page this is the page where you actually add sites to enroll in the PCMH notice again we have the accordion instructions giving you all kinds of hints as to how to get through this part of the enrollment process but the first thing you'll have to do is select the sites you're going to enroll notice right now I have no sites if I were an existing organization my sites would have shown up here but because I'm a new organization I have to create a new site to add a site you must enter the site's NPI number you have to enter a valid NPI so I'm actually using a true sites NPI but I'm gonna actually change the name of the site and then enter its address and also its tax ID number you must pick a specialty for the site in this case I want to make it a pediatric site and if you have a sponsor code that is if you're part of an initiative that gets a discount from NCQA you could enter that sponsor code here or you can do it later when we actually create an invoice for your program now I've added two more sites to this organization so I can show you what happens when you enroll more than one site in the PCMH program my sites are listed here and I as the instructions tell me I should select the sites I want to enroll I can select them individually or I can simply hit all or none and then click Next because I have three sites or more the system is asking me two questions first does my organization have an EHR system used across the three sites I'm going to answer yes and also does my organization or the to the practice sites at least share policies and procedures for things outside the EHR system I'm going to say yes to that as well when I submit it will tell me in fact well it will give me a multi-site pricing if you don't answer yes to those questions you'll get single site pricing so it's important to note that you want to have if you are a multi-site you want to have three or more sites listed when you enroll because two of my sites are in Massachusetts I can also choose to enroll them in the Massachusetts PCMH prime program which is an additional distinction program on top of PCMH only four sites in Massachusetts the third step in the process is your clinicians remember that the cost of the PCMH program is based on your clinician count so you'll only want to include primary care clinicians which are MDS do snps and pas that both manage a panel of patients and provide primary care for 75% or more of their patients don't include other clinicians listed at the site to manage clinicians click manage clinicians and you'll notice that you can either add a new clinician add an existing clinician from your organization or you can choose to import clinicians if you have a large number to import clinicians you'll actually have to download an Excel spreadsheet well you'll include the condition information and then import that back in the system I'm just going to add one clinician and again I have to have a valid NPI but I'm going to change the clinicians name and I also have to put in their date of birth whoops I didn't do it right so it warned me I've got to put in the appropriate date function I also have to add their credentials email address if they'd like to get information from NCQA their license number and the state where that license comes from although the NPI has this database has this information we ask you to update this to make sure that it's accurate if that clinician is going to be attesting to maintenance of certification by using the PCMH program you should click here and you also have to add a specialty for each clinician and if they're board-certified you'll have to note that if they're not click n/a save the board and specialty and then you save the clinician what I've done is I've ad two more clinicians to my family site Family Health site a I want to show you what happens if you have collisions that operate at more than one site and you need to add them to each of the sites so when I go to manage collisions for site B I can add an existing clinician and notice I have the Commission names and their license numbers so those two clinicians work at this site as well and then if I go to a site see I can add different clinicians so if your organization has a large number of clinicians it may be easier to use the import and then simply select them as you do here for each site after you've added your Commission's the next step is to sign the legal agreements there are two legal agreements that have to be signed the agreement for the PCMH program and the business associate agreement these can be signed very simply click view sign agreement the first question that will be asked is are you an authorized user to actually for this organization to sign an agreement so I'm going to say I am and then I'm going to click to sign it will come up as a PDF as you scroll down to the bottom you can of course read through it but you'll add your title and then you'll indicate you've read the agreement and click to e sign it's just that simple close out of here and notice it is now signed what happens if you're not the authorized user what if you're someone who can't sign well you could you click no and then you can actually fill out the information for the individual who should be signing the agreement once you've done that you click Submit authorized representative information and the system will actually generate a email to that individual asking them to go back into the system and actually sign the agreement if they have an existing user account with NCQA it will in fact tell them that they have an account and how to reset their password if they don't have an account it will set one up and then ask them to register when they go in to sign the agreement so it's a great system to allow you to indicate to someone else that they need to sign the agreement but in this case I'm gonna go back just for ease of use and say that I am the authorized person I will put in my title again and this is what an authorized user would have to do and sign that agreement and then click close and then click Next with a final stop the final step in the process the invoices and to actually pay the program fees notice at the bottom you'll have an invoice for each site you can create and pay them one by one if you want to or you can actually create them all at once and bundle them together to create an invoice just click on create invoice and then you have a couple options you can pay or you can cancel if I had wanted to bundle and I realized that I shouldn't have clicked on that I could actually cancel it cancel the invoice at this point I will tell them yes I'm sure I want to cancel and I can go back and bundle them all together again and a lot of organizations are going to want a bundle once I've bundled I can then pay the invoice we have an online payment system so you accept the terms into your name and then it will give you all this information you can put in your credit card number and and submit payment that way if you don't want to pay online by credit card or buy a check which is the other option for an online payment you can generate the invoice that I previously showed you and then you can pay offline via a cheque sent NCQA please note you will not be able to actually begin doing your evaluation until you actually pay now what if you're a part of initiative that gets a discount from NCQA well there are two places you can put the discount code which actually identifies the discount that that initiative is eligible for you can apply the discount code when you create a site or you can do it at invoicing right here so notice there's an applied discount option I'm gonna put in a discount code in this case this discount code takes $20 off of the cost of the review so notice both of these sites that haven't yet been invoiced now show a discount of $20 and their total balance is 180 versus 200 as it was before so how do you get a discount code like this well you have to actually be part of an initiative where the sponsor will give you the discount code and CQA doesn't give those out because we want the sponsors to be responsible for determining who is eligible to actually get the discount so if you think you're eligible check first with the sponsor you may also want to check with NCQA where we can verify whether or not there is a discount available but you'll have to go back to the sponsor to get the code as a final step in enrollment you'll review with the program you're actually enrolling in how many sites whether your agreements are signed and then the next steps so if you haven't paid your invoices do that check her email to get your NCQA representative assignment you can also set up site groups if you have more than one organization and you want to share evidence across them that's what you would want to do you can transfer credits if you've got pre validated vendors you can determine which of the criteria are going to be shared across your sites and you can also add more staff and users to your organization and to your practice sites once you complete enrollment you'll be taken back to the organization dashboard which also now has a handy dandy guide because it is a little bit more complex at this point and you continue on in your PCMH journey so if you're an existing user with NCQA and you believe you have an organization that's already been recognized or for some reason should be in our system when you go in to claim an organization you click on this button and you'll type in the organization's name now I'm going to type in Kaiser which is one of our larger customers and I'm going to pretend that I'm part of the military and part of the Kaiser Slaton site so I click on that I scroll back up to the page because this is my organization and I would like to claim it I scroll back up the page and notice it tells me that although the organization exists I am not listed as an authorized user now there may be a few reasons for this there may have been a corruption of the user file or you may have never been added to the organization as an appropriate user at that point you can claim your organization but first we need to verify in person some information so we're going to ask you to contact customer support click on that link and you'll be brought to the Mon CQ a.org website notice it's already trying to log me in and then I can ask a question and go up to my questions and then type in a new question here or I would ask about a program and I would put my question here to ask NCQA to verify that I'm an appropriate user and do the admin to the organization if NC Queen needs further information they will contact you to make sure that you are in fact an authorized user before adding you to the account once you're added to the account when you come back in to the Q pass system when you go to my organization's it will be there so it will be listed here under the organization website once you've claimed an organization of course you can go and enroll it in a program but there's a few other options one of the things you can do is if you're confused by anything you can ask NCQA a question this is actually the my dot NCQA org system but notice it's automatically logging you into recognition programs and the program you're in which is PCMH 2017 you can then provide context for your question is it a Content question where you're asking about one of our concepts are you asking about some of the other options are you asking a system question do you have a technical issue do you have a pre validation question would it whichever one you want you can actually put in there so let's say I have a technical issue and the subject is screen freezing so let's say I'm having a problem with my screen freezing I'll put in a test question here and then I would submit it to NCQA and it will go into our PCs system and you'll get a response in one to two business days now if your organization has a representative assigned the question will go automatically to the representative otherwise it will go through our normal triaging system and go to an appropriate and secure a staff person to answer your question we also have a lot of resources available right here on the website so if you click on get help you'll see there's a whole list of things that you can pick from if you're looking for one of the file templates for instance if you want to upload a lot of clinicians or a number of sites those templates are available here and you can download them and these of course accordion open and close this way our instructions do there's a checklist for enrollment there are some videos on navigating Cubase there's also a video on an overview of the transformation process there's some other information about basic documents standards overview all kinds of resources that you can access right here from the content before you even have to ask a question so now we'd like to actually show you how you can start to work with your sites and actually provide evidence for your evaluations the first thing we want to do is actually show you the transfer credit or pre validation options this is the organization dashboard for an organization that I've created called tes PCMH this is in our training site but this is exactly as you would do it in our regular cubase site and what you want to do is you want to click on transfer credits if you believe you have a sponsor that has or excuse me not a sponsor but a vendor that has a pre validation that is they've been previously reviewed by and cqa and have gotten some credit for certain features of their systems already so we're gonna use a test option and we're gonna actually assign all three sites they all use the same system and then we actually have to prove to NCQA that we have implemented these systems so that we can actually get the credit that the vendors received when they did their pre validation so the first thing I need to do is add a document so I'm going to click to browse and I'm gonna go to some documents I've already put together and we're gonna pretend that this document is the document we need and what that means is then I would submit that to NCQA for review so what I'm saying Tennessee QA is I have these systems this is the letter that proves that I've implemented them for at least 90 days and security will review that item and then once the representative approves it these sites will get credit for the criteria that the vendor has already been pre-approved for so once your NCQA representative looks at the documentation you've provided from the vendor showing yes in fact you haven't looked at the system when you go back in to transfer credit it will actually tell you for all these sites the review is complete and then if you actually go to the one of the site evaluations we're gonna go to site a and we're actually going to look at their evaluation the criteria that the vendor got credit for is a co 7 so if I go to the evaluation for this practice that's access that's our access concept AC and I actually look at the criteria for AC you will see it's actually already been met so as a practice I don't have to do anything else and cqa has reviewed my pre validation this criteria has already been met and that will actually show up in my preliminary results so I've already gotten credit in this case it's an elective credit criteria so I get one credit toward the 25 that I need for recognition so I'm done with that requirement so I'm back on my organization dashboard and I want to begin my evaluation for those items that I want to provide evidence for so the first thing I want to do is go to my sites so I manage sites again I see all three sites and what I'm gonna want to do is actually start with site a and I'll show you exactly how you're going to add evidence to each of the sites so you go to site a view details and when the site information comes up you go to manage evaluations it shows that there's one transformation evaluation happening and I go straight to the evaluation the evaluation instructions of course are like most of our pages shown at the top so I can find out about my evaluation what the process is going to entail right there's three reviews is gonna be a virtual review but to start the real place I want to start is on the PCMH criteria which are right here and that when I click on that it opens up I can look at all the criteria I can look at the core criteria I can look at the elective criteria by concept or all the elective criteria together to decide where I want to get my credit let's start with the core criteria and that's really most of you will want to begin your evaluation so as you can see the core criteria are broken out into the six concepts and you can really start wherever your practice has the most evidence ready or where you've been sort of doing things the the longest in this case we're gonna start with access this is actually patient-centered access and continuity AAC you can see that there are one two three four five six seven core criteria they are not consecutively numbered because the criteria are are put into an order that makes sense in terms of operations but the other numbers here AC 6 7 8 9 et cetera those are elective and so they're not going to be shown on this page I'm going to select the criteria that I want to work on in this case access needs and preferences and it tells me that the requirement is that the practice has to assess the access needs and preferences of their patient population as with most criteria there are two facets to this there's a documented process and evidence of implementation so let's think about the documented process first I'm going to click on that it's going to tell me the suggested evidence which is a documented process for the reporting year which means debt basically instructions for your staff you might call these policies and procedures standard operating procedures it might be flow charts things like that it's basically any instructions for your staff in this case on how to assess access needs and preferences from your patient population so assuming that I do actually do this and I'm gonna be able to meet the core the first thing I want to do is is add evidence now there are two options here I can link evidence that's evidence that already exists or I can add new evidence in this case since I'm just beginning I don't have any evidence so again I'm going to go to look on my system and I'm going to bring up an item that will be documentation in this case it's a handbook that allows tells my practice staff how to do this assessment of access needs and preferences if that's the only evidence then I want to add I can save that and notice the criteria changes a little bit I can now since I have evidence attached I can open that evidence so if I'm a different staff person coming in wanting to see well what did they attach here I can open look at it I can find out the details about it I can also add comments for the reviewer so I may say this is a long document start on page 10 or something like that I can also unlink if I realize that this evidence is wrong or if I suddenly realize that we've inadvertently provided pH I I can flag it right here I'm not gonna do that right now if I were to it would actually delete the item or the evidence directly from the system automatically and then it would flag this as something practice has to go back to in order to add evidence that doesn't have the pH I with most documented processes you're not gonna have pH I so it shouldn't be something you're gonna have to do very often but we do have that option there what if you have different evidence if you don't have the suggested evidence well you can click this item and you can again add new evidence or link evidence so this may be if you have some kind of reporting or some other items that we did not expect to see you can use the different evidence option there once I'm actually done with this documented process and this is all I need to do I've added my evidence I'm done I can click it as ready for check-in and that is the equivalent if you're thinking about an online shopping site as putting something in your cart you haven't checked out yet but you've indicated that this is ready for check-in if you come along later and say oh no I shouldn't have done that you can uncheck it and again you'll be able to work on that aspect of the criteria now what about the evidence of implementation for this same criteria so I have my documented process but I also need to prove to NCQA that I'm actually doing this assessment so my evidence of implementation I'm gonna open that that item I notice again I have the same options in terms of link evidence or add new evidence but I also have this option of doing a virtual review that is not available under the documented process that's because we expect a documented process to be something that we want our evaluator to read ahead of time rather than doing it during the virtual review when you're going to be on the phone and sharing your computer screen with the evaluator we don't want them reading documents during that during that time period because we only have two hours during that virtual review and we want to be able to get through the the evidence that you're actually doing things rather than read your processes so we're gonna have you upload any documented processes ahead of time but for the evidence of implementation for the most part we're expecting these to be done during virtual reviews so you would click and say we're going to do a virtual review and either tell the reviewer that you're going to show them a demonstration of your system or in this case it's an assessment of access needs and preferences I probably have a report I'm gonna show the evaluator and again once I'm once I know I'm gonna do a virtual review I can click it as ready for check-in it says who actually checked it in and when so you can see which of your staff has done this and again if both the documented process and the evidence are ready then they're both ready for check-in and again that's the equivalent of putting an item in your shopping cart but not yet checking out so we've checked in this criteria let's go back and look at another AC criteria so I'm gonna look at my same-day appointments this is a pretty important aspect of the medical home again I have to provide a documented process and I have to provide evidence of implementation so let's say that handbook that I already attached is in fact the handbook for all of my documented processes well rather than adding that again because I've already added it I can link it to this criteria as well and notice if I just start to search any aspect of the title any word within the title it shows up so I can say I want to attach the same thing here again I can open it I can unlink it or can flag it with pH I what's missing here are the details that's only gonna show up the first time you add a piece of evidence to criterion so once you've added it to one criteria though you can always link it to another one again I can say that we're ready for check-in if you need help with an item you can click we need help and that will actually send an alert to your representative that you have a question and they will contact you or have one of our managers contact you if it's a Content issue if you cannot meet a criteria that actually automatically sets it to not met now this is a core criteria so you have to meet it you don't really want to be selecting that for this criteria but that might be applicable for an elective where you try to meet it you realize you can't and so you basically are taking it off the table if something's not applicable you can also click that but you have to provide evidence of the not applicability so this may be something like we are a pediatric practice and this is not applicable for pediatricians in this case that doesn't apply or again you can say it's ready for check-in evidence of implementation is another requirement here so just as with the other criteria I'm going to do a virtual review here I'm going to do a demonstration of the system because it's scheduling and it same day appointments I'm just gonna show the evaluator what our schedule looks like we're the same day appointments are and how we fill them and again that's ready for check-in and we can go on to another criteria now what if you're a currently recognized practice either 2002 the 2011 standards or under the 2014 standards level one or two well you actually still have to go through this transform survey that we've been looking at but you'll be able to attest to certain items including AC three appointments outside business at hours which means you have to indicate whether or not you're doing this on this is a core you have to actually be doing it however you don't have to provide documentation you can simply attest to it so let's look at AC 3 again we've got a documented process and evidence of implementation but in this case I don't because I'm previously recognized I don't need to provide evidence so I can actually attest to this well how would I do that I would click add new evidence here and I would choose the text option notice I can choose a document I can choose text or I can put in a website so I'm gonna enter my name for this evidence it's gonna be my anta station and I'm gonna say I am level 2 2014 and don't need to provide evidence we actually have more formal language that we'd like you to use but let's just go with this for now and I'm going to save that that is actually a piece of evidence which means I've attested to this and I'm done with this I would I would click that as ready for check-in I also want to attach to the evidence of implementation since I'm doing this so I would link evidence again I would put in the name attestation and I can just click on that so you only actually have to put your answer station in once and then you can actually attach it or as if it were a piece of evidence to each of the items that you can attach to so again I've got two more items ready for check-in so now that you've actually added evidence and identified that there are criteria that are ready for check-in I'm gonna show you how you actually will schedule a formal check-in or what is basically a request for NCQA tour review your documentation and evidence and determine whether or not you meet the criteria so I'm here looking at my evaluations on my homepage and I'm gonna go to my production test site B I'll go to my program dashboard and to the evaluation now at this point I've already checked in a number of already have a number of criteria that I've identified it's ready for check-in and as I mentioned before that's the equivalent of putting items into a shopping basket on an online shopping site but the checking components for a review which is what I'm gonna do now is the equivalent of actually checking out when you're buying items so I'm gonna click checking components for review and the screen watch you show me all the items that I have identified as ready for check-in these are the items that I'm actually saying to NCQA I would like to have reviewed and if you notice it will tell me on the right whether or not it's a virtual review or if I have documents attached and so I do have all of these items already ready to go some of them will be doing virtual reviews on some of them I will not it's now I want to confirm the check-in and the screen will show me the date thirty days from now because we want to give the reviewer at least thirty days to be able to review all the documentation that you've uploaded before you actually meet with the reviewer on the virtual review and and actually show them the evidence in terms of demonstrations and reports so you'll actually pick a time for your first virtual review today we're going to do it Thursday at eleven o'clock Eastern it'll automatically show a two-hour block because we need to have at least two hours for the review once you've decided on your times click select and confirm and you'll have one more confirmation you can always cancel at this point if you don't want to schedule the review but once you confirm you'll have scheduled your check-in at this time and you can see it will tell you that you've checked in your components and the evaluator is currently reviewing your evidence if I go back to the evaluation now and actually look at some of the items that I've now checked in asked NCQA to review i'm gonna go to access core notice it will say it's checked in and it is now locked I can't get into the system I can see what is going on with the criteria but because it is checked in and it's being reviewed I cannot alter any of the evidence at this time I won't be able to until the reviewer completes their review now the final thing I want to show you is the preliminary results screen so if I click on this it will actually show me in a tree form what actually has been met and what has not been met notice in Sydney if are not met is is a thumbs down and because I've just checked in at this point I have not met most of the criteria but if I click on core for instance it will tell me which of the core criteria and then I can actually look and see which have been met and which have not been met as the reviewer actually identifies criteria as being met or not met you'll actually see these results change and over time you'll see green and the met insignia when the reviewer actually tells you that you've met criteria
Show moreFrequently asked questions
What is needed for an electronic signature?
How can I sign a PDF file on a laptop?
How can I make an electronic signature on a PC?
Get more for pass signed electronically Request with airSlate SignNow
- Print electronically sign Employee of the Month Certificate
- Prove electronically signed Product Sales Proposal Template
- Endorse digisign Web Design Agreement Template
- Authorize electronically sign Sales Agreement
- Anneal mark Article Writing Invoice
- Justify esign Firearm Bill of Sale
- Try countersign Affiliate Marketing Proposal Template
- Add Insuring Agreement mark
- Send Housekeeping Contract Template signed
- Fax Promotion Acceptance Letter digi-sign
- Seal Concert Press Release digital sign
- Password Severance Agreement Template initial
- Pass Purchase Order signature
- Renew Real Estate for Sale by Owner countersignature
- Test Creative Brief digital signature
- Require Roommate Agreement Template electronically signed
- Comment undersigned electronically sign
- Champion awardee signed electronically
- Call for patron electronic signature
- Void Privacy Policy template eSignature
- Adopt Funding Agreement template autograph
- Vouch Concert Ticket template digital sign
- Establish Simple Medical History template signed electronically
- Clear Construction Proposal Template template electronically sign
- Complete Foster Application template countersignature
- Force Declaration of Trust Template template electronically signing
- Permit Gala Reservation Confirmation Letter template mark
- Customize Bill of Sale template signed