Recover eSign Payment with airSlate SignNow
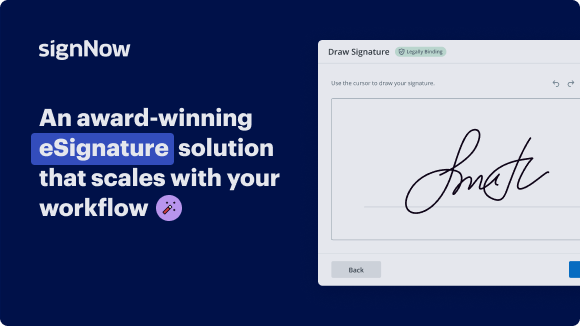
Award-winning eSignature solution


Get the robust eSignature capabilities you need from the company you trust
Select the pro platform designed for pros
Set up eSignature API with ease
Work better together
Recover esign payment, within a few minutes
Reduce your closing time
Maintain sensitive information safe
See airSlate SignNow eSignatures in action


airSlate SignNow solutions for better efficiency
Our user reviews speak for themselves


Why choose airSlate SignNow
-
Free 7-day trial. Choose the plan you need and try it risk-free.
-
Honest pricing for full-featured plans. airSlate SignNow offers subscription plans with no overages or hidden fees at renewal.
-
Enterprise-grade security. airSlate SignNow helps you comply with global security standards.

Your step-by-step guide — recover esign payment
Using airSlate SignNow’s eSignature any business can speed up signature workflows and eSign in real-time, delivering a better experience to customers and employees. recover esign payment in a few simple steps. Our mobile-first apps make working on the go possible, even while offline! Sign documents from anywhere in the world and close deals faster.
Follow the step-by-step guide to recover esign payment:
- Log in to your airSlate SignNow account.
- Locate your document in your folders or upload a new one.
- Open the document and make edits using the Tools menu.
- Drag & drop fillable fields, add text and sign it.
- Add multiple signers using their emails and set the signing order.
- Specify which recipients will get an executed copy.
- Use Advanced Options to limit access to the record and set an expiration date.
- Click Save and Close when completed.
In addition, there are more advanced features available to recover esign payment. Add users to your shared workspace, view teams, and track collaboration. Millions of users across the US and Europe agree that a solution that brings everything together in one unified digital location, is the thing that businesses need to keep workflows working easily. The airSlate SignNow REST API enables you to embed eSignatures into your app, internet site, CRM or cloud. Check out airSlate SignNow and get faster, easier and overall more effective eSignature workflows!
How it works
airSlate SignNow features that users love


Get legally-binding signatures now!
FAQs
-
How does signature airSlate SignNow verify?
Log in to your account or register a new one. Upload a document and click Open in airSlate SignNow. Modify the document. Sign the PDF using the My Signature tool. -
How can I get a copy of my digital signature?
How-to Guide Drag and drop your document to the uploading pane on the top of the page. Select the Copy Digital Signature feature in the editor's menu. Make all the required edits to your file. Click the orange “Done" button to the top right corner. Rename the document if it's needed. -
How do I get a copy of my eSign?
How-to Guide Drag and drop your document to the uploading pane on the top of the page. Select the Copy Digital Signature feature in the editor's menu. Make all the required edits to your file. Click the orange “Done" button to the top right corner. Rename the document if it's needed. -
How do I request an eSign PDF?
Select the document you want to request a signature for. After Acrobat uploads the file, sign in to send it for e-signing. Add recipients' email addresses, then click Next. Mark where signers need to fill in and sign. -
Is airSlate SignNow legally binding?
airSlate SignNow documents are also legally binding and exceed the security and authentication requirement of ESIGN. Our eSignature solution is safe and dependable for any industry, and we promise that your documents will be kept safe and secure.
What active users are saying — recover esign payment


Related searches to recover esign payment with airSlate SignNow

Recover esign payment
Well there's some features of this mud wagon that are real similar to mountain wagons and spring wagons. And as some of those features that we're going to work on today. Well in the last video on this mud wagon I did get the sideboards roughly cut out and the top frame piece. Well I've got to trim these to actual size and then do some routing that'll be the finished trim work on these sideboards. Well these iron braces are what go through the framework that goes across where the rocker frame braces are. This is about a half inch thick raised trim that goes where each of these iron braces are. There's one in the front and I'm assuming there's one in the rear. That one is not there, but this thickness here is where the sideboard would have been. This iron goes to the inside of the of the sideboard, and these don't show any sign of a washer underneath. I think these are still original. These have a slight bevel on them they are to 45 (degrees). They're more like maybe a 30. I'm going to show you where there's signs that these were on the old original sideboards. So this is the front left corner, and you can see a slight line here across the cross grain where the vertical trim piece would have been. This is on the front left corner. Then this same mark is evident here. And this is in the location of the cross brace of the rocker brace here. This would have been the cross framework. This front of the driver's box is tilted forward pulling this forward, but this mark here where this trim piece was would have lined up with the front cross member where the rocker brace was. The second rocker brace is where this board here was missing, but there's a little bit of a sign here where that arrays framework would have been in line with the back brace of the rocker. So since these side boards are inset half an inch from this bottom frame in this top cap, these inch and three-quarter strips will go on the very end, and then they'll come in at the 34" mark where the rocker brace will be. And there won't be anything in the middle cross brace for the floor. There'll be one at the 67". These are all inch and three quarter by half. This back one, the inside iron for the luggage boot is two inch, so I think I'm going to make a two inch by half that'll match that on the back end. You have the four irons that go at the braces of the rockers. There's this fifth one that is a little unique, has a hole in the top of it. It was kind of puzzling as to why, but I found the mate to it on the left side. So in the center brace you can see there is...
Show more