Request Log Sign with airSlate SignNow
Award-winning eSignature solution


Do more online with a globally-trusted eSignature platform
Remarkable signing experience
Trusted reporting and analytics
Mobile eSigning in person and remotely
Industry regulations and compliance
Request log sign, faster than ever
Handy eSignature add-ons
See airSlate SignNow eSignatures in action


airSlate SignNow solutions for better efficiency
Our user reviews speak for themselves


Why choose airSlate SignNow
-
Free 7-day trial. Choose the plan you need and try it risk-free.
-
Honest pricing for full-featured plans. airSlate SignNow offers subscription plans with no overages or hidden fees at renewal.
-
Enterprise-grade security. airSlate SignNow helps you comply with global security standards.

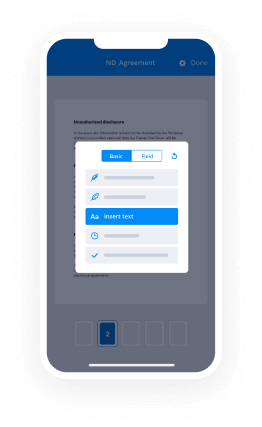
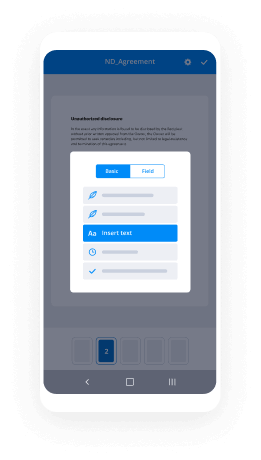
Your step-by-step guide — request log sign
Using airSlate SignNow’s eSignature any business can speed up signature workflows and eSign in real-time, delivering a better experience to customers and employees. request log sign in a few simple steps. Our mobile-first apps make working on the go possible, even while offline! Sign documents from anywhere in the world and close deals faster.
Follow the step-by-step guide to request log sign:
- Log in to your airSlate SignNow account.
- Locate your document in your folders or upload a new one.
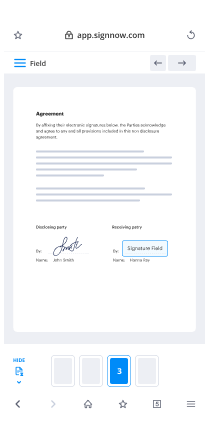
- Open the document and make edits using the Tools menu.
- Drag & drop fillable fields, add text and sign it.
- Add multiple signers using their emails and set the signing order.
- Specify which recipients will get an executed copy.
- Use Advanced Options to limit access to the record and set an expiration date.
- Click Save and Close when completed.
In addition, there are more advanced features available to request log sign. Add users to your shared workspace, view teams, and track collaboration. Millions of users across the US and Europe agree that a solution that brings everything together in one holistic enviroment, is exactly what companies need to keep workflows functioning efficiently. The airSlate SignNow REST API enables you to embed eSignatures into your app, internet site, CRM or cloud storage. Try out airSlate SignNow and enjoy faster, smoother and overall more productive eSignature workflows!
How it works
airSlate SignNow features that users love


See exceptional results request log sign with airSlate SignNow
How to complete and sign a PDF online
Try out the fastest way to request log sign. Avoid paper-based workflows and manage documents right from airSlate SignNow. Complete and share your forms from the office or seamlessly work on-the-go. No installation or additional software required. All features are available online, just go to signnow.com and create your own eSignature flow.
A brief guide on how to request log sign in minutes
- Create an airSlate SignNow account (if you haven’t registered yet) or log in using your Google or Facebook.
- Click Upload and select one of your documents.
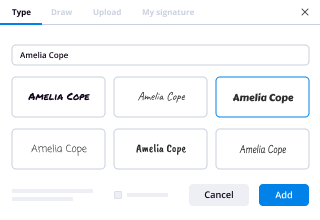
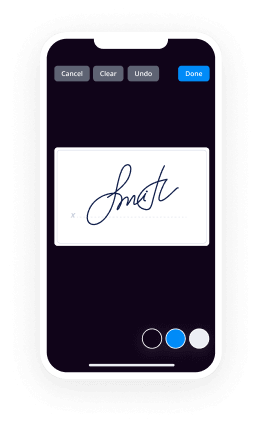
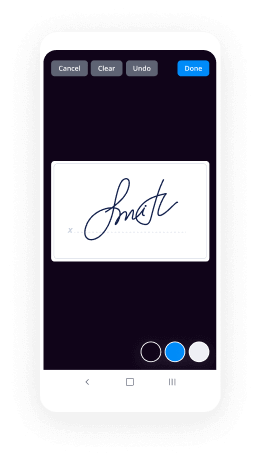
- Use the My Signature tool to create your unique signature.
- Turn the document into a dynamic PDF with fillable fields.
- Fill out your new form and click Done.
Once finished, send an invite to sign to multiple recipients. Get an enforceable contract in minutes using any device. Explore more features for making professional PDFs; add fillable fields request log sign and collaborate in teams. The eSignature solution gives a secure process and works according to SOC 2 Type II Certification. Be sure that all of your records are protected so no one can edit them.
How to eSign a PDF template in Google Chrome
Are you looking for a solution to request log sign directly from Chrome? The airSlate SignNow extension for Google is here to help. Find a document and right from your browser easily open it in the editor. Add fillable fields for text and signature. Sign the PDF and share it safely according to GDPR, SOC 2 Type II Certification and more.
Using this brief how-to guide below, expand your eSignature workflow into Google and request log sign:
- Go to the Chrome web store and find the airSlate SignNow extension.
- Click Add to Chrome.
- Log in to your account or register a new one.
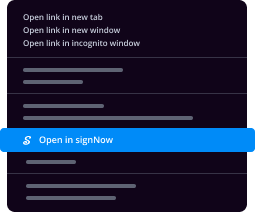
- Upload a document and click Open in airSlate SignNow.
- Modify the document.
- Sign the PDF using the My Signature tool.
- Click Done to save your edits.
- Invite other participants to sign by clicking Invite to Sign and selecting their emails/names.
Create a signature that’s built in to your workflow to request log sign and get PDFs eSigned in minutes. Say goodbye to the piles of papers on your desk and start saving money and time for extra essential duties. Choosing the airSlate SignNow Google extension is a great practical decision with plenty of benefits.
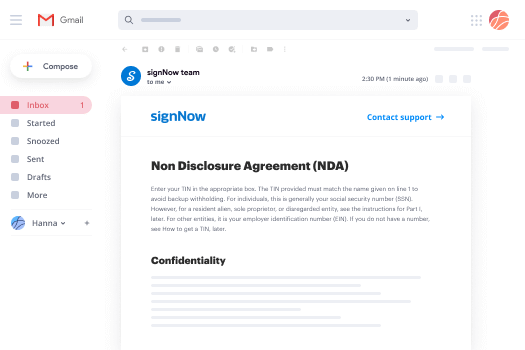

How to eSign an attachment in Gmail
If you’re like most, you’re used to downloading the attachments you get, printing them out and then signing them, right? Well, we have good news for you. Signing documents in your inbox just got a lot easier. The airSlate SignNow add-on for Gmail allows you to request log sign without leaving your mailbox. Do everything you need; add fillable fields and send signing requests in clicks.
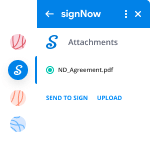
How to request log sign in Gmail:
- Find airSlate SignNow for Gmail in the G Suite Marketplace and click Install.
- Log in to your airSlate SignNow account or create a new one.
- Open up your email with the PDF you need to sign.
- Click Upload to save the document to your airSlate SignNow account.
- Click Open document to open the editor.
- Sign the PDF using My Signature.
- Send a signing request to the other participants with the Send to Sign button.
- Enter their email and press OK.
As a result, the other participants will receive notifications telling them to sign the document. No need to download the PDF file over and over again, just request log sign in clicks. This add-one is suitable for those who like concentrating on more important things instead of burning time for absolutely nothing. Enhance your day-to-day compulsory labour with the award-winning eSignature solution.

How to sign a PDF file on the go without an mobile app
For many products, getting deals done on the go means installing an app on your phone. We’re happy to say at airSlate SignNow we’ve made singing on the go faster and easier by eliminating the need for a mobile app. To eSign, open your browser (any mobile browser) and get direct access to airSlate SignNow and all its powerful eSignature tools. Edit docs, request log sign and more. No installation or additional software required. Close your deal from anywhere.
Take a look at our step-by-step instructions that teach you how to request log sign.
- Open your browser and go to signnow.com.
- Log in or register a new account.
- Upload or open the document you want to edit.
- Add fillable fields for text, signature and date.
- Draw, type or upload your signature.
- Click Save and Close.
- Click Invite to Sign and enter a recipient’s email if you need others to sign the PDF.
Working on mobile is no different than on a desktop: create a reusable template, request log sign and manage the flow as you would normally. In a couple of clicks, get an enforceable contract that you can download to your device and send to others. Yet, if you truly want an application, download the airSlate SignNow app. It’s comfortable, quick and has an excellent interface. Enjoy smooth eSignature workflows from your workplace, in a taxi or on a plane.
How to sign a PDF employing an iPhone
iOS is a very popular operating system packed with native tools. It allows you to sign and edit PDFs using Preview without any additional software. However, as great as Apple’s solution is, it doesn't provide any automation. Enhance your iPhone’s capabilities by taking advantage of the airSlate SignNow app. Utilize your iPhone or iPad to request log sign and more. Introduce eSignature automation to your mobile workflow.
Signing on an iPhone has never been easier:
- Find the airSlate SignNow app in the AppStore and install it.
- Create a new account or log in with your Facebook or Google.
- Click Plus and upload the PDF file you want to sign.
- Tap on the document where you want to insert your signature.
- Explore other features: add fillable fields or request log sign.
- Use the Save button to apply the changes.
- Share your documents via email or a singing link.
Make a professional PDFs right from your airSlate SignNow app. Get the most out of your time and work from anywhere; at home, in the office, on a bus or plane, and even at the beach. Manage an entire record workflow effortlessly: make reusable templates, request log sign and work on documents with business partners. Transform your device right into a effective enterprise instrument for closing contracts.
How to sign a PDF taking advantage of an Android
For Android users to manage documents from their phone, they have to install additional software. The Play Market is vast and plump with options, so finding a good application isn’t too hard if you have time to browse through hundreds of apps. To save time and prevent frustration, we suggest airSlate SignNow for Android. Store and edit documents, create signing roles, and even request log sign.
The 9 simple steps to optimizing your mobile workflow:
- Open the app.
- Log in using your Facebook or Google accounts or register if you haven’t authorized already.
- Click on + to add a new document using your camera, internal or cloud storages.
- Tap anywhere on your PDF and insert your eSignature.
- Click OK to confirm and sign.
- Try more editing features; add images, request log sign, create a reusable template, etc.
- Click Save to apply changes once you finish.
- Download the PDF or share it via email.
- Use the Invite to sign function if you want to set & send a signing order to recipients.
Turn the mundane and routine into easy and smooth with the airSlate SignNow app for Android. Sign and send documents for signature from any place you’re connected to the internet. Generate professional PDFs and request log sign with a few clicks. Come up with a flawless eSignature workflow with only your mobile phone and increase your total productiveness.
Get legally-binding signatures now!
What active users are saying — request log sign


Related searches to request log sign with airSlate SignNow

Request log sign
welcome to crosstalk solutions my name is chris and this is the definitive guide to hosted unify updated for 2021. in this video we're going to show you start to finish how to set up a secure hosted unify controller for multiple unify sites all right so there is a blog post that goes along with this video i will have a link down below to that blog post in that blog post are full written instructions for everything that i'm going to talk about in this video in the video portion i'm going to be moving a little bit quickly so refer to the blog post because everything is laid out step by step makes it nice and easy for you also if you enjoy this kind of content make sure you give us a like and subscribe to crosstalk solutions on youtube you can also follow us on twitter at crosstalk sol or if you've just found this guide super helpful and you want to buy me a beer there's also a link down below in the description where you can buy me a beer all right without further ado let's go ahead and get started up on my screen here i have the definitive guide to hosted unifi 2021 this is the blog post that i'm going to be following along with right at the top here you can see an example of a starter kit for unify if you're just getting into the unifi suite of products well for about 555 bucks you can get a really really nice starter network uh that i that i have detailed for you right here in this guide we are going to be setting up a unifi controller version 6.0.43 at least that's the version as of the recording of this video and we're going to be installing it onto ubuntu version 20.04 we're going to be using vulture as our hosting provider and if you do not have a vulture account there is a link where you can sign up for vulture that link will not change your price at all but in fact it will get you a hundred dollars worth of vulture credit uh if you use my referral link so i certainly appreciate any referrals that i get if you're more of a fan of digitalocean this exact same process works on digitalocean with the exception of the initial droplet or virtual machine setup that's going to be a little bit different for digitalocean but actually very similar you're just basically pressing a few different buttons for digitalocean and i also have a digital ocean referral link right down here if you're interested in signing up for digitalocean part one is to install our virtual server again we're going to be using ubuntu 20.04 for this hosted unifi controller so you want to log into vulture and once you're logged into vulture you're going to see this page here you just want to click the blue plus symbol right here on the right hand side and that's going to deploy a new server so for choose server we're just going to choose cloud compute and then we're going to scroll down a little bit here for server location i typically just pick a server that's geographically close to where i am located but of course you can pick whichever geographic location you want for the purposes of this video i'm going to choose seattle here in the united states scroll down a bit more and we get to the server type i'm going to choose 64-bit os and then i'm going to come over here to ubuntu and i'm going to click it and i'm going to choose 20.04 x 64. for the server size you can choose whatever size you like for just a very small unified controller with a few sites and maybe a couple dozen devices the five dollar tier is going to work perfectly fine or if you're just trying to test out unify you know if you're learning the platform the five dollar a month controller is perfectly fine for this purpose scrolling down even further we have our additional features the only one that i would really recommend enabling here is the auto backups reason being is that well it will automatically create a backup for you on a regular basis now you'll have backups created in unified but the more backups you have the better and for an extra dollar a month it's not too bad especially if you're running a production unified system it might just save your butt one day of course if you're just doing this as a test you don't necessarily have to enable the auto backups but again i'm going to go ahead and check the box finally you want to scroll all the way down to the bottom and where it says server hostname and label you want to enter in an fqdn or a fully qualified domain name now for me i'm going to use unify2021.crosstalksolutions.com this should be a valid domain name where you own the domain in my case i own the crosstalksolutions.com domain because the next step is we're going to have to create a dns a record for the name that we create for our server that's going to be very important because we're going to be using let's encrypt to secure the server towards the end of this documentation all right once you have everything in place go ahead and click on deploy now and you should be taken back to the dashboard and it'll take about a minute or two for your virtual machine to fire up while the virtual machine is initializing this is actually a really good time to go log into your domain hosting provider and add a new dns a record if you click on the server that you just created you can see the ip address right here and you can click this little icon to copy that ip address so you want to log into your hosting provider this is beyond the scope of this video because there's a ton of different hosting providers and many different ways to do this but ultimately you want to create a dns a record for the name that you gave your server in my case it's unifi2021.crosstalksolution.com and you want to point that dns a record to the ip address of your new vulture hosted server instance notice also on this screen we have the password for root you can also copy that password by clicking this icon right here we're gonna need that password in just a bit but we are going to change that root password as like the very first step when we first log into the server okay so after a minute or two the server should be up and running you should have the ip address hopefully your fully qualified domain name is now pinging that ip address like if you ping unify2021.crosstalksolutions.com or your own fqdn it should resolve to that ip address so here i have opened up putty and what i'm going to do is i'm going to come over here to the vulture instance and to start off i'm just going to grab the ip address we're going to copy that and in putty we're just going to paste that where it says hostname and we're going to click open you're going to get this putty security alert just go ahead and click yes and now we want to log in as root press enter now we need to grab our password so i'm going to come back here to vulture i'm going to copy the password go back to putty and we're going to paste that password in you can paste with shift insert and press enter and there we go we have now logged into our brand new hosted unifi controller for the first time but we have not done any configuration yet so the first thing that we're going to do since we just logged in let's change the password for root and make sure that you make it a very strong password now a little side note here we're going to be disabling root access to the server so you won't be able to actually log into the server as the root user by the time that we're done with this tutorial i mean that's a security risk so we're going to change the username that is allowed to log in and we're not going to allow root to log in however the password that you set for root is still going to be used for elevated commands for running the sudo commands right so we're going to need to remember the password that we create for you for root and make sure that it's a nice strong password so to do that we're going to say password p-a-s-s-w-d space root and it says what's your password so enter a very strong password and then enter it again okay and we can see password updated successfully now we're going to create a new user the user that i'm going to create is called unify admin but you can create whatever username you like okay so i'm going to say add user unify admin and then it's going to ask me for a password for unify admin make sure this is a strong password as well and take note of it so that you don't forget it and then when it asks you for some user information such as the name the room number the work phone the home phone and other basically you can just keep hitting enter until you get back to the main prompt so we've added a user unify admin and we've set the password but now we need to tell ubuntu hey this user unify admin they have rights to be able to run sudo commands or super user commands so we're going to say user mod a g sudo unifi admin that's basically putting the unify admin in the sudo group next we're going to want to generate a key pair right so a public private key pair this is because we're going to be setting up secure key authentication to the server we're not going to be logging in with the username and password we're going to be logging in with a public private key authentication so we're going to say ssh-keygen which by the way i am generating this key on this server but you can also generate this key on a different server and then copy it over to the server that's more advanced and that's beyond the scope of this documentation but that is also something that you can do you don't have to generate the secure key on this server so enter the file in which to save the key we're just going to take the default and now do we want our key to have a passphrase for added security it's recommended that you add a passphrase to your key basically you're going to have to log in with your public private key pair if you don't choose a passphrase all you need is the public private key to log in but if you add a passphrase you need both the the private key as well as the pass phrase on the private key to get logged into the server for the purposes of this documentation we're going to say no passphrase okay so now we have our key generated now we need to copy the key from the root user that we're currently logged in as over to the unify admin user so we're going to say ssh dash copy dash id and then username at server so i'm going to say unify admin at unify2021.crosstalksolutions.com it's going to say are you sure you want to connect we're going to say yes and then it's going to ask us unify admins password okay and we can see number of keys added is one all right so we're on to part six and this is where we're gonna start securing our server so the first thing that we're gonna do here is we're going to modify our ssh service configuration file and we're going to tell it that we don't want root to be able to log in and we're also going to tell it that we're not allowing password authentication to log into the server so basically we're saying you can't log in as root and you can't log in as any other user with just a password you have to have the private key to log into this server so we're going to say nano and i don't actually have to use sudo nano because we're logged in as root still so we're running all of our commands as root i'm just saying nano dash w slash sc ssh ssh d underscore config and we're going to scroll down until we find the line right here that says permit root login and we're going to change this from yes to no then you want to scroll down even further until you find password authentication now this is by default commented out so first we need to remove the hash symbol that's going to uncomment this line and we're going to change password authentication yes to password authentication no now from here you do ctrl x and it's going to ask you do you want to save your changes we're going to say y and then just press enter to write those changes to the same file that you were originally editing so control x yes enter now that we've made those changes we need to reload the ssh service so we're going to say system ctl reload sshd and now the ssh service has been reloaded but do not close this root window yet because we want to make sure that we don't that we can revert those changes if we accidentally locked ourselves out of the server or something like that so we're going to re-login as unify admin with our public private key pair and then once we have verified that that's working then you can close down this initial putty screen where you're logged in as root before we do that though we need to download a copy of our private key file and then remove the private key off of this server right we don't want to store our private and public key on the same server that's like basically you know leaving a key next to the lock on your door it's not a good idea because anyone can come by and grab that key and unlock the door so we want to remove the key the private key if you will from the server so we're going to first look at our private key we're going to say cat tilde dot ssh slash id underscore rsa and this is going to show us let me make this a little bit bigger this is going to show us our private key and you want to basically select and copy this entire thing now i'm not it's okay that i'm showing this on screen because by the time this video is produced i will have destroyed this server as well as this public private key pair so go ahead and try to write all this down if you want and try to log into my server the server is going to be gone by the time you're watching this so i've selected all the text i'm going to control insert to copy it and then i'm going to open up something like notepad or in my case i use a program called edit plus and i'm going to paste all of that information from the part of the private key file into edit plus and we're going to save that key somewhere secure on my desktop or just in a secure location somewhere and once you have saved the private key at this point we can delete that private key off of this server we're going to say rm tilde dot ssh slash id rsa and that private key has now been deleted now we want to use this private key to log into the server and i like to use putty to log into all of my servers this process may be a little bit different if you use something other than putty but for putty users we need to convert that private key into the dot ppk putty format so we're going to open up a program called putty gen if you have putty installed on your computer you should also have puttygen and here we are in puttygen we're going to click load and then we're going to open up the text file or the file where we just saved the private key okay so i've loaded that key and we can see here that i have successfully imported the key into puttygen we're going to say ok and now we're going to save the private key we don't have a passphrase we're just going to say yes and i'm just going to call it id underscore rsa and it's going to save it as a dot ppk file okay so i've saved that private key now we're going to close puttygen and now we want to test logging in as unify admin with our private key so we're going to open up putty again or you can do new session and in this new session first we want to put in our hostname unify2021.crosstalkssolutions.com and then we're going to click over here on the left hand window we're going to click open up ssh and then we're going to click on auth for authentication and right here where it says private key file for authentication we're going to browse and find the dot ppk that we just created okay so i've selected that dot ppk file i'm going to scroll back up to session and what i'm going to do here is i want to save this session right because i don't i want to be connecting to this unifi server over and over and i don't want to have to recreate this the putty session every time and remember oh where was that private key file and what port did i use for ssh and all that sort of good stuff so i'm just going to copy the name i'm going to paste it down here to save sessions and then we're going to click save so now i've saved that session and it should be listed down in the save sessions i can click on it and click load and bring back all of these settings so that i don't have to remember them every time but now let's just go ahead and click open and we're going to get this same security alert just say yes and then log in as we're not going to log in as root remember we disabled the ability for root to log in so we're going to log in as unify admin the user that we created you know a few steps ago and it says authenticating and boom we are logged in okay so just that easy we have now logged in using uh as unify admin with our private key and now i can close out the original route session that i had open exit okay so we've done a pretty good job of securing down the server at least access to the server so far we've you know changed we're not allowed to log in as root we've created a user that is allowed to log in and we've basically said that you have to have the private key file to log in as that new unifi admin user but let's secure it down even more because by default ssh runs on port 22 but everyone knows that ssh runs on port 22. so do we want to keep using that standard port definitely not let's choose a different port to log in with ssh so we're going to say sudo notice now we have to use super user commands because we're no longer logged in as root sudo nano dash w slash fc ssh sshd underscore config it's going to ask us for our unify admin password and then right down here we can see that we are port 22 by default but we want to change that to something else now i usually use just something like port 2 2 2 2. i make it a little bit less obscure other people say that it's better to use something you know way up higher in the port range that's just not at all easy to guess and not something that anyone is usually ever scanning on a regular basis uh something like maybe two nine nine nine nine right that would be a good port to use for the purposes of this demonstration though i'm just going to keep it at 2 2 2 2 and then we're going to save and exit that file once again we want to restart the ssh service with sudo system ctl reload sshd and now we want to log in once again but again don't close down this session until you have successfully logged into your new putty session so we're going to say new session now in this case i can load the previous settings so i've loaded the old settings that i created earlier but i'm still connecting to port 22. so i'm going to change that to whichever port i used or that i just set ssh to in my case it's two two two two might be something different for you and then we're gonna click save again so that we can save these settings one more time and now once again let's click open click uh yes on the security breach notification and log in as unify admin and there we go we have successfully logged in as unify admin using a private uh public-private key pair on a non-standard ssh port all right now we can close down our old uh session and we're good to move on to part 11. so in part 11 we're going to be enabling the firewall so basically we're going to close down all ports that we don't need and make sure that we're blocking everything when i lock down my servers i like to lock them down to specific wan ip addresses meaning that in order to connect on the unifi gui port which is 8443 or in order to connect in on ssh which in my case is 222 i'm only going to allow connections to those two ports from an authorized wan ip address in that case you know in this case the wan ip address of my my home office here and so to do that i'm not going to show you guys my wan ip address but to do that we're going to say sudo ufw allow from and now here i want to put in my home ip address or my office ip address or any ip address where i would like to connect from and by the way you can run this command multiple times if you have multiple places that you need to connect from so i'm going to say sudo ufw allow from 1.2.3.4 this is just a made up ip address we'll pretend that 1.2.3.4 is my wan ip address to any on port and then whichever ports we want to open so in our case it's going to be 2 2 2 2 and then i'm going to want to run the command again for port 9090 that's for a program called cockpit that's optional but we're going to be installing that a little bit later in the video and i'm also going to open it up for port 8443 which is the unifi controller graphical user interface so i'm going to go ahead and add those rules now but i'm going to do that with my wan ip address that i'm not going to show you guys on camera okay so i've added those rules there are a few other rules that we need to add but these rules we're going to want to open up to the whole wide world so we have a stun port that we need to allow that is udp port 3478 we're also going to allow the unify inform port which is port 8080 so instead of locking those down to a wanip address we're just going to say sudo ufw allow for stun is 3478 slash udp and then we're also going to say allow 8080 for the inform port notice though i'm not putting slash udp here because this is a tcp port so we're just going to say sudo ufw allow 8080. then there's a couple of optional ports that you can add this is port 8880 and 8843 those are ports that you're going to want to use if you're planning on setting up a guest authentication portal through unify in our cases and for the purposes of this documentation i'm not setting up those any sort of guest portal so i'm not going to add those ports to my own firewall rules but i do need to add some rules for let's encrypt so we're going to allow port 80 and we're going to allow port 443 now opening up those ports 80 and 443 those are very commonly used ports that's http and https we're only using them for let's encrypt if someone tries to browse to your server on either of those ports without any you know anything appended to the end of that request they're just going to get a you know request timed out it's not going to show them anything but if you want to secure everything down a little bit better you can actually add some hooks to let's encrypt that will open up these ports just before let's encrypt tries to renew a certificate and then it'll close those ports just after let's encrypt finishes updating its certificate again doing that is beyond the scope of this video and beyond the scope of this documentation but i did want to let you know that that is something that is possible that you can do okay so we've got all of our rules in place uh let's go ahead and turn on the firewall now keep in mind when you turn on this firewall if you did not enter your rules correctly you are going to lock yourself out of your server so be very sure that you entered in all of your rules correctly before you actually enable the firewall sudo ufw enable and we're gonna say yes and now firewall is active and enabled on system startup if you would like to check the rules that you entered you can say sudo ufw status and now you should see all of the rules that you just put in to the ufw firewall okay next let's go ahead and update our server i'm going to say sudo apt update this is going to check for any new software that's available and now we're going to say sudo apt upgrade dash y this is going to install any new software that's available once the updates have completed we're going to run one more command and that's sudo apt dist upgrade dash y this will update our distribution i don't think there's going to be anything available now if i run this command it should just yeah so there was nothing that it could update but in the future if you're watching this you know six months from when i recorded it there may be some packages you might want to just run that command just in case and now that we've just done a full update for good measure let's go ahead and reboot the server sudo reboot and press enter all right while that server is rebooting go ahead and click on this yellow banner here that's going to take you through to the crosstalk amazon store that's a bunch of stuff that we recommend not just unify and ubiquity stuff but other equipment as well it is a little bit outdated i will tell you that but if you click through this yellow banner and then go find anything else that you want to buy from amazon we'll get a little bit of credit for that as well and we certainly appreciate any of the referrals that we get after the reboot log back into your system and now we've got a little bit of house cleaning work to do starting with setting the time zone so we're going to type sudo dpkg reconfigure tz data enter in your unify admin password and now you can set your system time zone i'm going to select us and then pacific ocean and we can see that the local time is now 10 59 a.m pacific standard time which is correct along those same lines we also want to install ntp that is the network time protocol so we're going to say sudo apt update and two ampersands sudo apt install ntp dash y after about 30 seconds or so ntp is installed and we can verify the service status by typing service ntp status and we can see that it is active and running hit q to get out of the status and i'm going to clear up my screen again here you can also verify that ntp has the correct time information for your server by just typing date and we can see here friday 22nd of january 11 a.m pacific time that is correct next we're going to set up a swap file for this system now i've had some people tell me that a swap file is not necessary and other people swear that a swap file is necessary like most things the truth is probably in between there somewhere so we're just going to go ahead and set up a swap file but this step is completely optional if you don't believe that you need one so we're going to start by saying sudo f allocate dash l 4g that's the length of the file the dash l switch f allocate by the way is just a command that creates a file of whatever length you want and we're going to call the file slash swap file now if you do ls-la slash you should see swap file here we have it right here we can see it's a 4 gig file now we're going to change permissions on the swap file file that we just created so sudo mod 600 slash swap file now we're going to say sudo make swap slash swap file that's turning it into a swap file for us and then we need to turn swap on or basically tell the system to use it so we're going to say sudo swap on slash swap file which is great so our swap file is now working but if we reboot the server we'd have to go through all of those steps again so we want to make sure that when we reboot we also re-initialize that swap file so we're going to take this command here it's sudo sh dash c echo and then we're basically echoing this information here slash swap file none swap sw00 and we're putting that into the at cfs tab file so we're going to copy that and shift insert to paste and now if we say cat slash sc fs tab we see that information down at the bottom which when the server boots up it will now set that up as our swap file next we're going to install a couple of miscellaneous programs we're going to start with a program called cockpit cockpit is basically just a web gui for monitoring system resources we're going to say sudo apt install cockpit dash y this step is totally optional if you don't want to install cockpit you certainly don't have to okay once cockpit has been installed you can verify that it's working by bringing up a new browser tab and going to uh the ip address or fqdn of your unifi server colon 9090. so here we can see unifi2021.crosstalksolutions.com colon9090 we're going to get past the ssl warnings and here we have cockpit so i'm going to log in with unify admin and let me expand this out now we can see our system so we see the systems up to date we can see the cpu and memory status and if i click on dashboard right here on the left i actually get a live view of whatever i want to be looking at so here's the cpu memory network and disk io now we're going to install one more miscellaneous program and that is the have ged i'm not sure exactly how you say that have ged program basically this is a unpredictable random number generator for linux i'm not sure if it's used so much as it used to be but in the past having have ged installed on the server sped up the booting of unify quite significantly so we're going to put it in anyways it doesn't hurt anything even if it doesn't actually do anything to unify so sudo apt install have get dash y and there we go now we're going to set up apt auto remove basically auto remove is a way to clean up old stuff out of the system that you don't need in particular this helps keep your slash boot volume clear and clean so that it never fills up because if slash boot fills up it can cause problems for the server so we're going to say first let's just run auto remove and see what it does we'll say sudo apt auto remove dash y and we can see that it says the following packages will be removed and it would clear up 359 megabytes worth of disk space so we ran that it removed that it cleared up some disk space but now let's set that to automatically run every so often so we're going to run this once a month by putting this command here that same one we just ran sudo apt auto remove dash y into a file called etsy slash cron monthly slash auto remove so basically we're creating this auto remove file in the cron monthly folder which means everything in that folder runs once a month and then once we have that file in place shift insert and paste it we're going to set the permissions to make it executable so sudo sudo chmod plus x on the auto remove file that we just created there we go now if i say ls dash la slash etsy slash kron dot monthly we can see that i have an executable file called auto remove all right so all of that has been in preparation for installing unify let's finally get to the actual unifi installation the first step is to install the open jdk8 this is java so we're going to copy and paste this line right here and paste now notice on all of these i'm doing sudo apt update and then i'm doing the actual installation command here appended to it you don't always have to do sudo apt update if you've just run it recently like when we just installed cockpit you don't need to run it again you can just take the second half of this command and do that instead it just takes a little bit longer to do the sudo apt update first i put that in there just to be thorough all right open jdk8 has been installed the next thing we need to do is we're going to add an apt source for unify or in other words when you do a sudo apt update it looks through a whole bunch of different lists of software that can be installed and tries to find the latest versions of those of anything in those lists of software what we're doing now is we're adding another list to look through and that is the list that contains our unify installation files so we're just going to paste that command here in addition we need to make sure that we trust that new list that we just created so we're going to add the ubiquity or unify a gpg key the trusted gpg key we have downloaded that and added it and now we can install unify so sudo apt update and and sudo apt install unifi-y as of the recording of this video the latest version of unify is version 6.0.43 but your version may be different if you're watching this you know long after i actually recorded it unifi has now been installed i usually wait about 30 seconds for it to go through its sort of startup scripts make sure that it's running we can say service unify status and we should see a green active and running as we see right here now you're going to want to open unify in a browser so navigate to the ip or fqdn of your unifi server and append colon 8443 to the end there we go so i've got unify2021.crosstalksolutions.com colon8443 and then we can see here that i'm getting the ssl warning don't worry about this we're going to install let's encrypt next but for now let's go ahead and go through our unifi setup wizard so name your controller we're just going to say unifi 2021 we're going to check this box to accept the terms or if you want to restore from a previous version of unifi or a different server you can alternately upload a backup file by clicking this link right here we're going to click next now we're going to sign in with our ubiquity single sign-in account but if you want you can switch to advanced setup which allows you to not only disable remote access where you're not going to be connecting out to unifies cloud but you can also disable using your ubiquity single sign-on for login to this server basically you can make a local user instead of relying on ubiquiti's single sign-on if that is what you're interested in in my case though we're just going to sign in with our ubiquity single sign-in account step three of six is a couple of settings that you can turn on or off i certainly just would leave them both on and take the defaults this is going to be automatically optimize my network it just sets some settings that are optimal for most networks you can always change that once you log into the gui or and then you can also enable auto backups click next we don't have any devices right now and you probably won't have any devices because this device setup step 4 of 6 is looking on the local area lan or local area network for devices and since this is a hosted controller there's no devices connected to the lan of this controller so there shouldn't be anything in this list click next and then we have our wi-fi setup if you want to create your first wireless ssid you can put that information here you wireless name as well as password i'm going to skip for now and then you can reboot review your configuration and make sure that everything looks good including your time zone and click finish and there we go we're going to say don't send on the security and analytics and now we have a working unifi controller but if you look up here in the top left we are not secure so the next step is to add a let's encrypt certificate and make sure we have secure https communication to our unifi server all right so the first thing that we want to do is install certbot which is the service that will keep our let's encrypt certificate renewed every 90 days or so and we want to also install python3-certbot apache which is the connector for the apache web service once that has been installed we now need to generate our let's encrypt certificate you want to use this command sudo certbot dash dash apache dash d and then give it your own fqdn for your own unify controller so we're going to copy this and shift insert to paste it now it's going to ask you for an email address this is basically where they're going to email you if there are any issues with your let's encrypt certificate and now you have to agree to the terms and service we're going to say agree will you be willing to share your email address up to you i'm going to say no in this case and then finally it's going to ask us whether we want to redirect all http requests to https which is a good idea so we're going to say 2 to make that redirect happen and there we go so here we can see congratulations your certificate and chain have been saved at and it gives us all of the information now at this point we have a let's encrypt certificate installed onto our server but unified doesn't know about it so we have to tell unify to check for that let's encrypt certificate or install that let's incr encrypt certificate into unified services and there's a developer named steve jenkins i have a link to his article about this who created a nice script for making that happen so we're going to basically download steve jenkins's script here and then we need to set that script to be executable with sudo chmod plus x and then we need to edit that script and make a couple of changes so we're going to say sudo nano w slash user slash local slash bin slash unify ssl import dot sh and there's a few things we need to do so for the unifi host name you want to put your actual fully qualified domain name in my case it's unifi 2021 and then there's different rules for what type of operating system we're using in our case we're using ubuntu so we want to unc we want to comment out anything to do with red hat or centos and we want to uncomment anything that has to do with debian or ubuntu so we've uncommented these configuration options here and finally down here for let's encrypt we want to set le mode or let's encrypt mode to yes and then hit control x yes enter to save and exit nano and then finally we want to run that script so we're going to say sudo and then the name of the script stopping unifi controller importing the keys and then restarting unify with the let's encrypt certificate there we go it says done and now if you open up a new close the browser window that you had opened with unifi before and open up a new browser window so i've signed back into unify and as we can see here for unifi2021.crosstalksolutions.com we have connection is secure and we have a valid certificate issued to my fully qualified domain name that ssl certificate is going to renew periodically since it's a let's encrypt certificate so we also want to make sure that we're running the unifi ssl import on a regular basis we're going to put the import into our cron.daily file or we're going to create a new file called unify ssl import in the etsychron.daily directory that way we're going to run this script every single day now if there's no new certificate it's not going to do anything but if it happens to find that the let's encrypt let's encrypt certificate was renewed then it's going to re-import the new let's encrypt certificate all right so we're going to paste that next command in this is editing a file called etsy cron dot daily slash unify ssl import this is a new file that we're creating and then we're going to copy these two lines here and paste them into that file and then control x yes enter to save and exit now we want to change the permissions and the owner of the file so we're going to change it so that root owns that file with sudo chon root root and then the name of the file and we're also going to make it so that that file is executable now if we do ls-la slash etsy cron dot daily we now see our unify ssl import command or file executable file is in that directory finally totally optional step but if you want to test your let's encrypt certificate you can go to this url right here sslabs.com it's an ssl test and just change the url that i have here to your own fully qualified domain name just replace what i have in red and when you run that test essentially you should come back with an a rating on your unifi controller fqdn okay so there it is that's all there is to it you should now have a fully functional and secure unifi controller running the latest version of unify and if you ever want to update the server all you have to do is run apt-get update and then apt-get upgrade dash y and that will update all of your linux packages as well as it will update unify to the latest and greatest version i hope you guys enjoyed this video and the time and effort that it took to put into it if you guys are interested in buying me a beer there is a link down below for that make sure you like and subscribe to crosstalk solutions for more content just like this and we will see you in the next video
Show moreFrequently asked questions
What is considered an electronic signature?
How you can sign a PDF using a digital signature?
How can I eSign PDFs?
Get more for request log sign with airSlate SignNow
- Tell Car Sale Agreement Template digisign
- Tell Car Sale Agreement Template initial
- Tell Car Sale Agreement Template countersign
- Tell Car Sale Agreement Template countersignature
- Tell Car Sale Agreement Template initials
- Tell Car Sale Agreement Template signed
- Tell Car Sale Agreement Template esigning
- Tell Car Sale Agreement Template digital sign
- Tell Car Sale Agreement Template signature service
- Tell Car Sale Agreement Template electronically sign
- Tell Car Sale Agreement Template signatory
- Tell Car Sale Agreement Template mark
- Tell Car Sale Agreement Template byline
- Tell Car Sale Agreement Template autograph
- Tell Car Sale Agreement Template signature block
- Tell Car Sale Agreement Template signed electronically
- Tell Car Sale Agreement Template email signature
- Tell Car Sale Agreement Template electronically signing
- Tell Car Sale Agreement Template electronically signed
- Tell Debt Settlement Agreement Template eSignature
- Tell Debt Settlement Agreement Template esign
- Tell Debt Settlement Agreement Template electronic signature
- Tell Debt Settlement Agreement Template signature
- Tell Debt Settlement Agreement Template sign
- Tell Debt Settlement Agreement Template digital signature
- Tell Debt Settlement Agreement Template eSign
- Tell Debt Settlement Agreement Template digi-sign
- Tell Debt Settlement Agreement Template digisign