How Do I Set Up Electronic signature in ERP
Contact Sales
Make the most out of your eSignature workflows with airSlate SignNow
Extensive suite of eSignature tools
Robust integration and API capabilities
Advanced security and compliance
Various collaboration tools
Enjoyable and stress-free signing experience
Extensive support
Keep your eSignature workflows on track
Our user reviews speak for themselves


Award-winning eSignature solution


How to Establish an Electronic Signature in ERP
Establishing an electronic signature within your ERP platform can optimize your document signing procedure and boost efficiency. With airSlate SignNow, you can effortlessly eSign and handle documents effectively, enabling your business to function seamlessly while minimizing turnaround times and expenses.
How to Establish an Electronic Signature in ERP
- Launch your web browser and visit the airSlate SignNow site.
- Create a complimentary trial account or log in if you already possess an account.
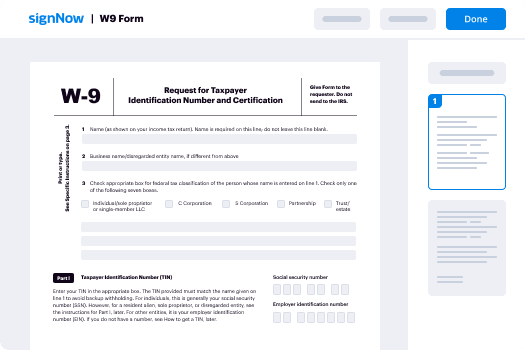
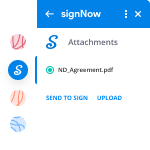
- Choose the document you want to sign or send for eSignature.
- If you intend to reuse the document, save it as a reusable template.
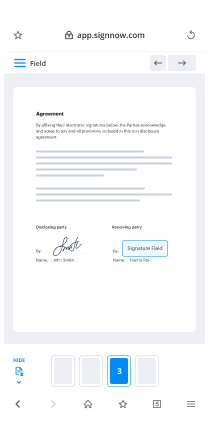
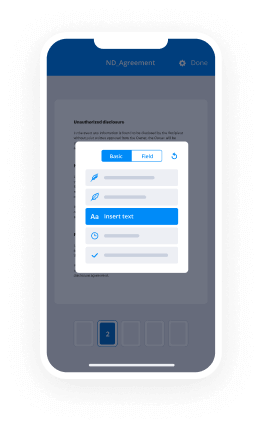
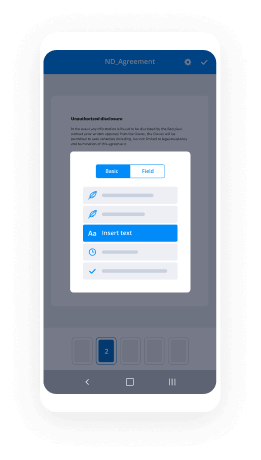
- Access your document and make necessary adjustments, such as adding fillable fields or inserting required information.
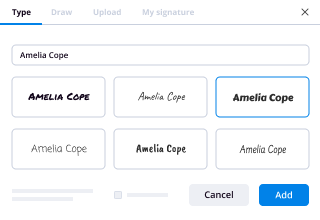
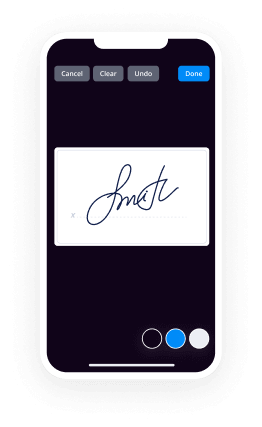
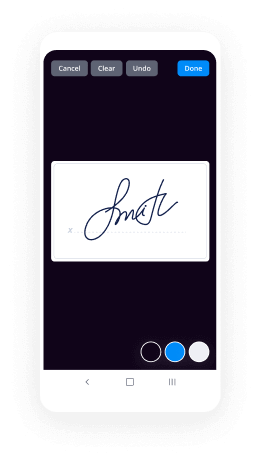
- Add your signature to the document and allocate signature fields for recipients.
- Click 'Continue' to set up and send the eSignature invitation.
To summarize, integrating airSlate SignNow into your ERP system not only streamlines the signing process but also offers a substantial return on investment with its extensive features designed for your business requirements.
Prepared to improve your document management workflow? Begin your free trial with airSlate SignNow today and enjoy effortless electronic signing!
How it works
Rate your experience
-
Best ROI. Our customers achieve an average 7x ROI within the first six months.
-
Scales with your use cases. From SMBs to mid-market, airSlate SignNow delivers results for businesses of all sizes.
-
Intuitive UI and API. Sign and send documents from your apps in minutes.
A smarter way to work: —how to industry sign banking integrate
How to electronically sign and complete a document online
Document management isn't an easy task. The only thing that makes working with documents simple in today's world, is a comprehensive workflow solution. Signing and editing documents, and filling out forms is a simple task for those who utilize eSignature services. Businesses that have found reliable solutions to how do i integration electronic signature set up erp don't need to spend their valuable time and effort on routine and monotonous actions.
Use airSlate SignNow and how do i integration electronic signature set up erp online hassle-free today:
- Create your airSlate SignNow profile or use your Google account to sign up.
- Upload a document.
- Work on it; sign it, edit it and add fillable fields to it.
- Select Done and export the sample: send it or save it to your device.
As you can see, there is nothing complicated about filling out and signing documents when you have the right tool. Our advanced editor is great for getting forms and contracts exactly how you want/need them. It has a user-friendly interface and full comprehensibility, supplying you with complete control. Create an account today and start increasing your eSign workflows with effective tools to how do i integration electronic signature set up erp on-line.
How to electronically sign and complete forms in Google Chrome
Google Chrome can solve more problems than you can even imagine using powerful tools called 'extensions'. There are thousands you can easily add right to your browser called ‘add-ons’ and each has a unique ability to enhance your workflow. For example, how do i integration electronic signature set up erp and edit docs with airSlate SignNow.
To add the airSlate SignNow extension for Google Chrome, follow the next steps:
- Go to Chrome Web Store, type in 'airSlate SignNow' and press enter. Then, hit the Add to Chrome button and wait a few seconds while it installs.
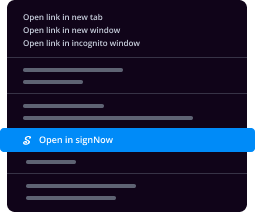
- Find a document that you need to sign, right click it and select airSlate SignNow.
- Edit and sign your document.
- Save your new file to your account, the cloud or your device.
By using this extension, you prevent wasting time and effort on boring activities like saving the file and importing it to an electronic signature solution’s catalogue. Everything is easily accessible, so you can easily and conveniently how do i integration electronic signature set up erp.
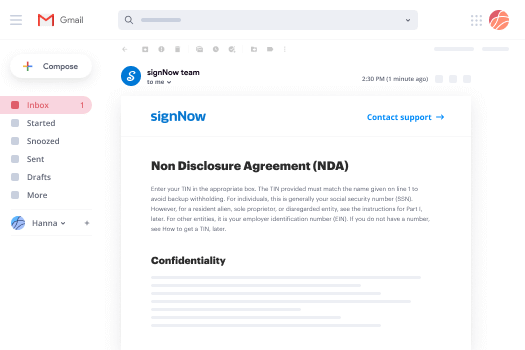
How to electronically sign docs in Gmail
Gmail is probably the most popular mail service utilized by millions of people all across the world. Most likely, you and your clients also use it for personal and business communication. However, the question on a lot of people’s minds is: how can I how do i integration electronic signature set up erp a document that was emailed to me in Gmail? Something amazing has happened that is changing the way business is done. airSlate SignNow and Google have created an impactful add on that lets you how do i integration electronic signature set up erp, edit, set signing orders and much more without leaving your inbox.
Boost your workflow with a revolutionary Gmail add on from airSlate SignNow:
- Find the airSlate SignNow extension for Gmail from the Chrome Web Store and install it.
- Go to your inbox and open the email that contains the attachment that needs signing.
- Click the airSlate SignNow icon found in the right-hand toolbar.
- Work on your document; edit it, add fillable fields and even sign it yourself.
- Click Done and email the executed document to the respective parties.
With helpful extensions, manipulations to how do i integration electronic signature set up erp various forms are easy. The less time you spend switching browser windows, opening multiple accounts and scrolling through your internal files trying to find a doc is a lot more time and energy to you for other essential duties.
How to safely sign documents using a mobile browser
Are you one of the business professionals who’ve decided to go 100% mobile in 2020? If yes, then you really need to make sure you have an effective solution for managing your document workflows from your phone, e.g., how do i integration electronic signature set up erp, and edit forms in real time. airSlate SignNow has one of the most exciting tools for mobile users. A web-based application. how do i integration electronic signature set up erp instantly from anywhere.
How to securely sign documents in a mobile browser
- Create an airSlate SignNow profile or log in using any web browser on your smartphone or tablet.
- Upload a document from the cloud or internal storage.
- Fill out and sign the sample.
- Tap Done.
- Do anything you need right from your account.
airSlate SignNow takes pride in protecting customer data. Be confident that anything you upload to your account is secured with industry-leading encryption. Auto logging out will shield your user profile from unauthorised entry. how do i integration electronic signature set up erp out of your mobile phone or your friend’s phone. Safety is crucial to our success and yours to mobile workflows.
How to digitally sign a PDF with an iPhone or iPad
The iPhone and iPad are powerful gadgets that allow you to work not only from the office but from anywhere in the world. For example, you can finalize and sign documents or how do i integration electronic signature set up erp directly on your phone or tablet at the office, at home or even on the beach. iOS offers native features like the Markup tool, though it’s limiting and doesn’t have any automation. Though the airSlate SignNow application for Apple is packed with everything you need for upgrading your document workflow. how do i integration electronic signature set up erp, fill out and sign forms on your phone in minutes.
How to sign a PDF on an iPhone
- Go to the AppStore, find the airSlate SignNow app and download it.
- Open the application, log in or create a profile.
- Select + to upload a document from your device or import it from the cloud.
- Fill out the sample and create your electronic signature.
- Click Done to finish the editing and signing session.
When you have this application installed, you don't need to upload a file each time you get it for signing. Just open the document on your iPhone, click the Share icon and select the Sign with airSlate SignNow button. Your doc will be opened in the app. how do i integration electronic signature set up erp anything. In addition, utilizing one service for all your document management demands, everything is quicker, smoother and cheaper Download the application right now!
How to digitally sign a PDF file on an Android
What’s the number one rule for handling document workflows in 2020? Avoid paper chaos. Get rid of the printers, scanners and bundlers curriers. All of it! Take a new approach and manage, how do i integration electronic signature set up erp, and organize your records 100% paperless and 100% mobile. You only need three things; a phone/tablet, internet connection and the airSlate SignNow app for Android. Using the app, create, how do i integration electronic signature set up erp and execute documents right from your smartphone or tablet.
How to sign a PDF on an Android
- In the Google Play Market, search for and install the airSlate SignNow application.
- Open the program and log into your account or make one if you don’t have one already.
- Upload a document from the cloud or your device.
- Click on the opened document and start working on it. Edit it, add fillable fields and signature fields.
- Once you’ve finished, click Done and send the document to the other parties involved or download it to the cloud or your device.
airSlate SignNow allows you to sign documents and manage tasks like how do i integration electronic signature set up erp with ease. In addition, the security of your info is top priority. Encryption and private web servers can be used for implementing the most up-to-date capabilities in information compliance measures. Get the airSlate SignNow mobile experience and work more proficiently.


FAQs
-
What is airSlate SignNow and how does it help with electronic signatures?
airSlate SignNow is a powerful tool that empowers businesses to send and eSign documents efficiently. If you're wondering, 'How Do I Set Up Electronic signature in ERP?', SignNow integrates seamlessly with various ERP systems, allowing you to streamline document workflows and enhance productivity.
-
How do I set up electronic signature in ERP systems using airSlate SignNow?
To set up electronic signatures in your ERP system using airSlate SignNow, first, create an account and connect it to your ERP. Then, select the documents you want to send for signing and utilize our user-friendly interface to initiate the signing process. This straightforward approach ensures that you can easily answer, 'How Do I Set Up Electronic signature in ERP?' with confidence.
-
What are the pricing options for airSlate SignNow?
airSlate SignNow offers flexible pricing plans to accommodate businesses of all sizes. You can choose from monthly or annual subscriptions, with options that scale based on your usage needs. Understanding how pricing works is essential when considering 'How Do I Set Up Electronic signature in ERP?' as it impacts your budget.
-
What features make airSlate SignNow stand out for electronic signatures?
airSlate SignNow boasts a range of features that simplify the electronic signature process, including customizable templates, audit trails, and real-time notifications. These features not only enhance user experience but also provide security and compliance, ensuring you know 'How Do I Set Up Electronic signature in ERP?' effectively.
-
Can airSlate SignNow integrate with my existing ERP software?
Yes, airSlate SignNow offers seamless integrations with popular ERP software, making it easy to incorporate electronic signatures into your existing workflows. You can quickly find guides and support on 'How Do I Set Up Electronic signature in ERP?' to ensure a smooth integration process.
-
What are the benefits of using airSlate SignNow for electronic signatures?
Using airSlate SignNow for electronic signatures can signNowly reduce turnaround times and improve document tracking. This leads to enhanced efficiency and reduces paper waste, making it a sustainable choice for businesses. Knowing 'How Do I Set Up Electronic signature in ERP?' is crucial for reaping these benefits.
-
Is airSlate SignNow secure for handling sensitive documents?
Absolutely! airSlate SignNow employs robust security measures, including encryption and secure data storage, to protect your sensitive documents. As you explore 'How Do I Set Up Electronic signature in ERP?', rest assured that your data is safe and compliant with industry standards.
-
How do I find the password I used when I set up my electronic signature?
It is not possible to find the password that you have used while setting up your electronic Signature. You have to create new electronic signature.For more visit: https://www.signer.digital
-
How do I set up different signatures for replies and new emails in Outlook 2011 for Mac?
It's not quite as easy as in Windows Outlook.When you are composing an email, there's a "Signatures..." button which, when clicked, shows a dropdown letting you choose from the ones you created, or you can choose "Edit Signatures..." to create one.I'm sure you figured that out. The key is to not specify a "Default" signature (or rather leave the default signature as "None").Create one signature called, say "Compose" and another one called "Reply/Forward" (you may have to use another character besides "/").You'll have to manually add it yourself though each time.
-
How do I set up an electronic lab in my room in my first year of my engineering course?
For some test and measuring equipment scour EBay, Amazon or similar sites! You can pick up older, working, test equipment on eBay for low cost.Even a small electronics lab needs a few essentials: 1. Digital Volts-Ohm-Amp meter (one will get you by but two will allow you to measure Volts and Current at the same time), 2. A variable DC power supply is best but you can also use the appropriate configurations of dry cells to power your circuits, 3. Oscilloscope (Digital Storage Oscilloscope (DSO) or Analog or both if you can afford it) to observe voltage waveform responses of your circuits try to find a scope with 2 input channels and 100MHz BW. You will find that the price will vary with Bandwidth with the lower BW ones being less expensive and used analog being the cheapest. 4. A function generator or Arbitrary Waveform Generator (AWG) to provide input stimulus, 5. Solderless Bread Board or two (for prototyping circuits). If you’re going to save your circuits for any length of time you’ll probably want to make them more permanent, so you will also need a temperature controlled Soldering Iron like the Hakko model 888D, which will serve you well for years, and vector prototyping boards, rosin core solder (SN63–PB37), solder wick, needle nose pliers, wire cutters, a few feet of AWG #22 solid wire. That is really about it, not much really. In today’s world I’d also throw in a microprocessor evaluation board there are several on the market: Arduino, Parallax Inc. Propeller, Raspberry PI, etc.Next hook yourself up with some components. You will probably have to buy some of your parts like passives like resistors and discrete components like transistors and diodes but check out manufacture’s web sites, TI, Freescale, National Instruments, Maxum, etc. A lot of them offer free samples of their components to engineers and students to play with mainly because it builds customer relationships and sometimes results in a design win for them. Even if they won’t it doesn’t hurt to ask.You can do most of this designing with simulation software such as Simulation Program with Integrated Circuit Emphasis (SPICE) but in my humble opinion building the design in hardware and probing around will greatly enhance your understanding.A picture of my basic lab equipment:
-
How do I delete my Quora account?
Quora allows users to delete their account if they choose to do so. Deleting your Quora account means that the following content will be removed from public view: your profile including photos and bio, your answers, comments, blog posts, votes, endorsements, and messages. Questions you may have asked will remain, since questions on Quora are community owned, but will not be associated with your name publicly. Deletion of your account is not reversible once the process is complete. Alternatives to deletion include: 1. Deactivation [ https://www.quora.com/How-do-I-deactivate-my-Quora-account-Can-it-be-reactivated-later/answer/Quora-Official-Account ] 2. Edit your Quora Privacy Settings [ https://www.quora.com/How-can-I-edit-my-Quora-Privacy-Settings/answer/Quora-Official-Account ] 3. Deleting individual pieces of content, such as answers, comments, or posts If you are certain you wish to delete your account, visit your account privacy settings and choose “Delete Account”. Once you confirm, your account will be deactivated immediately and the deletion process will begin. If you login during the next 14 days, the account will be reactivated and deletion will be canceled. Once the 14-day grace period has expired and your account has been deleted, your content and profile will be permanently deleted, and personal data associated with your account will be removed from Quora’s databases. Keep in mind that your content may have been republished or shared by others outside of Quora. Account deletion here does not remove any links or data hosted by others. If you have further questions regarding account deletion, contact us using our contact form [ https://www.quora.com/contact ].
-
How do I set up Tally ERP 9 (Multi user) for multiple locations using server/cloud?
Click here for Digital SignatureHow to Install Tally.ERP 9 Multi User and activate the license using promotional rental code:Download the latest version of Tally.ERP 9 from www.tallysolutions.comAfter downloading, there are essentially three steps:1. Installing Tally.ERP 9 on the Server 2. Activate the promo rental license 3. Configuring clients (workstations) to work on Tally.ERP 91. Installing Tally.ERP 9 on the ServerStep 1: Double click on the Install.exe to execute the installer.Step 2: Click the button "Next" to continue the Installation.Step 3: In Tally.ERP 9 Setup screen, in the field that reads "application directory", you can specify where you would like to have Tally.ERP 9 application files. By default, Tally will select C drive; if you want to change from C drive to D, you can do so. Once you specify the Tally.ERP 9 folder path, click "Next".Step 4: Click on "Install".Step 5: You will get the message "Tally.ERP 9 Installed Successfully". Click the button "Continue" to install "license Server".Note: License Server is used for ensuring that workstations connected in the network are able to work on Tally.ERP 9.Step 6: For installing License server ensure that "License Server" radio button is selected and click the button "Next" and Install.You will get the message, Tally License server 4.0 Installed successfully. You can click on Finish to close the Wizard.2. Activation of LicenseStep 1: Start Tally.ERP 9 -> Click on Activate License.Step 2: Click on Activation of Promotional rental license.a) Click on activation in single user mode if you are deploying this on a desktop.b) if you want to deploy a multi-user, please select "Option (1) Install and Start License Server in this system".Step 3: Enter the promotional code provided to you as in the screen below (Eg: BPP.sudheendra@tallysolutions.com) and then enter your email ID and press ENTER.Step 4: You will get the below screen and then press ENTER.Step 5: Click on Unlock license.Step 6: Check your mailbox you will receive the Unlock key.Type or copy and paste (Ctrl+Alt+V) the Unlock Key and then press ENTER, and get started with Tally.ERP 9.Press Enter button and you will get the message "Congratulation, Tally.ERP 9 Activated Successfully".3. Configuring the workstations to work on Tally.ERP 9Step 1: One can either copy the downloaded Tally.ERP 9 installer (Setup.exe) or map the folder on the server where the Setup.exe is located.Double click on the Install.exe to execute the installer file.Step 2: Click "Next" to continue the Installation.Step 3: Click on the radio button on the label that reads as "Use License Server". Here you need to specify your Server name or server IP address and click on "Next".Note: By default Port number will be 9999. You have the flexibility of changing the port number from 9999 to 65000.Step 4: Click on "Install".Step 5: Click on Finish. Now you are all set to start using Tally.ERP 9. Repeat the same step on other workstations from which you would like to use Tally.ERP 9.
-
How can I set up an employee in Tally ERP 9 for their payroll?
Main Menu in Tally.ERP 9Press F11 -> Accounting FeaturesSet yes to Payroll Set upEnable Cost Centers from the sam screen.Accept the form by pressing Control +ANow, your main Menu screen will give you 2 more optionsPayroll master under Accounts to create all payroll mastersPayroll Voucher under Transactions to pass payroll entriesGo to Payroll Masters you will find employee master creation formSimply, open that, type the employee name, Group if you have any departmentfill up the joining date, Date of birth, Pan number etc if you want to else simply accept the screen by pressing Control +A and your first employee in Tally Payroll is created!Payroll in Tally was one of the best Feature I loved most when I was working with accounts department with a company had to process salary for 150 employees with EPF, ESI etc and this Feature helped to complete everything just in 5 minutes every month!MahendraLearn TDL online or buy readymade tdl online
-
How do you set up your signature on the iPhone?
Your results may vary...
-
Information Security: How much do electronic signatures cost?
signNow is an Apple & Google loved secure e-signature solution. Pricing merely depends your requirement. Check out the pricing of signNow here.
-
How do I register a startup in India? How much money and time does it take? If am currently only 17, what issues will I face dur
Algorithm for starting a Private Limited Company: Engineer's View Personally I believe, If someone is starting a company with long term perspective or to bring some change through their unique Product/Services, one must go for Private limited firm. Prime reason for this is easy to raise funds from Angels/VC in case you go for investment. Step 1. Registration of Company 1. Name Selection: Check whether your desired company name is available or not at MCA website [ http://www.mca.gov.in/ ]. Name must be unique & must resemble with business you intend to do (highlighted one). EX: Arihant Labs Retail Services Pvt. Ltd 2. Registration of Name at ROC: Name approval usually takes maximum of 14 days. This is done online through MCA website. Moreover, you need to apply with at least 4 names for approval with a writeup about significance of names with main business of the company. 3. 1. Documents Required: 2. 1. Options for names for the proposed Company (on the basis of preference) 2. Amount of Share Capital; proposed shareholding ratio 3. A paragraph on the proposed major line of business of the company (main objects) 4. City of Registered Office. 5. Copy of ownership deed/sale deed(if property is owned) 6. Copy of rent agreement with NOC (if property is rented) 7. Copy of latest electricity bill/telephone bill/mobile bill for both directors 8. Copy of latest electric bill/telephone bill for the registered office proof. 4. Obtaining DIN & DSC: 5. 1. Documents Required 2. 1. PAN Card copies for directors and shareholders. 2. Voter ID/Passport/Driving License for directors and shareholders. 3. Occupation of the Directors for directors and shareholders. 4. E-Mail IDs of all directors and shareholders. 5. Phone Numbers for all directors and shareholders. 6. Photos for directors and shareholders 6. Company Incorporation: After above mentioned formalities have been completed, we need to file following forms/docs in Rs 100 stamp paper: 7. 1. Affidavits for non- acceptance 2. INC 9, INC 10 3. DIR 2 4. NOC : This is required to be filed by the owner of the property on which your company will be situated. 5. Subscriber Sheets of MOA & AOA 6. Documents required for filling MOA & AOA 7. 1. Must be filled on OWN handwriting 2. Passport size photos 3. Sheets needs to be witnessed by CA/CS/Advocate Step 2. Obtaining PAN/TAN: After company gets incorporated, you may apply for PAN/TAN. Step 3. Trade Licence in case you are selling PRODUCTS: This is required in some places for carrying out sales. You can obtain this from local Municipality. Step 4. VAT/CST registration for selling Products: For selling intra-state, you need VAT registration & for selling inter-state, you need to register for CST. 1. Documents Required: 2. 1. Trade Licence 2. Company Incorporation Certificate 3. PAN card of company as well as of all the directors 4. Proof of residence of Directors 5. Proof of occupancy of place of business (Rent agreement/ ownership deed, Rent Bills etc) 6. MOA & AOA of company 7. Current Account in the name of company in any national bank Step 5. Service tax registration for Service Industry: In India, you need to pay service tax of 14.5% on every services you have charged customer for. 1. Documents Required: 2. 1. Company Incorporation Certificate 2. PAN card of company as well as of all the directors 3. Proof of residence of Directors 4. Proof of occupancy of place of business (Rent agreement/ ownership deed, Rent Bills etc) 5. MOA & AOA of company 6. Current Account in the name of company in any national bank That's All folks! Your STARTUP is up to Conquer the World. UPVOTE & SHARE your views/issues We at labkafe [ http://labkafe.com/ ], prefer taxmantra [ http://taxmantra.com/ ] for our legal requirements.
Trusted esignature solution— what our customers are saying


Get legally-binding signatures now!
Frequently asked questions
How do i add an electronic signature to a word document?
How to provide authorize electronic signature?
How to rotate sign image on pdf?
Get more for How Do I Set Up Electronic signature in ERP
Find out other How Do I Set Up Electronic signature in ERP
- Independent contractor car salesman agreement form
- Agree agreed or agreement require the agreement to be form
- Prisoner of war utilization by the united states army 1776 form
- Independent contractor production assistant contract form
- This agreement hereinafter referred to as contract is made form
- Full text of ampquoteric ed365369 the community college form
- Independent contractor drafting agreement form
- Real estate salesman agreement independent contractor form
- Phycor inc tn law insider form
- Independent contractor tree surgeon agreement form
- Terms pool ampampamp spa industry search form
- Health maintenance organization hmo group certificate of form
- What to consider when drafting arbitration agreements law360 form
- Paving services contract form
- Employment agreement vivian lopez blanco secgov form
- The state of texascounty of hidalgocontract for service form
- Roofing services contract form
- Hereinafter quotemployerquot and form
- The project gutenberg ebook of the works of robert g form
- Full text of ampquota treatment of the fundamental principles of the form