Make Sign Proof with airSlate SignNow
Award-winning eSignature solution


Improve your document workflow with airSlate SignNow
Versatile eSignature workflows
Instant visibility into document status
Simple and fast integration set up
Make sign proof on any device
Advanced Audit Trail
Rigorous protection requirements
See airSlate SignNow eSignatures in action


airSlate SignNow solutions for better efficiency
Our user reviews speak for themselves


Why choose airSlate SignNow
-
Free 7-day trial. Choose the plan you need and try it risk-free.
-
Honest pricing for full-featured plans. airSlate SignNow offers subscription plans with no overages or hidden fees at renewal.
-
Enterprise-grade security. airSlate SignNow helps you comply with global security standards.

Your step-by-step guide — make sign proof
Using airSlate SignNow’s eSignature any business can speed up signature workflows and eSign in real-time, delivering a better experience to customers and employees. make sign proof in a few simple steps. Our mobile-first apps make working on the go possible, even while offline! Sign documents from anywhere in the world and close deals faster.
Follow the step-by-step guide to make sign proof:
- Log in to your airSlate SignNow account.
- Locate your document in your folders or upload a new one.
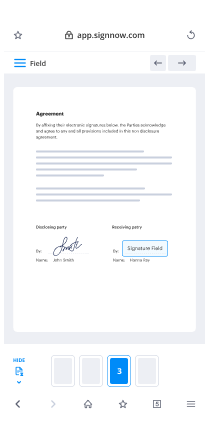
- Open the document and make edits using the Tools menu.
- Drag & drop fillable fields, add text and sign it.
- Add multiple signers using their emails and set the signing order.
- Specify which recipients will get an executed copy.
- Use Advanced Options to limit access to the record and set an expiration date.
- Click Save and Close when completed.
In addition, there are more advanced features available to make sign proof. Add users to your shared workspace, view teams, and track collaboration. Millions of users across the US and Europe agree that a system that brings people together in one cohesive workspace, is exactly what companies need to keep workflows working easily. The airSlate SignNow REST API enables you to integrate eSignatures into your app, website, CRM or cloud. Check out airSlate SignNow and enjoy quicker, easier and overall more effective eSignature workflows!
How it works
airSlate SignNow features that users love


See exceptional results make sign proof with airSlate SignNow
How to complete and eSign a PDF online
Try out the fastest way to make sign proof. Avoid paper-based workflows and manage documents right from airSlate SignNow. Complete and share your forms from the office or seamlessly work on-the-go. No installation or additional software required. All features are available online, just go to signnow.com and create your own eSignature flow.
A brief guide on how to make sign proof in minutes
- Create an airSlate SignNow account (if you haven’t registered yet) or log in using your Google or Facebook.
- Click Upload and select one of your documents.
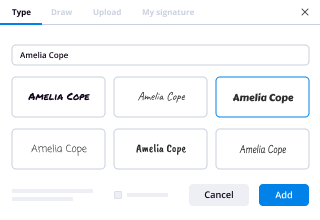
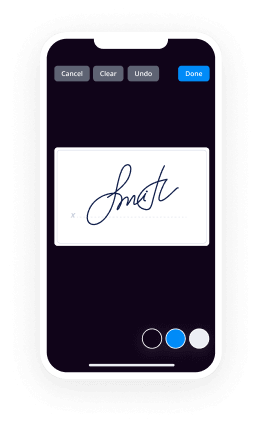
- Use the My Signature tool to create your unique signature.
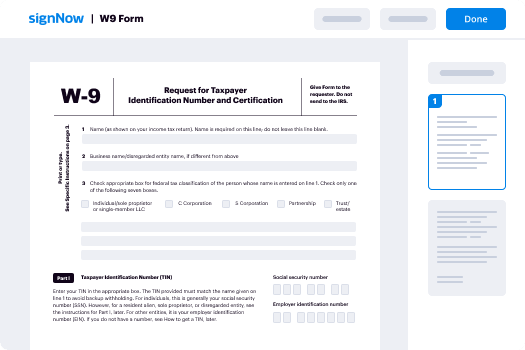
- Turn the document into a dynamic PDF with fillable fields.
- Fill out your new form and click Done.
Once finished, send an invite to sign to multiple recipients. Get an enforceable contract in minutes using any device. Explore more features for making professional PDFs; add fillable fields make sign proof and collaborate in teams. The eSignature solution gives a secure process and works based on SOC 2 Type II Certification. Make sure that your information are protected so no one can change them.
How to eSign a PDF in Google Chrome
Are you looking for a solution to make sign proof directly from Chrome? The airSlate SignNow extension for Google is here to help. Find a document and right from your browser easily open it in the editor. Add fillable fields for text and signature. Sign the PDF and share it safely according to GDPR, SOC 2 Type II Certification and more.
Using this brief how-to guide below, expand your eSignature workflow into Google and make sign proof:
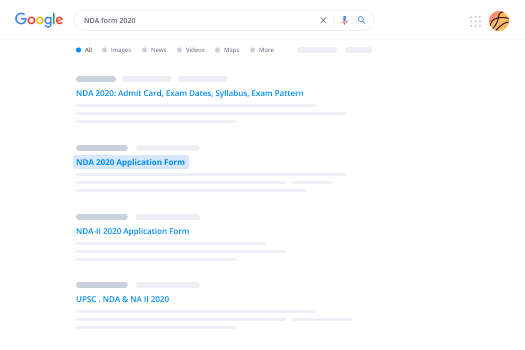
- Go to the Chrome web store and find the airSlate SignNow extension.
- Click Add to Chrome.
- Log in to your account or register a new one.
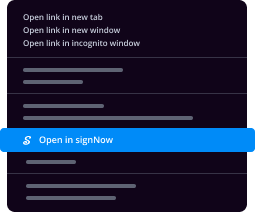
- Upload a document and click Open in airSlate SignNow.
- Modify the document.
- Sign the PDF using the My Signature tool.
- Click Done to save your edits.
- Invite other participants to sign by clicking Invite to Sign and selecting their emails/names.
Create a signature that’s built in to your workflow to make sign proof and get PDFs eSigned in minutes. Say goodbye to the piles of papers on your desk and start saving money and time for extra essential duties. Selecting the airSlate SignNow Google extension is an awesome convenient choice with many different benefits.
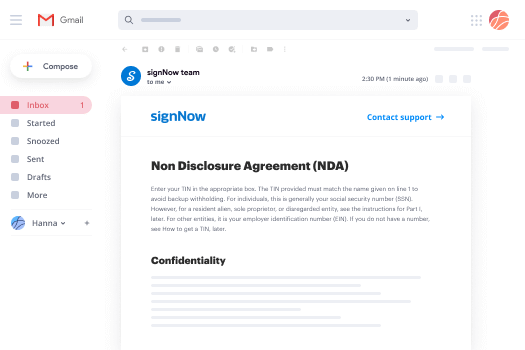

How to eSign an attachment in Gmail
If you’re like most, you’re used to downloading the attachments you get, printing them out and then signing them, right? Well, we have good news for you. Signing documents in your inbox just got a lot easier. The airSlate SignNow add-on for Gmail allows you to make sign proof without leaving your mailbox. Do everything you need; add fillable fields and send signing requests in clicks.
How to make sign proof in Gmail:
- Find airSlate SignNow for Gmail in the G Suite Marketplace and click Install.
- Log in to your airSlate SignNow account or create a new one.
- Open up your email with the PDF you need to sign.
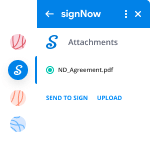
- Click Upload to save the document to your airSlate SignNow account.
- Click Open document to open the editor.
- Sign the PDF using My Signature.
- Send a signing request to the other participants with the Send to Sign button.
- Enter their email and press OK.
As a result, the other participants will receive notifications telling them to sign the document. No need to download the PDF file over and over again, just make sign proof in clicks. This add-one is suitable for those who like concentrating on more important things instead of wasting time for nothing. Enhance your daily monotonous tasks with the award-winning eSignature platform.

How to sign a PDF file on the go without an app
For many products, getting deals done on the go means installing an app on your phone. We’re happy to say at airSlate SignNow we’ve made singing on the go faster and easier by eliminating the need for a mobile app. To eSign, open your browser (any mobile browser) and get direct access to airSlate SignNow and all its powerful eSignature tools. Edit docs, make sign proof and more. No installation or additional software required. Close your deal from anywhere.
Take a look at our step-by-step instructions that teach you how to make sign proof.
- Open your browser and go to signnow.com.
- Log in or register a new account.
- Upload or open the document you want to edit.
- Add fillable fields for text, signature and date.
- Draw, type or upload your signature.
- Click Save and Close.
- Click Invite to Sign and enter a recipient’s email if you need others to sign the PDF.
Working on mobile is no different than on a desktop: create a reusable template, make sign proof and manage the flow as you would normally. In a couple of clicks, get an enforceable contract that you can download to your device and send to others. Yet, if you truly want an application, download the airSlate SignNow app. It’s comfortable, quick and has an intuitive design. Take advantage of in seamless eSignature workflows from your office, in a taxi or on a plane.
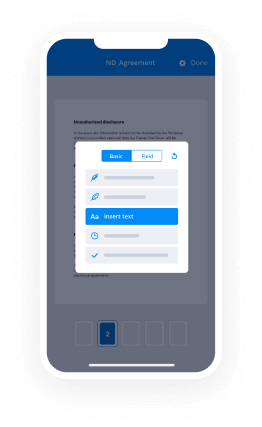
How to sign a PDF having an iPhone
iOS is a very popular operating system packed with native tools. It allows you to sign and edit PDFs using Preview without any additional software. However, as great as Apple’s solution is, it doesn't provide any automation. Enhance your iPhone’s capabilities by taking advantage of the airSlate SignNow app. Utilize your iPhone or iPad to make sign proof and more. Introduce eSignature automation to your mobile workflow.
Signing on an iPhone has never been easier:
- Find the airSlate SignNow app in the AppStore and install it.
- Create a new account or log in with your Facebook or Google.
- Click Plus and upload the PDF file you want to sign.
- Tap on the document where you want to insert your signature.
- Explore other features: add fillable fields or make sign proof.
- Use the Save button to apply the changes.
- Share your documents via email or a singing link.
Make a professional PDFs right from your airSlate SignNow app. Get the most out of your time and work from anywhere; at home, in the office, on a bus or plane, and even at the beach. Manage an entire record workflow effortlessly: make reusable templates, make sign proof and work on documents with partners. Turn your device right into a powerful business instrument for closing deals.
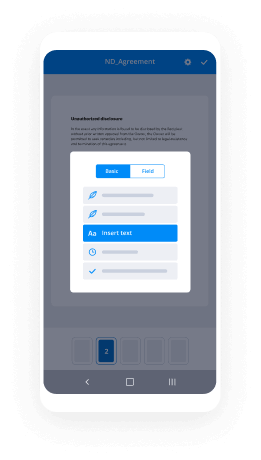
How to sign a PDF using an Android
For Android users to manage documents from their phone, they have to install additional software. The Play Market is vast and plump with options, so finding a good application isn’t too hard if you have time to browse through hundreds of apps. To save time and prevent frustration, we suggest airSlate SignNow for Android. Store and edit documents, create signing roles, and even make sign proof.
The 9 simple steps to optimizing your mobile workflow:
- Open the app.
- Log in using your Facebook or Google accounts or register if you haven’t authorized already.
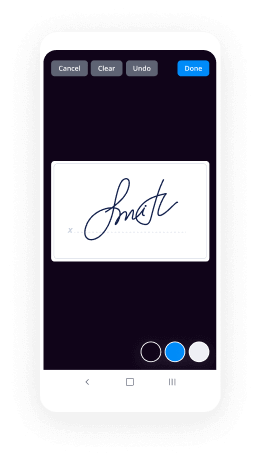
- Click on + to add a new document using your camera, internal or cloud storages.
- Tap anywhere on your PDF and insert your eSignature.
- Click OK to confirm and sign.
- Try more editing features; add images, make sign proof, create a reusable template, etc.
- Click Save to apply changes once you finish.
- Download the PDF or share it via email.
- Use the Invite to sign function if you want to set & send a signing order to recipients.
Turn the mundane and routine into easy and smooth with the airSlate SignNow app for Android. Sign and send documents for signature from any place you’re connected to the internet. Generate professional PDFs and make sign proof with a few clicks. Come up with a perfect eSignature workflow using only your smartphone and increase your total productivity.
Get legally-binding signatures now!
What active users are saying — make sign proof


Related searches to make sign proof with airSlate SignNow

How to make sign proof
hi foxy friends this is sarah from foxy's domestic side and this is the birthday girl i made these lawn signs for the birthday girl and that is correct i went online to see if i could rent some lawn signs and i found out that they are 100 plus dollars to rent for 24 hours so i thought that i would make them myself so i went online there are no tutorials out there so i'm going to show you how i made this birthday sign for the birthday girl come along with me as i show you how i do this thanks for watching please enjoy this video so the first thing you want to do when you're making your yard sign is to figure out how tall you want the letters there are so many yard signs out there in different varying heights and widths and all the above so what i decided is i knew that i was going to put it on my front lawn i decided how big i wanted the letters at first i thought i wanted the letters to only be 18 inches and then when i went outside and held up my ruler that's 18 inches i realized oh that's kind of small i want it bigger and more grandiose so that's how i ended up with 23 and a half ish inches because the cricut mat can only cut up to 23 and a half i made sure that i wasn't gonna have to have four pieces i only wanted it to be two halves so that it was going to be a lot easier to stitch together on the corrugated plastic i decided to go with 23 and a half and then however wide it needed to be to make it look right each letter is definitely is like 23.47 inches high correlating with is whatever the letter is so like the p is not going to be is going to be wider than i for example just decide what size you want before you do a knee printing when i first bought the vinyl i kind of had in my head that i was going to be 18 inches not realizing that i wanted 24 inches and i miscalculated so i ended up having to order more vinyl just figure that it's going to take about four feet of vinyl per letter because mostly because let's say for the h for example you're going to have the whole h and then you're going to have half of it be 23 inches and the other half is 23 inches to make a full h which is now almost four feet just kind of calculate that out i think in my head i wasn't calculating out that there was going to be two halves so make sure that you calculate that there's going to be two halves when you order your vinyl sometimes you could kind of piece together the second half of like the two peas onto one depending on what color scheme you wanted it only worked out i think once or twice for me that it was the same color and i could use the other half these are the things you're going to need i'm filming this on corrugated plastic um it helps if you have a long ruler this is a quilting ruler straight edge is going to help you cut the corrugated plastic easier a squeegee a box cutter of some sort and h bracket and i will leave a link to everything that i have down below and then i previously i cut out all of my letters already so i have all of these letters this is my cricut design space for the happy birthday there's a little bit a few letters up here because the letters that i was doing are different colors i put the like letters with the same colors just so it was easier for me to print that's the only reason i did it this way also the files are pretty big so i just decided for ease of how fast cricut was processing that i would just put like letters together so if you're all your letters are the same you might just want to split it up so that it makes the file size smaller so i did this birthday sign for my daughter i'm going to show you how i'm going to do it for my son because i already have the happy birthday i just need to write his name out so i'm going to start from the beginning it's called a bigger than matte qriket project so right now i'm going to write the c so c all right and the font i used is called all star font i got it onto font all star font all right so now this is the part where you want to make sure that you're in the parameters for the height of what will cut on your cricut mat because you only want it to cut in two sections so i know that i want this the height to be no more than 23 and a half in height so you can i'm scrolling out this is as large as it gets so this is how big it is and so what you want to do to get the two sides is go to your shapes over here pick a square square will pop up over here you kind of move it i want to take off the block and then i want to make this bigger than the shape but i don't want to exceed 11 and a half on the width because that's my max that i can go so i'll make it somewhere around here 11.4 just to it's almost 11.4 so you can see where that is i want to kind of get some so when you're placing this to cut it into two halves obviously this letter is not wider than 24 inches so i can put this basically anywhere i want to help me so that when you put both sides together it's the easiest because if i put it like this it might be a little easier but i feel like having just this post just trying to connect these two things and they're smaller is easier for me so that's what i'm going to do and you're going to use the same amount of vinyl really because you can't really reuse it so what you do here is you go select both of them over here like this and then down here there's a slice function so you click the slice what that does is it slices it so you want to get rid of the box now delete that there's an extra layer on here so you delete that and i can change this to black just so it matches and now you have two halves then you want to make sure that you oh that these are these are one piece if you want to save on vinyl you can definitely make these two pieces and lay them down separate i just found it just as easy to lay them down as one so it doesn't matter how you cut it but if you want to save on vinyl which i might do because i am kind of running out of vinyl um i'll probably do this in two sections that's how you do the sea i'll just gonna finish his name up but that's how i did everything in cricut i just did each letter like this i created the letter i made the size that i wanted and then i sliced it so that there was two halves so that i will print one this side on in one go and then this side on the other go let's continue on our tutorial i've now done about 12 letters so i feel like i have a better grasp on how to do this part the less bubbles okay so we're gonna start with the contact paper i use contact paper from you can use dollar tree this is from target just because that's where i was when i bought it and so i this is already used i used this last night but it's pretty new i found that i could get probably like three ish letters per before it kind of started getting all crumpled so what you want to do is turn it to the sticky side down and then attach it to your counter or whatever you're putting it on so rub it down right here and then i flip it over you're gonna lay your letter down like this and then i kind of start it and i kind of roll it down so it doesn't get any bubbles because i find if you get the if the bubbles are on the contact paper when you put it down they will show up when you put it on the corrugated plastic so i've kind of pushed it down a little this letter e is a little bit harder because um it's there's so much of it so there's a little few bubbles here so you really want to make sure that this side is stuck down so that's going to really help you so you can use your scraper and really get it down and then i use my scraper like this i scrape down trying to do it evenly i think it would work even better if i had a bigger scraper sometimes the contact paper gets ahead of me so see how it kind of made a little bubble so i peel it back and i do it again so try and get this as smooth as possible before putting it on the corrugated plastic works so much better so there's a few bubbles that you try and work out if you can if you can't you know you can't avoid bubbles altogether so it's just it's not possible i tried even when i did this part perfect i still got bubbles on my letter okay so now that this is pretty bubble free as you can see i'm going to bring it up and then we're going to take it outside so you want to i've been labeling them because it's two sheets for each okay i'm gonna peel this off [Music] so here's the letters this is kind of the part that's a little tricky because you kind of have to guess nothing is going to be perfect so i kind of just try and line it up so it's straight here on an edge and straight here on edge so i don't have to cut all the sides so i try and get one edge lined up you don't have too many tries so once you kind of put it down you have to put it down i have been successful in getting it up [Music] but the first couple were definitely you could tell you saw my first one that i did okay so i'm going to set this down got my squeegee um this kind of laid down a bit so we're just trying all right so it's down and we're just going to do that same thing with the squeegee hope for the best just kind of let it lay where it goes and rips out pretty nice sometimes you can like squeegee out the bubbles but the other part of this letter is a letter b so i have the other part of this so we're going to like i said before attach this to whatever surface you're doing using you want to try and get it as straight as possible and as tight as possible so you don't have any bubbles in the middle fold it over a little bit just to get really stuck gonna lift up lift it up smooth it out i already have a bubble we're gonna peel it back a little kind of crinkle this a bit pick it up back side is like one of the harder letters too this is the hard part linen stuff up this is also one of those things where you just have to trust it and stick it down and hope for the best especially since i'm lining up three things [Music] okay i'm gonna try and do it maybe this way first try and get it lined up here see i'm just gonna do it and hope for the best she can literally be here forever if you don't just do it you know as long as it touches it i'm happy it worked out there's a few bubbles that's a pretty good alignment though all right do you see that there's like tiny little bubbles right there these are tiny so they're not too big of a deal but if you slit it in the direction that the corrugated plastic is it hides it a lot better i've noticed so if you slid it in the direction of the corrugated plastic and honestly you can't see anything when you put it outside from like far away yeah there's one right here it's kind of a bigger one you just slice it in the direction of the corrugated plastic so there's all these little tiny ones and i probably won't bother with those you know there's a really big one one over here and if you just slice it in the direction of the corrugated plastic it goes away it's best if you cut out all of your vinyl so that on the corrugated plastic you can maximize your space so you can do if you have two y's you can do the y's one right side up and one upside down or if you have different leather like two peas you can do them upside down into each other so that you can maximize your space on your corrugated plastic because it's not expensive but it's not super cheap either so you want to maximize your space what i thought i was going to need i didn't need as much because i didn't take into account that i would be able to kind of piece them together like tetris that worked out really well but you always want to buy more than enough so that you don't run out and have to rent out to home depot or order something from amazon last minute because that's the worst when you get into a groove of a project and you don't have enough stuff okay we are day of the birthday and i wanted to give you some tips that i realized as i was putting these signs together these ones right here um the h the h stakes are 18 inches and then i ended up buying some 30 inch ones and then these little tiny eight inch ones because her name bella is going to be in the front and then birthday is going to be in the middle and then the happy is going to be at the top and so i wanted them to be tiered so that you can see them i did realize that these h stakes have this little thing right here where the letter will rest on so you want to make sure that all those are at the same level that being said i realized the r and the a and the birthday the a and the h um these are only five inches apart so they were not going to fit in here so i had to add the um center back into the r take that into consideration when you are making your letters and then this y i originally was going to use those five inch ones but i had to buy these 30 inch ones which was 10 inches across so i had to add the outsides and you can see that i've just taped on the other side of them to attach the center luckily i had the center still so i kept every all the scraps all right so let's lay these out on the grass and set it up do [Music] this is the h that i did at the very beginning and it was kind of crooked and i had a whole bunch of mistakes but when it's on the sign you can't really tell from far away so don't worry about the small stuff so that is how i made the lawn signs i know it looks hard but once you get the first couple done it goes a lot faster and you kind of find your groove and how you how the vinyl works best with your corrugated plastic i know it took me a few letters um i did film the very first letter that i did which was the r h something like that but i did not just i decided not to show you just because it was just a hot mess and i found a better way to do it um towards maybe the fifth or sixth letter i figured out a better way to get the vinyl to stick onto the transfer paper so i didn't show you the first letter so i might have referred to it a couple times but it did not actually show it to you if that first letter it was just like a hot mess the letters were all bubbly and there's like a lot of bubbles i ended up not doing it again and you saw in that last clip that you can't see it from far away so it just looks you feel like it's when you do the letters you feel like they're all bubbly and they don't look good but when you step back you can't really see those bubbles and you can't see the little slits that you made to kind of smooth down the bubbles so don't worry about it it's going to be it's going to look great if you put it on your lawn people are never going to be closer to it than 20 30 feet away so no one ever sees it and even that very first the first couple letters that i did there was a lot of bubbles and i kind of just had to go through with my x-acto knife and kind of flatten the bubbles a little bit you can still kind of see it but you know what it turned out great in the end and the most important thing is that my daughter loved it she was so shocked if you have any questions let me know down below i'm happy to answer any questions that you may have i know that this video is kind of long and i tried to fit everything into one video instead of making it two videos so there might be some things that i missed that i didn't realize that i missed so let me know down below i'll answer all the questions that you have whatever sign you do decide to make have fun with it make sure you give yourself a couple weeks i gave myself two or three weeks to finish this so it wasn't doing all this work because happy birthday bella was a lot of letters to have to do so i broke it up into three days i think and it worked out great i never got fatigued about doing the letter so it never became one of these things like oh i don't want to do it so just make sure you space it out have fun with it i hope you enjoyed this video if you like this video give it a thumbs up thanks for watching and i'll see you next time bye i love my size even more than that goodbye
Show moreFrequently asked questions
How can I create a PDF file that someone can sign?
How do I sign and scan a PDF?
How can I virtually sign a PDF file?
Get more for make sign proof with airSlate SignNow
- Vouch Home Improvement Contract Template signature
- Vouch Home Improvement Contract Template sign
- Vouch Home Improvement Contract Template digital signature
- Vouch Home Improvement Contract Template eSign
- Vouch Home Improvement Contract Template digi-sign
- Vouch Home Improvement Contract Template digisign
- Vouch Home Improvement Contract Template initial
- Vouch Home Improvement Contract Template countersign
- Vouch Home Improvement Contract Template countersignature
- Vouch Home Improvement Contract Template initials
- Vouch Home Improvement Contract Template signed
- Vouch Home Improvement Contract Template esigning
- Vouch Home Improvement Contract Template digital sign
- Vouch Home Improvement Contract Template signature service
- Vouch Home Improvement Contract Template electronically sign
- Vouch Home Improvement Contract Template signatory
- Vouch Home Improvement Contract Template mark
- Vouch Home Improvement Contract Template byline
- Vouch Home Improvement Contract Template autograph
- Vouch Home Improvement Contract Template signature block
- Vouch Home Improvement Contract Template signed electronically
- Vouch Home Improvement Contract Template email signature
- Vouch Home Improvement Contract Template electronically signing
- Vouch Home Improvement Contract Template electronically signed
- Vouch Consulting Contract Template eSignature
- Vouch Consulting Contract Template esign
- Vouch Consulting Contract Template electronic signature
- Vouch Consulting Contract Template signature