Tell Digital Sign with airSlate SignNow
Award-winning eSignature solution


Get the robust eSignature capabilities you need from the solution you trust
Choose the pro service created for professionals
Set up eSignature API with ease
Work better together
Tell digital sign, within minutes
Cut the closing time
Maintain important information safe
See airSlate SignNow eSignatures in action


airSlate SignNow solutions for better efficiency
Our user reviews speak for themselves


Why choose airSlate SignNow
-
Free 7-day trial. Choose the plan you need and try it risk-free.
-
Honest pricing for full-featured plans. airSlate SignNow offers subscription plans with no overages or hidden fees at renewal.
-
Enterprise-grade security. airSlate SignNow helps you comply with global security standards.

Your step-by-step guide — tell digital sign
Adopting airSlate SignNow’s electronic signature any company can speed up signature workflows and sign online in real-time, supplying a greater experience to consumers and employees. tell digital sign in a few simple steps. Our mobile-first apps make operating on the run feasible, even while offline! Sign contracts from any place in the world and close up deals faster.
Take a walk-through guide to tell digital sign:
- Sign in to your airSlate SignNow profile.
- Find your document within your folders or upload a new one.
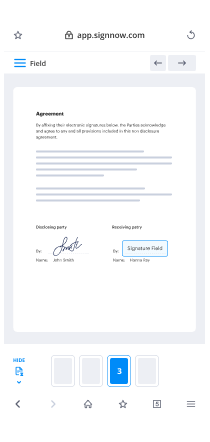
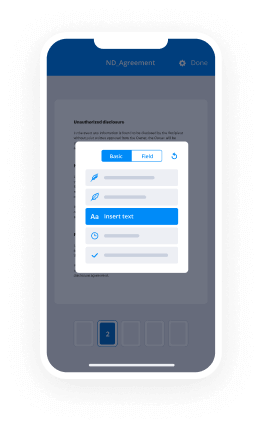
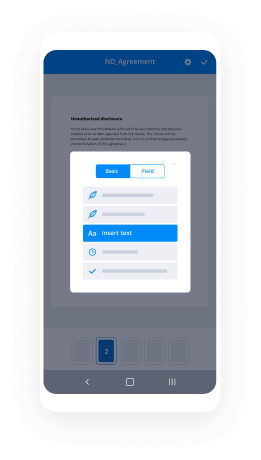
- Open up the template and edit content using the Tools menu.
- Drop fillable boxes, type textual content and eSign it.
- Add several signees by emails configure the signing order.
- Choose which individuals will receive an executed copy.
- Use Advanced Options to restrict access to the record and set an expiry date.
- Tap Save and Close when completed.
Moreover, there are more advanced features available to tell digital sign. Add users to your common digital workplace, browse teams, and monitor teamwork. Millions of people all over the US and Europe agree that a system that brings everything together in a single cohesive enviroment, is the thing that companies need to keep workflows functioning smoothly. The airSlate SignNow REST API enables you to embed eSignatures into your application, internet site, CRM or cloud. Try out airSlate SignNow and enjoy faster, smoother and overall more effective eSignature workflows!
How it works
airSlate SignNow features that users love


See exceptional results tell digital sign with airSlate SignNow

How to fill in and sign a document online
Try out the fastest way to tell digital sign. Avoid paper-based workflows and manage documents right from airSlate SignNow. Complete and share your forms from the office or seamlessly work on-the-go. No installation or additional software required. All features are available online, just go to signnow.com and create your own eSignature flow.
A brief guide on how to tell digital sign in minutes
- Create an airSlate SignNow account (if you haven’t registered yet) or log in using your Google or Facebook.
- Click Upload and select one of your documents.
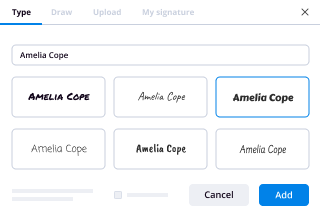
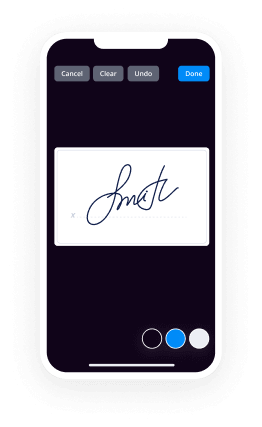
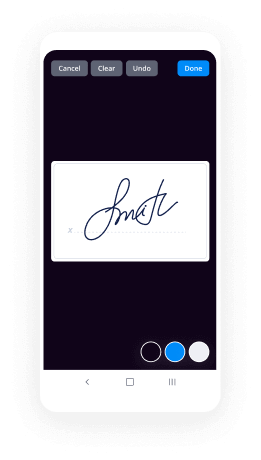
- Use the My Signature tool to create your unique signature.
- Turn the document into a dynamic PDF with fillable fields.
- Fill out your new form and click Done.
Once finished, send an invite to sign to multiple recipients. Get an enforceable contract in minutes using any device. Explore more features for making professional PDFs; add fillable fields tell digital sign and collaborate in teams. The eSignature solution supplies a reliable process and works based on SOC 2 Type II Certification. Ensure that all your data are protected so no person can change them.
How to eSign a PDF in Google Chrome
Are you looking for a solution to tell digital sign directly from Chrome? The airSlate SignNow extension for Google is here to help. Find a document and right from your browser easily open it in the editor. Add fillable fields for text and signature. Sign the PDF and share it safely according to GDPR, SOC 2 Type II Certification and more.
Using this brief how-to guide below, expand your eSignature workflow into Google and tell digital sign:
- Go to the Chrome web store and find the airSlate SignNow extension.
- Click Add to Chrome.
- Log in to your account or register a new one.
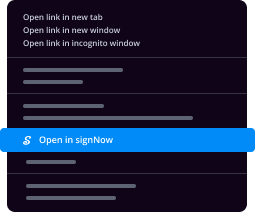
- Upload a document and click Open in airSlate SignNow.
- Modify the document.
- Sign the PDF using the My Signature tool.
- Click Done to save your edits.
- Invite other participants to sign by clicking Invite to Sign and selecting their emails/names.
Create a signature that’s built in to your workflow to tell digital sign and get PDFs eSigned in minutes. Say goodbye to the piles of papers sitting on your workplace and begin saving time and money for extra essential activities. Choosing the airSlate SignNow Google extension is a great convenient option with lots of advantages.
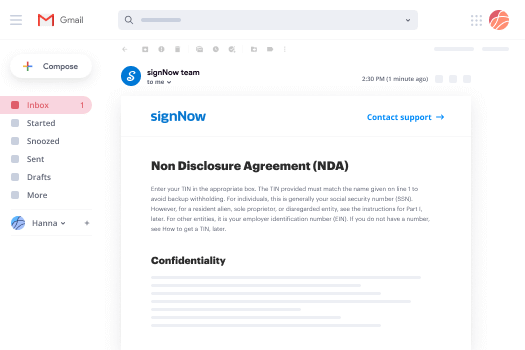

How to sign an attachment in Gmail
If you’re like most, you’re used to downloading the attachments you get, printing them out and then signing them, right? Well, we have good news for you. Signing documents in your inbox just got a lot easier. The airSlate SignNow add-on for Gmail allows you to tell digital sign without leaving your mailbox. Do everything you need; add fillable fields and send signing requests in clicks.
How to tell digital sign in Gmail:
- Find airSlate SignNow for Gmail in the G Suite Marketplace and click Install.
- Log in to your airSlate SignNow account or create a new one.
- Open up your email with the PDF you need to sign.
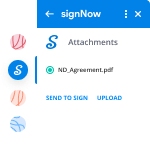
- Click Upload to save the document to your airSlate SignNow account.
- Click Open document to open the editor.
- Sign the PDF using My Signature.
- Send a signing request to the other participants with the Send to Sign button.
- Enter their email and press OK.
As a result, the other participants will receive notifications telling them to sign the document. No need to download the PDF file over and over again, just tell digital sign in clicks. This add-one is suitable for those who like focusing on more valuable tasks instead of wasting time for absolutely nothing. Boost your daily compulsory labour with the award-winning eSignature service.
How to sign a PDF file on the go with no app
For many products, getting deals done on the go means installing an app on your phone. We’re happy to say at airSlate SignNow we’ve made singing on the go faster and easier by eliminating the need for a mobile app. To eSign, open your browser (any mobile browser) and get direct access to airSlate SignNow and all its powerful eSignature tools. Edit docs, tell digital sign and more. No installation or additional software required. Close your deal from anywhere.
Take a look at our step-by-step instructions that teach you how to tell digital sign.
- Open your browser and go to signnow.com.
- Log in or register a new account.
- Upload or open the document you want to edit.
- Add fillable fields for text, signature and date.
- Draw, type or upload your signature.
- Click Save and Close.
- Click Invite to Sign and enter a recipient’s email if you need others to sign the PDF.
Working on mobile is no different than on a desktop: create a reusable template, tell digital sign and manage the flow as you would normally. In a couple of clicks, get an enforceable contract that you can download to your device and send to others. Yet, if you want an application, download the airSlate SignNow mobile app. It’s secure, quick and has an intuitive layout. Experience seamless eSignature workflows from your workplace, in a taxi or on an airplane.
How to sign a PDF file using an iPad
iOS is a very popular operating system packed with native tools. It allows you to sign and edit PDFs using Preview without any additional software. However, as great as Apple’s solution is, it doesn't provide any automation. Enhance your iPhone’s capabilities by taking advantage of the airSlate SignNow app. Utilize your iPhone or iPad to tell digital sign and more. Introduce eSignature automation to your mobile workflow.
Signing on an iPhone has never been easier:
- Find the airSlate SignNow app in the AppStore and install it.
- Create a new account or log in with your Facebook or Google.
- Click Plus and upload the PDF file you want to sign.
- Tap on the document where you want to insert your signature.
- Explore other features: add fillable fields or tell digital sign.
- Use the Save button to apply the changes.
- Share your documents via email or a singing link.
Make a professional PDFs right from your airSlate SignNow app. Get the most out of your time and work from anywhere; at home, in the office, on a bus or plane, and even at the beach. Manage an entire record workflow easily: make reusable templates, tell digital sign and work on PDFs with partners. Turn your device into a highly effective business instrument for executing deals.
How to sign a PDF file using an Android
For Android users to manage documents from their phone, they have to install additional software. The Play Market is vast and plump with options, so finding a good application isn’t too hard if you have time to browse through hundreds of apps. To save time and prevent frustration, we suggest airSlate SignNow for Android. Store and edit documents, create signing roles, and even tell digital sign.
The 9 simple steps to optimizing your mobile workflow:
- Open the app.
- Log in using your Facebook or Google accounts or register if you haven’t authorized already.
- Click on + to add a new document using your camera, internal or cloud storages.
- Tap anywhere on your PDF and insert your eSignature.
- Click OK to confirm and sign.
- Try more editing features; add images, tell digital sign, create a reusable template, etc.
- Click Save to apply changes once you finish.
- Download the PDF or share it via email.
- Use the Invite to sign function if you want to set & send a signing order to recipients.
Turn the mundane and routine into easy and smooth with the airSlate SignNow app for Android. Sign and send documents for signature from any place you’re connected to the internet. Build good-looking PDFs and tell digital sign with just a few clicks. Put together a perfect eSignature process with only your smartphone and improve your overall productivity.
Get legally-binding signatures now!
FAQs
-
What does Digital Signage mean?
Digital signage is a sub-segment of electronic signage. Digital displays use technologies such as LCD, LED, projection and eSignNow to display digital images, video, web pages, weather data, restaurant menus, or text. -
What does Digital Signage do?
Digital signage is a centrally controlled, content distribution platform by which to playback digital content to one or many displays or screens. Digital signage screens can be used for the relaying of any number of types of information; live weather, news, TV, menus, flights, calendars, adverts for example. -
How do you use digital signage software?
Suggested clip How To Use Digital Signage Software For Events - YouTubeYouTubeStart of suggested clipEnd of suggested clip How To Use Digital Signage Software For Events - YouTube -
What is digital signage used for?
Digital signage is used during exhibitions or marketing events to entice passersby. Digital signage aims to attract crowds to events and enhance visitor experience by making the experience memorable. Exhibitions use digital signage to create branding experiences. -
How effective is digital signage?
Here are some statistical data that proves the effectiveness of digital signage : \ufffc\u201c74% of customers say, an easy to read menu is their top priority.\u201d \u201c80% of adults have seen digital signage in the past month and 70% subsequently made an unplanned purchase.\u201d \u201cDigital signage has a recall rate of 83%.\u201d -
How effective are digital billboards?
Digital billboards generally start at around $3000/month in smaller cities and can go all the way up to $10,000/month in major metropolitan areas. ... Traditional billboards will almost always be more cost-effective over a longer period of time, but they also have their limits. -
How do digital signage systems work?
How does digital signage work? Digital signage's content is powered by a media player or system-on-a-chip which pushes content to a display. Users can then manage the content with a content management system, either on-site or within the cloud to change up content on the fly. -
How do digital signs work?
How does digital signage work? Digital signage's content is powered by a media player or system-on-a-chip which pushes content to a display. Users can then manage the content with a content management system, either on-site or within the cloud to change up content on the fly. -
How do you make a digital screen?
Step 1 \u2013 Understand the Goal of the Display. ... Step 2 \u2013 Design the Display the Same as a Website. ... Step 3 \u2013 Remove Clutter and Unnecessary Elements. ... Step 4 \u2013 Remember that Displays are Bigger than Computers and Smartphones. ... Step 5 \u2013 Remember the Call to Action. -
Why do LCD screens turn black?
Sunlight and Solar Clearing. Sun is the biggest enemy of LCD displays. It will cause them to heat up, discolor, and eventually turn black. The sun hits the display surface with 1250 watts/m2 of energy, which will cause the temperature of the Liquid Crystal cell to increase signNowly, even on the coldest of days.
What active users are saying — tell digital sign


Related searches to tell digital sign with airSlate airSlate SignNow

Tell digital sign
hi I'm Willie and thanks for coming to my channel thank you to everyone for being here tonight we're gonna talk about Raspberry Pi zero W and digital signage so let's take a look at exactly what I'm talking about now I use this in the real world first of all if you don't know what a Raspberry Pi zero is it is a low power very low cost computer and this is it it is really as a single board I'm gonna show you how big this is in just a second or how big it isn't and this is the kit that I use and we'll come back to that because we're going to do this in a few videos we're gonna set this up and get it going and then we're gonna do some things that they don't teach you about how to manipulate the firewall and things like that and kind of how we set up some best practices for security so the software that we're using is called screen ly open source edition and there's a couple different ways to get it but what we're going to do in this video is we're going to download the custom image and then we're gonna write it to our storage so first of all the Raspberry Pi does not come with a regular hard drive it comes with an SD card and this is the kit that I bought now I have to tell you this the one thing that you're gonna be missing from this kit is an adapter to take your microSD and make it a standard SD card so if you have purchased any other kits you can see this thing is tiny tiny but this actually is a micro SD card reader and you slide the micro SD card in here and then you just plug this into the USB to your computer or you can get you know the full-size adapters and then have a card reader and put it in somehow you're gonna have to write to the micro SD card so let's take a look at what is in this kit that you what do you get for 40 bucks so you get a few things the first thing you're gonna notice is you get a power adapter and this power adapter I believe is five point two volts one amp and so then it comes with the USB cable then the next thing you get is a case and this is called the official case and we'll take this out so you can see how small this is see it comes comes with a couple different tops for the case and one of them is so if you want to use the this one as if you want to use the GPIO headers that are on there so that's open there this other one I think is if you want to use the camera module but we're just going to use the standard case now if you want to get an idea of how small this really is I don't know if any of you use chapstick or like I use Burt's Bees so this is Burt's Bees and this is the case so it is not much bigger than my Burt's Bees so pretty pretty small and so you could put a little piece of velcro on this and put it on the back of the oh something else in the kit this must be for the came in there now it's got me wondering so we'll open this up so the other thing that's in here is it looks like we've got four little plastic feet that can go on the bottom of the case so I had no idea that this little ripping connector was in there so you know that's something else is in there we are likely not gonna use that for what we're doing then what you're really waiting for is what's in this package so I'm gonna go ahead and open this maybe you know I lost that new pocket and I mean pocket knife it flipped out of my pocket one day I think it's laying in a subway subway parking lot is in the subway sandwich restaurant so then you get another USB adapter because you'll notice here in a minute that these do not have full-size USB ports then you get the mini HDMI to standard HDMI adapter you get a heatsink but you may or may not need this depending on where you're deploying this app then you get a 16 gig SD card that has what they call noobs already on it but we're going to use this and we're gonna overwrite it with the screen link image and then this is the Raspberry Pi itself so I'm gonna show you this so this is this is it so where's my Burt's Bees so Burt's Bees so you can see yeah Burt's Bees works better than a banana here for scale so you'd have over here you have the right here's the mini HDMI then you've got power and USB this is powered over mini USB then you've got the camera connector over here and then you've got your GPIO pins so and I actually have another kit that comes with a you know a header that you can install in here you can do all kinds of stuff and then here's our SD SD card slot right there so yeah that's it that's a five dollar computer and this is what we're going to do our digital signage with so the first thing that we're gonna do is we'll put this guy we'll put it in the case it's just gonna fit down in there and there are little plastic pegs in the bottom so you can just slide it right over the little plastic pegs and if you were paying attention by the way this is the W so this has Wireless which is important because then we don't need any of the other we don't need like a sort of a ethernet dongle or anything like that so you put the Raspberry Pi in the case like that and then there's an opening here somewhere for our SD card you know we'll have to we'll have to pull this out put our SD card in it because that there is not a slot for that but then we'll put the top on it like this and this is how big this is your five dollar computer five dollar the computer that you're going to run Digital Signage on so we'll put that together let's hop over to if you've got any questions about the Raspberry Pi and any other projects they do with it we do with it I do have a game station upstairs where you can play all of my emulated games that I legally own so this is the kit I'm gonna leave a link to this down in the down in the description it will be my Amazon affiliate link and it does not change your price it just throws a couple bucks at the channel to keep things kind of rolling in I'll also put a link to screen light so we're gonna go over here and we are gonna download the custom image from github so they don't have the image for this yeah so we're going to scroll down to this one and we are gonna grab the 7 for 2017 screen leo se 4 gig image so go ahead and download this now it's worth noting that in the newer version of raspbian which is the version of debian that is used for the raspberry pi that as ssh is disabled now by default so what we're gonna do after we put the image on is we're gonna do a couple things but the first thing we're gonna do is we're gonna follow this instruction because we're not going to hook this up to a monitor until we get the network configured and and so the first time you're gonna see this you know in the next video excuse me is when i hook it up to my TV so we will enable SSH because we're going to want to get in there and we're gonna want to probably change a few things or take a look around and some of the options so will enable SS H and we will also set up our network and we'll all will do that all through will use a notepad plus plus to edit the file so you'll see that this guy is downloading once he's downloaded we'll be back okay so our download is complete so let's show this in the polar and we're gonna go ahead and extract this guy do you believe so see see this gives us an image so while that's extracting we are going to take our SD card out of the package and at the video blip there a little bit I am recording and extracting that extracting that file so all I have right now is I have my reader that I showed you so that's where I am going to put the card so I I'm gonna take the card and I'm gonna slide it in here just like this and now this thing looks just like a regular USB Drive make sure that's all seated properly and then we'll put it in the computer and see what happens so that is still extracting I better wait before you give the system anything else to do okay so that's all extracted and if we go into this folder you can see the image there so and I'm gonna take this guy and I'm going to put them in the computer and the computer is not going to but it is going to you see we get the 16 gig card and now we see Kanak it on there and so now we're going to open up etcher and I'll put a link to etch er as well but it's a program for writing operating systems or images to SD and USB cards but looks like it's running so we're gonna select an image and we're gonna go to downloads and we're gonna go to our screen ly and then we're gonna go to the image here it already selected our F Drive so now we're gonna say flash so this is gonna start it's gonna take a few minutes so it'll be right back okay so etcher is done so we're gonna pull this guy out real quick and we're gonna plug it back in and we're gonna see if all the files are there my editor was actually had two kind of funny so if you're at your axe kind of funny reinstall it maybe I don't know so let's check this out okay so it looks like we think maybe there so we want to come in here this is our boot drive and we want to first of all we're gonna rename this network da and I so we're gonna rename this just to network da and I yes then the next thing we're gonna do is we are gonna do a new and we're just gonna do a text document we're just gonna call this SSH and we're gonna take the extension off and say yes now that should enable SSH on first boot so well click let's edit the network I and I and put our network information in there okay so right now I'm not gonna sign a static IP we'll go into the edge router in the next video and find this so what we're gonna do in this video is we are going to put our SSID and our passphrase in so for this my SSID and my pass phrase first my SSI SSID is Willi digital signage and the passphrase is oh the wonderful places you'll go so we did that we're gonna save that will close this we'll come back in here we'll edit it one more time just to make sure that our edits took everything looks good so what we're gonna do is we're gonna we're gonna eject this guy so we eject it we're gonna take the the card out you can bring this back up we're gonna take the SD card out of this and we are going to mount it into the Raspberry Pi so I pulled the SD card out I am going to take the Raspberry Pi out of the case that we just put it in take just a second okay so we pull the Raspberry Pi out of the case we are gonna take the SD card and we are going to insert the SD card into I am trying to do this blind and fly blind but you get the idea so it's going to go into the PI just like that and then we're going to take this we're gonna put it back in the case we're gonna put it on the Wi-Fi we're gonna go and put this back together now but the next video I'm going to break this up into three segments and that's all I'm working on this week for videos besides network theory so we're gonna get these three videos out so you can have your own digital signage solution and and you're gonna see how well this thing really works so that's it for tonight's video so I'll put all the links to everything we use down there if you like this video please give me a thumbs up please subscribe please comment share please follow me on Twitter and Instagram please come back for part two and part three we're gonna do that this week that is what I am I am committed to so in the next video we're gonna boot this guy up we're gonna go into the web interface we're talking about the assets and how everything works and then we'll plug it into a TV and then the third video will be all about security on this guy so please come back for those please those Amazon affiliate links if you're gonna follow along with us and you know it doesn't change your price it just kicks a couple bucks to the channel so I can buy stuff like this and do these new tutorials so please come back and we'll see you in the next video
Show moreFrequently asked questions
What is the definition of an electronic signature according to the ESIGN Act?
How can I sign an emailed PDF?
Where can I sign my documents?
Get more for tell digital sign with airSlate SignNow
- Print electronically sign Copywriting Proposal Template
- Prove electronically signed warrant
- Endorse digi-sign Occupational First Aid Patient Assessment
- Authorize signature service Sorority Recommendation Letter Template
- Anneal mark Residential Construction Proposal Template
- Justify esign Website Development Proposal Template
- Try countersign certificate
- Add Merger Agreement electronically signed
- Send PandaDoc Sample Sales Proposal byline
- Fax Wedding RSVP esigning
- Seal Summer Camp Registration signature block
- Password Sales Proposal Template signature service
- Pass Shareholder Agreement countersign
- Renew Free Florida Room Rental Agreement signatory
- Test Landscaping Work Order initials
- Require Sublease Agreement Template eSign
- Comment benefactor email signature
- Boost eyewitness signature
- Compel undersigned initial
- Void Portrait Photography Contract Template template digi-sign
- Adopt Rights Agreement template esign
- Vouch Logo Design Quote template signature block
- Establish Maintenance Agreement template signature
- Clear Liquidation Agreement Template template email signature
- Complete Powerlifting Event template signatory
- Force Investor Proposal Template template digital signature
- Permit Glamping Business Plan template electronically signed
- Customize Partnership Agreement Amendment template byline