Write Signer Checkbox with airSlate SignNow
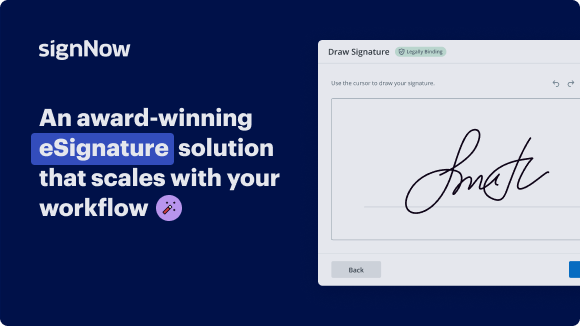
Award-winning eSignature solution


Upgrade your document workflow with airSlate SignNow
Agile eSignature workflows
Fast visibility into document status
Simple and fast integration set up
Write signer checkbox on any device
Detailed Audit Trail
Strict safety standards
See airSlate SignNow eSignatures in action


airSlate SignNow solutions for better efficiency
Our user reviews speak for themselves


Why choose airSlate SignNow
-
Free 7-day trial. Choose the plan you need and try it risk-free.
-
Honest pricing for full-featured plans. airSlate SignNow offers subscription plans with no overages or hidden fees at renewal.
-
Enterprise-grade security. airSlate SignNow helps you comply with global security standards.

Your step-by-step guide — write signer checkbox
Using airSlate SignNow’s eSignature any business can speed up signature workflows and eSign in real-time, delivering a better experience to customers and employees. write signer checkbox in a few simple steps. Our mobile-first apps make working on the go possible, even while offline! Sign documents from anywhere in the world and close deals faster.
Follow the step-by-step guide to write signer checkbox:
- Log in to your airSlate SignNow account.
- Locate your document in your folders or upload a new one.
- Open the document and make edits using the Tools menu.
- Drag & drop fillable fields, add text and sign it.
- Add multiple signers using their emails and set the signing order.
- Specify which recipients will get an executed copy.
- Use Advanced Options to limit access to the record and set an expiration date.
- Click Save and Close when completed.
In addition, there are more advanced features available to write signer checkbox. Add users to your shared workspace, view teams, and track collaboration. Millions of users across the US and Europe agree that a solution that brings everything together in a single holistic workspace, is the thing that enterprises need to keep workflows working smoothly. The airSlate SignNow REST API allows you to embed eSignatures into your app, internet site, CRM or cloud storage. Try out airSlate SignNow and get quicker, easier and overall more productive eSignature workflows!
How it works
airSlate SignNow features that users love


Get legally-binding signatures now!
FAQs
-
How do you add signers to airSlate SignNow?
Open your document in the airSlate SignNow editor and click Edit Signers. Add signers by clicking the blue silhouette icon. You can customize signer names and add their email addresses in the corresponding fields (or leave them blank). -
How do I add multiple signatures?
Sign using airSlate SignNow Open your document with airSlate SignNow. Select File and Request signatures. Add the email addresses of the signers and click Specify where to sign. Click the relevant area of the document to place signature fields. ... Once you have finished, click Send to email the recipients. -
Is airSlate SignNow legally binding?
airSlate SignNow documents are also legally binding and exceed the security and authentication requirement of ESIGN. Our eSignature solution is safe and dependable for any industry, and we promise that your documents will be kept safe and secure. -
How do you add multiple signers to airSlate SignNow?
How to add multiple signers to a document with airSlate SignNow. If you need more than one person to sign your document, simply add more signers to your eSignature invite and provide the necessary fields in the document for all your recipients to fill out. -
How do I send a document to multiple recipients in airSlate SignNow?
Turn your document into a template by clicking More >> Make Template. Once you've finished editing, close the document. Then, click More and select Bulk Invite from the menu. In the invite window, enter your recipients' emails.
What active users are saying — write signer checkbox


Replace recipient of document, Add check box and Sign
hello this time I will show you how to insert a checkbox nervous into Microsoft Office Word so you click it it will be checked ok so to do that you need enable the developer mode go to file then options then you need go to customize button then from the right side you will see developer manual let's check it then click OK after that you will see the developer mode enabled so you click that and the bomb you'll find the check box click that and it will automatically insert ok so how about if you want to insert a check mark like this check box like this so to do that you need to click the check check box then go back to the developer properties check properties and from here you have checked symbol you can change the symbol to only of them ok you can you can use spell face sad face for example if you want your sad face ok click OK then when you click you got children to check surface ok so from here once again you need a jacket highlight it and go to probably checked sample then you click then from the font you'll see the font from this found you go I need a bit higher then you can find the real checkbox okay then you click OK then they are when you click it it will change so how about if you have a years under no like bounnam option like true and false so then you click true when you select choose the false will uncheck automatically when you uncheck true the false will check how to Merkley like this okay so when you click that this one is checked but give you an check the other one will automatically check where are checked is this file automatically check so how to do this in the next video I'll show you all of that because you need to adapt it baby sleep of that okay so hope you enjoy this video and see you next video bye
Show more