Add Users to Your Subscription and Team
- Understanding Users, Subscriptions, and Teams in signNow
- Roles and Permissions: Subscription Admins, Team Admins, and Team Members
- Adding Users to Your Subscription via the Admin Console
- Inviting Users to Your Team
- Managing User Seats and Bulk Invitations
- Team Membership vs. Subscription Membership: Key Differences
- Troubleshooting Common Issues When Adding Users
Adding users to your signNow subscription and teams is a powerful way to streamline document workflows, enhance collaboration, and ensure everyone on your team has the right access to digital signature tools. Whether you’re an admin looking to expand your subscription or a team leader aiming to boost productivity, understanding the process and the differences between subscription and team membership is essential. This guide will walk you through everything you need to know — from user roles and permissions to step-by-step instructions for inviting users and troubleshooting common issues. By the end, you’ll be ready to manage your signNow users with confidence.
Understanding Users, Subscriptions, and Teams in signNow
In signNow, the concepts of users, subscriptions, and teams are distinct but interconnected. A signNow user is anyone with a valid account, capable of sending documents for signing, creating teams, and collaborating with others. Subscriptions determine which users have access to paid features, while teams are designed for document collaboration and sharing within groups. Users can belong to multiple teams and can be part of a subscription, a team, or both. This flexibility allows organizations to structure their workflows according to their unique needs. For example, a user might be a member of several teams for different projects, while only some of those users are covered under your paid subscription.
Roles and Permissions: Subscription Admins, Team Admins, and Team Members
Understanding roles and permissions is crucial for effective user management in signNow. Subscription Admins have the authority to manage the subscription, including adding or removing users, assigning seats, and overseeing billing. Team Admins, on the other hand, manage team membership and shared documents but do not control subscription-level access. Team Members can collaborate on documents within the team but have limited administrative privileges. For instance, Team Admins can view and manage documents shared within the team, add or remove members, and even transfer team ownership. Team Members can send documents for signing, create document copies, and generate reports, but cannot access private documents of other admins or owners. This clear separation of roles ensures security and efficient workflow management.
Adding Users to Your Subscription via the Admin Console
To add users to your paid signNow subscription, you must be a Subscription Admin. This process is managed through the Admin Console, which provides a centralized dashboard for user management. Begin by navigating to the Admin Console from your account’s sidebar. If you need to add more users than your current seat allocation allows, you can easily purchase additional seats. Once you have available seats, you can invite users individually by entering their email addresses or in bulk by uploading an Excel file. Each invited user receives an email invitation to activate their signNow account, ensuring a smooth onboarding experience. The Admin Console also allows you to monitor user status, resend invitations, and manage roles, making it a comprehensive tool for subscription management.


Step-by-Step: How to Add Users to Your Subscription
- Access the Admin Console Start from your signNow dashboard Click on the Admin Console link in the bottom left of your account interface. This opens the user management dashboard where you can view current users, available seats, and manage invitations.
- Check Available User Seats Ensure you have enough seats for new users If you have no free seats, navigate to the Subscriptions tab and click 'Get more seats' to increase your user allowance. This ensures you can add all the users you need without interruption.
- Invite Users Individually or in Bulk Choose the best method for your needs To invite users one by one, click the 'Invite User' button and enter each user's email address. For bulk invitations, use the 'Invite Users From .xls' button to upload an Excel file containing multiple email addresses. This is especially useful for onboarding large teams quickly.
- Add User Details and Send Invitations Personalize the invitation process Enter the user's email address and, if desired, their first and last name. Click 'Add User' to send an automatic email invitation. The invited user will receive instructions to activate their signNow account.
Inviting Users to Your Team
Team Admins can invite users to collaborate on documents within a team, regardless of whether those users are part of your subscription. To invite users, navigate to the 'My Teams' section, select your team, and click 'Add Users.' Enter the email addresses of the people you wish to invite and assign their roles if necessary. Invited users will receive an email with a link to join the team. If they do not already have a signNow account, they will be prompted to sign up. This process makes it easy to bring together collaborators from inside or outside your organization, fostering seamless teamwork.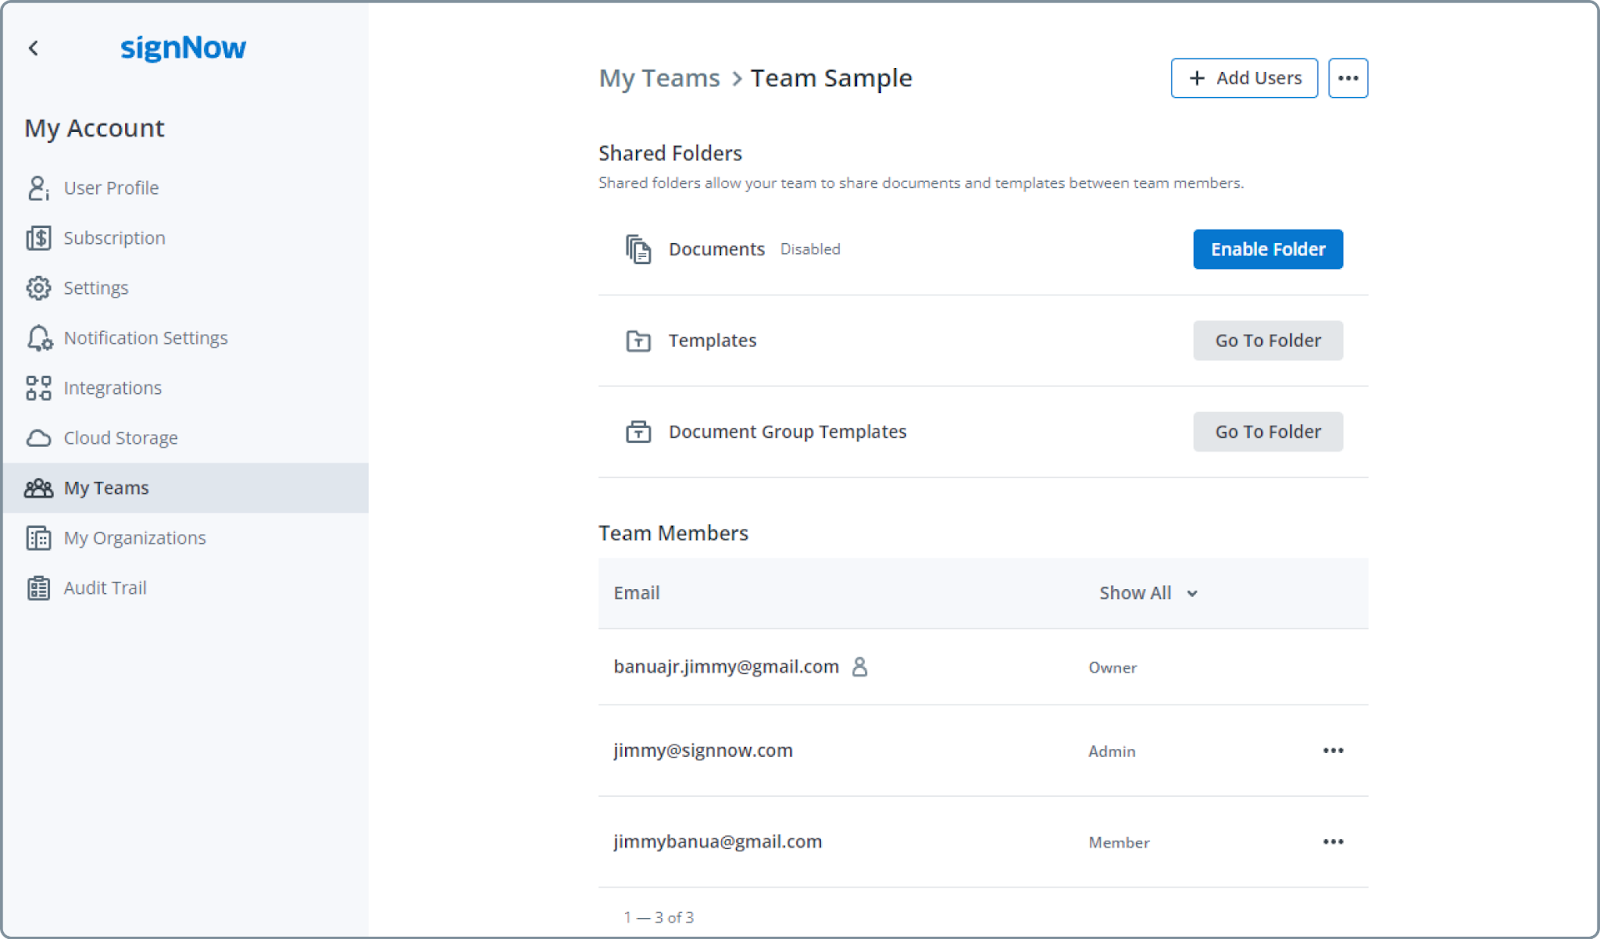

Get legally-binding signatures now!
Step-by-Step: How to Invite Users to Your Team
- Go to My Teams Access team management from your dashboard Click on 'My Teams' in the lower-left corner of your signNow main page. This section displays all teams you manage or belong to.

- Open Your Team Select the team you want to manage Find the relevant team and click 'Open Team' to access its management interface.

- Add Users to the Team Invite new members to collaborate Click the 'Add Users' button, enter the email addresses of the people you want to invite, and assign their roles if needed. Click 'Add to Team' to send invitations. Invited users will receive an email with instructions to join the team.

Managing User Seats and Bulk Invitations
Efficiently managing user seats is essential for scaling your organization’s use of signNow. The Admin Console provides a clear overview of your current seat allocation and usage. If you need to add more users than your current plan allows, simply click the 'Get more seats' button in the Subscriptions tab. For large teams, bulk invitations via Excel files streamline the onboarding process, saving time and reducing manual entry. You can also export your user list to CSV for record-keeping or compliance purposes. These features ensure that your team can grow without friction, and that you always have visibility into who has access to your subscription.
Team Membership vs. Subscription Membership: Key Differences
It’s important to distinguish between team membership and subscription membership in signNow. Team membership allows users to collaborate on shared documents and templates within a specific team, regardless of their subscription status. Subscription membership, on the other hand, grants users access to paid features and is managed by the Subscription Admin. Users can be part of multiple teams, and teams can include users from different subscriptions or even non-subscribers. This separation provides flexibility — for example, you can invite external collaborators to your team without adding them to your subscription. Conversely, adding a user to your subscription ensures they have access to all paid features, but does not automatically make them a member of any team. Understanding this distinction helps you structure your organization’s workflows for maximum efficiency.

Troubleshooting Common Issues When Adding Users
Occasionally, you may encounter issues when adding users to your subscription or team. Common problems include insufficient available seats, users not receiving invitation emails, or confusion between team and subscription membership. To resolve seat limitations, check your current allocation in the Admin Console and purchase additional seats if needed. If invitation emails are not received, ask users to check their spam or junk folders, and use the 'Resend Invite' option in the Admin Console. Remember that team and subscription memberships are managed separately — ensure you are inviting users through the correct interface for your intended purpose. For persistent issues, consult the signNow Help Center or contact support for personalized assistance.
Frequently Asked Questions
-
Can I add users to my subscription during a free trial?
No, you cannot add users to your subscription during a free trial. Each user must sign up individually for the trial using their own credentials. No payment information is required for trial sign-up.
-
What is the difference between a Team Member and a Subscription User?
A Team Member is someone who collaborates on documents within a specific team and may or may not be part of your paid subscription. A Subscription User is someone who has access to all paid features under your subscription. Team membership and subscription membership are managed independently.
-
How do I invite multiple users at once?
To invite multiple users at once to your subscription, use the 'Invite Users From .xls' option in the Admin Console. Upload an Excel file with the email addresses of the users you wish to invite. For teams, you can enter multiple email addresses in the 'Add Users' dialog.
-
What should I do if a user does not receive their invitation email?
If a user does not receive their invitation email, ask them to check their spam or junk folder. You can also resend the invitation from the Admin Console. If issues persist, contact signNow support for further assistance.
-
Do users need to be part of my subscription to join my team?
No, users do not need to be part of your subscription to join your team. You can invite any signNow user to your team, regardless of their subscription status.
-
Where can I find information about pricing and available plans?
For detailed information about signNow pricing and available plans, please visit our pricing page.