Using Zapier With SignNow
- Benefits of Integrating SignNow with Zapier
- Getting Started: Connecting SignNow to Zapier
- Understanding Triggers and Actions in SignNow for Zapier
- Popular Use Cases and Workflow Examples
- Creating and Customizing Zaps with SignNow
- Managing and Modifying Your SignNow Zaps
- Advanced Features: API, Webhooks, and Custom Integrations
- Troubleshooting Common Issues
Welcome to your comprehensive guide on using Zapier with SignNow! If you’re looking to automate your document workflows, connect SignNow to thousands of popular apps, and eliminate repetitive manual tasks, you’re in the right place. This page will walk you through the benefits, setup, customization, and advanced features of the SignNow Zapier integration, empowering you to streamline your business processes and boost productivity — all without writing a single line of code.
Benefits of Integrating SignNow with Zapier
Integrating SignNow with Zapier unlocks a world of automation possibilities for your eSignature workflows. With Zapier, you can connect SignNow to over 5,000 apps, including Google Sheets, Microsoft 365, Mailchimp, Dropbox, and more. This means you can automatically trigger document creation, send signature invites, store completed documents, and update records across your favorite platforms — all in real time.
By automating routine tasks, you reduce human error, save valuable time, and ensure that your document processes are always running smoothly. Whether you’re in sales, HR, legal, or operations, the SignNow Zapier integration helps you focus on what matters most: growing your business and delighting your clients.


Getting Started: Connecting SignNow to Zapier
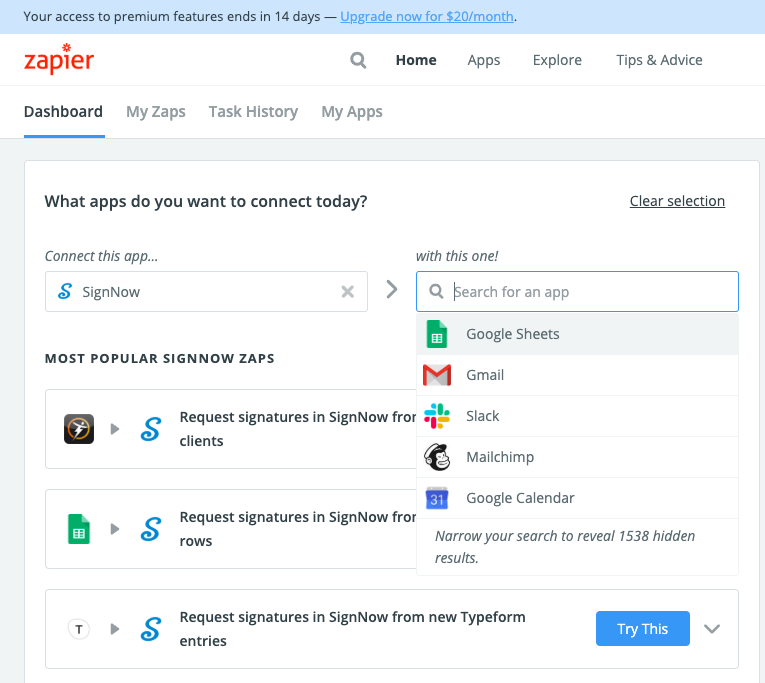
Getting started with SignNow and Zapier is refreshingly simple. First, you’ll need active accounts with both SignNow and Zapier. If you haven’t already, you can create a SignNow account and explore our plans on the pricing page. Once you’re set up, head over to Zapier and search for the SignNow app.
From there, you can connect your SignNow account to Zapier by following the on-screen prompts. Zapier’s intuitive drag-and-drop interface makes it easy to select SignNow as either a trigger or action app, depending on your workflow needs. You’ll be able to choose from a variety of ready-to-use Zaps or build your own custom automations from scratch.
Understanding Triggers and Actions in SignNow for Zapier
Zapier operates on a straightforward principle: every automation (called a "Zap") consists of a trigger and one or more actions. In the context of SignNow, a trigger could be an event like a document being completed, while an action might be sending a signature invite or creating a document from a template.
The most popular trigger is "Document Completed," which fires when all signers have finished signing a document. This can then prompt actions such as saving the signed PDF to Google Drive, updating a CRM record, or sending a notification email. On the action side, "Create Document From Template & Send Role-Based Invite" is a favorite, allowing you to generate documents, pre-fill fields, and send invites automatically based on data from another app.
Other available triggers and actions include uploading documents, extracting fields, sending free-form invites, and even canceling invites or deleting documents. This flexibility means you can tailor your automations to fit virtually any business scenario.


Get legally-binding signatures now!
Popular Use Cases and Workflow Examples
The SignNow Zapier integration is used across industries to automate a wide range of document workflows. Here are some popular examples:
- Sales: Automatically generate contracts from CRM data and send them for signature when a deal is marked as closed.
- HR: Trigger onboarding document creation and signature requests when a new employee is added to your HR system.
- Finance: Send invoices for signature and archive completed documents in cloud storage like Dropbox or Google Drive.
- Legal: Receive notifications or create tasks in project management tools when a document is signed or updated.
- Education: Auto-send permission slips or enrollment forms to parents when a new student is registered.

Creating and Customizing Zaps with SignNow
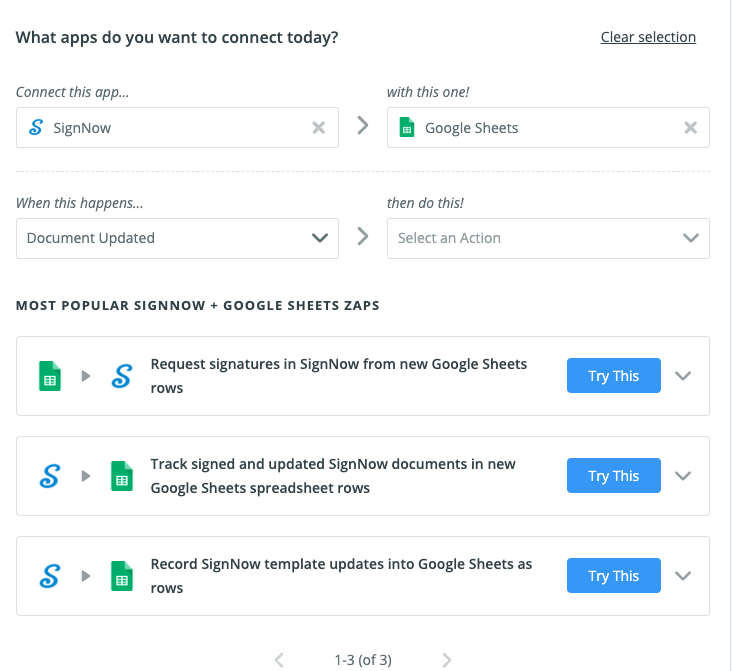
Building your own Zaps with SignNow is both powerful and user-friendly. Start by selecting your trigger app (such as Google Sheets, Salesforce, or your CRM) and defining the event that should kick off the workflow. Next, choose SignNow as the action app and specify what you want to happen — for example, create a document from a template and send a role-based invite.
You’ll be guided through each step, including selecting templates, mapping data fields, setting signer roles, and customizing messages. Zapier’s interface allows you to test each step, ensuring your automation works as intended before you turn it on. If you need more control, you can add filters, delays, or multiple actions to build complex, multi-step workflows.


Managing and Modifying Your SignNow Zaps
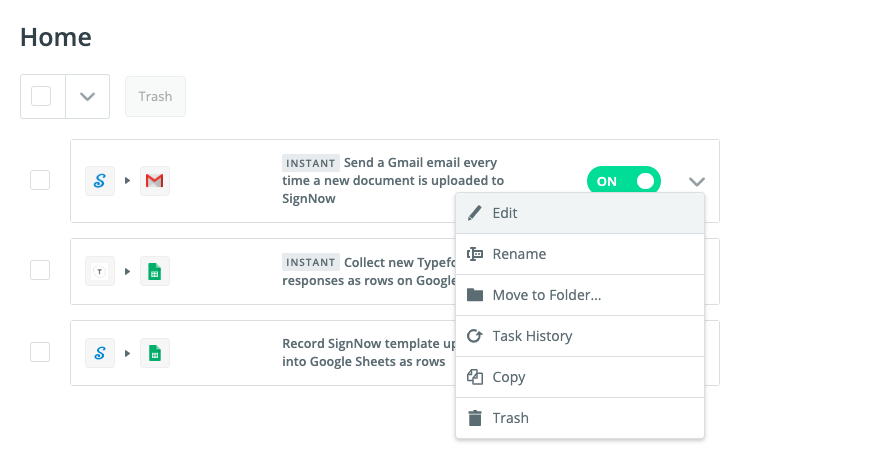
Once your Zaps are up and running, managing them is a breeze. Zapier provides a centralized dashboard where you can view, enable, disable, or edit all your automations. Each Zap is listed with its trigger and action summary, and you can quickly toggle them on or off as your business needs change.
You can also organize Zaps into folders, rename them for clarity, and review task history to troubleshoot or optimize performance. If you need to update a workflow — for example, to add a new signer or change a template — simply edit the Zap and test the changes before reactivating it. This flexibility ensures your automations always align with your evolving processes.
Advanced Features: API, Webhooks, and Custom Integrations
For users seeking even more customization, SignNow and Zapier support advanced features like API requests and webhooks. With the SignNow API, you can integrate eSignature functionality directly into your own apps, websites, or CRMs, enabling complex, multi-step workflows and data exchanges. Webhooks allow you to trigger actions in real time based on specific events, such as a document being signed or updated. These advanced options are ideal for organizations with unique requirements or those looking to build highly tailored automations. If you’re interested in exploring the SignNow API, check out our ultimate guide to the SignNow API or request a demo to see what’s possible.
Troubleshooting Common Issues
Even the best automations can occasionally hit a snag. Common issues include authentication errors, missing data fields, or changes in connected app permissions. If a Zap fails, Zapier’s dashboard will display an error message with details to help you diagnose the problem. Typical troubleshooting steps include:
- Re-authenticating your SignNow or connected app accounts
- Ensuring all required fields are mapped correctly
- Checking for recent changes in app permissions or API keys
- Reviewing Zap history for error logs and step-by-step execution
Frequently Asked Questions
-
What apps can I connect to SignNow using Zapier?
With Zapier, you can connect SignNow to thousands of popular apps, including Google Sheets, Microsoft 365, Salesforce, Mailchimp, Dropbox, Slack, and many more. This allows you to automate document workflows across your entire tech stack.
-
Do I need coding skills to use SignNow with Zapier?
No coding is required! Zapier’s intuitive drag-and-drop interface lets you build and customize automations visually. You simply select triggers and actions, map fields, and test your workflows — all without writing a single line of code.
-
Can I create custom workflows if there are no pre-built Zaps for my use case?
Absolutely. If you don’t find a ready-made Zap that fits your needs, you can create your own custom integration by selecting your desired trigger and action apps, defining the workflow steps, and mapping the necessary data fields. Zapier’s flexibility ensures you can automate virtually any process.
-
How do I manage or update my existing SignNow Zaps?
You can manage all your Zaps from the Zapier dashboard. Here, you can enable, disable, edit, rename, or organize your automations into folders. If you need to update a workflow, simply edit the Zap, make your changes, and test before turning it back on.
-
Where can I learn more about advanced integrations or get support?
For advanced integrations, check out the SignNow API documentation and Zapier’s developer resources. If you need help, both SignNow and Zapier offer extensive support centers, community forums, and direct assistance to help you troubleshoot or optimize your automations.