Send Invites and Manage Signers
- Understanding Invite Types in SignNow
- Preparing Documents and Templates for Signing
- Adding and Managing Multiple Signers
- Setting Signing Order and Roles
- Sending Invites: Single, Bulk, and Freeform Methods
- Uploading and Formatting Recipient Lists (CSV)
- Customizing Invitation Messages and Advanced Options
- Tracking Invite Status and Managing Signed Documents
Welcome to your comprehensive guide on sending invites and managing signers in SignNow. Whether you’re handling a single contract or orchestrating a complex, multi-signer workflow, SignNow provides the flexibility and control you need to streamline your document signing process. This page will walk you through every step — from understanding invite types and preparing documents, to managing signers, setting signing order, sending invites (single, bulk, or freeform), uploading recipient lists, customizing messages, and tracking the status of your documents.
Let’s dive in and unlock the full potential of SignNow for your organization.
Understanding Invite Types in SignNow
SignNow offers several ways to invite recipients to sign documents, each tailored to different workflow needs.
- Single Invite: Send a document to one or more recipients, specifying their roles and signing order. Ideal for contracts, agreements, or any document requiring a controlled signing process.
- Bulk Invite: Distribute a template to many recipients at once, each receiving their own unique copy to sign. Perfect for HR onboarding, policy acknowledgments, or mass agreements.
- Freeform Invite: Send a document without predefined fields, allowing recipients to add fields and sign wherever needed. This is great for flexible, ad-hoc signing scenarios.
Preparing Documents and Templates for Signing
Before sending out invites, it’s crucial to prepare your documents or templates with the appropriate fillable fields and roles. In SignNow, you can easily create templates, assign roles, and add fields for each signer.
For example, when preparing a W-9 form for multiple signers, you can assign fields to each recipient, ensuring everyone knows exactly where to sign or fill in information. The editor allows you to drag and drop fields, switch between signers, and visually distinguish roles with color coding. 
Once your document is ready, save it as a template for future use or proceed directly to sending invites.
Adding and Managing Multiple Signers
SignNow makes it simple to add and manage multiple signers for any document. You can add signers directly from the editor by clicking Edit Recipients, then entering each recipient’s role and email address. 
Switch between signers to assign fields, ensuring each recipient only sees and completes their designated sections. If you need to add yourself as a signer, just click Add Myself.
After configuring recipients, click Save and Close to return to your document list. This flexibility allows you to tailor the signing experience for each workflow, whether you’re managing a simple agreement or a complex, multi-step approval process. 
Get legally-binding signatures now!
Setting Signing Order and Roles
Controlling the order in which recipients sign is essential for many business processes. SignNow lets you set the signing order either when sending an invite or by editing the document or template settings.
When sending an invite, you can choose between At the same time (all signers receive the document simultaneously) or In Order (signers receive the document sequentially). 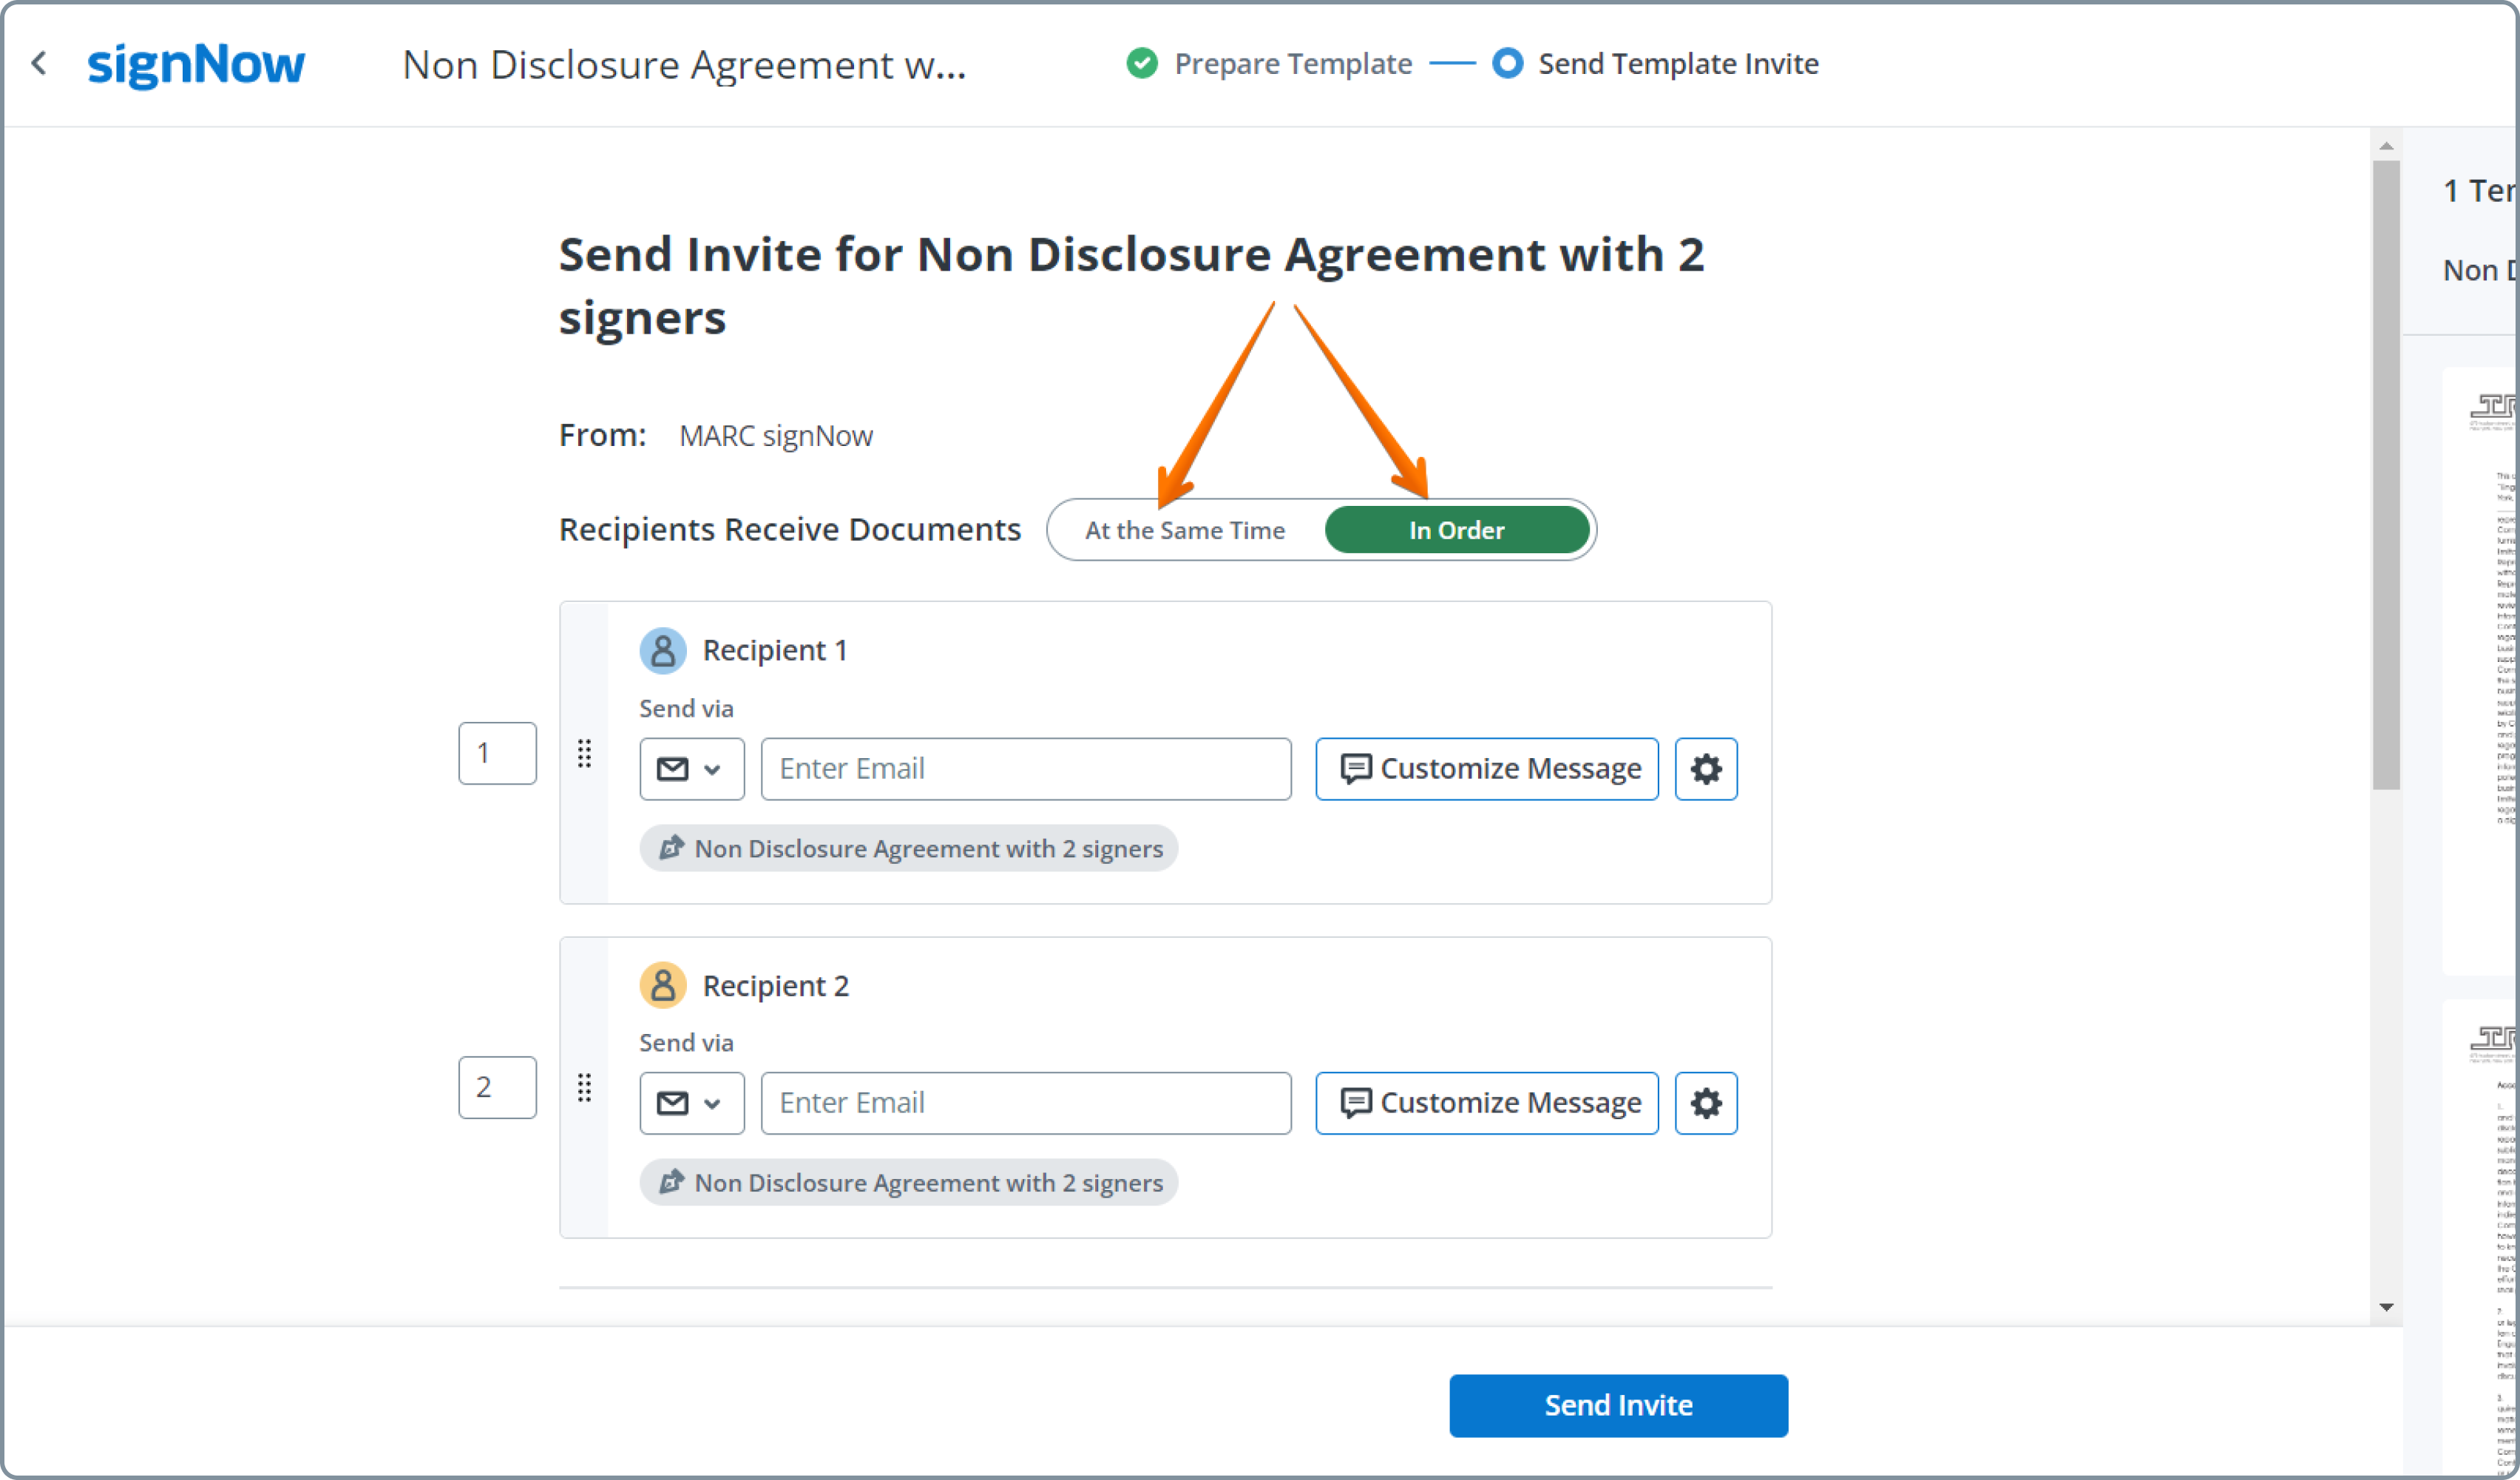
For more advanced workflows, edit the signing order from your account or template settings. Drag and drop signers into different steps, add CC recipients, and save default email addresses for recurring roles. This ensures your documents are signed in the correct sequence, maintaining compliance and process integrity. 
Sending Invites: Single, Bulk, and Freeform Methods
SignNow provides multiple ways to send invites, each designed for different scenarios:
- Single Invite: Select your document or template, click Invite to Sign, enter recipient details, customize the message, and send. You can also add CC recipients and configure advanced options like authentication and reminders.
- Bulk Invite: Distribute a template to many recipients at once. Each recipient receives a unique signing link and their own copy of the document. This is ideal for mass agreements or policy updates.

- Freeform Invite: Send documents without predefined fields, allowing recipients to add fields and sign anywhere. This is perfect for flexible, ad-hoc workflows.

Uploading and Formatting Recipient Lists (CSV)
For bulk invites, SignNow supports uploading recipient lists via CSV files, making it easy to manage large-scale signing campaigns. Prepare your CSV with a header row and columns for each recipient role. For example, if your template has roles like Supervisor, Employee, and HR Manager, your CSV should have separate columns for each. 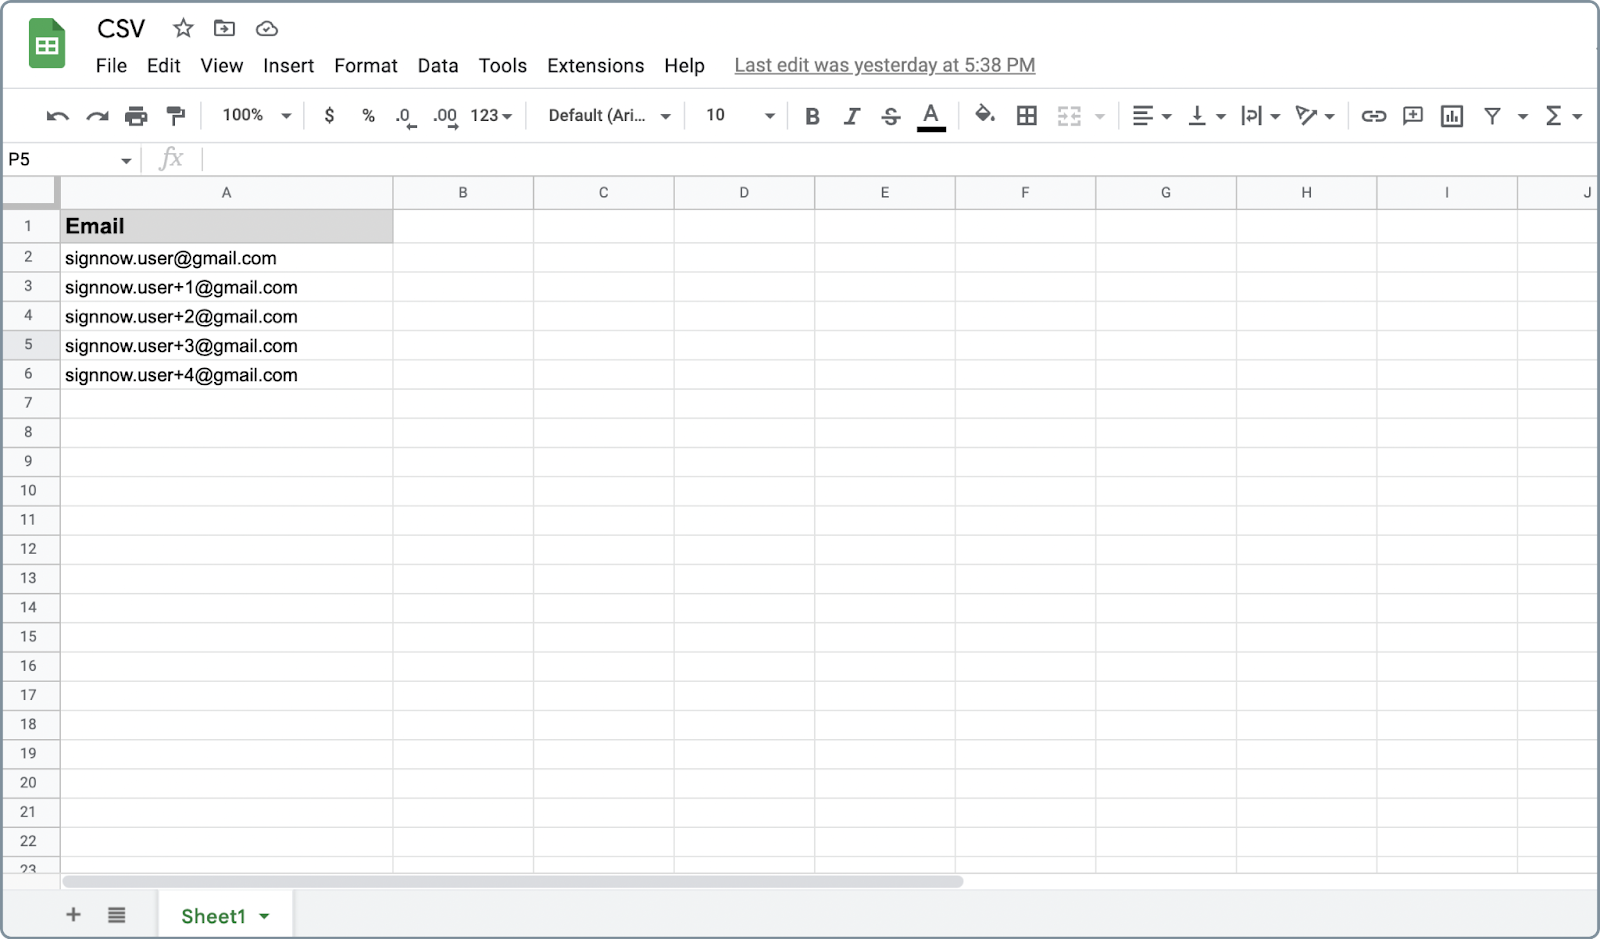
After uploading, map each column to the corresponding role in the Bulk Invite modal. This ensures every recipient receives the correct document and signing instructions. 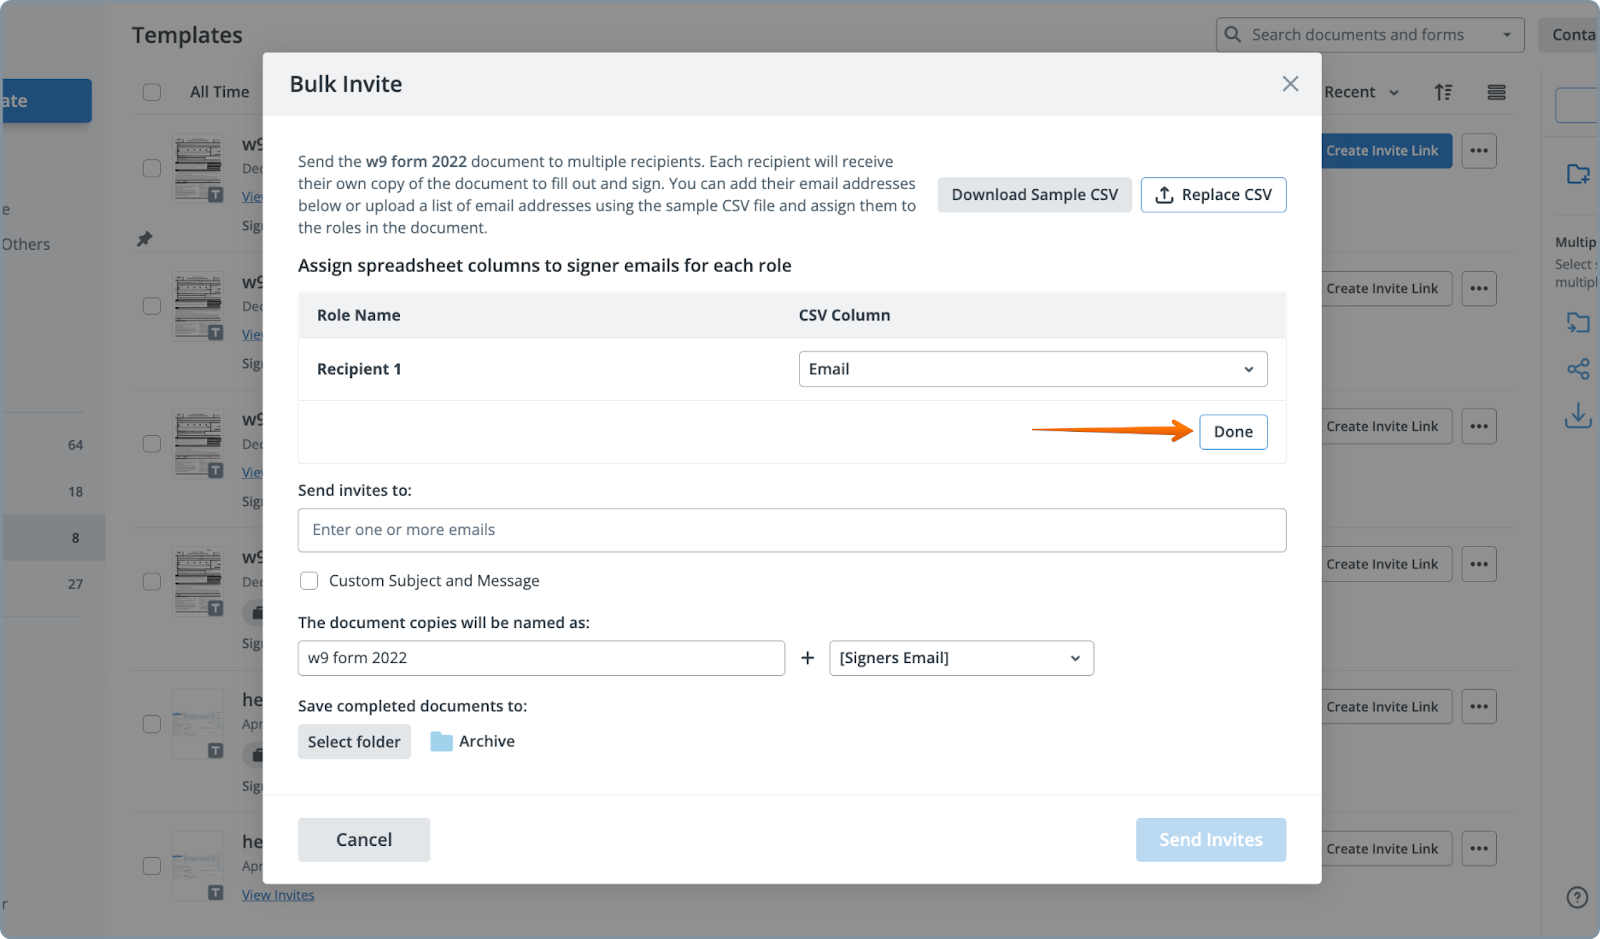
Review your recipient list, remove any unnecessary entries, and proceed to customize your invites.
Customizing Invitation Messages and Advanced Options
Personalizing your invitation emails can increase engagement and ensure clarity for your recipients. In SignNow, you can customize the subject and message for each invite, whether sending individually or in bulk. 
Advanced options are available via the gear icon next to each recipient, allowing you to set authentication methods, expiration dates, reminders, and permissions such as forwarding or declining the invite. 
For even more control, configure post-completion actions like redirecting signers to a specific URL or requesting payments upon signing. These features help you create a seamless, branded signing experience.
Tracking Invite Status and Managing Signed Documents
Once your invites are sent, SignNow makes it easy to track the status of each document and manage completed files. All sent invites and their statuses are accessible from your document or template folders. 
For bulk invites, open the designated folder to view all generated documents. Use the View Documents option to see which recipients have signed, who is pending, and download completed files as needed. 
Organizing signed documents into folders keeps your workflow tidy and ensures you can quickly locate any agreement when needed.
Frequently Asked Questions
-
Can I control the order in which signers receive and sign documents?
Yes, SignNow allows you to set a specific signing order for your recipients. You can configure this either when sending an invite (choosing between simultaneous or sequential signing) or by editing the signing order in your document or template settings. Drag and drop recipients into different steps to create multi-stage signing workflows.
-
How do I send a document to a large group of people at once?
Use the Bulk Invite feature to send a template to many recipients simultaneously. Prepare your template with roles, upload a CSV file with recipient emails, and map each column to the appropriate role. Each recipient receives a unique signing link and their own copy of the document.
-
What happens if I need to add or remove recipients after sending an invite?
If you need to adjust recipients after sending an invite, you can cancel the current invite and resend it with the updated recipient list. For ongoing workflows, consider updating your template or document settings before sending new invites to ensure accuracy.
-
Can I customize the email message sent to each recipient?
Absolutely. SignNow lets you personalize the subject and message for each recipient, whether you’re sending a single invite or a bulk invite. This helps clarify instructions and improves the recipient experience.
-
How do I track who has signed and who is still pending?
You can monitor the status of all invites from your document or template folders. For bulk invites, use the View Documents option to see a list of all generated documents and their signing status. You’ll know at a glance who has completed their part and who still needs to sign.
-
Where can I find information about SignNow pricing plans?
For up-to-date details on SignNow’s pricing plans and available features, please visit our pricing page.