When to Use Radio Buttons vs Checkboxes
- Understanding Radio Buttons and Checkboxes in SignNow
- Key Differences: Radio Buttons vs Checkboxes
- When to Use Radio Buttons in Your Documents
- When to Use Checkboxes in Your Documents
- How to Add and Customize Radio Buttons
- How to Add and Customize Checkboxes
- Best Practices for Designing Forms with Selection Fields
- Accessibility Considerations for Selection Fields
Choosing the right selection field is crucial for creating clear, user-friendly forms in SignNow. Whether you're building a medical intake form, a legal agreement, or a customer survey, understanding when to use radio buttons versus checkboxes ensures your recipients have a seamless experience and provide accurate responses. This guide will help you distinguish between these two field types, show you how to add and customize them in SignNow, and share best practices for designing accessible, effective forms.
Understanding Radio Buttons and Checkboxes in SignNow
Radio buttons and checkboxes are both interactive fields that allow recipients to make selections in your digital documents. However, their use cases are distinct. Radio buttons are designed for situations where only one option can be selected from a group, ensuring exclusivity. In contrast, checkboxes allow users to select any number of options, including all or none. Knowing the difference is essential for collecting the right data and guiding your signers through the form completion process.
Key Differences: Radio Buttons vs Checkboxes
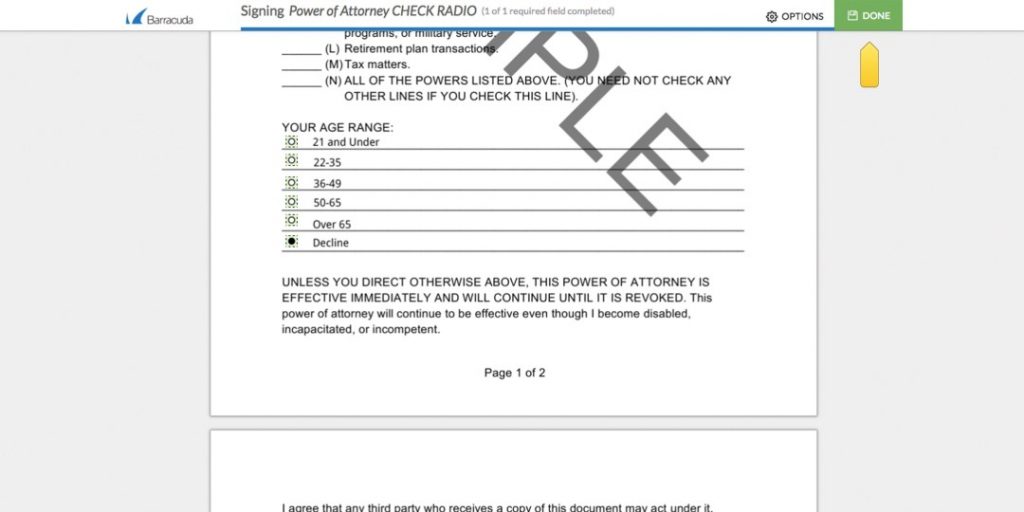
- Radio Buttons: Only one option can be selected within a group. Ideal for mutually exclusive choices, such as selecting an age range or a preferred contact method.
- Checkboxes: Any number of options can be selected, including none. Perfect for lists where multiple selections are valid, such as medical conditions or skills.
Radio Buttons Example: In a legal document, a recipient is asked to select their age range. Since a person can only belong to one age group, radio buttons are used.
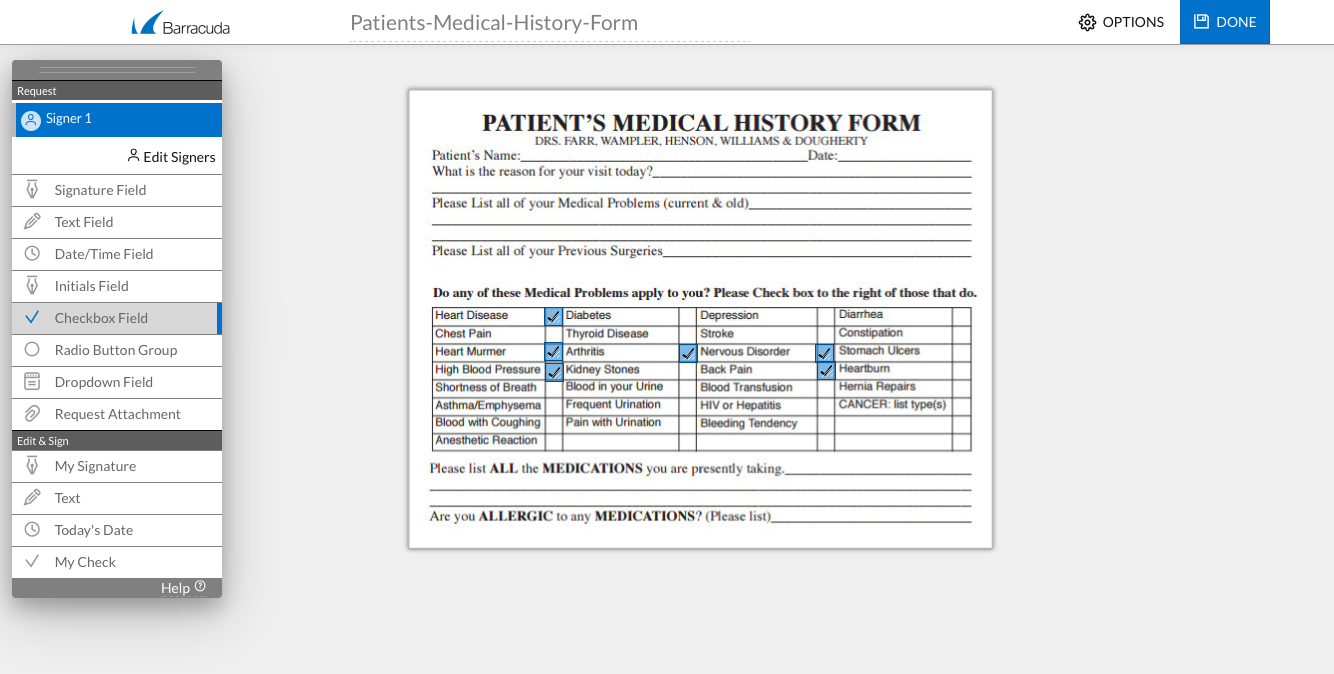
Checkboxes Example: In a medical history form, a patient can select all applicable medical conditions. Here, checkboxes are appropriate because multiple conditions may apply.
When to Use Radio Buttons in Your Documents
Use radio buttons in your SignNow documents when you need recipients to select only one option from a list. This is especially important for questions where only a single answer makes sense, such as:
- Choosing a payment method (e.g., credit card, PayPal, bank transfer)
- Selecting a department or office location
- Indicating a preferred contact time (morning, afternoon, evening)
- Answering yes/no questions where only one response is allowed
Get legally-binding signatures now!
When to Use Checkboxes in Your Documents
Checkboxes are the right choice when recipients may need to select multiple options, or when a question allows for more than one valid answer. Common scenarios include:
- Listing medical conditions, allergies, or skills
- Allowing users to opt into multiple notifications or subscriptions
- Requesting acknowledgments for several terms or policies
- Enabling selection of multiple products or services
How to Add and Customize Radio Buttons
Adding radio buttons in SignNow is straightforward and highly customizable. Here’s how you can create a radio button group and tailor it to your document’s needs:

Step 1: Select the Radio Group Button from the toolbar and click on your document where you want the group to appear. The Add Radio Group menu will open.
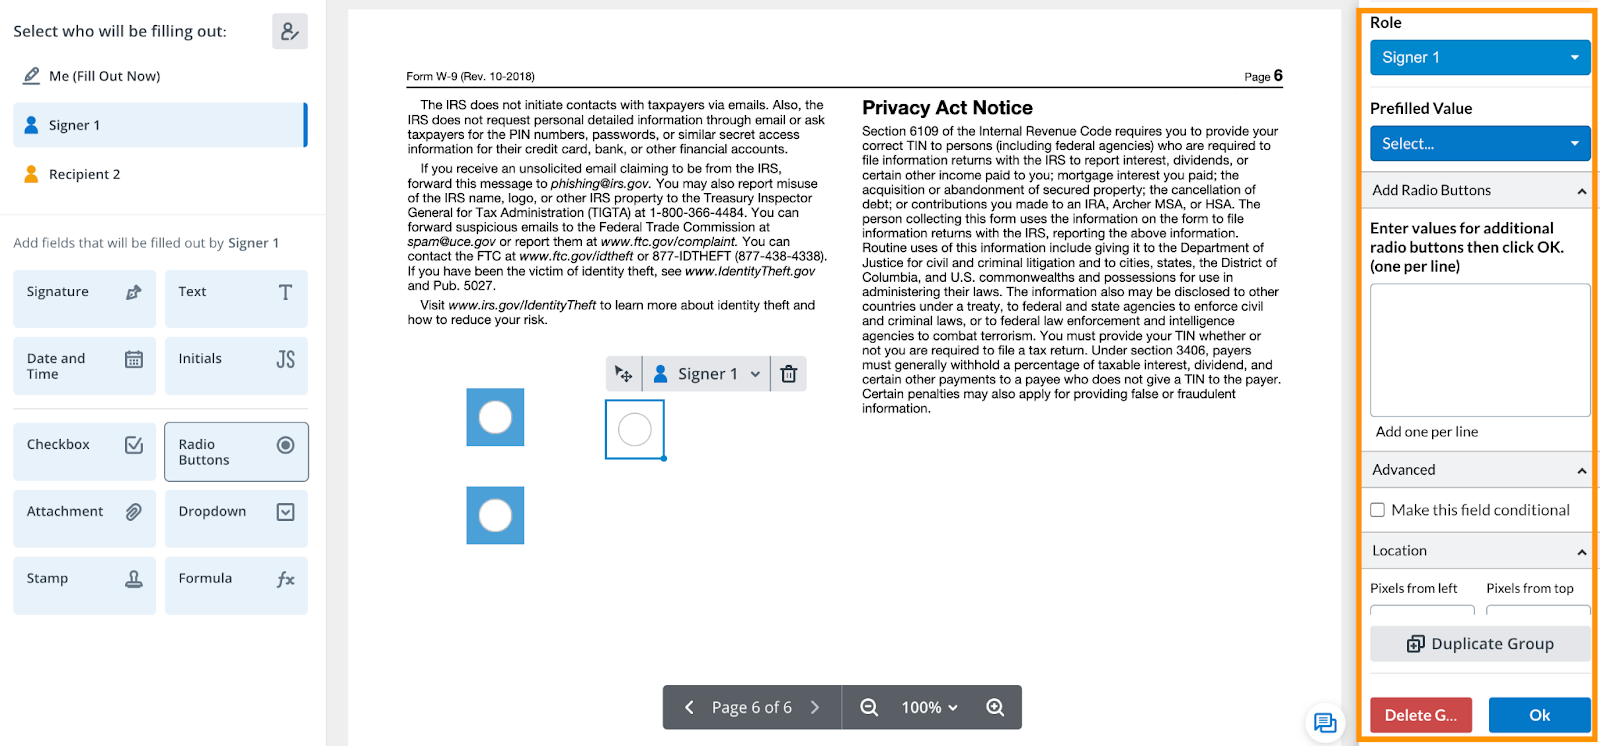
Step 2: Enter a Group Name and list each radio value on a new line. This determines how many radio buttons will be created and what each represents. You can also specify if the group is required.
Step 3: Move and resize the radio buttons as needed. Adjusting one button will automatically resize the others for consistency.
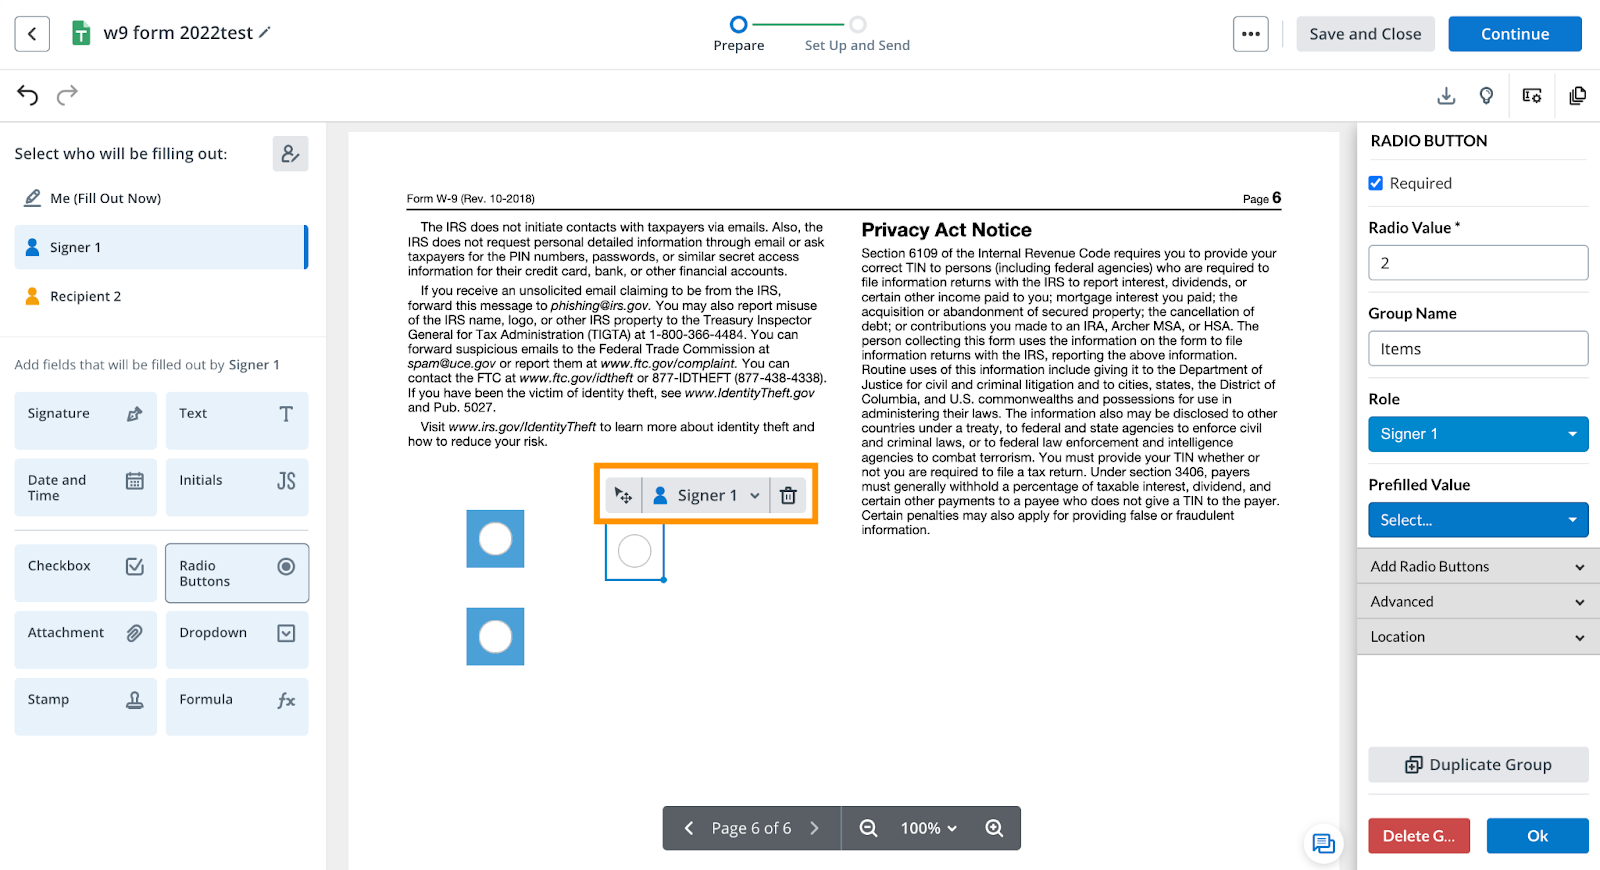
Step 4: Edit individual radio button properties by clicking on a button. You can assign roles, set prefilled values, and give each button a unique field name for advanced workflows.
How to Add and Customize Checkboxes
To add checkboxes in SignNow, simply select the Checkbox Field from the field palette and place it on your document. You can add as many checkboxes as needed, positioning them next to each relevant item or statement. Each checkbox can be configured as required or optional, and you can assign them to specific recipients if your document involves multiple signers.
For example, in a patient’s medical history form, you might add a checkbox next to each medical condition so the recipient can select all that apply:
Checkboxes can also be used in combination with conditional fields, allowing you to reveal additional questions or fields only when certain boxes are checked. This keeps your forms clean and focused, showing recipients only what’s relevant to them.
Best Practices for Designing Forms with Selection Fields
Designing effective forms goes beyond just adding fields—it’s about creating an intuitive experience that guides users to provide accurate information. Here are some best practices for using radio buttons and checkboxes in SignNow:
- Use clear labels: Make sure each option is clearly described so recipients know exactly what they’re selecting.
- Group related options: Keep radio buttons and checkboxes for the same question close together to avoid confusion.
- Indicate required fields: Mark fields as required only when absolutely necessary to avoid overwhelming users.
- Use conditional logic: Show or hide fields based on previous answers to streamline the form and reduce clutter.
- Test your form: Preview your document as a recipient to ensure the selection fields work as intended and are easy to interact with.
Accessibility Considerations for Selection Fields
Accessibility is a key aspect of form design. Both radio buttons and checkboxes in SignNow are designed to be accessible, but you can further enhance usability by:
- Providing descriptive labels for each field and option
- Ensuring sufficient contrast between text and background
- Grouping related fields with clear headings
- Allowing keyboard navigation for all interactive elements
- Testing your form with screen readers and other assistive technologies
Frequently Asked Questions
-
Can I use both radio buttons and checkboxes in the same SignNow document?
Absolutely! You can combine radio buttons and checkboxes within a single document to accommodate different types of questions. For example, use radio buttons for exclusive choices (like selecting a department) and checkboxes for multiple selections (like acknowledging several policies).
-
How do I make a radio button or checkbox required in SignNow?
When adding a radio button group or checkbox field, you can mark it as required in the field’s properties panel. This ensures recipients must make a selection before submitting the form, helping you collect complete data.
-
Can I use conditional logic with radio buttons and checkboxes?
Yes, SignNow supports conditional fields. You can set up fields to appear only when certain checkboxes are checked or specific radio button options are selected. This keeps your forms streamlined and relevant for each recipient.
-
Are radio buttons and checkboxes accessible to users with disabilities?
SignNow’s selection fields are designed with accessibility in mind. By providing clear labels and grouping related fields, you can further enhance accessibility. It’s also recommended to test your forms with assistive technologies to ensure a smooth experience for all users.
-
Where can I find more information about pricing for SignNow features?
For the most up-to-date information on SignNow’s plans and features, please visit our pricing page.